.JPG.cfcada9cf1c1b502df3f5f2f2ca3ff36.JPG)

SteveJ
Free Member
-
Joined
-
Last visited
Everything posted by SteveJ
-
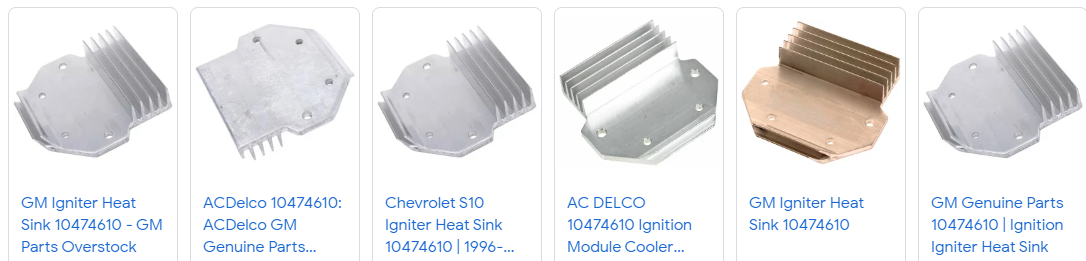
 It's not just about absorbing heat. You have to reject the heat, too. If the heat sink reaches equilibrium with the ignition module, it doesn't accept more heat. The cooling fins allow some air flow to release the heat. Mind you, the cooling fins should be mounted vertically to allow air to move past. If you mount the cooling fins horizontally like you. currently have, the heat cannot flow out as easily. On the other hand, you could mount the cooling fins pointing up, and that would allow heat flow, too.
 -
Nope. It's designed that way. The ground for Low drops out when you go to High.
-
What I'm thinking is that you carry an IR thermometer in the car and find a place to park safely when it acts up. If the problem is heat related, you should easily have a couple of minutes to measure the temp. Also another trick is to keep a can of dusting air in the car. If you can hold it upside down in that tight space, spray the HEI with the dusting air. The contents should come out as a liquid when upside down and evaporate quickly when the liquid comes in contact with the HEI. That will cool the HEI rapidly. If full function returns, you most likely have confirmed an overheating problem.
-
I'm not sure of the heat produced by the Volvo ignition vs the GM HEI. Thermal mass is what I'm concerned about. Is there enough mass to absorb the heat from the HEI and reject the heat into the environment. Most of the HEI heat sinks I have seen include cooling fins. That makes me think that heat rejection might be an important consideration in design. If you have an IR thermometer, it might help you figure it out.

-
These results make a lot more sense, and it mirrors my testing. Your switch is functioning properly. The next step is to connect the switch, disconnect the wiper motor and test the grounds out there. I'll write up the procedure soon.
-
Do you think you have enough of a heat sink on the module? It sounds like the old one could have been overheating. I do like the fact that the heat sink is above the HEI, though.
-
If the black wire is either OL or 47+ ohms to the other wires, that is a problem. The circuit operates by grounding the YG (on the switch) wire in low and high. That is for the relay in the motor to spin it in the correct direction. (The opposite direction is for the park function.) Then, the low speed wire (YB on the switch) is grounded in low. It should have low resistance to the black wire. (I would want it to be as close to zero as possible.) Next, the high speed wire (RL on the switch) is grounded in high. Again, it should have low resistance to the black wire. The reason for disconnecting the switch is to prevent confounding results. I have not tested a wiper motor separate from the car, so I didn't know if it could affect measurements. I have a couple of wiper switches that do not appear to the functioning properly. I may take one apart soon to make a video of it. That may shed some light on what is wrong with your switch.
-
For the heat soak, you may want to try something like this: https://www.amazon.com/gp/product/B000E267JC
-
First off, let's verify. Did you swap out the guts of the tach with a Volvo tach? 😉 Increasing the impedance in the tach circuit to get it to work is rather puzzling. I'm wondering if a diode in the circuit would accomplish the same thing. That would indicate there is a large voltage spike on coil discharge. The best way to verify would be to use an oscilloscope. (Thanks to @Captain Obvious for pointing me to videos on checking the ignition with a scope.) To be sure, check the coil wire and all of the plug wires to see if they are fully seated in the wells of the coil and distributor cap, especially the coil wire. I would try to run the car without the tach to see if the tip-in issue would go away. I'm thinking that could be more of a fuel pressure issue than ignition. I have seen something similar on a car I was working on that was too rich because of the FPR setup. It would bog on tip-in and catch quickly. I could see the AFR reading dancing at tip-in.
-
Disconnecting the positive is okay. Disconnecting the negative is safer. The reason I said to remove the switch was to test the switch and only the switch. If you left the switch mounted in the car and connected, it is still interacting with the circuitry in the wiper motor. By taking the switch out of the car, you're only testing the switch.
-
Yes, the harness works on a 70.
-
Yes it is. I put a 6.2mm female open barrel spade (with insulator) on one end of a short piece of wire, and an M6 open barrel ring on the other. I just connected the spade to the negative terminal and ground the ring on a screw.
-
So what's your impression of the Auxito bulbs?
-
I found the ones in the list work well. I haven't experience issues with them. (I have experienced issues with the ungrounded, 2-pin electronic flashers.) Just get two. Adjustable isn't required. I just like it because I want to be able to set how fast they blink. And here's another link the post with the list: https://www.classiczcars.com/forums/topic/68561-parkingtail-lights-fuse-holder-heating-up/?page=2
-
I also just searched on Chester and Herod. They have a current FB page, and they list that number to call them.
-
In my list I have electronic flashers. You have to add a ground wire to them, but they are adjustable rate.
-
If you didn't understand what @dutchzcarguy was describing, it is closed cell foam.
-
Yep, I've done that before.
-
Eastern Beaver Here: https://www.hi-1000ec.com/product/1139 I have used both places.
-
I was just following @Zed Head's reasoning to a possible logical conclusion.
-
I found this on someone's car about a year ago. Cylinder 2 was reporting zero compression. The valve was mis-adjusted and the lash pad eventually turned on its side.
-
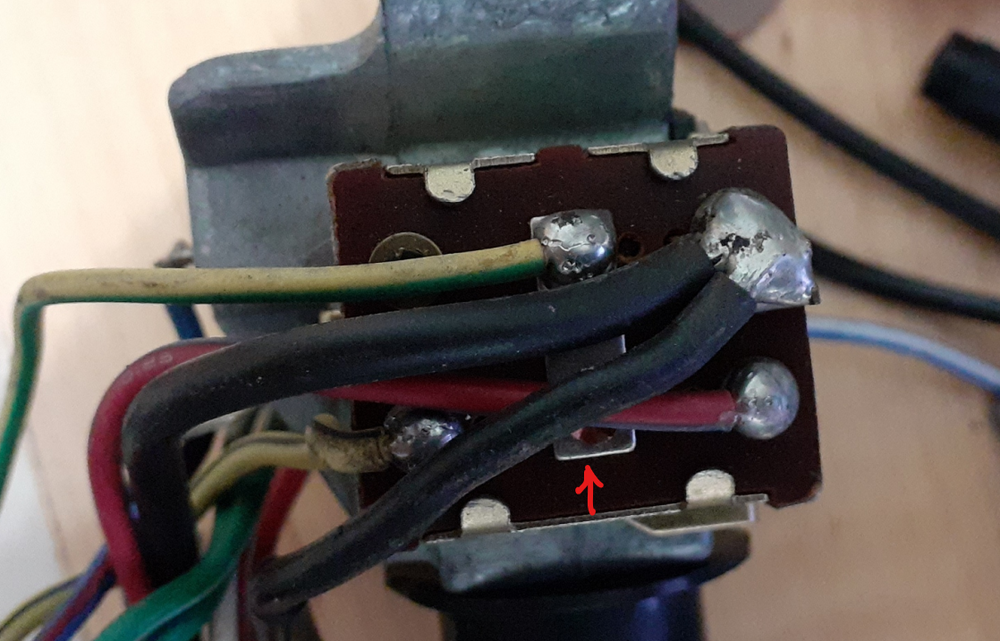
By the way, here is a picture of the switch assembly with the wires. Note the jumper across the middle terminals.
-
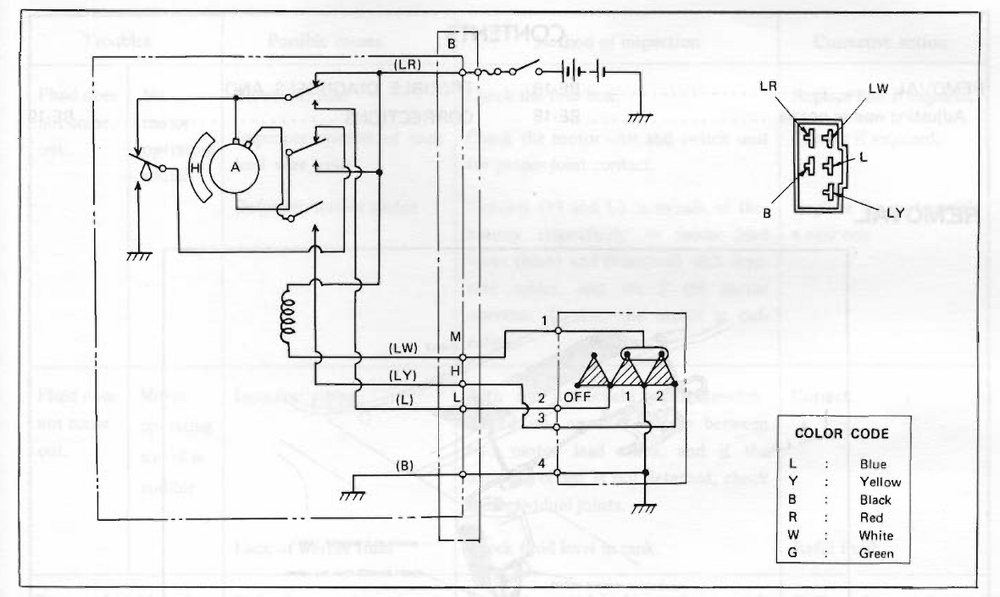
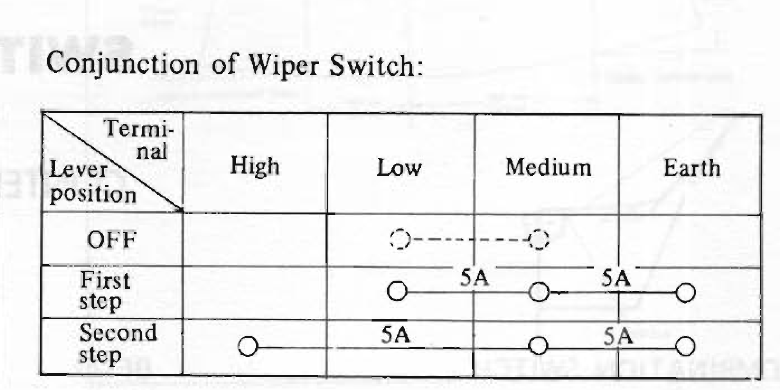
There are two basic sources of confusion with the wiper circuit. How does the circuit work? Where does Nissan explain it? What is the actual wiring? In looking through the BE section and supplements for 71 & 72, it has this rather confusing diagram. In Off, the L & LW wires are connected and ungrounded. When the switch is in 1, the LW and L wires are grounded. The LW wire is the ground for a relay that causes the motor to spin in the proper direction. The L wire is the ground for the low speed. When the switch is in 2, the LW wire is still grounded, and the LY wire is grounded, too. The LY wire is the ground for the high speed in the motor. The 72 BE section also has a truth table that backs up my observations. I am not sure why they show a dotted line connection between the L & LW wires when the switch is in off. From testing, the terminals are connected and ungrounded as I said earlier. Testing the switch operation: Disconnect the negative on the battery. Remove the clamshell from the steering column. Remove the headlight switch. You should see a switch assembly on the bottom of the headlight switch. I looked at several in my collection, and the wire colors were consistent. (see below) Set your meter on resistance. Have the wiper switch in OFF. Test YG to YB. They should have continuity. B should not have continuity with any other wire. (For testing, I put the probes on the solder joints on the switch assembly. Put the wiper in Low. Test B to YG and B to YB. Both measurements should be 0 ohms or close to it. Test B to RL. It should have a large number or OL, depending upon how your meter shows high resistance. Put the wiper in High. Test B to YG and B to RL. Both measurements should be 0 ohms or close to it. Test B to YB. It should have a large number or OL, depending upon how your meter shows high resistance. Report back with your results.

-
I should clarify. I haven't driven more than 1 hour in the dark in any given drive. I have driven in the dark plenty of times with these bulbs without issues.
-
I have used the Auxito bulbs for a couple for about 3 years now. I don't believe I've driven more than an hour in the dark, either. As for flicker, I haven't noticed it in either of my cars, and I haven't heard of any complaints, either.