.JPG.cfcada9cf1c1b502df3f5f2f2ca3ff36.JPG)

SteveJ
Free Member
-
Joined
-
Last visited
Everything posted by SteveJ
-
 Dan, There is a fusible link. It comes off of the starter. That being said, follow Dave's advice carefully.
 -
Mike, if you get rid of your flat tops, let me know. I might take them off of your hands.
-
I'm already planning my vacation...
-
Despite the widespread hatred for the flat-tops, I have to say that they haven't given me any problems in the three years I've had my 260Z.
-
Basically in your car, the headlight switch completes the ground for the headlights. As Sarah said, that causes a lot of stress on the switch contacts. Please note that there is not a relay in the stock configuration. Your test results indicate that the switch in your car isn't working. While WD-40 or contact cleaner might remove some of the build up on the contact, it may require disassembly and light sanding with emory paper to remove enough debris to ensure good contacts on the switch.
-
Note: the 260Z/280Z taillights have the reverse lights separate from the rest of the lights. If you want to put in the 240Z taillights, there is also some fabrication. Remember to inspect carefully under the car for signs of rust. If you go to Zhome.com, you can find good advice on inspecting a car. The car you linked does look nice in the pictures, though.
-
The results look good to me so far. Boy, that gives me some ideas for some other projects.
-
To clarify - You had an internally regulated alternator, but you did not removed and jumper out the external regulator. That can cause overvoltage conditions, and it sounds like it may have burned out your MSD box. Hence, E's statement was quite correct. You (or a previous owner) messed up the electrical system. By the way, I have done that myself in the past, but I fixed it after only blowing out a headlight. However, unless the MSD also gets an unswitched 12VDC+ source, your solution doesn't address the previous problem of the coil having voltage with the ignition off. Also, with the internally regulated alternator and electronic ignition, be on the lookout for feedback through the charging system keeping your car running after you shut off the key. The solution is to put a diode in the alternator circuit. If you search through Zhome.com, you can find the details.
-
In the US, the 73 240Z gained weight from the regulations that required heavier bumpers, but I'm not sure where you got your weight range from. Here is data collected from various US magazines over the years. In my humble opinion, I wouldn't worry about horsepower ratings for the L24. They are about 40 years old now. Also, most of the ratings you will find are SAE gross horsepower. With that method, they did not have any accessories attached (water pump, alternator, smog pump, etc.). Eventually, the ratings came out to SAE net horsepower. That method has accessories attached. (Text added...) In addition, emission requirements were reducing horsepower. Emission requirements drove Nissan to increase the engine displacement, creating the 260Z, and add fuel injection and additional displacement for the 280Z all to get power back. (End of added text) A rolling dyno gives you rear wheel horsepower which accounts for drivetrain losses. Anyway, after about 40 years of wear, unknown maintenance habits, unknown modifications, etc., it is difficult to know how much horsepower an engine produces without the use of a dyno and a trained operator.
-
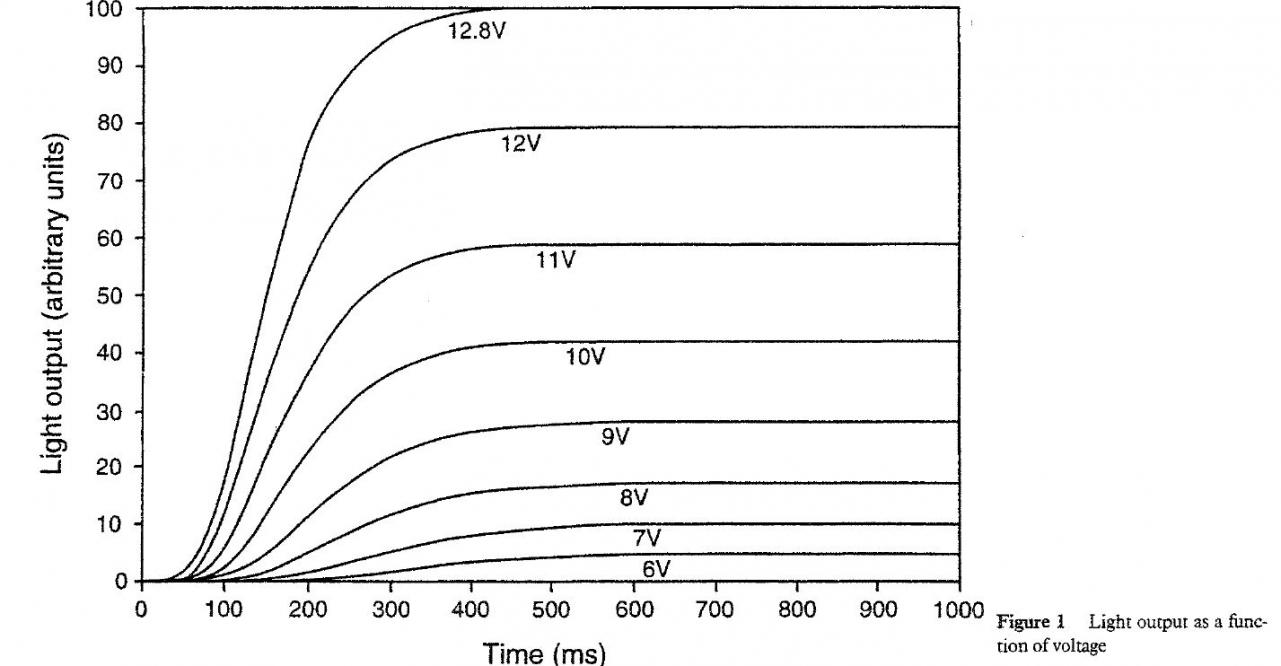
For incandescent bulbs, light output will drop proportionally to voltage. According to this reference, dropping the voltage by 5% drops light output by 20%. That means you're getting 80% of the light at 13.3 volts that you would at 14 volts. It's not unusual to have a 2 to 3 volt drop at the headlights. That's a drop of 14 to 21% in voltage. (Attached is a chart I pulled from this study.) If you're going to drive at night in a 40 year old car, add relays to the headlight circuit! For LEDs, light output is also proportional to voltage up to a point, so a parking light relay harness can improve light output. (For the record, I have no idea at what point a voltage increase does not increase light output.)

-
Here are his other threads: http://www.classiczcars.com/forums/showthread.php?t=40533 http://www.classiczcars.com/forums/showthread.php?t=40219
-
I moved away from that area 11 years ago, so I don't know anything about the car. However, the seller does not seem keen on selling out of the country.
-
There isn't much of a need to do the parking light relay harness AND LEDs for exterior lights. The LEDs drop the current load so much that there is not much of a load on the circuit. Also, once either LEDs or parking light relays are installed, there isn't much need to change out the fusebox unless the fusebox is already damaged. Most of the fuseboxes that melt down do so on the parking light circuit.
-
Amazing! He saw a Datsun 240Z in a dealer lot over a year before it came to America. By the way, I told Nissan that I didn't like the styling of the concept they developed in 1999, and sure enough, they ditched that design.
-
Upgrade the headlights with relays. MSA sells a set designed by Dave, aka Zs-ondabrain.
-
If you are using a tone for continuity, you CAN get a tone on the downstream side of the brake light switch to ground if you have lightbulbs in the sockets and the brake pedal is up. That is why I specified voltage instead of continuity, and that's why I prefer a voltage reading over a noid light. (Side note: I work on AC equipment, and in doing continuity checks, we can get fooled by thinking we have continuity when we are actually reading across a transformer.) PLEASE download the FSM from the XenonS30 link in my signature. You can go to the BE section of the FSM and find a simplified drawing of the stop light circuit. Print it out and use it as you go through your diagnostics. If you get stumped, you can tell us what you were doing and where. Then we can look at the diagram and help you out better. Also, when describing continuity or voltage measurements, please describe where you placed the meter probes. That will help us figure out what you're seeing.
-
You could contacting vendors of used parts, such as Zcar Source or Zbarn for pricing on a dash harness, body harness, and possibly a taillight harness. Expect that to run a few hundres dollars. That is not an electrical issue. The only electrical component is the fan. However, the heater core could be blocked off from the cooling system. It could be clogged. The valve could be stuck closed. The clips on the control cables could have come off. Was there an 1157 style bulb (dual filament) in the socket? If the speedometer isn't registering, that's an issue with a cable. If you are talking about the dash lights, that could be burned out bulbs, bulbs not seated into sockets, or sockets not seated into the gauges properly. Get acquainted with your nearest Z Car Club and find out where they take their cars to get worked on.
-
Yes, it takes a little effort to trace the wires on the FSM diagram, but it's more accurate as far as wire colors go. For true diagnostics, accuracy is better. The start circuit is rather simple. Look at the grid above IGN. SW. This grid shows you what contacts are made for each key position. The top line is for the Accessory position. The second line is Off. The third line is Run, and the last line is Start. The W/R wire is the 12VDC+ coming into the switch. When the key is in the start position, the B/Y and G/L wires should have voltage. The B/Y wire goes to the solenoid. The G/L goes to the ignition circuit (and bypasses the ballast resistor). That means you should have 12VDC at the coil when the key is in start. When the key is in the run position, the B/W and L/R wires have voltage. The B/W wire passes through the ballast resistor and powers the ignition. The L/R energizes the accessory relay and powers other key-switched circuits. The running/parking lights are powered through the headlight switch. The G/L wire carries the voltage in, and the G/W wire carries teh voltage out. The G/W wires branches off to the rheostat to power the dash lights, too. I believe it's an R/L wire going to the dash lights from the rheostat. The headlight circuit is unique. The W/R wire carries 12VDC+ to the fuses for the left and right headlights. There is a R/Y wire for the left headlight and R wire for the right headlight. From the headlights, the R/W and R/B wires return to the Turn Signal switch. If you select low beams, the R/W wire will be connected back to the headlight switch. If you select high beams, the R/B wire will be connected back to the headlight switch. When you turn the headlight switch on, the ground is connected to complete the circuit, allowing the headlights to come on. As Dave said, check the connectors, and check that you have the circuit connected for the ground path between the turn signal and headlight switch. By the way, Dave makes highly regarded relay setups for the headlights and parking lights and sells them through Motorsport Auto. They do a lot to relieve the stress on the 40 year old wiring. If you don't want to do the parking light relays, then consider swapping out the parking light bulbs for LED bulbs. They dramatically drop the current flowing through the circuit.
-
Possibly... When you were measuring voltage at the brake light switch, were you measuring from one pin to ground, or were you measuring across the switch? If you were measuring from one pin on the switch to ground & voltage goes to zero when you depress the brake pedal, it could mean a short. Of course, you would expect to blow the fuse in that case. If you had the voltmeter probes on each pin of the switch, voltage would go to zero when you depress the brake pedal because there is no difference in voltage at the pins. When you weren't touching the pedal, you have a difference in potential and could see a voltage, though I would guess it was less than 12 volts. Here is what you should have seen, measuring voltage to ground... Brake pedal up: Fuse box - 12VDC on both sides of the fuse Brake light switch - 12VDC on one pin, zero on the other side Back connectors - zero Brake pedal depressed: Fuse box - 12VDC on both sides of the fuse Brake light switch - 12VDC on both pins Back connectors - 12VDC
-
As a matter of fact, I suggested that to Jamie when we were at the club meeting tonight. So, Jamie, did you remember to ask Eddie?
-
What? Don't you like internal combustion?
-
First, find an empty metal garbage can. Place it outside and put in about a quarter inch of gasoline. Light it on fire and toss in the Chiltons manual. The Chiltons manual it HIGHLY generalized. There were a lot of variations in wiring for instance from year to year, especially going from the 240Z to the 260Z and from the 260Z to the 280Z. You can download a copy of the factory service manual from the link in my signature. That will be much more accurate for what you're working on. If you prefer using a hard copy, send me a PM with your email address, and we can discuss a deal for an extra copy of the 260Z FSM that I have. Anyway, the BE section of the FSM for the 260Z breaks out the different circuits in separate pages to make following the circuit a little easier. The top of the fuse cover points toward the front of the car. There are no wires for the brake lights in the engine bay. There is, however, a sensor that will illuminate the brake warning light on the dash. It is wired in parallel to the switch for the parking brake. What you saw coming out of your brake switch was correct. There should be two B/Y wires. One of those comes off of the fuse box to supply 12VDC+. The other wire off of the switch travels back to the brake lights. NOTE: The wire going to the brake lights passes through 3 connectors on the way. The ground wire coming off the brake lights passes through 2 connectors. My recommendation to find the problem is this: Go from one end of the circuit to the other. Start with the fuse box and see if you have voltage on the B/Y wire. You can do that with a noid light or voltmeter. I prefer a voltmeter because you can also look for drops in voltage. If you have voltage at the fuse, check at the brake switch. If you don't have voltage on either pin, check the wiring harness connector. (See the FSM.) If you have voltage on one pin of the switch, press the brake pedal and look for voltage on the other pin. If the switch is good, then trace the voltage by checking at the connectors going back. Finally, for posting pictures, make sure you use the Go Advanced button or Quote button to get the advanced features. To attach a picture, click on the paperclip located on the top row of icons. That will open the popup for attaching pictures. There are size limits, so keep the pictures a reasonable size (under 1 MB).

-
Jamie, There is a WTB section in the classifieds. However, I think you may compromise fresh air flow through your car if you do changes hatch styles. I hope others can confirm.
-
If you replaced all of the exterior lights for your turn signals with LEDs, your lights will STOP blinking with the old thermal flasher units. This is because the current flow through the unit drops to a point that the resistive element will not heat up enough to break the circuit. I replaced BOTH the turn signal and hazard flashers with Bussmann 232 electronic flasher units. I found them on eBay. I cannot say for sure that electronic flasher units would speed up the blink rate for incandescent bulbs, but I would expect that they would.
-
Yes, that is the fuse cover for the glass tube fuses. The fuse box is in the passenger side footwell. Good. I wanted to make sure I wasn't giving you bad information. Wire colors and location mean everything. Now we can get somewhere. G/W is 12VDC+ for the running lights. B is the ground wire. G/Y is not in the wiring diagram. Are you sure it's not B/Y? B/Y is the 12VDC+ for the brake lights. The wiring harness from a 240Z isn't a drop-in replacement for the 260Z unfortunately, but hold that thought. As for the bulbs, take one of the brake lights bulbs out of the socket. (It's the top outboard bulb in the taillamp assembly.) Look at the bottom of the bulb. A dual filament bulb will have two bumps on the bottom. You can look here for an example of the difference between a single filament bulb and a dual filament bulb. Now if I was to hazard a guess about what happened, I would think that a previous owner had a problem with the taillights or the running light circuit overall. The running light circuit is one of the biggest strains on the electrical system in that there is a weak link in connector for the wiring on the combo switch. In the 240Z it is usually manifested by the fusebox melting down for that circuit. In my 260Z, the connector melted down. As a short-term fix, I replaced the connector. For the long-term, I replaced the exterior bulbs with LED bulbs. Look for the Sold on LEDs thread for more information. As for what you should do, can you post pictures of the wiring? That could give us an idea of what to suggest for repairs. By the way, where in GA are you? If you're close enough to me, I could help with repairs.