.JPG.cfcada9cf1c1b502df3f5f2f2ca3ff36.JPG)

SteveJ
Free Member
-
Joined
-
Last visited
Everything posted by SteveJ
-
 You guys have a lot of great toys in Japan, Kats.
 -
1. Rip out your jury-rigged fix for your brake lights. (Okay, remove the wires carefully.) 2. Check the bulbs you have in the sockets. Are they dual filament bulbs? If you put single filament bulbs in the sockets, it will cross the left and right turn signal circuits through the bulbs. That would cause both turn signals to flash at the same time. 3. Download the FSM. Look at the wiring diagram in section BE. That wiring diagram will allow you to trace the wires from your brake switch. You'll find two wires, both green with a yellow stripe. One comes straight from the fusebox to energize the circuit. The other runs from the brake switch to the brake lights. Remove the bulbs from the brake lights. Measure voltage both sides of the switch (to ground) with the brake pedal depressed. You should get 12VDC on both wires. 1. 12VDC on one side - Bad switch 2. 0VDC both sides - check the fuse and check that the wires are plugged in firmly. If you get 12VDC on both sides, check for voltage at the taillights. If you are losing the voltage between the downstream side of the brake switch and the taillight, the chances are that you have a bad or broken connection. Also make sure the bulb sockets aren't corroded. Tell us what you find out.
-
The fuse could be heating up due to corrosion. Clean the fuse contacts with emery paper. If you have a Radioshack near you, go see if they carry Caig Deoxit, and clean up the contacts with that. Ensure the fuse is tightly clipped in. If you look at the circuit on the wiring diagram, you'll see a black wire with white stripe coming off the ignition switch and going to the fuse block. A green wire comes off the fuse and goes to all of the components you were noticing failures on. The fuses can heat up enough to melt the fuse block. As a matter of fact, I was looking at my old melted fuse block to confirm the wire colors. There are no relay contacts that could interrupt the circuit identified in the wiring diagram. Also, if you need connectors or plugs, check out Vintage Connections. His product line matches up great to the connectors used in our cars. On the other hand, if you have a local supplier who carries the electrical connectors that match the ones in our cars, let me know. I might be interested in buying some.
-
That may be one of the things people have done. I'm getting too old to remember all of the posts I've read, though. I think you might be able to dig around zcar.com and find something on the subject. That could work. Now all you need to do is find a 3-D printer, and you could make your own molds...
-
I think the struts holding the bumper are part of the problem. If you search for info on converting the bumpers to 240Z style, part of the process is killing or removing the struts. I think one of the challenges would be what to do with the end pieces of rubber since they would be pushed further forward. It might not improve the looks. There, I managed to write that whole post without any sort of remark like, "Does this bumper make my rear end look big?" Okay, so I ALMOST made it through the whole post...
-
Double check your firing order. 1-5-3-6-2-4 counterclockwise. Number 1 is on the front. Inline spark checkers can be good to see if you're getting spark.
-
Check your fusible links.
-
Oh come on, Sarah, it's not that bad. Hitting a bump and "fixing the problem" indicates a loose connection somewhere, quite possibly a ground from the number of systems that malfunctioned. The FSM is your friend. Between the wiring diagrams and the illustrations of the wiring harnesses, you can possibly hone in on the offending circuit(s). Even if it is just a loose connection, Sarah gives some really good advice for driving around in a car that's almost 40 years old.
-
Since the car was still running, an easy thing to check would be the wiring harness coming into the car.There should be plugs for the harness under the dash on the passenger side and on the driver side Also, could you check to see if you still have the following: Headlights Running lights Brake lights Knowing what you still have could give a clue on where the break is in the circuit. Also, if you have a voltmeter, check the voltage at the battery with the car off, and then do it with the car on and with someone giving it some gas to get the revs up. Car off - 12 volts Car on and about 2000 RPM - 14.5 volts or so If you live within about an hour and a half of me, I could help you out over the weekend if you need a hand.
-
This is from the 73 FSM. Chances are that your wire colors are the same. Expect a six wire plug with five wires and the following colors: Black with Yellow stripe Black with White stripe White with Red stripe Blue with Red stripe Green with White stripe There should be two other wires, one with a male spade and another with a female spade. One of those wires is red. Download a copy of the FSM and look at the Instrument Harness page in section BE for details on the plug.
-
The answer to that is definitely, "It depends." A 2+2 door won't work on a couple and vice versa. Also later 280Zs (I think the 77 & 78...) have different latches from earlier doors.
-
Are you referring to the ignition switch or all of the wiring harness on the steering column?
-
James, Aside from the fact that there is only one mounting hole at the bottom in a 1970 240Z, the drawback for the floor mounted retractor is that the shoulder mount is behind the floor mount. This means the belt travels from the retractor, back to the shoulder mount, and front toward the seat. Furthermore, I don't believe it's a straight line from the floor mount to the shoulder mount due to the package shelf/tool bins. (I'm not near my cars, so I can't look.) These factors contribute to periodic binding that I experienced with the belts with three mounting points. You might have the skills that Ron does to do the hidden mounting. I know I don't have them. I bet it will look nice when all is said and done, or have you finished it already, Ron?
-
If you use Firefox, you can search multiple Craigslists by going to crazedlist.org. Search long enough, and you'll find some long-in-the-tooth beater on its last legs.
-
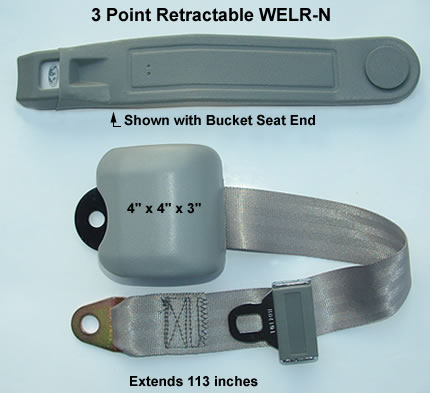
The roadster style belts from WESCO (part WELR-N) have two mounting points. You mount the retractor on the ceiling behind the seat, and the other end mounts on the floor. It extends easily with little-to-no binding, yet the inertia locks will grab quickly in panic stops to minimize the chances of you eating your steering wheel. As Trevor mentioned, you'll need a couple of washers or a flat metal spacer to allow the retractor to swivel without tearing up your interior plastic. Mounting is very easy, too. If you do decide to go this route, I recommend the 11 inch inboard belts and mounting hardware.

-
Definitely, but all of you are welcome to come join the Georgia Z Club at the next Mitty. It's the first weekend in May.
-
You could just buy a piece of flat steel and drill a couple of holes it in. That would give you better strength than a piece of metal that has been bent and straightened. By the way, check your existing mounting holes. A 1971 240Z with non-retracting seatbelts may not have two threaded holes on the floor for mounting a seatbelt like the one you linked. The WESCO roadster style that Trevor and I used would not have that problem. Also, one of the drawbacks of the style you linked is that it tends to bind easily. I mounted WESCO seatbelts similar to that one in my 240Z. I don't like those nearly as much as I like the ones I mounted in the 260Z. Feel free to send me a PM with your phone number if you'd like to talk about seatbelts some more.
-
Well, I saw a couple of familiar faces there. I wanted to do one of the blind rallies that the ZCCNV did, but I didn't think my beat-up 240Z would go over too well for that.
-
If I get my 260Z back in time, I hope to take it to the next club meeting. That way you could take a look at how I mounted the belts.
-
Yes, I did. It makes the inboard portion easier to mount.
-
Search is your friend...
-
Look at this thread to find a color version of the 78 wiring diagram. It could prove helpful to you.
-
Thanks for the link. The visual reference helped a lot.
-
Bring it to the next Georgia Z Club meeting.
-
Cool, I hope to see you at the next meeting. If I can get my 260Z over to Eddie to do some work, I may even drive it there.