


Seppi72
 Subscriber
-
Joined
-
Last visited
Everything posted by Seppi72
-
 Not yet. I'm prepping for hip replacement surgery on Tuesday so there have been higher priorities this past week.
 -
Thanks, CanTechZ. What you're doing will be quite helpful to julitoMX_1964 as I think it will be better for him to cut the top, back and bottom parts out of one piece of PVC or ABS sheet and bend it as needed at the edges. I have been working with ETI4K to produce mold core models for julitoMX-1964's thermoforming the side pieces and for me to do one-piece FRP lay-ups of the whole box.
-
Yeah, jonbill, yours looks like my QuickJack except that your two sides are linked whereas a QuickJack is two independently moveable sides so there's nothing on the ground between the two sides and i can move around freely. But yours lifts a lot higher. My QuickJack will only go 18 inches or so unless I use extra cribbing - and I do sometimes.
-
As for the lift, are you talking about a QuickJack? I have a BL-5000SLX that I bought new through Home Despot (yeah, Despot) for about $1,000 almost two years ago. I see they're running $1,400 now. Works fine for my Ford Flex and girlfriend's Nissan Murano. If that's being offered at $400, take it. Haven't used mine on a Z yet but, when I do, the lifting will be done along the frame rails running down the entire car. I had Bad Dog frame rail "boosters" welded in during the rust repair prior to painting as I knew I'd be running higher torque than what the original L24 put out. Plus, I just love a stiff car on a twisty road. Regardless of my rambling on, my point is: DO NOT LIFT YOUR CAR THE FIRST TIME USING THE ORIGINAL JACKING POINTS. Those are likely to be very weak if there's even a hint of rust in the old girl. Get some 6-foot lengths of 2x4 and cut them to the length of that bodywork between each side's wheel wells. Then, put some latex paint along the bottom edge seam of the car and carefully press the 4-inch side of each board into that seam to transfer the paint. Then, when it's dry, router a groove along that paint line deep enough to accommodate the seam and then use those boards each time you want to raise the car using that lift. You could could even glue some old carpeting along the flat to protect and cushion the bodywork.
-
Sometimes I think Nissan did this stuff just so we could chase down trapped air bubbles for weeks. Obviously, they knew in advance that our social lives would allow for this activity.
-
Welcome and nice car, Dadson. I also have a 9/71 build date car, HLS30-46372 (original owner), and it, too, has the vertical defroster grid found on the '71 models. I though that mine was a rare bird in that Nissan was likely using up a few old parts in the early '72 models. But your VIN looks to be about 1,000 units after mine so it seems there were more than just a few leftovers. My car came off a rotisserie earlier this year and is now undergoing restomod to become a 5-speed, triple Weber 45 carbs, 3.2 L stroker, 3.90 R200 diff beast (with Vintage Air A/C) and I'm hoping to get it back on the street this coming spring - depending on how cold the Ohio winter is going to be (unheated outbuilding). First bit of advice: take a LOT of pix before you begin removing bits and label, label, label.
-
I don't think you have to go full moon suit. An N95 ought tp be good enough to protect your lungs as long as you don't go sticking your face into a cloud of dust. What would concern me more is whatever might get into your eyes or you might pick up on your hands, hair and clothes and then inhale as you shake off the dust. Do that outside in a breeze blowing away from your loved ones. And, just to be realistic, not every exposure to Cr(VI) results in a cancer. It's the occupational exposures or, damn us all for allowing unbridled industrialism, the unknowing long-term exposure in your drinking water or air that will get you. Watch the movie Erin Brockovich.
-
Looking at the BASF Glasurit 801-703 chromated epoxy primer's safety data sheet (SDS), it is a "horror show" from the perspective of having cancer causing ingredients which include both the solvent xylene as well as the "active ingredients" strontium and barium chromate. Chromate is what we chemists call "chromium six", abbreviated as Cr(VI), and it is exceeding dangerous in long-term occupational exposure. If you work with such a product, it is probably not too bad when you are applying the wet mixture - but do that with proper ventilation and other PPE, please. But, if you EVER have to sand, media blast or otherwise disturb the dry film - even years later - you absolutely need to do so outdoors, fully protected and well away from any area where people or animals would be likely to roam afterwards. Literally, that dust could end up killing you. I once worked on a contract for the USAF to clean up the waste streams from a parts reconditioning facility in Utah that did a lot of electroplating with, among other things, cadmium and Cr(VI) solutions. By the time the waste streams got to the treatment facility, the Cr(VI) and mostly been reduced to chromium four, Cr(IV), which is still every bit as dangerous as Cr(VI) but not as reactive. I always wondered about the folks who had to haul the sludge away to a HAZMAT landfill.
-
I'm almost beginning to think that the best thing we can do is to snake some 1/2" OD polyethylene tubing down each drain hole in the cowl and give each side a 30-second blast of compressed air (run through some desiccant drier first) each time we suspect it might have accumulated a bit of moisture; like when the temperature has dropped overnight and its humid. That will guarantee our cars get the loving attention they deserve. Sorry, honey, I have to go give my Z a blow job.😖
-
Following up on ETI4K's observation, if I were going to go that route, I'd consider using a vinyl plastisol to seal the area. That's the stuff you dip you tool handles into in order to give you a non-slip surface. The vinyl formulation is heavily plasticized and exceedingly flexible. However, it's thermal expansion values are a lot larger than those for steel so it is possible that it might pull away from the metal surface were they both to get very cold. A flexible polyurethane coating (NOT POR-15 as it is crosslinked to provide chemical resistance) material might work as well; but I'd make sure it was based upon MDI isocyanate and not TDI so you get the greatest flexibility.
-
Will send as a PM because the numbers aren't finalized yet.
-
I'm happy to report that ETI4K has now taken my initial glove box dimensions and created 3-D renderings that he and I will now "clean up" and create forming jigs. Once we get that done we should be able to recommend processes (1) for julitoMX_1964 to try with his thermoforming machine and (2) for me to try with FRP (fiber-reinforced polyester, the proper term for what folks colloquially call fiberglass).
-
Maybe I did this too many years ago to actually remember doing it, but my cowl has black fiberglass glued to its underside that prevents any large items (and skeeters) from entry. I guess that I roughed up the surface and used epoxy to hold the screening pieces in place.
-
Perhaps, instead of fighting Mother Nature, you let her work for you? Attach hoses to those cowl drains and terminate them in the area of your concern. Then, when it rains, that water will work to flush out whatever crud that may have accumulated in the lower fender. You could also periodically pull your cowl and then flood the drains with a garden hose to flush out gunk and follow up with a blast of compressed air.
-
I've now sent the dimensions and sketches to ETI4K so he can attempt to make CAD drawings for the plug over which julitoMX_64 can attempt to thermoform his PS sheet material.
-
OK. How thick is the PS sheet material? The cardboard is 2 mm. I think it would be not problem to reinforce the PS shell with fiberglass afterwards because there do not appear to be too many, if any, critical dimensions for this part. I mean, after all, Nissan used cardboard. Geesh.
-
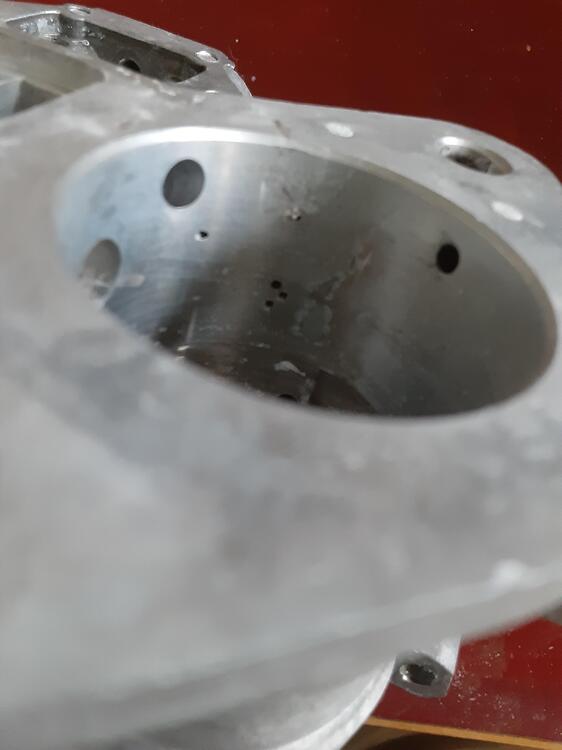
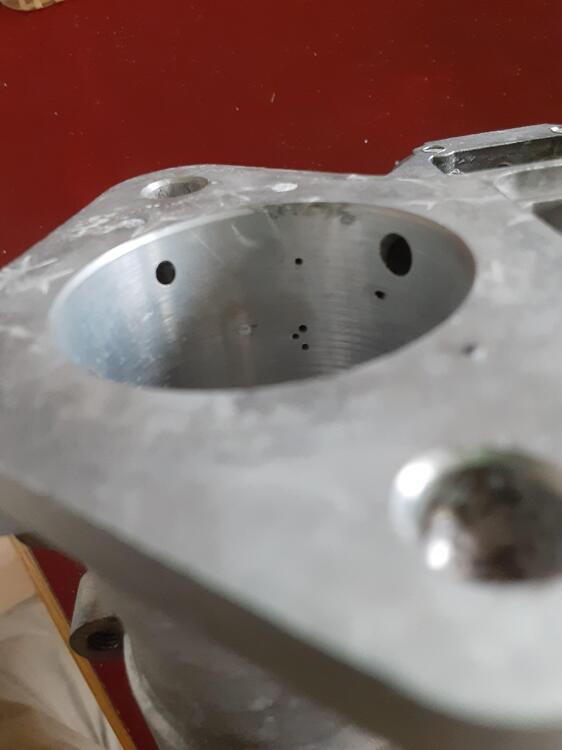
Success !! The broken idle screw tip is now but a memory and I can see light through the hole. Now I can resume refreshing this carb and not have to purchase a new 40 DCOE for about $350 from www.carbparts.eu in the Czech Republic or even more from Pegasus Racing here in the U.S. I also have learned that simply buying a new aluminum carb body is difficult, if not impossible. I did not end up using mechanical force to remove the tip. In looking through old threads here, I found someone who had the same issue several years ago and resolved it using concentrated (conc.) nitric acid (70%) to dissolve the iron tip while leaving the aluminum carb body intact. As a retired chemist, that approach appealed to me and that's the route I eventually took. There is also a similar technique using a boiling, saturated alum solution with YouTube videos to back it up. I tried that approach first and was unsatisfied. In addition, the alum treatment darkened the aluminum alloy. So, nitric acid it was to be. But, just a warning to any others, it has to be conc. nitric acid as that will passivate (and thus protect) the aluminum surface. Dilute nitric acid will react with aluminum. Fortunately, I had a small amount of conc. nitric acid that I had brought home from work many years ago just to have it "in case." Well, this was the case and it was just as well that I already had some because obtaining conc. nitric acid is not that easy to do here. There's no problem if you want to buy conc. hydrochloric acid (muriatic acid) to do cement work as you can get that in any hardware store. And if you want conc. sulfuric acid (oleum) to top up a car battery, you can get that at any auto parts store. Both are exceedingly dangerous chemicals and must be handled as such, but no one will question your intent. Not so with conc. nitric acid. To my knowledge, it's not available in local stores; and certainly not here in my small town. People also seem to assume that you're going to use it to make explosives so that many chemical supply businesses ask a lot of questions and have rules about who can purchase it, shipping, etc. But, I did see where you could order twelve, 1-ounce bottles through Walmart.com at a hideous price. But, if you need it, you need it. In order to be the most effective, I blocked off the channel between the idle screw and the progression holes on the top of the carb using butyl rubber as it would also be unaffected by the acid. I placed the carb body on a level surface and used a small eyedropper to fill the idle screw hole to the top with acid. That didn't take a lot of acid, perhaps one mL. I think I initially saw some bubbling but that isn't important. I replaced the acid twice a day. The process took a long time to achieve the desired result. The "tell" of success was when I saw liquid leaking out of the bottom of the idle screw hole. That took about a week. Once this happened, a small pick was used to push the screw tip remnant up into the port where it could be removed. There is no obvious damage to the outlet hole. I know that I've gone on a long time about this but I think it's important to provide as much detail as possible so others can benefit from my experience. I'll probably write up a technical article on the matter.
-
Great. I'll clean up my sketches and send them along with some photos to you.
-
Sorry, it took me a lot longer than I anticipated to getting to doing the measurements. And now that I have them probably to within + 1 mm -- the 2 mm cardboard is somewhat distorted after 50 years -- I need to get them onto a sketch and then a drawing. I wish I had my CAD software from where I used to work, but it will have to be freehand. And I haven't done a perspective drawing in ages. So, it's going to take some time. The glove box is distorted from being rectangular and what makes it almost diabolical is that there are "cut ins" along both of the short top edges and they are not symmetrical. They are to avoid interfering with the duct work to the passenger eyeball vent. As such, those dimensions are not terribly critical. To get you started, however, let me suggest that you begin with a block of rigid, open-cell foam that is cut to be 306 mm x 140 mm x 200 mm. You will then need to shave and contour that block to get the final dimensions that I shall provide in the drawing. Once that's done, you can "harden up" the finished plug by applying polyester resin to the foam. Let the fun begin.
-
I understood that you meant PS sheet material and not PS foam, which is used, among other things, for the shallow trays that hold cuts of meat in the supermarket here in the U.S. I spent the bulk of my chemistry R&D career in the plastics and polymer industry and a lot of that was making material recommendations for all sorts of applications from automotive to telecommunications to medical devices to aircraft interiors to farm equipment. In my opinion, plain PS will likely be too brittle in this glove box application, particularly it there will be substantial items like tire pressure gauges or pocket knives banging around when you're driving on a twisty road. You will be better off using ABS (acrylonitrile/butadiene/styrene copolymer), which has much better impact performance compared to PS because of the butadiene (rubber) content. It's working temperature for thermoforming will not be too much higher than for PS. I'll have initial dimensions and a sketch for you here later today so you can get started fabricating a plug. A proper drawing will come this weekend.
-
Sure. I can give you the internal dimensions as well as the dimensions of the flanges that are used to attach the box to the dashboard. I'll harken back to my high school class in mechanical drawing and try to produce a mostly-proper, 3-view, engineering drawing. You will have to radius the corners so your sheet does not tear while you are draping it over the plug. But, even if it does, you can always fill in or build up those gaps later with bondo. And, while it's great for you having access to a thermoformer, I would not rely on polystyrene (PS) to do the job. Think about using 2-3 mm ABS instead. An alternative would be to externally reinforce your PS box with some fiberglass.
-
View Advert S30 tranny mount I'm looking for Item 16 on the attached illustration. I absolutely KNOW that this part is lurking somewhere in my outbuilding but it's done a great job of hiding itself over the years. Consequently, I'm looking to acquire one from a fellow club member. I figure that will either (1) convince my tranny mount to come up for air or (2) get me a part I'm very close to needing. Either way I win. Advertiser Seppi72 Date 10/28/2021 Price Category Parts Wanted Year 1972 Model S30
-
An excellent suggestion, ETI4K. I have some 1" diameter stainless steel tubing so I might try using that as the pusher and a thin oak slat on the other side of the bore. I'll then drive an oak wedge between the two to apply force to the broken tip.
-
In refreshing my 40 DCOE carbs, I've found that one of them has the tip of the idle screw lodged in the orifice of one barrel. I've included pix of both barrels so you can see both the clogged one as well as the open one. Does anyone have a suggestion for how I might remove this broken tip without doing significant damage to the barrel? I'm thinking that after filling the screw hole with Kroil and letting it sit for a few days, heating the carb body with a propane torch will somewhat enlarge the orifice and perhaps facilitate removal. But how should I go about pushing that tip out?
-
CD871F: I got both L and R frame rails and the radiator core support from a rear-end-totaled junkyard car and, after checking them out and cleaning them up, had a professional body guy weld them back into the car. He had to fiddle with the inner fender too as it had gotten stretched in the crash. I am a neophyte welder like you and would never attempt such an intricate and exacting procedure while learning.


