kmack
-
Posts
1,440 -
Joined
-
Last visited
-
Days Won
1
Content Type
Profiles
Knowledge Base
Zcar Wiki
Forums
Gallery
Events
Downloads
Store
Blogs
Collections
Classifieds
Everything posted by kmack
-
"These plans are in no way designed by or checked by a registered engineer, and I assume no liability for damages incurred or caused by products built using these plans. Any product built using these plans is done so at your own risk. All I know is that they are working just fine with my car on them. These plans are to be used as a guideline for fabbing up your own stands. They are good as seen, but may need to be customized for different circumstances. Stands: The front and rear stand themselves should be identical. The only difference being in the mounts themselves. The tubing I used was 1/8†thick. And I ground all the welds on the bottom of the stands flat so they would not rock back and forth. Also, pre-drill all your rotation locating holes in the pipes before you mount your car. A 3/8†or ½†bolt 4†long works good as a locating pin. Rear Stand Mount: You will need to make an accurate measurement of the mounting holes for the rear bumper. Drill the holes into the mount as precise as you can. I used flat bar for the long piece of the mount instead of angle because there is a slight bow to the back of the 240Z’s and I didn’t want to make spacers. It holds fine as is, but don’t compromise on the thickness of the bar. Front Stand Mount: The length of the long bar is 30†+/- ¼â€. You will need to verify this on an individual basis. The 2†x 2†angle iron needs to be at least 4†long. This is where the front mounting holes will be drilled. There are threaded mounting holes on the bottom of the core-support where a skid plate attaches on all Z’s. Use these holes for mounting the front mount. You will need to make an accurate measurement of these and drill them into the mount as precisely as you can. The 2-1/2†pipe needs to be longer on the front mount than the rear mount. This is to accommodate the extension off the core-support where the grill mounts. Figure on this piece being a minimum of 10†– 11†long. Notes: The two stands can be tied together or left free standing, independent of each other. If you decide to tie them together, you will need a piece of flat bar or angle that is about 12’ long. If you weld them together, you will have to cut them apart for storage when you are through." rotisserie-rear stand.bmp
-
Ok, here are the plans I made and used when I was rebuilding my 240. The files are a bitmap file, so just about any program should be able to open it. Please keep in mind: The stands themselves are made to be universal between the early Z series cars (240, 260, 280). The mounts are the pieces that change for each model car. I have given rough estimates on the measurements for the front and rear mounts for the 240Z only. You'll need to verify the dimensions when building. If anybody has any questions, just PM me or send an email. There are pictures of my car up on the stands on my website and few here in my gallery, so check them out. rotisserie-front stand.bmp
-
I'll post copies of the files in the downloads section of the forums. Keep in mind the drawings are predominantly for the 240's. I'll make it clear in the downloads.
-
I have plans for the rotisserie that I built for mine. If you were in the US I could build you one and ship it. Don't know what the cost would be to ship overseas though. For anyone else who's interested here in the States, I will build and ship anywhere in the 48 states for $300. (Deposit is required, though)
-
If you would have asked this question last year, it would have been a lot longer..... But here is the short of it: 1 - New tires (ordered, but not received yet) 2 - finish polishing '82 ZX 6-spoke wheels (for new tires) 3 - install new carpet set (ordered but not received) 4 - buy & install new stereo & speakers 5 - buy & install full dash cap 6 - refresh & install orig. engine & trans 7 - color sand and buff paint job (working on a glass like finish) 8 - take the car out on the track at least twice 9 - get the wife off my back for still having not finished the car That last one is going to be the toughest of all. She's had almost 9 years of practice yelling at me about the car. It's almost a habit now.
-
Unfortunately 240Z, that is the first thing to go on most seats. You'll have the hardest time trying to find just a good seat bottom. I looked for awhile before I just finally broke down and bought a re-upholstery kit. but good luck on your search.
-
The drive shaft should be fine (as long as there are no big dents in it) and most likely doesn't need to be replaced. You can replace the u-joints, though. They shouldn't set you back more than $15-20 each. A vice, hammer, and a little patience should be all you need to replace them yourself.
-
If those suggestions don't work, I have an extra L24 block that I'll let go VERY cheap (need to get it out of the garage). Shipping may be an issue as I'm in TX.
-
Take a look at the centerfold of the Winter 2002 issue of Sport Z Magazine, '74 260Z GT2 car. From certain angles (shown in the mag) this car could easily be mistaken for a 350Z! Paint it that wierd metallic orange and you can see what I mean....
-
That looks like what the new 350Z was styled after. Strange resemblance, isn't?
-
Have you looked at Falken tires? I have heard that the Azenis series is the next best thing to actual race rubber. Even better than the Victoracers in some circles. http://www.victoriatire.com/tires.html?cart=10410148303283221&brand=Falken&NAME=Azenis I'm (finally) getting a set of Falken Zeix 502's right now. Prices are good also.
-
I agree with Carl on the damage assessment on that car. Based on the front damage, it was a square hit into something other than a bumper or other car's rear-end. This suggests that the driver t-boned another vehicle. Most often a t-bone accident involves someone running a red light or stop sign. And based on the side damage, it looks as if this car ran a light or sign, t-boned someone else, then got smacked by another oncoming vehicle. Also, since there are no signs of glass damage, there are no head injuries. Since the cabin is still structurally sound, no leg or other bone damage. Most they could get is a slight headache or stiff neck and some bruises. (I used to go to a lot of insurance auctions and looked at wrecked cars for over 5 years.) Based on this idea, the driver appears to have been at fault. That driver should suck up the pain and take this as a learning lesson, to either pay attention to what he/she is doing or get driving lessons to learn how to handle a car like this. It's too easy in this country to get a driver's license and any idiot w/ a pulse is capable of doing so. Just my view on this....
-
The Campbell Hausfeld brand will do fine. Basically a compressor is a compressor. I would worry only about the tank size. I have a Crapsman w/ an 11 gallon tank. It works fine w/ the 1/2" impact, does ok spraying paint, and absolutely sucks while running the die-grinder! Those little air-powered grinders use a lot of volume of air and anything smaller than a 20 gallon tank won't keep up. I can drain my 11 gallon tank faster than the compressor can fill it. All that does is generate a lot of heat, lots of moisture, and burns up the motor. Btw, have you been following the thread on the email list about moisture in compressors that mperdue started? Look for a decent water trap also.
-
Most likely the pump is froze up from not being used in quite some time. But that can be gotten around pretty easily. The pump works off a simple concept. It has 3 vanes inside mounted on the shaft. When turning, the vanes produce air current, much like a fan. If not used, then those vanes will stick themselves to the inside of the pump. What you need to do (other than just throwing the whole away), is pull the pump apart and get those vanes loose. Once you have the pump apart, then remove the vanes completely and put the pump back together. This way, you can hook a belt up to the pump pulley and the pump will look like it's running, but in fact it won't be doing anything at all. Only downside is the slight drag of the belt.
-
Somebody has done that swap before. I used to have a link to their website until I had to replace my motherboard. I believe the engine designation for the 300ZX ('84-'89) is VG30, so you might do a search on HybridZ for that. Good luck.
-
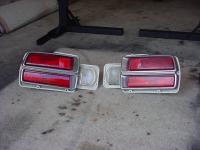
Ok, here's a picture of the tail lights. Somebody make me an offer on these....
-
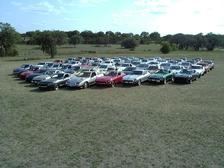
Ok, here's the deal. During the 2002 National ZCCA Convention, at the car show, there was a group picture taken that has been used in the one of the new 350Z commercials. My Z was in that picture and I'm looking for good quality pictures of this group shot. Has anybody seen any out on the web that look good? I found one, but it's small and not of good quality. I want to get a good picture and frame it for my garage. Any help is appreciated in this search. I have attached a copy of the picture I found to give you an idea of the picture I'm looking for.

-
Bright sunny morning, not a cloud in the sky and I’m on my way to work in the left lane doing about 60 mph. Following with flow of traffic. There’s a slow car in front of me (left-lane blocker) so I move into the center lane to pass him. Just then, the new car in front of me (a plain, maroon Chevy Impala) puts its brakes on and slows down fairly rapidly. I have just enough room to make it, so I change lanes back into the left lane and proceed on my way to work. A minute later and I notice there is an unmarked, maroon Impala following me with its red & blue grill lights flashing. So I pull over. This skinny guy in a nice shirt, tie, and slacks gets out and asks me, “What do you think you were doing back there?†I didn’t know what he was talking about until he said that I almost rear-ended him. I wasn’t that close. He proceeds to show me his badge and he’s an officer for TABC, Texas Alcoholic Beverage Commission. Then he writes me a ticket for “Passing: insufficient clearance.†Hey, I made it didn’t I? He also puts down that it’s raining. What? So my appearance day comes and I show up at the court ready to put in a plea of not guilty. I really wanted to test the system on this one. The give me a paper to sign with my formal plea of “Not Guilty.†But I notice that the offense now says “speeding.†Ok…. I start to laugh a bit then sign my name. This is going to be good. I proceed to get all my weather info collected saying there wasn’t a drop of moisture reported for a 3 day period during that time and some other miscellaneous stuff to back me up. Now I just have to wait for the court date. So I’m sitting in the hallway of the courthouse waiting and I see this skinny guy so up, it’s the TABC officer. I like this even more now. I just smile. Then Prosecutor comes out and leads me into a small room to discuss with me what’s going to happen during this trial. He says I have a few options. “One, you can plead guilty right now for a lesser fine and some community service. Or you can continue with the trial, be found guilty, and pay a bigger fine and more community service. What do you want to do?†“I’m sticking with not guilty. That’s still an option isn’t?†The Prosecutor hands me some paperwork to fill out real quick and asks me how I plan to prove myself in this speeding trial. I show him my weather data, which he seems unimpressed about, then mention the offense. “I’m here to defend a passing insufficient clearance charge. I don’t know what this speeding charge is about.†He shows me a photocopy of my ticket that shows my signature on it, but “Speeding†as the offense in a big white space right in the middle. “That’s funny because I have my original carbon copy of the ticket and it says nothing about speeding on it.†He takes my ticket and disappears. A few minutes later he comes back in the room and says, “Well the case we had against you is not the case we thought we had against you. The ticket has been dismissed. You’re free to go.†I smiled at the officer as I walked passed him and headed off to work. In hindsight I wish I hadn’t said anything about the ticket until we were in front of the Judge. I would have loved to see to look on the Judge’s face when I accused the officer of falsifying evidence. And I would have loved to hear what the Judge had to say about it. But it never happened and I got the ticket dismissed.
-
Which movie is the car in?
-
I'm parting out an L24 block. No cam, rockers, distributer, or manifolds. Engine is disassembled. Only wear found on the engine was in the crank bearings and that was minimal. Crank is in excellant shape. No visible signs of damage to the crank surfaces from the bearings. E88 head w/ no visible signs of damage. Valves are in excellant shape and there were no signs of a blown head gasket. I was told it has over 100k miles, but I do not know the full story behind this engine, that's why I'm parting it. Make me an offer on what you want. Buyer pays shipping. I need to get rid of this thing, so any offer will be considered. If you'd like to work a deal on the complete set, I marked everything by numbers relating to piston number. Email or PM me with any ?? and I'll answer them the best I can.
-
Good clean set of taillights for 280Z. No cracks, lenses are clean & shiney. Chrome overlays in ok shape. Includes wires and bulbs. $60 obo + shipping for the pair. San Antonio, TX I'll post pics soon.
-
I have the same setup on my 240. 3 groove pulley with only one groove being used. On mine, there are 2 10mm hex-head bolt holding the outer 2 grooves onto the main pulley, along with the main crank bolt which holds all 3. To remove the outer 2 grooves, you'll need to pull out the 2 smaller bolts, then remove the big crank bolt (the one with the high torque value). Just for reference, the crank bolt head size is big. I used 1-1/16" socket to get mine off. But I also used an impact wrench.
-
GunnerRob, I believe it was EScanlon that used the Qpads, but thanks for the ID plug! What I used on mine was a double lined foam pad. This foam is rather dense and has a fairly durable liner on both sides. I got a 8' x 12' piece from my neighbor (they pulled it out of their house from under the carpet and were throwing it away). Sprayed some adhesive spray down on the trans-tunnel and it fits the contours nicely. Also adds a little padding to the vinyl trim.
-
Mine came off a parts car. They may have a small dent or two, I can't remember as it's been awhile since I've looked at them. My first suggestion would be to try and find some locally. Then if that fails, search them out. Shipping safely would be the biggest concern.
-
I have a set also stored away, but I'm afriad to sell them because they might get destroyed in shipping. They're very easy to bend just removing them off the car!