kmack
Free Member
-
Joined
-
Last visited
Everything posted by kmack
-
 How much of a Z enthusiast are you? Ok, so we have a make of car covering over three decades with all different types of cars and owners. I made up this little test to see what kind of Z car person you are. Take the test, add up the scores, and we'll see if it is accurate or not. OK? Here it goes. 1). My Z car is: A: stock B: modified C: barely streetable 2) My helmet is: A: a Mark Martin mini helmet with a clock in it. B: used primarily on weekends C: strapped in the back at all times 3) When I get stopped its for: A: 15 over B: 25 over C: outrunning a police chopper 4) On weekends, I like to: A: drop the car off at the detailer B: wash the car in the driveway C: use a nylon spatula to clean the rubber from the quarters 5) For tires I have: A: the set that came on the car B: the set that came on the car, road race tires and some drag radials/slicks C: my own personal “tab†at the Toyo dealer 6) A major mod is: A: a K&N B: a stroker motor C: a tube chassis 7) “Katayama†is: A: a type of Sushi B: Godfather of the Z C: The name of all of my children, including the girls 8) When I see a BMW M Coupe, I think: A: nice car B: I could take him C: Wuss 9) When a deer jumps out in front of my car I: A: call my insurance agent since my reaction time isn't so good. B: appreciate the fact that I have coil-over suspension and avoided the accident C: race it 10) When a little kid throws a rock at my windshield I immediately: A: call the police and my insurance agent B: chase the kid down and make his parents pay for the damage C: race the kid for his bike, laugh as I drive away with his Schwinn poking out of the passenger seat window 11) My passengers usually are heard to say: A: nice car, what is it? B: Man, I love Z’s C: I think I just crapped myself. 12) Powershifitng is: A: abusive B: fun C: mandatory 13) My driving style is most similar to: A: Morgan Freeman in "Driving Miss Daisy" B: Steve McQueen in "Bullit" C: Bo and Luke in "Duke's of Hazard" 14) When I am making love to my partner, I am thinking: A: completely about them B: mostly about them, but I'm also thinking about that weird skip at 4,800 Rpm’s as well. C: how the hell did she get dressed so fast? I only screamed out "5 point quick release harness" once. 15) My car has been smacked up by: A: the Valet at the club B: sliding into the tire barrier at Sears Point C: throwing a rod through the pan and oiling the front tires at NHIS 16) Lime Rock is: A: Where Fred Flintstone lives. B: A fun place to watch and race C: a romantic place for a date. 17) Race fuel is: A: offensively odorous B: fun but expensive C: a tasty non-dairy substitute 18) When people ask how many halfshafts I have broken I reply: A: What's a halfshaft? B: None, but I trashed some U-joints C: I had to use a come-along to get the last one out of the floor. 19) I hate digital tachometers because: A: They only come in one color, it would be more fun if I could toggle to complement my shirt. B: They aren't accurate. C: They can't be positioned at 12 o'clock for shift points. 20) I have boiled: A: water for tea. B: my coolant. C: my brake fluid. 21) When I break something I think: A: I hope that is under warranty! B: damn, there goes my mod money! C: that was cool. 22) If my Z got totaled I would: A: buy a Lexus, the Z thing is out of my system. B: cry a little, curse the name of the guy that hit me, hope insurance pays for an identical car C: hold a memorial service, harvest the car for parts. Light a candle in memoriam. 23) A cool tool I own is: A: a mini brush attachment for my vacuum. B: a digital torque wrench. C: an air powered valve spring compressor. 24) When I drive down the road, other people: A: wave. B: give the thumbs up. C: take down my plate number. 25) Speed bumps are: A: a necessity with all the crazy drivers out there. B: a nuisance, especially with headers. C: a perfect opportunity to catch air. 26) When I pass other Z’s I think: A: why are you waving at me? B: Woo-Hoo! Save the wave! C: I could take him. 27) "The Fast and The Furious" was: A: really cool. B: entertaining. C: a comedy. 28) Rice in general is: A: tasty, especially pork fried. B: mostly a joke, but some are quick. C: something FOR ME TO POOP ON!!! 29) When I go out on Friday nights with my friends, I usually end up needing: A: a Wet Nap, ice cream can get so sticky! B: rags to get the shoe polish off the windows. C: bail money. 30) Racing is: A: not my cup of tea. B: fun on weekends. C: the quickest way to get anywhere. 31) I set off car alarms: A: when I forget to disarm mine and open the door. B: when I blip the throttle in parking garages. C: everywhere I go. 32) At cruise nights, I open the hood: A: to show off the Nissan engineer's work. B: to show off my aftermarket intake and headers. C: I don't open my hood, you don't need to know what's under there. 33) My exhaust is: A: factory stock B: aftermarket C: home fabricated 34) My Z car is: A: transportation. B: a hobby. C: an obsession. 35) http://www.classiczcars.com is A: a great website for early Z car owners B: just as real of a place as any bar or club. C: the definitive source for all aspects of Z car ownership and the only Z site I visit. 36) When I hear "Brock" I think: A: “Huh?†B: legendary Z racer C: I could take him 37) When I see cones on the highway I: A: slow down B: think "autocross" C: proceed to participate in autocross 38) If I had $1,000 to spend on the car, I would: A: upgrade the stereo B: upgrade the exhaust C: get the car out of impound. 39) I have a fire extinguisher: A: in my kitchen. B: in the back compartment. C: bolted to the rollbar. 40) I have spun my Z out: A: in the rain. B: in the snow. C: in my garage. 41) My car has a lingering smell of: A: "Magic Tree" air freshener B: brake material C: engine fire 42) An RB26DET is: A: a vaccination serum B: possibly waiting for transplant in my Z C: already in my riding mower 43) When I see the number of this question, I think: A: the number after 42 and before 44 B: King Petty C: I could take him 44) I purchased a holster for my timing light. A: No B: Yes C: Full Shoulder Harness 45) When people ask if the Z is a V6, I: A: check the owner's manual B: laugh C: punch them in the head. 46) My Z is made out of: A: umm, I don't know B: lightened chassis, engine/suspension mods C: pure evil 47) When I see "Cobra" on a Mustang, I find it: A: intimidating B: challenging C: hysterical 48) My cats are: A: Persian B: hollow C: in the basement 49) My windows are tinted to: A: cut the glare B: save the interior C: hide the cage 50) The local dealership's service center: A: welcomes my business B: frowns when they open the hood C: has a restraining order against me So, add up your scores and see how you did. If you have an abundance of A's, you are a Z car OWNER. You bought the car mainly to drive on weekends and sunny days. It’s the car you always sort of wanted and figured you would try one out. You will grow tired with its quirks and eventually trade it in on an SUV. You're not a bad person and you are welcomed into the Z community, but you probably won't stay in for the long haul. If you have a lot of B's, you are a Z car ENTHUSIAST. You always wanted one and when you finally got it, had a blast. It’s most likely your daily driver in good weather and you have some mods and have fun with the car. This is where the majority of Z owners fall. You always wave and have fun at car shows and drag strips. You will probably always have at least one Z around during your life if finances will allow it. If you have lots of C's, you are a Z car FANATIC. You are pre-occupied with racing your car and being quicker and faster than everyone else. Numbers matching means nothing to you. You will forego groceries for the week in order to purchase a brake upgrade. Your neighbors give you a disparaging look as you rumble down the street but secretly admire your beastly machine. You are few and far between but everyone knows of at least one "Type C" out there. You actually do need help but since you are a hero to the B's, no one is willing to get you professional medical assistance.
 -
We hit the lottery last weekend! But it was only 4 numbers and turned out to be only $113. Hit it once before, 5 numbers. But still only got $1500. That barely puts a scratch in the credit cards....
-
-
You should have 2 "loops bolted to the sides of the head. One should be located just above the fuel pump and the other on the last exhaust stud on the back of the engine (opposite side from the front one). If you don't have these "loops", then either just bolt the chain directly to these lcoations or get something that'll work.
-
Hey, Fred! Haven't talked to you in awhile...I check in on the chat room periodically from time to time, but things are starting to get a little busier here at work so it's tough to get in sometimes. But like you, I have noticed that there seem to be less and less people in there when I show up. (Maybe they smell me coming!! ) I do get in on the weekends in the evenings sometimes, but by then all you guys across the great pond are already in bed. Maybe I'll run into you there agains sometime soon, until then...take care.
-
I do searches myself on old posts, as well as old threads I have started. Some of the threads I've started were questions, and it can sometimes take me awhile to get around to doing some of the stuff that other people recomend. So I need to be able to search out the answers that were postsed for me.
-
Like Daniel said, I would check out the "spray bar" on top of the cam. (that's the oil tube he's talking about) It has little holes above each cam lobe and they can get glogged over time. The bar also splits at the "boxes" where it mounts to the cam towers. A little JBWeld fixes that nicely. As for pulling the engine, I have gotten the engine and tranny out (in one piece) in about 50 minutes by myself. Figure it'll take 1-2 hours. There are not many wires to disconnect and the biggest thing to remove (besides the engine itself) is the hood. If you still have the stock exhaust manifold, then the down pipe going to the muffler disconnects at a flange on the bottom of the manifold. There should be 3 nuts on studs coming off the manifold itself. I'd soak these real good for quite awhile before attempting to remove them. I broke one before and had to drill and re-tap it. Everything else should be straight forward. Good luck.
-
If you want disc brakes on the rear, then you need to look at getting the rear set-up from a 280ZX. (OMG! I said the forbidden word! :tapemouth ) Try doing a search on this site. I'm not sure if there is a write up here or not. I'm pretty sure there is one at www.zhome.com There are also very good write ups around the net, you just have to do a little searching. This might be a little involved as I believe you also have to swap part of the half shaftes because of the different stub axles from the 280ZX. Good luck on the project, though.
-
"If you don't get hurt, then you weren't really working."
-
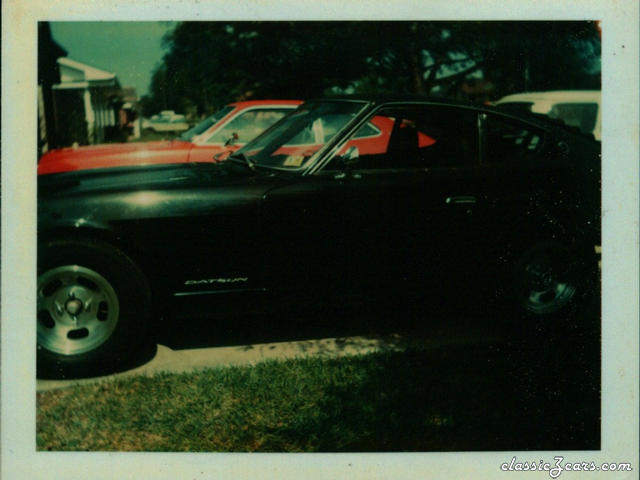 This car was built from 2 wrecks and painted a gorgeous black w/ very fine gold dust in the clear coat. Awesome color!
 -
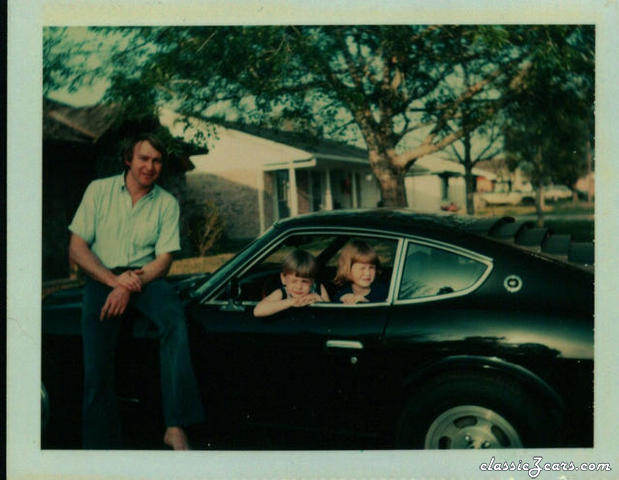 This the car that started my passion, demise, madness w/ Z cars. '72 240. I'm not quite 5yrs old in this picture (circa 1976)
 -
If it's just the u-joint that is bad, just take it to a local drive-shaft place and they can replace the u-joints. Probably for less than $40. If your drive shaft itself is breaking apart (the tube body is coming apart) then you are doing some serious damage to your car! I've seen lots of u-joints fail, but I've never seen an actual drive-shaft come apart, even in a research facility where that was the goal.
-
Hybernation? Winter Storage? What the hell does that mean? Doesn't it stay nice all year round like here in Texas? Oops, sorry. What was I thinking? Make sure you also change the oil before putting it up in storage. There are acids and such left in old oil that can attack the engine and it's internals. Ask anybody storing motorcycles and they'll tell you the same thing. And since you'll be in a heated warehouse, I'd leave the battery in the car, but connect it to a Battery Tender. That way you won't have to worry about where to store the battery. And you'll know it has a charge at all times.
-
I couldn't resist this one!!!! 2liters.bmp
-
I also have a demented friend that likes to collect wasps nest. He used the biggest one to scare the crap out of me one day. We found the biggest one one day at work up on the side of the building. It measured 10" across the longest part! After we killed the 20 or so wasps on it, he spent the about 15 minutes picking all the dead wasps off the ground. Then he took it home and glued them all back on the nest. He kept it on top of his tool box at work and loved to put it behind corners and such. I always hated when he did that...
-
I don't worry too much about spiders, but wasps are another story.... When I first got my '71, it had been sitting in some guys backyard for at least 5 yrs. Now for those that don't know, here in Texas, wasps will build a nest anywhere that has protection from the rain and hasn't moved in a few days. Well, I'm laying underneath my car pulling the rear bumper off using a wrench and a hammer (to bang on the wrench) one day behind a friends barn. My goal was getting the gas tank out. After about half an hour banging on the rear bumper, it finally comes off. Now for the tank. So I'm under the car, gas tank laying on my chest. As soon as I lower the passenger side just enough to clear the lower body section, I notice 2 wasps nest about 4" in diameter! Each one had 8 angry looking wasps just sitting there staring at me! Now I'm prone to freeze in fear at the mere sight of a wasp buzzing around my head. This was absolulye terrifying. It took me over five minutes to slowly slide my way out from under the car. To this day, I will always shine a flash light up under fenders, and under any car that has been sitting for awhile before my body goes underneath it. I still get chills recounting that story...
-
As I understand it, the only piece that is different is the one going from the bell-crank on the firewall to the intake balance tube. One is longer than the other. Not sure which one though. But this assumes that you're switching out the '73 balance tube with one from a 70-72 model. If all you're doing is using the existing balance tube, but plugging up all the unneccessary ports, then a new linkage is not needed.
-
First check out the carbs to make sure they are set to pre-tune settings. Since they have been replaced, we'll assume that they have been apart and/or rebuilt somewhat. In that case, they need to be set at a pre-tune setting so the car will start, and then they can be properly tuned. Do a search on carbs here in the forums and you'll come up with a wealth of info. Also check out a Factory Service Manual or Haynes manual for additional info. That will get the carbs in the ball park. If the engine ran but then sort of quit, then you can assume a few things there. One is your getting some fuel, but are you getting enough. What kind of operational condition is the fuel pump in? Another thing is the carbs may be close but not close enough. Do you know if the PO was able to get the choke operational during these times? These engine can be rather cold-blooded when first started and the choke helps a lot. It sounds like most of the general electrical stuff has been taken care of so I wouldn't worry too much about those items. But I would focus on the fuel delivery system and the carbs. Check out articles on www.zhome.com and maybe do a search on SU carbs out on the net. There are quite a few places that give good descriptions on tear-down and rebuild procedures for these carbs. Good luck on getting your car started. BTW, definitely get a little oil into the cylinders and if you might even pull the valve cover and pour a little oil on the cam. It couldn't hurt...
-
:D :D I think I just found my new job! SO how much is it to ship a Z to Guam?
-
I just emailed you all the pics I have so far. It's at my house now (wasn't before) so I can get pictures of whatever soon. Might take me awhile to get pictures of the underneath, though. But I'll see what I can do. Also, the complete wire harness is all there, but I think the injector clips are getting a little brittle. The dash and one seat make up everything in the interior. I also don't have the gas tank.
-
I have a '76 280 shell that needs a good home. Only rust is in the battery area and front section of passenger floor. Frame rails, rocker panels, and rear quarters are rust free. roof has some light surface rust from thinning paint. Clear Texas title. $200 obo. Located in San Antonio, TX.

-
I've been a memeber of the email list (from this site, great job on that, too Mike, btw) for about 3 years. When Mike first mentioned the beginnings of this site, I started to keep an eye on it from time to time. Although i didn't officially join for sometime after that. But I've been here for almost 2 years now and wouldn't go anywhere else. :classic:
-
I have seen them placed under the dash in the kick panel area in front of the doors. Cructhfield sells a kick panel mount that will accept a 6" speaker (I believe) and mounts into the Z nicely. I've seen this on a car at the Convention and it sounded pretty good. The speakers actually mount at an angle so they end being projected more into the interior compartment instead of just at the trans, tunnel. Might be something to think about since you don't want to make holes in your doors. (My doors already have the holes there, so I might as well use them.)
-
Well here is the latest and probably last update on the camber issue..... I layed out the control arms on the floor and transferred them with a marker. Then I measured from the center of the crossmember bolt-line to both the radius arm mounting holes, and the ball-joint mounting holes. All dimensions on both pieces came within 1/8". So much for my odd-ball control arm theory. I have measured the strut towers (cross-pattern) and they both come out to be the same dimensions there. So they are straight. The only thing I haven't done is measure their vertical angles, but the cross-pattern measuring should have taken care of that. I went ahead and mounted the camber bushings and installed everything and I'll deal with any adjustment limitations later on. I'm tired of messing with this and I'm missing being able to drive my car.
-
If they are hidden in bushes, then casually pull to the side of the road, walk up to the bush and then relieve your self. Or just run the things over. I can't image that they'd be manned. Just a few dilinquent thoughts roaming through my childish mind. I'll grow up now...