
kmack
Community Member
-
Joined
-
Last visited
Everything posted by kmack
-
If you over fill the damper, it will push the fluid out of the top when you replace the damper rod. I did this when putting my engine back in my car a few months ago. Best bet I found was to pour a little fluid in at a time and keep checking the level.
-
http://cgi.ebay.com/ebaymotors/ws/eBayISAPI.dll?ViewItem&item=1816840146
-
EScanlon, it looks like we're both right! This is taken from manufacturing info from Crown Industries: "Acetone- A strong, fast-evaporating solvent used for thinning and cleaning fiberglass resins, epoxies, vinyls, lacquers, and adhesives. Excellent heavy duty degreasing agent. MEK (methyl ethyl ketone) - A strong solvent similar to acetone but with a slower evaporation rate. Used for thinning and cleaning fiberglass resins, epoxies, vinyls, lacquers, and adhesives. Superior to acetone for cleaning and degreasing applications." I guess it basically gets down to your prefference on what you want to use. For reference, a gallon of MEK will run about $3-4 more than a gallon of Acetone (generally). I hope this information will help someone later down the road.
-
Sorry to burst your bubble, 2Many, but on the '73 240's the choke cables DID come throught the firewall on the passenger side of the engine! The '73 240 I bought years ago was stock and this was the case. It's that way because of the '73 flat-top carbs. And there is a "V" or "U" shaped cable holder that mounts to the top of the valve cover where the cables cross over. I have a picture of my '73's engine bay and I'll try to find it.
-
I assume that the POR-15 is/or similar to an epoxy paint. If it needs to be thinned out, you can use MEK for this. MEK (methyl ethyl ketone) is specifically designed to thin epoxies and you can get it at Home Depot or at your paint store.
-
I didn't use the POR-15, but I used an epoxy-based truck-bed liner that I sprayed on. I had the same question regarding the thread holes on the car. What I did was to just put a small piece of masking tape over the holes. Just big enough to cover it. (Make a mental note of where these holes are located) Then when I was through spraying and the paint had a chance to tack up, I carefully removed the little pieces of masking tape. Since I was using a bed liner matrial this allowed for a nice smooth surface for when all my pieces went back together. And any bare metal was covered up after bolting everything back on. I also did re-chase all my threads, but only to clean them up from rust and dirt. Every thread has been cleaned out on my car!
-
Anybody looking for a cheap turbo motor? http://cgi.ebay.com/ebaymotors/ws/eBayISAPI.dll?ViewItem&item=1816555016
-
72 datsun / nissan Z radiator support http://cgi.ebay.com/ebaymotors/ws/eBayISAPI.dll?ViewItem&item=1816041071
-
Includes tires, lug nuts, and center caps... http://cgi.ebay.com/ebaymotors/ws/eBayISAPI.dll?ViewItem&item=1815553537
-
Here is an early 240 Intake manifold w/ balance tube and linkage: http://cgi.ebay.com/ebaymotors/ws/eBayISAPI.dll?ViewItem&item=1815521585
-
I have never done this conversion but I do know there are 2 different types of 240 bumpers. They changed to a different mounting set-up for the '73 cars. The early ones (70-72) just used a flat piece of steel w/ a slight bend in it. The '73's used a set-up somewhat similar to the shock mounts used on the 260's and 280's. You're best bet would be to try and use the '73 bumpers since the mounting would be similar. I have also heard that just mounting up the bumper on the standard 280 shock mounts will result in the bumper sticking WAY far out away from the car. To get around this you will have to collapse the mounts. This will not allow your new bumper set-up to absorb small impacts. Anyone else with info on this correct me if I'm wrong.
-
thunderstreak, Follow this link: http://www.240z.org/forums/showthread.php?s=&threadid=1937 I posted a file of the body dimensions for a 240 from the factory manual. Dimensions are in millimeters. I hope this helps.
-
This file is to be opened in Adobe Acrobat. This is a copy of the overall body dimensions for the 240Z from the factory shop manual. All dimensions are in millimeters. To convert (mm) to (in) multiply by .03937. chassisfrommanual8bmpwocomp.zip
-
The Owner's Manual says to place the jack under the seam where the rocker panels meet the floor panels. There is a vertical strip of metal there that has a "half-moon" cut-out and those are the exact jacking locations for the stock jack supplied with the car when new. If you're using a regular floor jack, you can still lift using these points, but I'd suggest using a block of wood in between so you don't damage the metal any more than neccessary. I always place my floor jack under various points of the suspension. I lift the back by placing the jack under the diffirential, and the front using the front cross memeber.
-
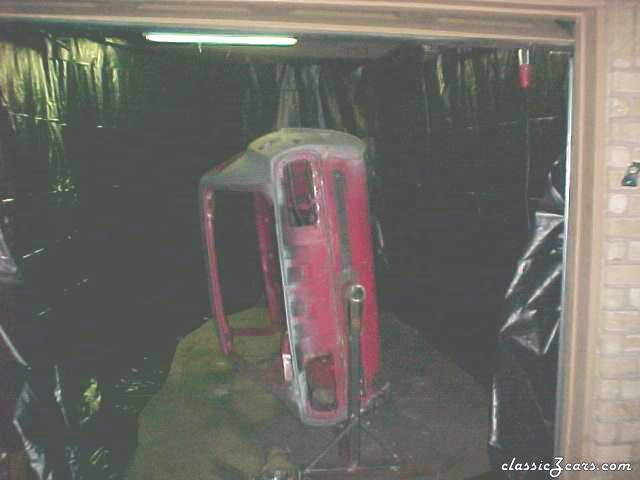
From the album: '71 before shots
This was done while I was sand blasting the body. Just used 7 mil foundation plastic that you can get at Lowe's or Home Depot. -
Jerry, Rest assured that the "I spend more time waxing my Trailer Queen than taking a bath" Purists, would end up eating cones if the rules of the show insisted that the cars be driven on a road course to evaluate their road-worthy ability! Anytime my local club holds a car show and we get to vote for viewer's choice, I always - ALWAYS - vote for a car that has at least a little road grime on it! Cars are meant to be driven, not stored away in an oversized closet and taken out in the sunshine on special occasions. "Controlled chaos on asphalt" I love it! Drive 'em the way they were intended to drive, I say.
-
Both EScanlon and myself gave a pretty good description of replaceing the lines for the vent tank. Follow this link: http://www.240z.org/forums/showthread.php?s=&threadid=1309 We've both been down this road before as have others. It's not too hard to do, but it does required dropping the tank a little.
-
I saw that....blew my mind to. And we both said pretty much the same thing. Just wait, 2ManyZs will come on and be jealous that we beat him to it. Then he won't be able to up his number of posts some more!
-
All of the panels should fit without any problems. (Although all my knowledge is with 240's) You also have the option of repainting your interior panels. I believe the best product is SEM. (someone else help me out with the product info) It may come out cheaper than buying an whole parts car, especially if your panels are in good shape other than being discolored.
-
Have you checked the condition of your tank vent lines? These are the large fuel lines that run behind the tail light panel, through the floor and into the gas tank. Over time they get hard and brittle and crack. If so, then when you fill your tank over half full they will leak gas out of the tank. Particularly the long one on the driver's side of the car. It joins into the gas tank right at the tank seam.
-
So I should try and cram a "turbo-type" muffler in the tunnel along w/ the trans. and drive shaft? That sounds a little crowded. My "original" exhaust had a "glasspack" type installed there, that's the only reason I mentioned it. I know the pre-muffler is supposed to quite the resonating, but are you saying I should do w/o it? I hate to be picky here on this, but I'm getting close to to needing this.
-
Glad to hear you were ok.... As for the car.....ever want to do a convertible project?
-
Marty, I know the factory system came w/ a "pre-muffler" in it. At some point, a PO had installed what looked like a glasspack in the middle of my otherwise stock system. I need a total rebuild of mine, and will go to the 2-1/4" system. What do you recommend for this middle muffler or one at all? As for the Turbo muffler, what brand(s) do you recommend? I want something that is rather subdued, but will growl when driven hard. Looking for suggestions also.....
-
EScanlon's on to something here....maybe T-shirts w/ the site logo. Then everytime a site member went to a Z function, they could wear their shirt and the site would get free advertising.
-
I've heard that a 1" sway bar up front can eventually lead to metal fatigue of the frame rails and cause cracking. Suggested fix was to weld on a plate underneath the bar mounts to help overcome the fatigue and strengthen the area.