kmack
-
Posts
1,440 -
Joined
-
Last visited
-
Days Won
1
Content Type
Profiles
Knowledge Base
Zcar Wiki
Forums
Gallery
Events
Downloads
Store
Blogs
Collections
Classifieds
Everything posted by kmack
-
The Owner's Manual says to place the jack under the seam where the rocker panels meet the floor panels. There is a vertical strip of metal there that has a "half-moon" cut-out and those are the exact jacking locations for the stock jack supplied with the car when new. If you're using a regular floor jack, you can still lift using these points, but I'd suggest using a block of wood in between so you don't damage the metal any more than neccessary. I always place my floor jack under various points of the suspension. I lift the back by placing the jack under the diffirential, and the front using the front cross memeber.
-

From the album: '71 before shots
This was done while I was sand blasting the body. Just used 7 mil foundation plastic that you can get at Lowe's or Home Depot. -
Jerry, Rest assured that the "I spend more time waxing my Trailer Queen than taking a bath" Purists, would end up eating cones if the rules of the show insisted that the cars be driven on a road course to evaluate their road-worthy ability! Anytime my local club holds a car show and we get to vote for viewer's choice, I always - ALWAYS - vote for a car that has at least a little road grime on it! Cars are meant to be driven, not stored away in an oversized closet and taken out in the sunshine on special occasions. "Controlled chaos on asphalt" I love it! Drive 'em the way they were intended to drive, I say.
-
Both EScanlon and myself gave a pretty good description of replaceing the lines for the vent tank. Follow this link: http://www.240z.org/forums/showthread.php?s=&threadid=1309 We've both been down this road before as have others. It's not too hard to do, but it does required dropping the tank a little.
-
I saw that....blew my mind to. And we both said pretty much the same thing. Just wait, 2ManyZs will come on and be jealous that we beat him to it. Then he won't be able to up his number of posts some more!
-
All of the panels should fit without any problems. (Although all my knowledge is with 240's) You also have the option of repainting your interior panels. I believe the best product is SEM. (someone else help me out with the product info) It may come out cheaper than buying an whole parts car, especially if your panels are in good shape other than being discolored.
-
Have you checked the condition of your tank vent lines? These are the large fuel lines that run behind the tail light panel, through the floor and into the gas tank. Over time they get hard and brittle and crack. If so, then when you fill your tank over half full they will leak gas out of the tank. Particularly the long one on the driver's side of the car. It joins into the gas tank right at the tank seam.
-
So I should try and cram a "turbo-type" muffler in the tunnel along w/ the trans. and drive shaft? That sounds a little crowded. My "original" exhaust had a "glasspack" type installed there, that's the only reason I mentioned it. I know the pre-muffler is supposed to quite the resonating, but are you saying I should do w/o it? I hate to be picky here on this, but I'm getting close to to needing this.
-
Glad to hear you were ok.... As for the car.....ever want to do a convertible project?
-
Marty, I know the factory system came w/ a "pre-muffler" in it. At some point, a PO had installed what looked like a glasspack in the middle of my otherwise stock system. I need a total rebuild of mine, and will go to the 2-1/4" system. What do you recommend for this middle muffler or one at all? As for the Turbo muffler, what brand(s) do you recommend? I want something that is rather subdued, but will growl when driven hard. Looking for suggestions also.....
-
EScanlon's on to something here....maybe T-shirts w/ the site logo. Then everytime a site member went to a Z function, they could wear their shirt and the site would get free advertising.
-
I've heard that a 1" sway bar up front can eventually lead to metal fatigue of the frame rails and cause cracking. Suggested fix was to weld on a plate underneath the bar mounts to help overcome the fatigue and strengthen the area.
-
Alfadog, the "L" in HLS stands for "left-hand drive". Your's is right hand drive am I correct? Joe71, I'll have to check and see if I still have the vents that came off the parts hatch I bought. I have new vents so I"m not sure what I did w/ the old ones. They weren't in the greatest shape, but were still in one piece. If I can find them, I'll let you know.
-
Would a well machined metal block work? Say something along the lines like a meatl lathe cutting bit? These are high strength steel and are typically rectangular in shape. I have quite a few ranging from less than an inch to over 3" in length.
-

From the album: '71 before shots
Here's a shot on the rotisserie. Notice the clean shiney metal waiting for epoxy sealer and final undercoating. The primered section on pass. side is the section of floor that had to be replaced along with battery/firewall repair. -

From the album: '71 before shots
This how my battery, firewall repair looked before final paint. Not the best, but definitely better than before! -

From the album: '71 before shots
This is basically what I started with...and hopefully somewhat of an idea what I'll end up with. The paint in this picture is totally shot, but you can't tell. -
I agree w/ 2ManyZs, the paint code sticker was on the drivers side on my car. It's not there anymore because you almost couldn't read it so I just peeled it off. My color code is 905, sort of a Cherry Red. An unmistakable red!
-
I found this info on a Mercedes Benz site. Lots of good stuff there. Ken Taken from Scott Grundfor Co. – Ideas for Collectors (www.scottgrundfor.com) A friend in the auto detailing business suggested a way to repair the chips quickly and economically. He proposed brush-touching the chips with a dab of paint. I thought the paint would look as if it had been brushed, but he described the process of building up the paint just above the original level then gently sanding it down. We tried it, and we could see that unless you knew exactly where the chip was, you could never see the repair. The process works best with solid colors; metallic colors may come out blotchy. A Better Way First, get the right touch-up paint for your car. For a recent model with original factory paint, a Mercedes-Benz dealer can sell you a small bottle of touch-up paint with an integral brush. If you don't know the name of the color, if it has faded, or if the car has been repainted, your local automotive paint store can match a paint sample and sell you a pint or so. Your car has a code used to determine the formula for mixing the color. Clean the chipped area. Paint will not stick to a surface with wax, grease, or silicone on it. Dilute a liquid detergent, and use a sponge or soft rag to clean the area around the chip, especially the chip itself. Clean off any accumulated residue. Let it dry. If you see bare metal, dry it immediately to prevent rusting. This works well for a small chip, perhaps caused by a rock, but a long scratch takes more skill and patience; it can be repaired, but rarely. Practice on a small, out of-the-way area so that if you make a mistake, it will be hidden. This process is not recommended for a car with a lot of chips. If that's the case, consider repainting the panel. For one or two chips, this alternative saves the difficulty and expense of spot-painting a larger area or repainting an entire panel. If you spot-paint an entire area and blend new into existing paint, you have two dissimilar paints: the new paint and the original underneath. When you spot-paint an area then finish it, you might get an exact color match then, but in time the two paints applied at different times age differently, and a ring or spot will appear. Applying Paint With the area clean and dry, you'll need a good brush with a very fine point. A large brush will slop paint over the edge of the chip. To keep the paint inside the chip, you need a very small brush with just a few bristles. Mix the paint thoroughly. Liquid paint settles as it stands, so mix in all the pigment at the bottom of the container, or the color will be off. If the paint is too thick to go on the brush and be applied in a light coat, it will need to be reduced to a thinner consistency. If you're using lacquer, you'll need lacquer thinner; if you are using acrylic enamel, use acrylic reducer. To get the desired consistency, paint should be thinned approximately one part thinner to one part paint or one half thinner to one part paint. With the brush, build successive light layers of paint into the chip. Paint shrinks as it dries, so build the layers gradually. If you put one big glob of paint into the chip, it will continue to dry for months, shrinking as it does so. Even if you finish it flat, a few months later a crater will develop where the repair was made. Allow drying time of at least an hour or two between paint layers. The longer you wait, the better the finish you'll get, so let the paint dry thoroughly. Two to four layers of paint will be needed to fill the crater. Because the paint will shrink, build the final layers a little above the crater surface. It should be fairly close but slightly above the surrounding paint. Let this dry for several weeks. In the meantime, your car won't look awful. It will look like you simply brush-touched that area, which will certainly look better than the chip. The key to this entire process is that the paint must dry thoroughly. Finishing Learning the skill of finishing is another key to success. You'll need a cube about an inch square that is perfectly flat on at least one side to use as a small wet sanding block. If you don't have something flat of this size, cut a block of hardwood. Before sanding, you might mask off the area by putting tape about an inch away all the way around. Then if you get a little aggressive in your sanding, you won't sand and scuff the surrounding area. Use 1,000-grit or 1,200 grit ultrafine wet sandpaper. You need very little; a sheet will cost about a dollar at an automotive paint store. Tear off a tiny square, enough to wrap around the block, then use a sponge to wet the area as you sand. Use the sandpaper and block to level the paint mound down to the surrounding original paint. Use the lightest possible pressure on the block, and gently wear down the little mound. Sand a little and very lightly—this can take mere seconds—then dry the area and inspect it. When you see that the mound has disappeared, you've gone far enough. Avoid sanding too much. If the paint is old or thin, or if you sand too hard, you'll go right through the finish. If you very carefully let the block float with just the gentlest pressure over the little mound of paint built up over the chip, you'll wear off the top of the new surface without removing much if any of the surrounding paint. Ideally, you'll scuff it just a bit. Next, use magnesium polish, Mother's or Blue Magic, available at most automotive stores. Magnesium is the finest abrasive I've found for compounding paint. Use a soft cloth in the area scuffed by the sandpaper and rub until the scratches are gone. Rubbing in one direction works best. After polishing, wipe the area dry and inspect it. If you see deeper scratches, do a little more polishing with the mag polish. Finally, wipe the surface clean and use wax or automotive polish (carnauba wax or similar), to finish the area around the chip. Done right, you've filled the chip and finished the top so that it blends in nicely. If you look very closely, you may see the spot. If you notice bubbles trapped in the paint (they produce white specks in the center of the chip) your paint was probably too dry, too thick. As you grow more skillful in applying wetter, thinner layers, the surface will not bubble. This method can effectively repair a chip without painting an entire panel. I've used it on show cars, where it even held up to the scrutiny of judges.
-
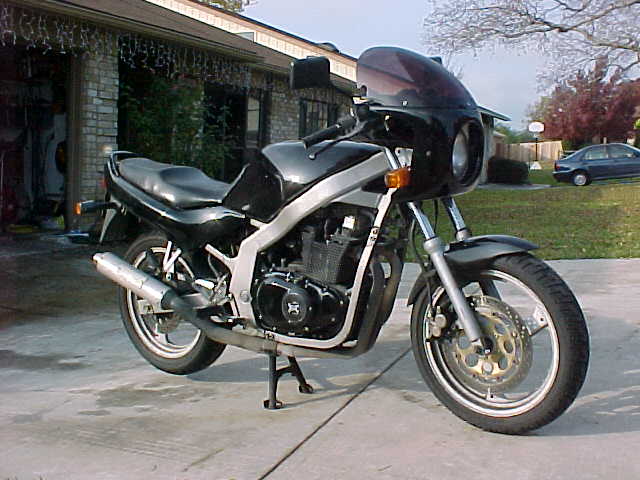
I know this isn't really Z related, but all proceeds go directly to my Z project. So in a way, it kind of is related... Anyway, what I have is an '89 Suzuki GS500 w/ 16k miles for sale. It has new brakes, Vance & Hines Exhaust, Stage 1 jet kit. Minor scratches and one small dent on the side of the gas tank. I'm asking $900 as is. This bike runs great and has never failed to start or run excellant in the last 4 years I have had it. I'm located in San Antonio, Tx and can arrange delivery to as far away as Dallas or Houston. Any inquires can be either emailed to me or call the house @ 210-699-6436. Thanks, Ken.
-
I got the new Motorsport Auto Auto News the other day. On page 18 they list a new "Performance Camber kit" for the front and rear. They are listed at $99.95 for a pair. "...our camber kit is a direct bolt-in allowing simple camber changes while requiring no sheet metal modification. Allows for 1.5 degrees of camber change. Maintains original ride height in Z's built up to 8/74...." At some later point down the road, I'd like to lower my Z a little, no more than an inch. I've heard/been told that lowering affects your camber, hence the need for adjustment. If this little gadget works, then it would make things a lot easier. Question: Has anybody heard/seen/used or otherwise have any additional info on this type of product? Is 1.5 degrees of change enough for a Z that has been lowered 1"? I know I could adjust my camber just by slotting the strut mounting holes, but I'd hate to do that sort of thing and then later want to go back to stock. Also, I'm looking at using this car for some autocross duty.
-
I've pulled the engine w/ and w/o the trans. Personally, I like pulling both at the same time. (I've usually needed to have both out at the same) It really doesn't take much longer if you pull both. Disconnect items per Royce's list but add: remove fan/clutch remove driveshaft remove shifter disconnect speedo cable loosen trans mount bolts. Once you get the engine mount bolts out and have the hoist hooked up, then drop the trans mount and let the tranny hang. Make sure you have the hoist attached to the engine so that it picks up the front of the engine first and lets the rear hang a bit. I usually find it's easier to push the car away from the hoist rather than pull the hoist/engine/trans away from the car. You'll need to pick up the engine high enought to clear the oil pan above the radiator mount. Once you've cleared that, get someone to hold up the back of the tranny as you move the assembly away from the car. That's about it. Reassembly is just the reverse. Plus I find it's easier to attach the tranny with engine out of the car rather than while it's sitting on my chest under the car!
-
Ok, I found some more information regarding the Renu product. Check out their website... Gas Tank Renu
-
Found the info on my gas tank. It's marketed as "Gas Tank Renu - USA". The dealer through which mine was done was out of Houston (409-372-9107). It carries a limited Lifetime warranty (non-transferable to next owner) My paperwork lists a bunch of dealers throughout the US & Canada, so if you're interested, tell me where you are and I'll give you the number of the closest dealer to you.
-
I used the acid by itself. Won't ever do that again. There is a way to nuetralize muractic acid. I believe baking soda or something like that. You can ask a pool supply company. They use muractic acid in cleaning pools. I'll try to find my warranty card on mine and post the company info for those that would be interested.