kmack
Free Member
-
Joined
-
Last visited
Everything posted by kmack
-
 I've pulled the engine w/ and w/o the trans. Personally, I like pulling both at the same time. (I've usually needed to have both out at the same) It really doesn't take much longer if you pull both. Disconnect items per Royce's list but add: remove fan/clutch remove driveshaft remove shifter disconnect speedo cable loosen trans mount bolts. Once you get the engine mount bolts out and have the hoist hooked up, then drop the trans mount and let the tranny hang. Make sure you have the hoist attached to the engine so that it picks up the front of the engine first and lets the rear hang a bit. I usually find it's easier to push the car away from the hoist rather than pull the hoist/engine/trans away from the car. You'll need to pick up the engine high enought to clear the oil pan above the radiator mount. Once you've cleared that, get someone to hold up the back of the tranny as you move the assembly away from the car. That's about it. Reassembly is just the reverse. Plus I find it's easier to attach the tranny with engine out of the car rather than while it's sitting on my chest under the car!
 -
Ok, I found some more information regarding the Renu product. Check out their website... Gas Tank Renu
-
Found the info on my gas tank. It's marketed as "Gas Tank Renu - USA". The dealer through which mine was done was out of Houston (409-372-9107). It carries a limited Lifetime warranty (non-transferable to next owner) My paperwork lists a bunch of dealers throughout the US & Canada, so if you're interested, tell me where you are and I'll give you the number of the closest dealer to you.
-
I used the acid by itself. Won't ever do that again. There is a way to nuetralize muractic acid. I believe baking soda or something like that. You can ask a pool supply company. They use muractic acid in cleaning pools. I'll try to find my warranty card on mine and post the company info for those that would be interested.
-
Correct me if I'm wrong here, but I think pauls240z has it wrong. You would want to keep the speedo drive gear for the transmission that you are putting into the car. If you use the 4 spd gear on a 5 spd, that would give you a different ratio going to the speedometer.
-
Word of caution about using acid to clean your tank....make sure you nuetralize the acid or it will rust again! When I first got my car back in '93, there was 3/8" of sludge in the bottom (along with a screwdriver?) and it was almost hard as a rock. (My car had been sitting for about 5 years.) I pulled the tank and it had been suggested to me to use muractic (sp?) acid the clean the inside. The acid worked great! Nice, clean, shiney metal appeared inside. I thoroughly rinsed the inside of the tank for over an hour. 3 weeks later I had my engine running. Well about 3 weeks after that, while test driving the car on the road (1/2 a tank of gas), the thing ran out of fuel (or at least felt like it)! Checked the fuel filter.....BROWN! Pulled it, and brown liquid poured out. Changed it, and a week later it was glogged again. Finally, I pulled the tank again. The inside looked worse than it did before I tried to clean it! Turns out that you can't nuetralized muractic acid with water alone, so it kept eating away at the metal. And not having a full tank of gas let air/moisture in which caused the rust. The fix? I'm not sure, but I went to a radiator shop that repaired fuel tanks and they turned me on to a process called "Renew." (I have the paperwork at home and will look for it later) Basically, they clean out your tank, nuetralize the metal, then coat the inside and outside with a fuel resistant, hard, epoxy coating and baked it in an oven for 6 hours. Carries a lifetime warranty. Cost me about $150. As I haven't really had my car back together since that point, I can't tell you how it's holding up. I can tell you that when you look inside my tank, it's clean and neat inside with no signs of rust. FWIW....
-
Well, I guess it's my turn. I just turned 30, 1 wife, 1 kid, 1 cat, 1 dog (85lb German Shepard), 1 house, 1 Z, and now down to 1 motorcycle. (I had about 8 so far) Bought my '71 and a '73 parts car back in '93. Got the '71 running and riving, but I couldn't drive it much becuase of the rust under the battery. Frame rail had a crack in it! Last time I drove my car was when we moved into our house in Jan. of '96. I drove it there and then once in the garage, it was torn apart. I have gone so far as to remove everything off this car. Took it straight down to the metal and have slowly brought it back to where it is now. Took it off the rotisserie back in Dec. Engine/trans. is back in (although I have to pull it again to replace a freeze plug). Underbody and suspension is complete and the only things left are the body and the interior. I'm working on priming and sealing the body right now. I have finally set a deadline to have this car finished-June, 2002. I have to have it driving by the time the National Convention gets here to San Antonio. I'm the only member of our Z club that hasn't ever driven their Z to a meeting! Plus I'm also the only member that brought their car to a car show on a trailer as a rolling, primered shell! I've loved Z cars since I was 5 years old. I have fond memories of rolling around on the rear deck of my Dad's '72 240 and the way to my Grandparent's house going down curvy roads at obnoxious speeds! (back before car seats were mandatory!) I had a chance at a '76 280 2+2 back in High School, but couldn't convince my parents to help front the cash. (I don't particulary care for the "hump backs", but I always did think the dual interior door handles was pretty cool!) Anyway, I plan on always having at least one Z. Just like I'll always try to have at one motorcycle. My wife claims I love the Z more than her, well I have had my Z longer! Anyway, I'ved lived in Texas all my life (never farther north than San Antonio). I can definitely say that warm weather is the best! We can drive all year long, in shorts and a t-shirt, and in flip-flops, w/o worrying about road salt, snow, we hardly ever have rain, etc.... Long live the classic Z!
-
Zlishous, 2ManyZs has that many posts because he doesn't work on his cars! Sorry Keith, I couldn't resist. Of course I'm one to talk, I haven't driven my car in over 6 years!:eek:
-
I've talked to a few places already and have even bought some sealer/primer. But I thought Carl B. had said once that bondo on bare metal is a no-no. Something about moisture still being able to penetrate. I've had a light coat of primer on my car now for awhile. I stripped all the paint off previously and put a light coat of primer to help seal out rust. (It's been garaged this whole time.) I'm sanding off the primer right now back down to the metal. I'm using a rust inhibitor called "ospho" to treat the metal, then I'm spraying the sealer. The paint shop I talked to said this process is ok and should seal up nicely. But I just wasn't sure about the bondo thing. Hope fully I can get it cleared up soon. I'm hoping to have the door sills, window/hatch channels, and the roof done by tomorrow.
-
I have my car stripped down to bare metal. And I'm getting ready to start prepping for paint. I've heard that it's not good to put "bondo" on bare metal, but to lay down a sealer/primer first, then use the bondo. How correct is this? Is so, then how do I prep the surface of the primer so that the bondo will adhere to it?
-
Well, as my project gets closer to winding down, I'm now faced with finally having to order all the window and door rubber seals. I know Motorsports and V.B. both sell rubber seal kits. I don't have any problems paying for them. But I seem to remember a thread somewhere about using the kits for a 280Z on the 240's because the seals fit better. Anybody have any suggestions? Who has been there and done that? Victoria British has three kits kisted: 240 70-73 260-280 74-6/75 280 7/75-78 I have a Series I, 1971 240Z. And I need all the rubber seals! I'm looking for suggestions here since my budget is limited and I'd hate to spend the money to find out my parts don't fit. Any and all suggestions and comments are welcome...
-
Come join us for the 15th Annual ZCCA Z Car Convention! The National Z Car Convention is rapidly approaching. The hosting club, Z-Sport of San Antonio , has prepared a ton of stuff for this years convention, June 17-21, 2002. This Convention will also coincide with the new release of the 350Z. Registration forms are now available on-line at Z-Sport So come join us in San Antonio, Texas for this year's Convention! "Ya'll come down now, ya here!"
-
Like 2ManyZ's said, start taking it off. I went so far as to even cap off the EGR valve also, but at the time I had a '73 motor and the EGR was shot anyway. Now I have an early model balance tube that doesn't require the EGR. Taking the air pump and it's various plumbing off will not be all that difficult. The hardest part will be removing the air injection tubes from the exhaust manifold. I pulled my manifold off the car, cut the tubes as close to the manifold as I could, then drilled the rest out. Later I tapped the holes for a 3/8" NPT flush pipe plug. Now you have to really look to see where the tubes went in. (Or you could always just get a header and not worry about it.) The rest of the job is just plugging up the various lines. Good luck.
-
I thought I wouldn't mess mine up either, but I still had to buy new choke nozzles because I rushed my disassembly too quickly. When ya'll work on these things, make sure you are patient and take your time. It'll definitely save you money in the long run.
-
I had a motorcycle that I restored where someone had hammered out the main jets and screwed up the aluminum housing the jets screwed into. They cracked it in 2 places. A little JB weld and a small metal wire to sinch things back together and "presto", good as new. I road the that bike for 4 more years and never had any ill-effect from being immersed in gas. I also have a small 50cc scooter that has JB weld holding the gas tank sending unit together. After 6 years, still works like a charm!
-
The difference between the two (visually) is in how the "dome" is attached. By either 4 screws (early) or 3 screws (later models). According to Z Therpy's SU video, the 4 screws are easier to align the piston. Apparently, the 3 screws alow a bit of movement in the positioning of the dome on top. There are a few other minor differences between the two like the mixture nut is different and little things like that, but the overall operation is the same.
-
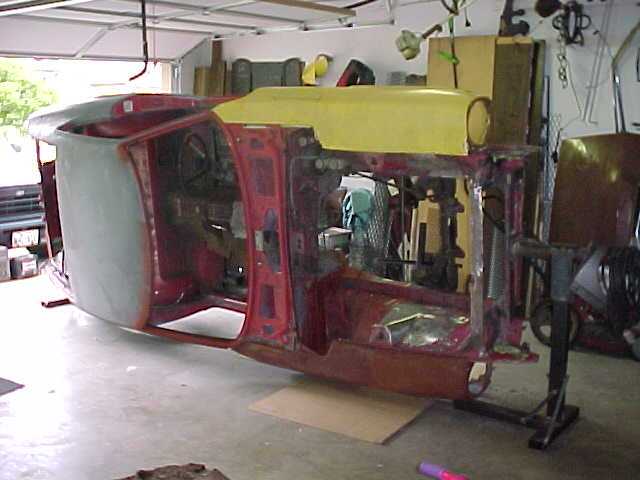
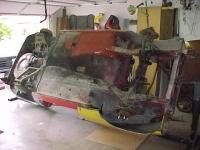
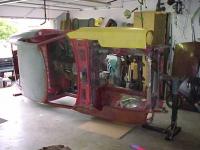
I didn't have full rotation with my stands, but this shows how far I could go....
-
Suntadz, Look on my website... I have one that I built shown there. Plans are available. http://www.geocities.com/kenshobnob You can use 2 engine stands but there will be problems. The first being the height of the stands themselves. From the top of the legs to the center line of the rotation point needs to be about 34" for the sides of the body to clear the stands. Otherwise, the car won't even get on it's side. Also, the width of the engine stands are very stable with the car on them. They will want to rock from side to side. The width needs to be at least 3' at a minimum. As for mounting the car, on the rear you can mount direct to the bumber mounts. Just make sure the brackets behind the rear valance panel are in good shape. (I had to replace mine before putting my car on the stands.) As for the front, the only good way to mount is to make a cradle for the front radiator support to sit into. There are threaded bolt holes in the bottom that you need to bolt to. If you have any other questions, just give me a shout. BTW, my stands/mounts will be for sale soon when I get them back from a friend.
-
I've seen the Z Racing (brand) wheels. They have them at Sears and NTB. I'd really like to get the Tuner X series ($89/ea), but their catalog basically says that none of their wheels will fit a Z. They have some specs listed for the wheels, like bolt pattern spacing, offset, etc. Anybody know what I should be looking for spec-wide when shopping for aftermarket wheels? What offset should I focus on? How close can I get without having to go to spacers? Any ideas? I think these wheels would look great on my car. Just need a little more info.
-
my pun was a little vague wasn't it? Actually her Dad is an ex-Sheriff's Deputy that used to use his 78 280Z as a patrol car once in awhile. He likes to brag about how he beat a Dodge cruiser to a scene once from being 4 miles farther away! now if I can just get her to let me race....
-
Once I get my current project finished, then I plan on starting a convertible project next. This would be the car I build for my wife. She loves convertible and really misses her Fiat X1/9. If I build the Z, then I can convert her......
-
I would recommend an electric pump if made some or all of the following: L28 block and head with larger valves Race cam fuel injection turbo weber carbs. If you just swapped in an L28 block, let's say, you could probably get away with the mechanical pump only if you're running the SU's. But since that engine already came with an electric pump (because of the fuel injection) it would really be a good idea to install one. No sense in running the risk of running out of fuel and causing a lean condition which would hurt the motor. Especially while you're racing. If you're only running the stock L26, I wouldn't worry about it too much.
-
2manyZ's, Scott Bruning's old video used to have a segment on making a convertible. He sold plans that used a Triumph retractable top. TR7 I believe. If I remember correctly, his plans also included the use of the hatch (cut down of course) as a trunk lid. There used to be a guy here in San Antonio that had 2-'77 model 280z's that were convertible. He said he had bought one for him and one for his wife from an outfit in Washington state that was running a production of them back in the late 70's/early 80's. The company supposedly went under. He eventually sold one (kids) and still had the other. His had a cloth top and a hard top (don't know from where) and a working trunk lid w/ luggage rack. Only problem he encountered with the car was with the insurance company. He had been hit by someone in the front and the insurance was going to total the car. "It's only a 77 model 280," they said. He had to give them paperwork on how rare such a car is before they would settle. Food for thought....
-
Zlishous, If by "stock" you mean the stock '74 carbs, then you may want to put an electric pump back in your car. The late '73 and '74 carbs were the whole reason for the electric fuel pump (along w/ the mechanical) in the first place. If you're going to be running SU's then you won't need to worry about it too much unless your carbs and/or engine have been modified and will require a greater demand of fuel than the mechanical pump will provide.
-
Are you sure you have an electric fuel pump? 71's did not come w/ an electric pump stock, so if you pulled the gas line from up stream of the mechanical pump then you won't see any gas come out. Normally gas does not evaporate quickly, at least not in large amounts. 3 gallons of gas will take a few weeks to completely disappear. If you just want to make sure the engine will fire, run a fuel line from a gas can to the mechanical pump and try to start the engine from that. As for the hole in your tank, I wouldn't be surprised if the long, 1/2" diameter vent line hose on the left side of the tank is cracked or broken. That would be the first thing I'd look at when seeing a fuel leak from under the tank. They are relatively easy to replace and there has been a rather extensive discussion on this site about it. If you do have to replace the vent lines, then now would be a good time to clean up your tank a little and blow out the fuel lines. BTW, are you planning on making it down to San Antonio for the National Z Convention in June?