Everything posted by kenz240z
-
Newbie from UK (another one)
That's one very sharp looking Z car you've got there! I've got the original steel wheels and Z hubcaps on my '73 240Z. Welcome to the club!
-
HybridZ told me to give you guys a try
Hi Jezze, the fuel nozzles are located at the bottom of each carburetor. Look for the little rubber hose at the bottom of the carb. One end connects to the fuel float bowl, the other end connects to the fuel nozzle.
-
HybridZ told me to give you guys a try
Have you adjusted the valves? Do the fuel nozzles move up & down ok, or is one stuck? Has any work been done on the engine recently?
-
Missing part on both su carbs !!!!
Looks like a front carb off a 70/71 240Z. No water passages like on the '72 carbs. The spot were the pencil is inserted most likely had a set screw (idle limiter) mounted in it to limit the downward travel of the idle adjust nut. I've got one set of the early carbs that still have the idle limiters, but they are missing from the other set of carbs that I have. Nothing that will affect the operation of the carb. Also, mine have the old screw type spring clamps on the rubber hose that connects the float bowl to the fuel nozzle. I can't tell from the angle of these shots, but I don't see the suction chamber that is on the top of the carb. It houses the suction piston and damper.
-
Gas Mileage for '73 240Z
Yes, there is a fuel return sysem on th older Z's. All the '72 FSM says is "This is a device which prevent vapor lock or percolation and to ensre a constantly stable idling in a hot engine compartment." I'd give all the rubber hoses a once over. Also check the hose that connects the float bowl to the jet at the bottom of each carb. There is also a flow guide valve mounted on the inside of the driver's fender that routes fuel vapors from the expansion tank (located inside the rear passenger side plastic panel) into the crankcase. You might check those hoses as well. The flow guide valve has three ports: one to the crankcase, one from the fuel tank and one from the air cleaner. They are labeled C, F and A, respectively.
-
Rust under rear seat mounts...
Wow, from the looks of things, the floor pans will never rust out from the inside!
-
Rust under rear seat mounts...
Hi Gregg, instead of cutting an access hole, you could probably accomplish what you want to achieve by using the hole that is there on the top of the mounting bracket. You might try making a dauber out of a bit of wire or a coat hanger and a small swatch of cotton. It should fit through that hole, and you could swab out the inside pretty well. There will be some areas you can't reach, but I'd think you could get to the backside of the seam along the floorboard. You should be able to bend the dauber to get to most of the inside of the bracket. This approach could be used to apply the Rust Mort, or similar rust inhibitor, and also for the POR-15. In fact, I think I've seen something on their website about daubers you can purchase to do this very thing. It was either that, or in the latest Eastwood catalog. If you decide to go ahead and cut an access hole, you might consider using a hole saw. Get a round metal plug of the proper size from the hardware store to plug it up, put a little strip caulk around the edge, it will help seal it and prevent the edge of the hole from rusting. Or, use a rubber hole plug. I doubt cutting a small hole would compromise the structural integrity of the mount by much.
-
My baby @ Sonic
Very nice, John! The weather here in Colorado has been on the warm side and I've had my Z out for a cruise quite a few times.
-
Determining paint code
I really like the light blue paint on the early Z cars. I had my eye on one, but waited too long to try and contact the owner. I spotted it sitting at the back of a construction company lot in a small town nearby. It had been there for a couple of years that I can recall. But, last fall I was back in the area and it was gone...
-
Determining paint code
I've seen a few Z cars with the engine bay painted black. From what I know, the engine bay was originally painted the same color as the body. Seems kind of like an old American muscle car kind of thing to paint it black.
-
Rebello 2.7L stroker
Keep us posted with progress! I had my original engine rebuilt for just under $2k. Runs like a champ! I have the automatic, so not as snappy as a manual, but not bad if I shift it through the ranges!
-
Determining paint code
Remove the ash tray and look at the paint on the transmission hump under the console. But, as has already been stated, it looks like you have already determined that the car was originally orange. A great color, by the way, but then my opinion is biased!!!
-
Shut down "Moneyman"
In the mean time, if each of you would kindly send me a dollar, I promise not to offer you anything at all in return! Ha, ha, ha!
-
Engine parts Identification of year/type help ...
Are you going to rebuild this engine, or the one currently in your car? You may consider rebuilding the one you just bought. Then it's only a matter of swapping the old one out and installing an exhaust that will fit the header. Save the original engine & transmission, that way you can always revert the car back to stock, numbers matching, etc...
-
Is a 240Z for me?
To Bill and Montoyafan: Of all the vegetables, only the beet goes on...
-
VIN tags
Oneuthin, the VIN is stamped on the firewall above the brake booster, and to the right of the driver's side windshield washer nozzle. In addition to my love for the Z car, I'm also an old Chevy nut. I remember the discussion several years ago regarding reproduction ID tags for the '60's Impalas. Like Steve mentions about the GTO's and Shelby Mustangs, the Impala crowd was concerned with people converting a six cylinder car to a 409 V8 car and passing it off as original.
-
need advise on spring/strut combos!
Hi deadflo, I've got the Tokico spring/strut combo with blue HP struts on my '73. Good, firm ride.
-
Dissapointed In My New Exhaust, Twice!!
I had a MSA 6-2 header and turbo exhaust system installed by a local Z shop. These guys restore Datsuns & build race cars, they know what they are doing. The installation turned out great. A good exhaust shop can be hard to find. I've had problems with bad exhaust installations on other vehicles, not enough clearance between the bottom of the vehicle & the muffler, so that you get a nice rattle inside the car...annoying!
-
70 Z Bought on EBay...ROAD TRIP!!
Kurt, looks like you got yourself a good project car there. I hope the trip to bring it home goes smoothly. I look forward to seeing your progress with giving this Z car a new lease on life!
-
Spindle Pin woes
I had a stubborn spindle pin that didn't want to budge. I took it to a local machine shop, but the fellow there said his press wouldn't be able to push the pin out. He suggested taking it to an alignment shop. So, I then took it to a local alignment shop and they managed to get it out. Apparently it took a combination of heat from a torch and the press to get it out. $250 seems a bit high for a transverse link/strut assembly. Are there any U-Pull it type of salvage yards near you? Might be worth a look. How about any of the Z shops that carry used parts?
-
Oz flying car mystery.
Interesting, I wonder if it is a Zcar!
-
Bob Sharp Racing 4bbl intake & Holley carb
Hi Zthing, thanks for the info. The 240Z I looked at had the same intake as shown in the picture you posted. Thanks for the link on Bob Sharp, I'm still learning about the proud racing history of the Z car.
-
Bob Sharp Racing 4bbl intake & Holley carb
I went to look at a '72 240Z for sale yesterday. Body & interior are in rough shape. The engine is not stock, apparently came out of a '73. Instead of the flat top carbs, it has a 4bbl intake with a Holley carb. The 4bbl intake has "Bob Sharp Racing" embossed in raised letters. Does anyone know the value of an intake like this? The car originally came with an automatic transmission, but currently has a 5 speed. I drove the car, and it is fast! But, the rear end is making a lot of noise, supposedly the differential was recently replaced. The suspension and brakes on the car would need to be rebuilt. The fenders, rocker panels, rear wheel arches & dog legs all showed evidence of rust repair. I'm wondering if it might make a good donor engine/transmission if a solid body/rolling chassis could be found. The seller is asking $2000 OBO.
-
OOOhhh, Bugger it !!!!!!!!
Rick, To be injured on the way to answer a pesky soliciation call...there must be a bit of cosmic humor somewhere here, but I haven't been able to put my finger on it yet. Perhaps it is a message to give up golf. I sure hope you heal up soon, every day you're unable to take Precious for a spin must be causing you anguish! Like me, I'm sure you're one of the few sane people amidst a crowd of madmen, so I hope your mental state isn't compromised by the situation!!!!
-
Battery tray ugly
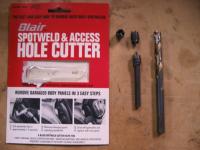
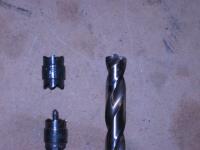
Hi Garth, I've used a couple of different spot weld cutters, both with good results. One type is basically a 3/8" drill bit with a different cutting face. Hopefully you can see what I mean in the pic on the right. The other one is like a tiny hole saw, the one I have is made by Blair. The drill bit tool leaves a dimple, and seems to have more risk of drilling completely through both layers of metal, but it works pretty fast. The Blair tool can cut a spot weld out without any sign, except for the circle of metal left from the top layer. These spotweld remnants then need to be removed with a grinder. Less chance of cutting through both layers, unless you get in a hurry. Seems to take a bit longer to cut out a spot weld, though. Extra cutting tips are a must, they get dull pretty quick, even with constant application of oil. I think the main thing when using either one is to take your time and stop the drill often to check your progress. I didn't have to cut any panels off my Z, but I've used both of these tools to remove plenty of panels from other vehicles. I got the Blair tool after seeing a buddy use one to cut the floor panel out of a '62 Chevy. Needless to say, there were a lot of spot welds, and the sheetmetal on an old Chevy is a lot thicker than the metal used on the Z cars! :laugh: In the case of a rusty battery tray area, there might not be any benefit in cutting out the spot welds if the underlying metal is rusted through and the tray is also too rusty to be salvaged. It might be better to cut the whole assembly out with an air saw or nibbler. Cut the same area out of a solid donor, plus a little extra around the edges, then it can be trimmed & fitted before welding it in. I have a hunch that the area under the battery tray didn't get the best paint coverage from the factory, and the combination of battery acid, water and time allow rust to eat through!:mad:


