Everything posted by kenz240z
-
Sandblasting
I cleaned & prepped the engine bay in my Z the hard way, lots of scraping to get the heavy stuff off. Then a lot of scrubbing with a toothbrush & solvent, followed by a good general scrubbing over everything. With all of the oil, dirt & grime removed, I then sanded everything with 220 grit paper, then 600 grit wet/dry paper. A lot of work, but all the prep work payed off, the engine bay now looks great! Another mess I had to address was cleaning a bunch of undercoating off the bottom of the toeboards & transmission tunnel. I used a propane torch to heat it up and then scraped it off. Messy, and a lot of work. After the heavy stuff was off I used paint thinner to clean it up real good before sanding.
-
New and need some advice
Hi Toni, welcome to the club. Post some more pics of your Z when you get a chance, it looks like a beauty. It sounds like the carbs are not properly synchronized. Use the search function on the site and you should be able to find some info on how to do it. The carbs are vacuum operated, so it is important to make sure the engine has good compression, the valves are properly adjusted and the timing is adjusted before putting a lot of effort into the carbs. If the previously mentioned items are out of whack, adjusting the carbs won't make up for it. Pick up a factory service manual when you get a chance, it has a wealth of information on all of the mechanical aspects of the Z. I'd also recommend that you thoroughly inspect the brakes, suspension, steering & tires before spending much time on the road with your Z. Repair/replace any needed items, especially in the brake system. The first concern with an older vehicle should be to make sure it is safe to drive. You never know what kind of maintenance the vehicle received from previous owners, and you shouldn't take any chances. Plus, a well handling Z with solid brakes, steering & suspension is a joy to drive! As far as the automatic vs. manual question, I'd also recommend driving the car a while with the automatic before deciding on which way you want to go. Some of the old enthusiast articles (Road & Track, Car & Driver, I can't remember which, exactly...) detail the comparison in performance between the manual & automatic equipped cars. By manually shifting the automatic the car had similar 1/4 mile times as with the manual. My Z has the automatic, and when I shift from 1st to 2nd at 6000 rpms it takes off like a rocket!
-
Need some help with my HORN... NO HORN!
ZSaint, I'm glad to hear you solved your horn problem. I don't feel so bad about how much time & effort I spent in diagnosing the horns on my Z, sounds like others have had the same experience.
-
A newbie from Colorado
Hi Eric, that's a sharp looking 280Z you have. I really like that color of blue. Longmont is having a car show this weekend for Cinco de Mayo, I'm planning to take my Z. I took the Z to a small show last Saturday in the King Soopers parking lot near my house. Only 20-25 cars showed up, but there were some nice ones. No other Z cars, though... I've seen the house you mentioned. The Z's in the yard have been there for awhile, perhaps they need a new home???
-
Need some help with my HORN... NO HORN!
Hi ZSaint, did you repaint the firewall? If so, did you remove the steering column before hand? Then you might remove the bolts that mount the steering column to the firewall (from the passenger compartment side) and chase the threads to remove any paint that is in there. I had a similar problem with no horn after I refinished the engine bay in my Z. I checked the fuse, verified continuity in the wiring with a DVM, replaced the horn relay, etc... all to no avail. It turns out that depressing the horn button grounds the low current side of the relay, and the path to ground is through the steering column and the bolts that mount it to the firewall. I learned this the hard way... If memory serves, the horn relay has three contacts: H, S, B. H is the connection to the horns, S is the connection to the horn button and B is the connection to the battery. Here's a quick way to check for a poor ground: remove the horn button pad. You should see a ring with 3 mounting screws, and a screw with a black wire. Get a jumper wire and connect one end to the screw with the black wire and touch the other end of the jumper to a known good ground. If the horns sound, then you most likely have a grounding problem in the horn button path, and cleaning those threads should help.
-
A newbie from Colorado
Hi Eric, welcome to the club! I'm a bit north of you, up in Longmont. Post some pics of your Z when you get a chance.
-
SU Carbs
Glen, the symptoms you describe can be caused by out of balance carbs, where only one carb is actually working at idle speed.
-
Bolt replacement
Another thought would be to clean & refinish the old nuts & bolts. There are several methods you could use: 1. Bead blast them 2. Use a vibratory tumbler to clean them 3. Use a rock tumbler to clean them I noticed that most of the original nuts & bolts on my '73 appeared to be cadmium plated, even the ones that were painted. So, once you've cleaned the nuts & bolts, you could have them re-plated, or simply paint them. I've purchased a few new nuts & bolts from MSA and Victoria British, you could also try a Nissan dealer.
-
Heat Shield - Carb Springs
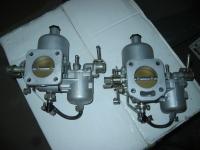
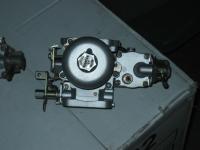
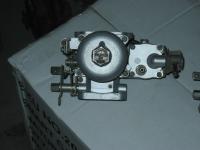
Bill, the '72 round top carbs have a water passage and will work with the '73 intake manifold. So, you should be able to leave the coolant lines connected to the intake. It will provide a quicker warm up in cold weather. Here are a few pics showing the differences between the '72 and earlier round top carbs. In the photo with the two carbs side by side, the one on the right is a '72 carb with a water passage at the bottom of the manifold side. The one on the left is off a '71 and does not have the water passage. The second photo shows the top of the '72 carb, it is also referred to as a 3 screw carb. Look close and you'll notice that there are three screws that mount the dome to the carb body. The last photo shows the top of the '71 carb, also referred to as a 4 screw carb. You'll see four screws that mount the dome to the body. If it turns out that you have the earlier round top carbs then you will need to disconnect the coolant lines to the intake and block them off on the engine side, or replace the intake with a '71 or earlier intake. When I bought my '73 it was setup with '72 round tops and the '73 intake. Keep us posted with your progress!
-
Rock star wannabe
Hey, guitars & cadillacs, why not guitars & 240Z's!!!! Yeah, I dig the Strats. Les Pauls are very cool, too, but I'm partial to that single coil sound...SRV!
-
a little update of my project. but what now?
I have to agree with Enigma. Looks like several (and I mean SEVERAL) thousand bux to have the rusty panels repaired/replaced. If you are handy with a welder, or have a good friend who is, then you might consider forging ahead. Do a search for Mull, I think that is the guy who has been doing a lot of rust repair on his Z. The progress I've seen on his Z is inspiration for anyone planning to take on the rust demon!
-
New Black Metallic paint job finally done! (with pic)
Looking good! I painted my Z in the garage much like you did. The pics showing the plastic sheeting in your garage brings back memories... I found that the actual painting went pretty well and pretty quick. I spent about 80% of the time sanding everything in preparation for the paint, followed by all the wetsanding afterwards. I got a nice, smooth shiny orange car for my efforts!
-
Finally
Be prepared to spend big bux on fixing the rust issues. If you were to purchase the car and have a shop do all the metal replacement, a good estimate would be $3500 for parts & labor. Now, double that number and you have a more realistic estimate. So, you're looking at $7000 to address the rust issues, and you haven't even started on the mechanical systems. Brakes, suspension, steering and new tires will cost you another $2000 or $3000 if you have a shop do the work (add $1000 to $2000 if you want custom rims, let's keep it stock, though...). Now you've got $9,000 to $10,000 in the car. Does the engine run? Are the carbs adjusted and working properly? Is the exhaust system shot? Figure on another $3000 to $4000 to get the engine rebuilt, have the carbs rebuilt, and have the exhaust replaced. Now you've got $12,000 to $14,000 in the car. Oh, and didn't the seller mention the interior needs work? It's gonna cost you about $1000 for a full dash cap, new seat covers, carpet, headliner, console and door panels; another $500 or so if you need to replace the plastic panels...there's another $1,500. So, you're now at $15,500, max. Add 10% for a fudge factor and you will need $17,050 to get the car in good shape. Let's be generous and round it down to $17,000. Wait a minute, when the body work was done, that was only to cut out the rust and weld in/install the new panels. We forgot to paint it... That will be another $500 to $5000, depending on the shop and the quality of the paint job. Let's say you get it done for $2,500, now you've got $19,500 in the car. Well, now that it's looking so good, you can't resist putting 20" rims on it, better add another $3000 to $4000 for the rims & tires. Worst case, you've now spent $23,500. Can it be done for less, sure. It can also cost more. Then again, maybe you can live with the rust, and the car is driveable. In that case, plan on spending $1,000 to $2,000 getting the brakes, suspension & steering replaced/rebuilt. At the absolute minimum you need to insure the car is safe to drive. Don't even think about driving it on the street until you can safely steer and stop the car. Forgive me if this has come off as a rant or anything negative, my intention is to provide a dose of reality. And, if you get this car, I want you to be safe so that you can enjoy it, even if it takes you a while to get all the cosmetic work done.
-
Hood is stuck!!!
Hi Gregg, glad to hear you were able to open the hood on your Z. Before you try closing it again, you may consider removing the hook/spring/pin from the hood and the latch from the car. Verify that both are in proper working order. It may be a good time to clean and lube the moving parts. Next, slowly lower the hood to make sure it will go down all the way without binding. Once you're sure it is on the car straight then reinstall the the latch on the body and loosely mount the hook/spring/pin to the hood. Now slowly lower the hood and verify that the pin is centered on the latch. Re-position the hook/spring/pin on the hood until it looks good, then carefully close the hood all the way. Hopefully this will prevent it from locking up again...
-
Z car parts includes Tokico Spring & Shocks
When I rebuilt the suspension on my 240Z I started at the front. The engine was out for a rebuild at the time, which made the front end rebuild easier. I removed the rotors & hubs, front strut assemblies, transverse links, TC rods, steering rack, tie rods, ball joints and crossmember. All parts were cleaned and refinished using Eastwood's chassis black paint. My Z got new Tokico struts & springs too, and new urethane bushings all around. Once the front suspension was done and reassembled I tackled the rear suspension. I removed the brake drums, rear strut assemblies, transverse links, differential, mounting hardware, etc... Again, everything was cleaned and repainted. I also removed the fuel line & brake hard lines and cleaned & refinished them using Eastwood's Cad System paint which does a fair job of duplicating the cadmium plating used on these parts. Have fun with the work on your Z! Please post pics as the work progresses.
-
Car Valuation...jusut curious
I don't know if this will answer your question, or not, but...I bought my '73 for $300. The rear quarters were rusted through on the wheel arches and both front fenders had some rust behind the wheels. Also, the drivers side door was dented up. There were smaller dents on the car, such as the hood, roof & rear end. No rust in the engine compartment, the battery tray, inner fenders & frame rails were solid. I've done the body work (the rear quarters were done by a shop), repainted the engine compartment and the rest of the car, rebuilt & refinished the suspension & brakes, had the engine rebuilt, had a header & new exhaust system installed, replaced the headliner, carpet & door panels and installed a full dashcap, etc... I've got over $8k invested in the car, and that's with me doing 80% of the work. How much over I'm afraid to know. I can't bring myself to add up all the receipts!
-
rust in gas, bad running now
Is the choke setup and operating properly? With the choke lever pulled all the way back the fuel nozzles (located at the bottom of the carb - follow the rubber hose from the bottom of the float bowl) should be pulled down and out of the bottom of the carbs by about 1/4". Also, the throttle valve should be opened slightly, I'd have to check the FSM for the measurement... but it should at least be opened a crack. You'll have to pull the carbs off to measure & adjust the amount the throttle is opened by the choke.
-
help me spend some money please
I was looking for another 240Z last fall and came across one with a Holley 4bbl setup. It was pretty quick! But, I'm kind of a purist and think that it would be better to get the round top SU's. They are rather simple to set up and tune. The biggest challenge is to synchronize them, but with the right tools or a good ear even that is pretty simple. I'd determine the shape of the engine before purchasing a new carb setup. Have you checked the compression yet? I'd also spend time replacing/repairing the steering/suspension/brakes. Especially the brakes. You want to make sure the car is safe to drive before you get the engine running, because once you do the temptation will be there to take it out for a spin...the maiden voyage is NOT the time to discover the brakes are no good.
-
16 Yr Old and My poor Z! Opinions!!
I'd think that a L26 with triple Webers & a five speed would have plenty of power and be darn quick! I'm a 240Z guy and don't have any experience with fuel injection on the later Z's. But, being a car nut & shade tree mechanic, I'd think you should be fine with the wiring in your car. I don't think you would even need the computer anymore, either. Here are a few things to consider. The oil pressure connector and water temp connector should be the same, so no problem there. If you keep your alternator there will be no changes required for that wiring. Without fuel injectors you won't need the wiring for the injectors anymore. Tape it up and get it out of the way. If you swap your distributor into the new engine that wiring will be the same. The only thing I'm not really sure about is any emission control devices you may currently have. With the triple Weber setup, I'd suspect most of that has been removed from the other engine. So, it should be a matter of taping up any unused wiring to get it out of the way. Someone here has probably done a similar swap, hopefully you'll get better advice from someone who has done this!
-
77-280 Sitting 20 years-now what?
Not engine related, but before you attempt to drive the car, drain, flush & refill the brake fluid, brake lines, calipers & wheel cylinders. Brake fluid absorbs moisture. I've worked on older vehicles where the wheel cylinders were filled with gunk and were rendered inoperable. Best bet would be to remove the calipers & wheel cylinders, clean them and rebuild them with new parts. If they are in bad shape, replace them. Same for the master cylinder. And, replace all the rubber hoses in the brake system. After sitting so long, and with the age of the vehicle, they are most likely getting dried out & cracked, only a matter of time before one splits. I'd also recommend inspecting the suspension. Replace the struts, they are probably shot by now. Make sure all bushings are in good shape, replace any that have deteriorated or are missing. Check the ball joints & tie rod ends, replace as necessary. The other replies have been good regarding what to do to get the engine running. Follow the recommendations you've been given and you should have the engine running in no time. But remember, you don't want to take any chances driving an unsafe vehicle. If you focus on the engine and get it running it is easy to get a bit excited and want to jump in the car to go for a spin! But, hold off a bit, go through EVERYTHING on the car first, make it SAFE to drive, and then you'll have a LONG time to enjoy it! Sounds like you found a great project Z for a great price. Please post some pics when you get a chance and keep us posted with your progress! Welcome to the club!
-
VERY INTERESTING THREAD ABOUT PAINTING WITH A ROLLER.-Hybridz
I predict that your beer fridge will now get more speeding tickets...
-
Now We have another issue
A couple of things to check... Did you bleed the air out of the clutch line, clutch master cylinder & slave cylinder? Was there a spacer between the ring gear (for the automatic tranny) & crank? If so, did you put it back when you put on the flywheel (it might throw off the geometry for the clutch lever)? I don't think the spacer is needed for a manual transmission setup.
-
Missing Tow Hook
The missing bracket supports the bottom of the grille and the lower valance panel. Here are a couple of pics showing the bracket, and the tow/tie down hooks. The one on the left is definitely "hook" shaped, whereas the one on the right is more of a bracket with a hole in it. I've seen a few Z's with the hooks mounted to the rear bumper brackets. I think these were often removed by the dealer, from what I've read. http://www.classiczcars.com/photopost/showphoto.php?photo=16250 http://www.classiczcars.com/photopost/showphoto.php?photo=16207
-
240 Z IN State of Kuwait
Wow, what a fantastic bunch of Z cars! Thank you for sharing those photos! Please post more! I really like the looks of the red 280Z in post #8. Those rims & tires look great on that car!
-
One thing after another.
Have you checked the alternator to make sure it is good? Sounds like it might have failed. Or, the belt could be loose.


