kenz240z
Free Member
-
Joined
-
Last visited
Everything posted by kenz240z
-
 Hi Zthing, thanks for the info. The 240Z I looked at had the same intake as shown in the picture you posted. Thanks for the link on Bob Sharp, I'm still learning about the proud racing history of the Z car.
 -
I went to look at a '72 240Z for sale yesterday. Body & interior are in rough shape. The engine is not stock, apparently came out of a '73. Instead of the flat top carbs, it has a 4bbl intake with a Holley carb. The 4bbl intake has "Bob Sharp Racing" embossed in raised letters. Does anyone know the value of an intake like this? The car originally came with an automatic transmission, but currently has a 5 speed. I drove the car, and it is fast! But, the rear end is making a lot of noise, supposedly the differential was recently replaced. The suspension and brakes on the car would need to be rebuilt. The fenders, rocker panels, rear wheel arches & dog legs all showed evidence of rust repair. I'm wondering if it might make a good donor engine/transmission if a solid body/rolling chassis could be found. The seller is asking $2000 OBO.
-
Rick, To be injured on the way to answer a pesky soliciation call...there must be a bit of cosmic humor somewhere here, but I haven't been able to put my finger on it yet. Perhaps it is a message to give up golf. I sure hope you heal up soon, every day you're unable to take Precious for a spin must be causing you anguish! Like me, I'm sure you're one of the few sane people amidst a crowd of madmen, so I hope your mental state isn't compromised by the situation!!!!
-
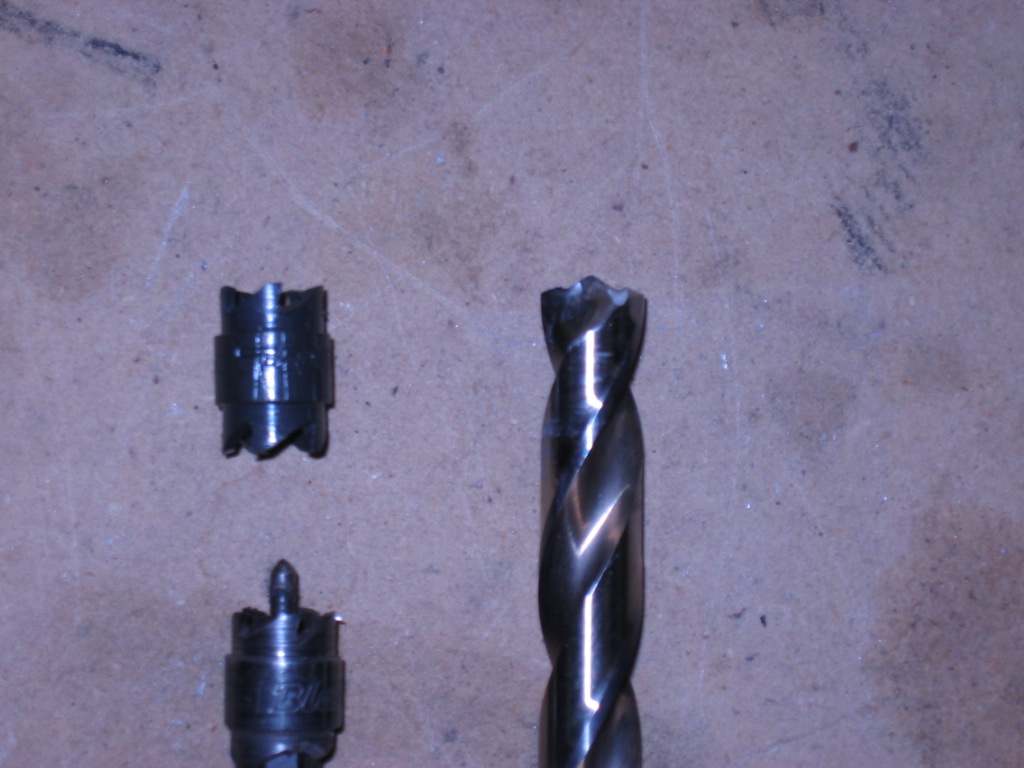
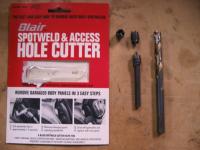
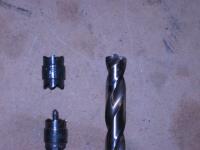
Hi Garth, I've used a couple of different spot weld cutters, both with good results. One type is basically a 3/8" drill bit with a different cutting face. Hopefully you can see what I mean in the pic on the right. The other one is like a tiny hole saw, the one I have is made by Blair. The drill bit tool leaves a dimple, and seems to have more risk of drilling completely through both layers of metal, but it works pretty fast. The Blair tool can cut a spot weld out without any sign, except for the circle of metal left from the top layer. These spotweld remnants then need to be removed with a grinder. Less chance of cutting through both layers, unless you get in a hurry. Seems to take a bit longer to cut out a spot weld, though. Extra cutting tips are a must, they get dull pretty quick, even with constant application of oil. I think the main thing when using either one is to take your time and stop the drill often to check your progress. I didn't have to cut any panels off my Z, but I've used both of these tools to remove plenty of panels from other vehicles. I got the Blair tool after seeing a buddy use one to cut the floor panel out of a '62 Chevy. Needless to say, there were a lot of spot welds, and the sheetmetal on an old Chevy is a lot thicker than the metal used on the Z cars! :laugh: In the case of a rusty battery tray area, there might not be any benefit in cutting out the spot welds if the underlying metal is rusted through and the tray is also too rusty to be salvaged. It might be better to cut the whole assembly out with an air saw or nibbler. Cut the same area out of a solid donor, plus a little extra around the edges, then it can be trimmed & fitted before welding it in. I have a hunch that the area under the battery tray didn't get the best paint coverage from the factory, and the combination of battery acid, water and time allow rust to eat through!:mad:
-
Wow, looks like several of us must have been typing a response at the same time!
-
Hi Ed, Here's what I found in the latest MSA catalog: 10-5002 Intake valve, 75-78, 79-80 $11.13 10-5022 Exhaust valve, 74-78, 79-80 $17.70 None of the descriptions include the head number, only the year ranges. Let me know if you need any other info. Kenny P.
-
Hi Chris, It sounds to me like the throttle for the rear carb is closed. Are you measuring vacuum by placing a hand over the mouth of each carb? The following is from the '72 engine service manual: Starting Mechanism By pulling the choke knob, the starting lever is moved, and the nozzle is drawn down by a link mechanism. As a result, the clearance between the nozzle and the jet needle is increased, and an increased amount of fuel required for starting is fed into the system. Moreover, the throttle valve is automatically set to proper opening for starting (approximately 6 degrees) by the connecting linkage. The instruction sheet that came with a rebuild kit has this: Cold Starting Device Adjustment 1. Throttle valve held completely closed 2. Choke lever held in the full choke position 3. Measure distance between throttle valve and bore of carburetor .025" (.63 mm) 4. To adjust bend connecting rod The connecting rod is the one between the throttle valve lever and the choke lever. It sounds like you've already adjusted the operation of the choke lever itself, and that it is pulling the nozzles down. But, have you also checked to see that when the choke is applied that the throttle valve is also cracked open? Here's how you might check: without the engine running, remove the air cleaner. Pull the choke lever all the way back. Raise the suction piston of each carb and verify the throttle is cracked open. You'll probably need a flashlight to see this. If not, you'll have to remove the carbs, but then you would need to remove the carbs anyway to properly make the measurement & adjustment mentioned above. Hope this helps!
-
The engine bay is pretty easy to refinish. I just jumped right in there, scraped off all the large collections of gunk, then spent a couple of weeks cleaning the nooks & crannies. Once clean, I spent another couple of weeks sanding to prepare for primer & paint. I was lucky, no rust holes under the battery tray or in the frame rails. There were a few areas that had a bit of surface rust. I treated those spots with Rust Mort, followed by Eastwood's rust encapsulator primer paint. It's pretty much the same thing as POR-15. Sounds like you've got a bit of work ahead of you, but I'm sure the results will be worth it!
-
Ed, that is truly a bummer.
-
Depends on what kind of paint you plan to spray. The newer acrylic urethanes contain isanocyanates, a form of cianide. So, they can be dangerous to work with and a typical dual-canister type of half mask won't provide sufficient protection. For these paints you need a fresh-air type hood & mask. Check www.eastwood.com for these types of respirators.
-
I've got a key like the middle one pictured for my '73.
-
I've been lucky, so far my Z has not been a target. It is always garaged at home, and I don't drive it out all that often. But I've had a few problems in the past with other vehicles. Came out of a local tavern, one I frequented a bit in my younger days, to find that someone had backed into the front of the '91 Ford Probe I drove at the time and left a nice dent and a broken turn signal lens. I found someone's load of chew spat upon my '91 Cadillac Allante which was parked at a meter on the street downtown. The '95 Ford F150 was egged once, while parked out front of my house. Most recently, someone threw a rock through both side windows of my work vehicle, a '04 Trailblazer, which was parked out front of the house. I have a Fujitsu computer mounted on a stand in the vehicle, but it wasn't taken. I have several cell phones mounted in the vehicle too, and none of them was taken either.
-
It does seem kind of pointless for the management company to issue letters based on CC&R violations if nothing is ever done about it. The HOA for our neighborhood has the authority to impose fines and take legal action if violations aren't remedied in a timely manner. As in Gregg's situation, the management company for our HOA has a representative make periodic drive by inspections, and letters are issued for all observed violations, from peeling paint, weeds, underwatered lawns, overgrown lawns, unlicensed vehicles, etc... This is on top of local city ordinances, one of which prohibits vehicles from being parked in the same spot on the street for more than 48 hours, and another which prohibits vehicles parked on the street from being within 10 feet of a driveway. My wife and I are going to buy a house on a couple of acres outside of town, as soon as we can find one we can afford!
-
From the 1972 FSM: "Manifold heat control thermostat Manifold thermostat is installed on the 1972 models. This device operates in the following manner; that is, the engine is quickly warmed up and then the coolant in the intake manifold and carburetor is kept in constant temperature at various vehicle speeds. This thermostat shuts down when coolant temperature is above 150 degrees F. Then the flow of coolant is stopped in the intake manifold line." "Temperature control of SU-type carburetor by engine coolant On the SU-type carburetor, the flow rate of fuel varies with a change in temperature of gasoline which is largely affected by viscosity variations. The carburetor is heated by engine coolant. This design not only keeps a nearly constant flow rate regardless of ambient temperature variations, but also contributes much to improved atomization into the air intake system. A small-sized thermostat was employed to control the flow of coolant to prevent deterioration under hot weather." As Arne mentioned, if the carbs don't have the coolant passage, then the coolant won't flow through the intake manifold. The FSM shows the coolant flow from the thermostat housing into the intake manifold and into the front carb, back into the manifold and into the second carb, back into the manifold and through the thermostat, then back into the coolant pipe & hoses that route to water inlet at the front of the engine on the right side. So, with the 4 screw carbs, the coolant flow would be blocked at the front carb.
-
That is one sharp looking steering wheel, it really looks nice in your Z!
-
Hi Pete, welcome to the club. Check out this site for info and pictures on where to look for rust: http://www.geocities.com/gramage2000/the_rust_file.htm There are lots of engine/transmission choices, L24, L28, fuel injection, turbo charger, small block Chevy, small block Ford, etc... For V8 engine swap info you might check hybridz.com. One thing to consider is the space required for working on the car. As long as you've got a garage space available, you should be set. Keep us posted if you get the car!
-
Yipes! Sorry to see the damage to your ride! It will take a lot of panel beating to straighten out, but looks doable. Hopefully you can find an old school body man who can actually pound that dent out.
-
It's too late for me, but fortunately I survived. Bought my Z for $300, and the WIAI and IMAW bug hit hard. At least I'm done now (mostly!). All it took was time & money, lotsa money! I've kept all the receipts, but I am afraid to add everything up. Might put me in a coma or something due to shock...
-
Hi Jayco, welcome to the club. Good luck in your search, keep us posted when you find your Z!
-
Here's a link discussing the important points to consider when choosing a motor oil. Synthetics, and their benefits, are also discussed. http://www.atis.net/oil_faq.html
-
I love the look of the taillights & rear finisher! Mom had a B210 in the early '70's when I was a kid. It was pretty tame...the 140Z looks like a beast!
-
Hard to tell from the photos, because the wrecked Z is pretty smashed up, but it sure looks like a ZX to me. The hood vents, squared edge on the fender, and front turn signal lens all look like a ZX... I like the tutone paint on the 260Z 2+2, gives it a nice, custom look. Both of the 240's look awesome, too! Good luck with your search, I hope you find your Dad's old car!
-
Another thought... You could use a zinc chromate weld through primer. It is made to be sprayed on the backside of panels, fenders, etc, that aren't going to be topcoated. I've used Ditzler DPE 1538 on other vehicles. It's been awhile, though, and a product like POR-15 is probably better to use, especially if you can't remove all of the rust.
-
Here's a twist on the same theme, scroll down about 1/3 of the way down the page: http://www.geocities.com/gramage2000/links.htm This site also has some good info on where rust likes to hide on a Z.
-
Well, if you want to get to the back side of the mounting bracket, I'd recommend using a spot-weld cutter (either the specialized drill bit, or the tiny hole-saw type) to cut the spotwelds out. Then the mounting bracket can be removed intact. With either tool, only cut through the first layer of metal, be careful not to cut a hole all the way through. Use a grinder to remove any remnants of the spot welds from the floor of the car. Once the rust issue is addressed, the mounting bracket can be welded back in place. Simply weld in the holes that were left by cutting out the spot welds. No one will ever no, except you and your hairdresser!!!