


kenz240z
Free Member
-
Joined
-
Last visited
Everything posted by kenz240z
-
 Hi Enigma, I'm glad the photos I've posted have inspired you. These Z cars are really pretty simple to work on. With a big floor jack it's easy to take the suspension apart by yourself. And with this being the age of digital photography, it's so easy and convenient to take a few pictures as you work on a project. Please feel free to PM me if you have any questions as you get started with your suspension rebuild.
 -
Thanks, Bart. I put in a lot of nights & weekends to rebuild the suspension on my Z. I had the engine out for a rebuild at the time, made it easier to do the crossmember & steering rack.
-
Hi Enigma, I refinished all the parts when I rebuilt the suspension on my Z, check out my gallery for pics if your interested. I took several before & after pictures as I did the work. It took me about 3 weeks to do the front suspension & steering rack, and about a month to do the rear suspension. I'd say about 85% of the time was spent cleaning parts to prep them for paint.
-
Those seats look fantastic!
-
I disassembled the horns on my '73 and refinished them. Check this link for pics & details. http://www.classiczcars.com/photopost/showgallery.php?cat=500&ppuser=6323 All it took was a little bit of work to remove, disassemble & clean them up, plus a can of satin black paint. All in all, a cheep & easy project!
-
It better be a Z!
-
Welcome to the club! What are your plans for your Z?
-
I installed a set of Tokico blue HP struts and new Tokico springs on my '73. I also installed new Energy Suspension bumpstops. I did not cut the bumpstops before putting them on, and I haven't noticed any problems with my suspension at all. In fact, the car handles & rides better than ever!
-
rbm260z, not sure where you are, but I've seen a few 260Z's in the salvage yards near me in northeast Colorado.
-
If I were going to do this, I'd use a spot weld cutter. It is kind of like a miniature hole saw. To use it, you have to locate the center of the spot weld. Then use a center punch to make a dimple, then cut out the spot weld. Once all of them are cut out the skirt will come right off. I'm not sure if replacements are available, you might have to find one in a salvage yard. If you find a suitable donor car in the salvage yard, use the spot weld cutter to remove the skirt. If you use the spot weld cutter with a cordless drill, plan on having several spare, charged batteries. I think Eastwood (www.eastwood.com) carries the spot weld cutters. I bought mine at a local parts house.
-
Hmm, you said you added a little oil to the cylinders, re-tested compression, and got the same readings... To me that would indicate valve trouble, either worn valve guides or bad valve stem seals. If the rings are going bad, adding oil will usually raise the compression.
-
Please, don't sell it! You'll end up kicking yourself later on!
-
These are both sharp looking Z cars. I have to admit I like the orange one better, I guess I'm partial to the color...mine's orange, too! These cars are on opposite ends of the spectrum: the first one appears to be a highly modified racer, the second appears to be mostly stock. I can't help but admire a nice looking Z, no matter how it is "dressed." Well, there was one Ive seen that didn't exactly tickle my fancy, it was built like a monster truck...but it's still a Z!
-
Have you tried MSA (zcarparts.com)?
-
Hi Denz, nice looking Z! Looks like it's in great shape. Any plans for the car?
-
Have you adjusted the valves? Checked the timing? What shape are the distributor cap, plug wires and spark plugs in?
-
Those rims are gonna look sweet on your Z!
-
Welcome to the club! I looked at the pics of your car. It looks great! Neat to see the progress as you worked on it!
-
Hmm, not sure what is going on there. I'd suggest getting the proper wiring diagram for a '75 and checking for shorts or opens with a good DVM. Have you had any of the altnernators tested at an autoparts store? Was the old voltage regulator burned out? "Driving down highway 40 in my beat up pickup truck!" - Brak. At least I think that's how it goes... Oh, and "I like beans!" - Brak
-
If you're planning to change the bearings & re-ring the pistons, you might as well rebuild the engine. If you're not concerned with matching numbers you could drop in another engine. I think Jasper Engines has rebuilt engines for a reasonable price.
-
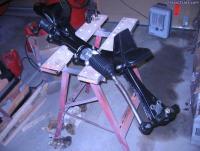
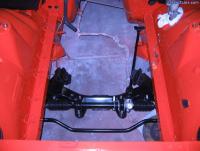
:knockedou Here are a couple of pics from my gallery, showing the steering rack assembled to the cross member with new urethane bushings. This is on my '73, should be the same as your '71. :rambo:
-
Nice car, Datstan! Welcome to the club.
-
All you need to do is remove all of the old carpet pieces, and lay in the new carpet pieces. I bought a new carpet set made by ACC. All the edges were bound, similar to the originals. All the sections had padding already attached to the bottom. My '73 had snaps on both front carpet pieces that fasten the carpet to the firewall. I was able to remove them from the old carpet and install them on the new pieces. The original front carpet pieces also had slots on the edge that fits under the seat. These slots fit over a pair of tabs welded to the floorpan and kept the carpet from moving around or bunching up under your feet. The new front pieces did not have these slots, but I've never had any trouble with them.
-
Welcome to the club! Prepare to have fun, working on a Z can be rewarding! Here's how to post pictures: Select "Go Advanced" Scroll down to the "Additional Options" section Select "Manage Attachements" Follow the instructions there and you'll be able to upload pictures with your post.
-
Hi Matt, Well, you'll be able to tell whether you can get by with only rebuilding the head once you remove it from the engine. For instance, when I pulled the head off my engine I discovered that there was pitting in the head itself that caused the problem. All of the pistons looked good, there was hardly any lip at the top of the cylinders, and you could still make out the cross hatching on the cylinder walls. I was tempted to only get the head redone, but I wanted to pull the engine out any way to rebuild the front suspension and refinish the engine bay. So, I figured while it is out, I might as well have the whole engine rebuilt. I spent around $1900 to get my engine rebuilt. I think I've heard of folks getting rebuilt engines for half that, if your not concerned with matching numbers. Hopefully your engine block/cylinders/pistons are in good shape!

