Sean240Z
Free Member
-
Joined
-
Last visited
Everything posted by Sean240Z
-
 Wow! Just wow. I had seen this before on CarDomain and was wondering what had happened to it. Thanks for the link!
 -
Saturday for me.
-
Looks like I have a green light from the boss. I'll be there in my green 240z. It's about a 2hr drive for me from McLean, VA so I should arrive between 0800-0900hrs.
-
I ran into a similar issue where I thought number 3 cylinder was running rich (when compared to cylinders 1&2). Turns out I had a manifold gasket leak at the intake manifold for cylinders 1&2 which leaned up the mixture for those cylinders. Since tightening up the manifold nuts, I now have much more consistent plugs across the first three cylinders. The intake runners for cylinders 1&2 and 5&6 are "siamesed" so only way I could see this being your issue would be if the rearmost intake manifold bolt was loose or perhaps you had a manifold gasket leak for the #6 intake runner. The remaining plugs do look rich. Suggest you clean the plugs and reinstall. Then check that the chokes are fully off (i.e. push up on the bottom of the carb needle housing to ensure that they are fully closed). The P.O. for my Z had installed bike cables instead of solid choke cables and the chokes would not fully close without assistence. If chokes were fully closed, suggest leaning each carb by 1/4 turn of mixture nut. That said, you really can't get an accurate reading on the plugs without driving around for a period of time, with the engine under load.
-
Z is ready. I'll be driving down tomorrow morning from McLean.
-
Just putting my Z back together. I hope to have it ready for the show to make the drive down from McLean.
-
Desmond - In my case, I also thought I had a problem in the last two cylinders nearest the firewall. The hole in my header was at the very rear of the engine compartment and I could hear it distinctly on both sides of the car. I guess the sound bounced off the tranmission tunnel to the passenger side. Good luck!
-
Congratulations! I look fwd to seeing it on the road!
-
I had a thunking noise in my 240Z at one point, whenever I got on or off the throttle (though I would not describe it a s a ratcheting sound). Turns out the rubber on the diff mount was completely torn free from the metal portion of the mount. Replacing the mount solved my problem. Not sure if that is the problem you have though.
-
I was chasing a similar noise over the last month, trying to get my 240Z on the road (L28, SUs, Schneider cam with springs and lash pads, MSA 6-1 header). I inspected the valve train (including camshaft, rocker arms, lash pads, springs) and adjusted valve lash. Everything looked good. Started the engine and the noise was still there. I next checked all the manifold nuts and they all seemed tight. I inspected the intake and header (MSA 6-1 coated) and could not notice any obvious leaks. I installed the header in ~2005 and noticed some discolouration of the coating where two pipes come close together. Though when I held my hand nearby, I could not feel or see any obvious leaks. Finally, I removed the header to properly inspect it. I clamped a piece of wood over the manifold section of the header, covered it in soapy water and inserted a funnel and my wife's hairdryer in the exhaust end. Bubbles!! Turns out that the header has a leak where the 6 pipes come together, on the inner side, so the hole was not visable as the pipes are very close together. New MSA 6-1 header will be here Thursday, so now I'm cleaning up and painting the driver side of the engine compartment and polising my intake. Not sure if you have a manifold or header, but take a really close look for a leak at the manifold (could be warped) or a hole or crack in one of the pipes. If I had not fould the leak in my header, the next step would have been to pull the head, thinking that I must have damaged a valve. NOTE: I've had my Z since '91 and replaced a warped exhaust manifold with an uncoated header. I made the mistake of wrapping the header and it only lasted four years before it developed a hole under the wrap (held moisture against the pipes and increased the heat, increasing rate of deterioration). This last coated header has done well, lasting nine years. As an aside, now that I have the manifolds off, I can really see gunk / carbon build-up on the valves. Once it's back together, I plan to complete a careful water mist decarbonization through the SUs (been researching this since I noticed the state of my valves). Interestingly the rear valves are cleaner than the front valves. I have a 280Z vented hood and suspect that water dripping through the driver's side vent, has been dripping into the K&N filter on the rear SU and helped to decarbonize those valves. Good luck.
-
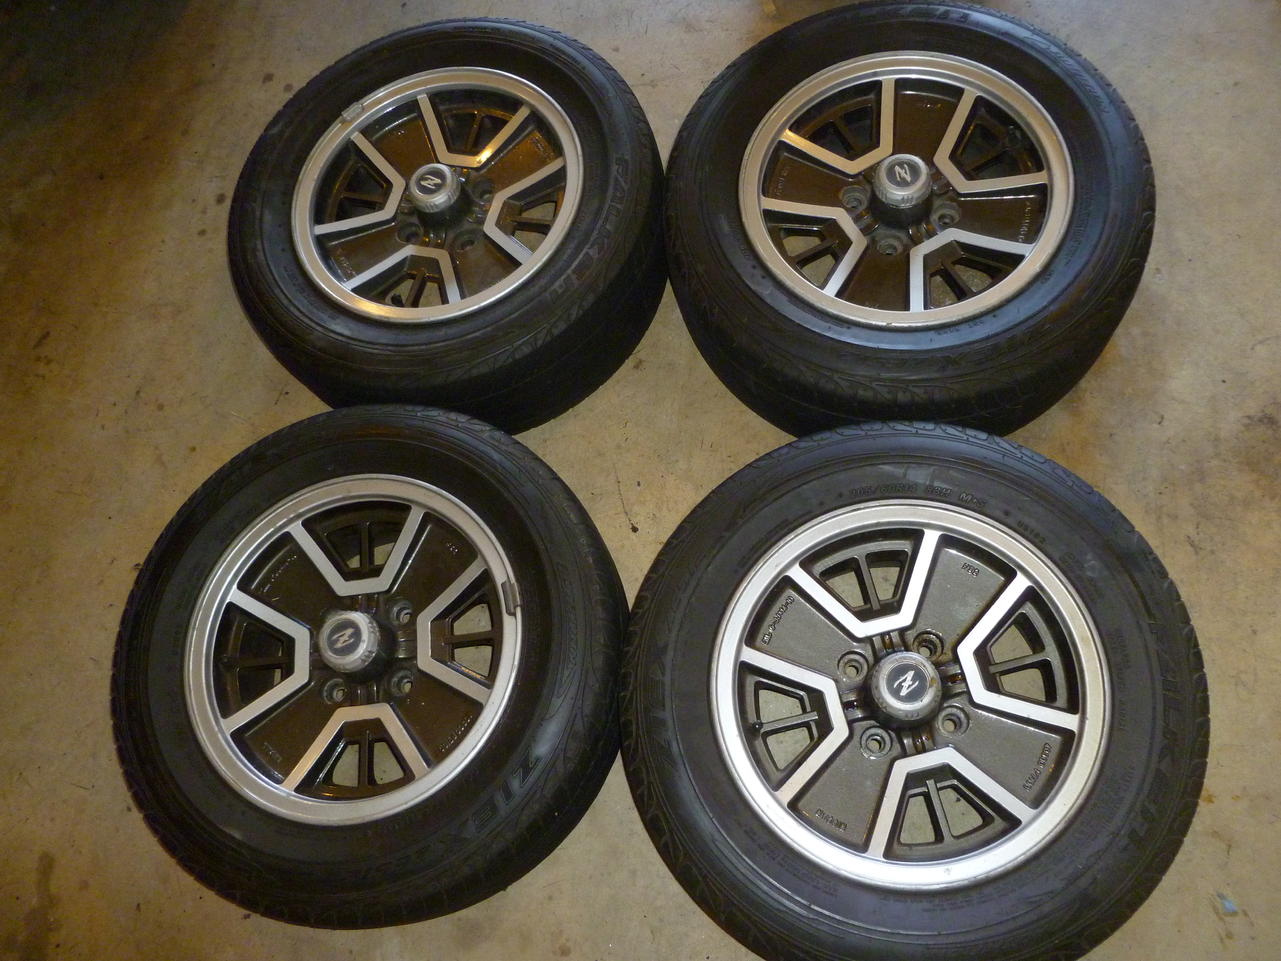
You reminded me that I have a set of four custom painted iron cross wheels in my garage that I'm interested in selling ($160). Wheels have had some touch-ups but are in decent shape. Two tires have a bit of tread left, the other two are bald. If anyone is interested, PM me. Will post in classifieds later this week.

-
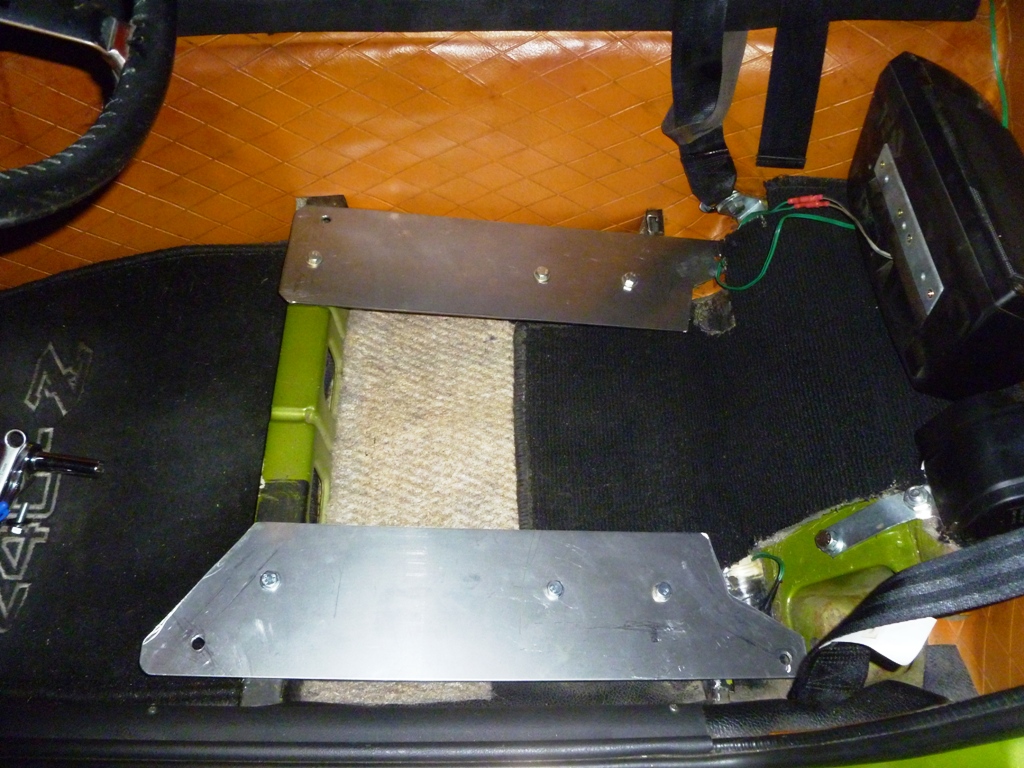
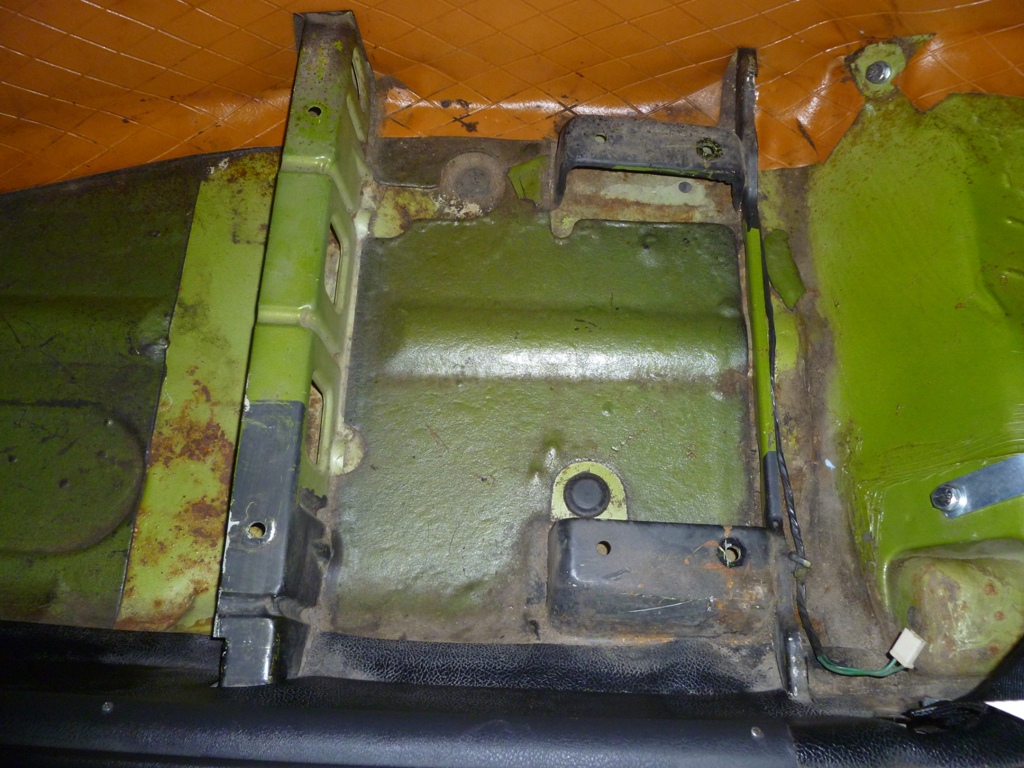
Dave, I'm an engineer and I've studied crash survival investigation and ensuring integrity during an accident was of prime concern when designing my seat installation. I'm confident that my S2000 seats are more securely mounted than the original 240z seats. In my case, the adapter plates are made from 11 gauge steel (~1/8" thick) plates, bolted to the vehicle seat mounts in three locations per side where the stock seats are only bolted in two. The 11 gauge steel is much thicker than the Z's seat mounts. Additionally, the inboard fwd seat bolt is actually bolted through the fwd vehicle seat mount cross bar. Though the S2000 seats include a seat belt receiver on the inboard sides of the seats, I removed these. I decided to use the original vehicle seat belt mount locations as I know that the vehicle structure there is designed to withstand the seat belt crash loads. I wasn't comfortable that the vehicle seat mounts would withstand crash loads if they also had to withstand seat belt loads. During any aftermarket seat install, I would definitely not recommend moving the seat belt mounting locations to the seats.


-
I decided on seats from the Honda S2000 and I love them. My install details are here: http://www.classiczcars.com/forums/interior-s30/48744-s2000-seat-swap-240z.html
-
Steve, The information you provided on your install was very helpful! When I bought my Z 23yrs ago, it had a half-dash cover installed that had since cracked (the previous owner had glued the entire top of the dash, so the cover could not expand). I just completed the install of the full face dash cover (from MSA) on my late '73 240z and although not perfect, I'm very satisfied with the results and thought I would post a few notes: - I removed the defroster panel at the base of the windshield, the upper clamshell of the steering column and opened the glove box door to install the full dash cover; - on my late '73, the dash cover did not fit well on the driver side air vent (i.e. lower left side of dash). The air vent on the dash was ~1/4" outboard of the corresponding opening in the dash cover (even with heat, I could not make the opening work); consequently, I had to trim the back of the air vent opening on the dash cover to allow the cover to sit flush against the dash. As a result, in the lower right quadrant of the air vent opening (i.e. ~4 to 7 o'clock position) I can see ~1/4" "fingernail" of the dash. This may be a late '73 240z peculiarity or could just be my car. Given the location, most people will not notice, but I know it's there; - I needed to trim the lower portion of the hazard knob hole in the dash cover to make it fit (on a '73, push in and 1/4 turn the hazard knob to remove); - the glove box door opening in the cover required some heat to make the cover fit tight against the sides (be very careful with the heat to avoid warping and shrinkage!). Even with the additional molding of the dash cover, I ended up using an orbital sander to sand down the outboard edge of the glove box door ~1/16 to an 1/8" to make it fit properly; it now opens easily. Note that the glove box door is wider on the back side than the front (i.e. a wedge shape), so the material that was removed from the door is not visible when the door is closed. After I got the door to fit, I rubbed down with fine steel wool and then buffed the area of the glove box door that I had sanded away, so you don't notice the removed material when the door is open (as an aside, until working in the glove box area, I did not realize that my glove box door was already warped/twisted (i.e. the upper right corner of the door sticks out ~1/8"); - my dash was in really bad shape and I had recently installed a new sound system (http://www.classiczcars.com/forums/interior-s30/50330-240z-audio-system-install.html), and needed to find a location to install the tweeters. After much deliberation, I cut holes in the new dash cover and cut corresponding holes in the top of the dash for the tweeters to flush mount and a grove in the dash to the outboard sides for the speaker wires. I'm very happy with the results (my dash was in such poor shape that this was not too difficult a decision to make). The tweeters were actually a big help in holding the cover in position; - I found that the defroster panel at the base of the windshield really did a great job of making the cover fit properly. - I used a Dremel with grinding bit/wheel to carefully trim/grind the dash cover; - To brace the cover for glueing, I used the following bracing: - two tweeters on the top outside corners of the dash; - defroster panel, fully screwed in; - pieces of foam between the doors and dash ends; - four braces on the bottom edges of the dash, braced against the seat or floor: - one left of the steering wheel; - one on the lower left edge of the centre stack; - one on the contoured surface between the centre stack and the glove box; and - one under the passenger air vent. - I worked on this installation over a couple of weeks off and on. I installed, braced, removed, trimmed, molded and reinstalled at least a dozen times to get the cover to fit as good as I could before I glued in place. Though not perfect, I'm very happy with the results and will try to post some pics tonight.
-
Mike - Thank you so much for the picture you provided above. I was missing the 0.7 pitch, 4mm screw and could not figure out the size. Your pic was just what I was looking for!!! Cheers,
-
Wrt the choke, make sure that when the choke lever is in the "off" position, that the nozzles on the undersides of the carburetors are fully returning (i.e all the way up). When I first owned my Z, I had an issue with one of my carbs where I'd push the choke fully fwd but the nozzle would not return to the fully up position (a combination of grime on the underside of the carb, an incorrect choke cable and a stiff fuel hose from the carb bowl to the nozzle).
-
Chris - Very nice 240Z and welcome to the forum! Are you sure it's exhaust and not fuel vapors you are smelling? If it could be fuel you are smelling, check the fuel tank vent lines, especially the vent line that connects to the fuel tank to the top rear driver's side. Mine was so perished that with a full tank, fuel would spill out under acceleration and the fuel smell was really strong.
-
I'm really not a fan of wrapping exhaust pipes as it holds moisture against the pipe, increases the heat of the pipe itself and increases the rate of deterioration of the pipe. To decrease transmission tunnel heat I installed Thermo-Tec heatshield on my exhaust system. (http://www.classiczcars.com/forums/exhaust-s30/48907-reducing-cabin-transmission-tunnel-temperature-thermo-tec-heat-shield-exhaust.html). The heat shield works extremely well, significantly decreasing transmission tunnel temps.
-
I have a '73 240z with SUs and the MSA Ceramic coated header (circa 2006). Obviously not your setup, but I still needed to include the heatshield and add a heatshieled extension under the rear SU to avoid vapour lock. My $0.02.
-
I haven't yet heard of the Spring Sale; however, in the past I've found that the Club Discount is usually equal to or saves more money than the actual "Sale" items (depends on the sale and discount on the particular item). If you're not aware, you can state in the comments at the bottom of your order that you are a member of ClassicZCars.com and include your Member ID that is under your avatar. I believe that will give you a 10% discount.
-
Replacing the vent lines solved the fuel vapour problem in my '73. The worst hose was the driver side rear one in vicinity of item 36 in Capt 0's image above. The hose was so bad, that with a full tank, the fuel would pour out under accel.
-
Shawn - Welcome! This site is a great resource. Good luck finding a car. Cool name BTW, even if you spell it wrong
-
Datsun 1972 Datsun 1972 Pick-up Not a lot of details but looks pretty nice!

-
My '73 has black phillips screws. No felt.
-
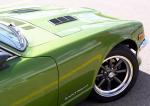
I've always loved the E-Type, but don't think I'd get rid of my 240Z to get one. Attached are some pics of my 240Z next to an E-Type at Katie's Cars and Coffee in Great Falls Virginia from last fall. I've only seen one or two other nice 240Z at Katie's. There are usually a half dozen E-Types...