


pparaska
Free Member
-
Joined
-
Last visited
-
 I'm absolutely sick about this. Tears and everything. John was the most kind, level-headed, thoughtful, smart guy I ever knew. His Z and car posts, his FB posts were always top notch and human. My condolences to his family and friends.
 -
It's just a piece of metal. I'm not going to get bent out of shape about having a brand new one dechromed or the $300 for it. I have more than that much labor in the bumper reinforcement behind the bumper. It's all relative, I guess. If someone near me has a straight but slightly rusty bumper, I'll pay $150 for it, and that way the new owner can get a new one for the cost of the new one ($300) plus shipping, minus the $150.
-
Everyone, thank you for the replies. I didn't see that MSA was now offering these. I realize 300 is alot for this thin piece of metal, but compared to having the body shop straighten a bent one, I bet the new one will end up being cheaper. Besides, the insurance of the guy that rear ended my Z is paying anyway. Too bad the chrome will get ground off to get it painted !
-
I hope I put this in the correct forum. My Z was rear ended and I need a straight rear center section. It will be dechromed, and modified on the ends like the one on the car now. But I need a straight center section (preferably 73) for the body shop to work with. It seems like these aren't available new any longer. Is that true? Anyone have leads on a straight used one for a 73? Thanks,
-
Thanks for all the nice words about my bumper treatment. FYI, here's how I did it: http://www.classiczcars.com/forums/showpost.php?p=116145&postcount=27 Cheers, Pete
-
Well, I not only have the bumper on the rear, but it's reinforced with a 1" black pipe and heavy mounting brackets, like I've posted about before. Back on 9/11/2005, a Summer Sunday no-less, I was rear ended, (by a guy in a 90s Mazda Protege) and here are the results: http://forums.hybridz.org/showthread.php?t=104232 $4500 bucks damage. He was probably going 20mph or less when he hit (sliding on the pavement with tires locked). As you can see, the bumper didn't catch all the impact. His bumper actually slid off mine and went below my bumper and crushed the rear panel and tank. Put a bumper on it! JMO
-
Dudeboy, WOW - thanks for that high praise on my site! I will someday update it with more stuff, but HybridZ is the place to go when trying to get EXTREME Mod info on the Z. Chassis, suspension, brakes, body, as well as drivetrain stuff. THX, Pete
-
 Wheel Company is WRD. Out of business.
 -
 Who's car? Nice job on the air box grabbing cool air!
 -
I seem to recall that the R180 mounting holes are in a bit different position for/aft than the R200, when you do a R180 to R200 conversion. If that's correct, the hole for the stud in the GM trans mount won't line up with the hole in the bracket, once the GM trans mount is bolted to the diff and you try to mount everything.
-
I know this is years old, but I just got the drawing back on my site for the differential front mount that's on my car and thought maybe someone would find this useful (I see someone was looking for it and couldn't find it before): http://alteredz.com/drivelinemods.htm#Differential_Front_Mount Back to your 2005 programming
-
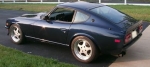
Someone asked me about my Z's rear bumper lately, kind of a related idea. My Z is a 73 (9/72 production date). It had the 73 front bumper that sits out a few inches more than the 70-72 front bumper, with fill plates between the body and bumper. When I bought the Z, it had the overrider stuff front and back as well. Ugly IMO. When I redid my Z, I got a straight but rusty 70 bumper and mounting brackets to replace the 73 bumper and heavy brackets. I realize the 73 setup was probably safer for the bodywork, etc., but I decided to use the older, flimsier parts instead. I ground the chrome/nickel/copper layers off the 70 bumper with a flapper disc on an angle grinder, welded shut the holes for the over-rider and rubber strips, and had the body guy smooth the surface and paint it body color. It hides the bumper pretty well, although I think the Z looks better without a front or rear bumper as long as the indents, holes, etc. are removed to make it look right. For the rear bumper, I decided I really didn't want one at all, but decided that the rear of the car needed some protection from being hit from behind. At the time the rear panel was NLA and not being reproduced. What I did was remove the bumper ends that go around the car, shortened the depth of the Z bumper by 3/4" (from the rear panel to the rear edge of the bumper, and made short, tapered extensions that go to the side edge of the 1/4 panel, dechromed it and filled the over-rider holes, then had it smoothed painted it body color. I made up heavy duty 1/4" steel brackets to replace the stock flimsy Z brackets (while making them shorter by 3/4" off the body) and welded a 1" dia piece of black schedule 40 pipe behind them for reinforcement. All welded together as a stiff, strong structure. So the real bumper is now the brackets and black pipe, and the bumper you see is just a cover now (painted body color). Some people see pictures of my car and don't even see a bumper.
-
Gotcha - I thought you had found a source for new ones. Shucks!
-
I forgot to mention that I ran a new 8 gage wire from the 130 amp GM CSIO alternator on my engine to the battery. Well, actually the Ford-type "contactor" that I have on the firewall near where the battery usually is. My battery is relocated behind the right seat up on the package shelf. A 2 gage wire runs from the Ford contactor to the battery, as well as a 2 gage ground cable from the battery to the engine block near the firewall. I have an 8 gage wire running from that point to the headlights (as well as a bunch of other grounds through other wires). I'm going to have to disagree with the premise that the lights get current from the battery (while the engine is running and the alternator is providing current, anyway). The alternator provides the high current for the loads while the car is running. It also provides more voltage than the battery (or else the battery wouldn't charge). More voltage means brighter headlights. Measure the current in the alternator wire with the headlights off and on (with the engine running above ~1500rpm) and it becomes apparent that the alternator is providing the current for the headlights. If the alternator is turning fast enough to be turned on (an OE 240Z alternator is not turned on at idle, IIRC) then it will provide the lion's share of current for the headlights. The battery serves two purposes - starting the car, and acting as a large capacitor to even out the voltage fluctuations when the alternator isn't turned on (idle for some cars) and when it is and is charging. While the engine is running and the alternator is turning fast enough to produce current (be turned on), the alternator provides the electricity for the vehicles electrical circuits. So my headlights get voltage (more of it) straight from the 130 amp GM CSI alternator than it would from the battery (due to a small voltage drop through the new 8 gage wire from the alternator to the battery. If the alternator is not providing current, then it goes to the battery through the alternator to battery wire. The nice thing about the CSI alternators is that they put out alot of current at idle.
-
I've used a brass brush and electrical contact cleaner for fixing up corroded terminals and connectors. But sometimes the corrosion is in the wire and at the crimp. The only way to really fix that is to remove the corroded portion of the wire and replace it. Many of the .250" QC type crimp connectors will work in the OE Datsun harness connector shells. Dave, where do you get these new 240Z connector shells? I am working on a "separate turn signal and brake" circuit that I'd like to plug in between the rear harness and the short harness at the tail lights. The reason I'm doing the separate brake and turn signal thing is because I have European tail lights and want to make them work the way I think then should. Cheers,
