xray
Free Member
-
Joined
-
Last visited
Everything posted by xray
-
 Acetone, a rag and a big fan were my friends for a couple days while I cleaned off the rest of the undercoating after I was done scraping. Its much easier than the scraping was, and goes fairly quickly (20 min a side or less, IIRC) Steve
 -
What was the original color of the car? This is a good use for POR-15/Rust Bullet/Eastwood type products. I did similar to what you did, then after cleaning/degreasing soaked it in phosphoric acid to etch the metal. After coating with POR-15 I put a coat of primer on it, then Rhino Liner. After that hardened I had it painted while at the body shop. Looks pretty good and should hold up well to road grit. Here's a link to what I did: http://picasaweb.google.com/srcartermd/UndercarriageBodyRestoration Good luck, Steve
-
Zs are hardly the only car to suffer this...Almost every car produced before the late 70s will have rust in the water-dependent regions of the unibody and frame. Poor paint/primer, non-galvanized steel, bad water control engineering (cowl drains, for example) all conspire against these 30+ year old cars... ...Worth it? That's your call. Most of us here would probably say yes, but it's your call. If the rest of it is as good as you say, then do it--especially if ou can DIY the welding. Zedd Findings makes great kits for this repair, and you'll save about $1000 on paying someone else to do it. Ultimately, the process will be most important, as I hope this gives you and your son some quality time together and he learns how to be patient, plan correctly, do a job right and then have some fond memories. Good luck, Steve
-
In all my searching (obviously not exhaustive) here and other automotive forums you're the only person so far that brings up the need for a BR to protect the tachometer. Not that I doubt you,but could you explain that in greater detail for those of us in the dark? Here I am thinking it was only for the coil/points etc. Thanks, Steve
-
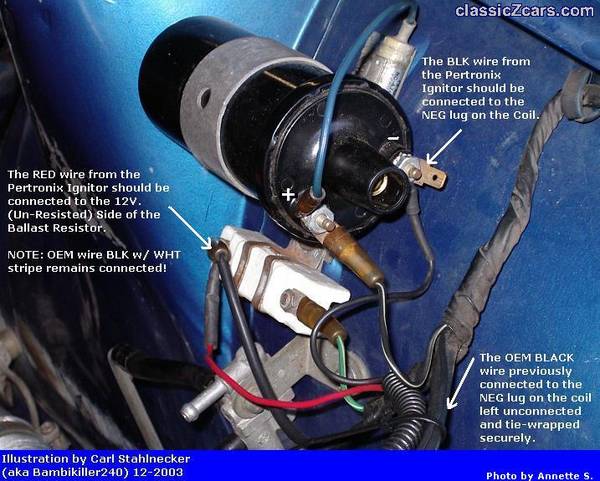
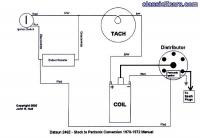
I got some more info from Pertronix, and with a quick confirmatory call to their tech support line, confirmed my notion in the first post. If you're running the 3ohm Flamethrower coil, the red wire goes to the (+) terminal on the coil. Jump the ballast resistor, connecting the B/W and G/W wires. With its internal resistance, the 3ohm FT coil does not generate the needed voltage for optimal spark if the ballast resistor is left in the run circuit. But, if you're using a stock 1.5ohm coil, the picture depicting the red wire from the Pertronix connecting to the 12v+ side of the BR is correct. As stated on the Pertronix website, running a low resistance coil alone can cause premature failure of the Ignitor. Here's the .pdf below: After altering the wiring, I took the Z out for a spin. It revved to redline without a complaint. Punched it and it didn't sputter or lose power. Looks like the vast majority of mechanical gremlins are worked out! ...Now for the little things.:stupid: Steve ignitor12vneg.pdf
-
Bump for more advice....anyone? Thanks, Steve
-
Hi Arne, The muffler fit is still suboptimal. Nothing new since my pics of 11/18. I sorta like the sound...a bit of a grumble with a nice deep tone in the 2000-3500 range. Nothing ricey at all. The exhaust sound resonates in my chest when I check the rear brakes/wheels etc..a nice bonus, IMO. I installed a tip extension that has a small resonator in it which I think has toned down the noise level. My wife likes it--says it's distinctive but not overbearing. As I stated before, the muffler is the weak spot in the system, and I am sure better options are out there. As soon as I get some other issues taken care of, I'll do some more research. I'd love a midpipe resonator with an over/under Ansa-type setup, but everything I've found is for the stock exhaust diameter (admittedly I've not been looking too hard.) Steve
-
Thanks, Nissanman... I thought the tach always got 12V, and the point (pun intended) of the ballast resistor was to protect the points from seeing too much voltage and burning out. Then again, an electrical guru I am not.
-
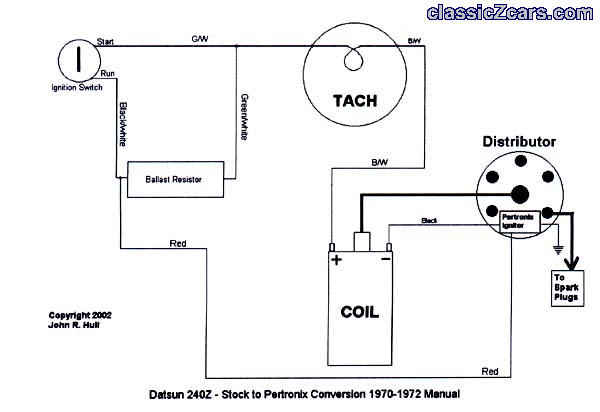
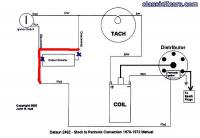
So I'm finishing up some final sorting out of minor issues (major ones have been fixed finally) and was looking over the info from Pertronix against what has been posted here as well as in my files. The Flamethrower coil I have is the recommended one from Pertronix with 3ohms of resistance in the primary coil. The stock 240Z coil is 1.5 ohms. The Pertronix instructions say to bypass the ballast resistor. Fine. But, pics shown here, as well as the diagram from ZHome (and supplied here) show the Pertronix attached (I think) diagrammed in parallel to the BR in the run circuit. Is it safe to assume the author of that diagram was implying use of the stock coil? If so, is my modifed diagram below correct for "bypassing" the ballast resistor when using the 3ohm Flamethrower? An aftermarket seller of Pertronix devices states that using a coil with improper resistance has been known to cause problems in the ignition system, and mirrors info from Pertronix that 6-cyl cars should use a 3-ohm resistance coil: http://www.vintageperformance.com/retrorockets/avoiding_problems.htm My reason for asking is a slight misfire at 4500-5000rpm which I think may be related to a weak spark (since my other problems were derived from the same issue.) Since the Pertronix is designed to see the full 12V in the run and start circuit...If the BR is still in the run circuit with an internally resisted coil, the output would be weaker than intended, correct? Any electrical gurus (ZsonDaBrain, EScanlon others--I'm looking your way!) with advice would be helpful. Pic 1: wiring in the engine bay (courtesy BambiKiller 240--RIP) Pic 2: Pertronix diagram Pic 3: modified diagram, for use with 3ohm Flamethrower Thanks for the help, Steve

-
The fuel supply line is 5/16", and narrows to 1/4" at the fuel filter. So while you can use tubing that is a similar metal, brake lines are 3/16" and won't supply enough volume, or will potentially be at too low a pressure. As for the return and vent lines, they are 3/16", but substantially different in shape. You can bend to fit, but rebending a bent brake line may cause it to kink or bind against other engine bay components. Steve
-
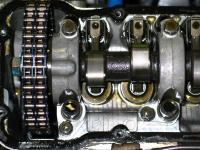
That info looks helpful, but the pics are too small.. Can you upsize or scan them? Thanks. Here's a pic that I think gets you close to what you want...I was having some timing issues earlier as well... Good luck, Steve

-
Wow! I thought Filipe's was an early 1970/71 Z...that's a late 71+ wheel isn't it?
-
Ding! Not trying to accuse, but it looks a bit fishy. Same item, listed twice, won by the same bidder for nearly the same price!? Probably not a deadbeat bidder...Most of us share a similar skepticism about the pricing of this particular item (given its unrestored appearance) and lack of other corroborating evidence that demand for Series I steering wheels is increasing. This is different from the NOS hubcap, taillight, door panel discussions because those were NOS parts in perfect shape, not items in need of "a little sanding and paint." Caveat emptor.
-
http://cgi.ebay.com/ebaymotors/ws/eBayISAPI.dll?ViewItem&item=270179276437 Same seller, $242 for a "restorable" one? Hmmm...
-
snipped, emphasis mine. Uh, I think the thread is about the exhaust improvements in a stock US-spec L24. While no one is invalidating your experience with your L28S, or your generalization that an exhaust improvement can increase power in a stock motor (MKIV Supra immediately comes to mind), more than enough anecdotal evidence (and dynosheets, although I have none at the moment to post) exists to support the motion that a performance exhaust in a stock L24 does little to improve its performance. Steve
-
Joe, http://scca.com/home.aspx Go to the Club Racing page here http://scca.com/contentpage.aspx?content=44 Download the 2008 GCR .pdf file and review it. Find your local division here http://scca.com/divisions.aspx I assume you're So Pac Division... http://scca.com/divisions.aspx?div=sp Check the Membership guy's phone and email...He'd be your first contact, I'd wager ...San Diego Chapter SCCA website.... http://www.sdr-scca.com/ Talk to them about details regarding build ups, speed shops local to you, upcoming DE events etc Good luck! Living vicariously through you and others, Steve
-
As a counterpoint.... Using stripper is good for outside panels but may prove problematic for inteior surfaces, particularly given the nooks and crevices of the floorpans near the seat mounts. If stripper isn't fully removed, it will adversely affect whatever coating you choose to use. You may find it better (at least more fun and less toxic) to get some 3M 4" stripping wheels and attach them to your drill and have a go with that. They are cheap, safe and effective... In re: POR-15...lots of info on the site, so searching will be helpful. Here's the exec summary: Wash the surface with a degreaser. Rinse. Soak the rusty surface with a weak phosphoric acid solution (Ospho, Metal Ready, etc) for as long as you can stand (at least an hour is my general rule). Rinse. Dry the surface (I use a heat gun to make sure all parts were dry). Apply POR-15 according to directions. Because POR-15 isn't designed specifically as a topcoat, apply primer at the correct interval (I used POR's primer to ensure compatibility). Good luck, and have fun getting dirty. Steve
-
/golf clap Well done, Will...two identical replies at the exact same time. Kudos. Randy, I would not try to add "noise control" type materials to the rear wheel wells. The vinyl is cut to be form-fitting, so if you expand the wheel wells by adding Dynamat et al you may not get it to cover the top at the strut tower or other sharper corners/creases as well. I did put some Damplifier from Second Skin Audio inside my rear quarter panels and it provides a substantial noise reduction from wind and road without hampering the exhaust sound.... FWIW, Steve
-
Hi Randy, Put the trans tunnel vinyl on first, then the luggage riser. The rear hem of the trans tunnel is not as "finished" appearing as the luggage riser trim. DEFINITELY remove the old vinyl. I would use some adhesive remover to get rid of the remnant adhesive from the wheel wells before re-applying. Good luck, Steve
-
Dave, ezzzzzz Would you mind posting some pics of the correct (and incorrect, particularly vis a vis the output shaft and the "spider legged") motors so those of us off to hunt the local JY will have a field guide of what works? Thanks, Steve
-
Here's a thought.... Buy a second pair of fender extensions. Then paint them to match (try automotivetouchup.com for possible matching paint and clearcoat). Drill the second set, keep the first without the holes. That's what I did, except I had both sets painted when the whole car got done. Steve
-
Hi Warren, Glad to see things progressing for you...I thought mine was fixed, and was in a similar position to you. After new plugs the car runs quite well, revs to 6k, but they get carbon-fouled in about 5 miles of driving or 20 minutes at idle..:tapemouth. Since I've replaced all the ignition components and the Pertronix and its coil test out fine, I decided to pursue the fuel system some more. Car will idle with the mixture nuts fully screwed in, so there appears still too much fuel getting in the system. I adjusted the float level to 5/8" (instead of 9/16" recommended) and the problem seems to persist. I'm taking off my newly-rebuilt ZTherapy SUs today for a full inspection to be sure the needle is well seated and the choke isn't stuck. If that all checks out, then it's back to the timing issue (again). Or, if I'm too tired of chasing my tail by then, I'll consider tossing in the towel and taking it to a local mechanic. I just hate the idea of giving up though....:mad:
-
I'm surprised no one noticed that until now, but not surprised it was you that brought it up! My car has an aftermarket BMC which apparently necessitated some custom bend tubes to fit the distribution block. I test fitted an old OEM BMC I have and the tube fit appears much better...so it is "completely wrong" but only because the old tubes were the wrong ones.... CT is a good place to get tubing from, but they still require some "onsite" bending/manipulating to fit the car well. No, it's not plug and play, but it looks pretty good to have new stainless lines instead of corroded ones. I bought the tubes listed by CT as matching those from a 6/72 240Z. Should still be a 1972 MY since the VINs listed on your site are in the 9xxxx range. They reference their patterns based on samples sent in from customers, so I had to take it on faith that this was not a set from a very early 1973, since IIRC the dist block is in a different location. To get by until I get around to installing a "correct" BMC I sanded and polished my old tubes, and put three coats of clear on them. Merry Christmas! Steve
-
Gary, The ZTherapy video says the float level should be 0.55" or 9/16"--now they are saying 0.50"? Interesting. If it falls flat like you say, and is better with a higher float level, it sounds likely to be lean. I wonder if the presence of ethanol in the winter mix of gas has anything to do with it, since ethanol is not as potent on a per unit basis---wouldn't there need to be more in the combustion chamber to get the same combustion energy? Warren, et al My issues are mostly solved, as I mentioned above. New BP6ES plugs gapped at 0.036 and it runs well. Timing was a bit overadvanced, since then corrected--the car has a nice smooth idle at 900rpm (my mild cam likes a slightly higher idle apparently). Still fairly lean, though, so I need to Colortune it, readjust the float level as Beandip suggested, and continue mucking around as I have been... Steve
-
Will, Wow. What a daunting list! Certainly looks to fill the void in available parts for Z restorations for sure--best of luck! I certainly hope I get the opportunity to buy some parts for my Z as well... I may have the wrong part in mind, but (in reference to part #14 on the list) when I recently bought my new outside door mirror, it came with a gasket to attach between it and the door--is this the one you're recreating? Thanks and Good luck, Steve