sam280z
Free Member
-
Joined
-
Last visited
Everything posted by sam280z
-
After you have the idle speed and balance set with the fast idle screw backed off, screw the fast idle screw in to raise the engine speed and use the balance screw to balance the rear to the front. You will probably have to move back and forth between the balance and fast idle screws to maintain a good engine speed for the off-idle balance. After they are balanced, back off the fast idle screw. It is just used for tuning.
-
That's an old Clifford Research system.
-
The correct thing to do would have been to stop the car and get it running before descending. Barring that, descending a little at a time allowing the brakes to cool at regular intervals. Using engine braking on a non-running carbureted engine is a good way to fill up the exhaust system with gasoline.
-
Kroil is the best penetrating oil I've used. I find it to be much better than PB Blaster which is much better than anything else. I've also heard of mixing equal parts ATF and acetone, but have not tried this myself. Alternate heat and cold. Tap harder than you think you should on the bolt with a ball peen hammer while you attempt to turn with the vice grips. Sometimes using impacts (hammer to vicegrips) versus steady turning will break it free.
-
Was it possibly over-reved? The head looks pretty clean. How old is the gas? Varnished gas can coat the valve stem and make the valve stick or close too slowly. Tis means that the rocker will lose contact with the cam and can bounce off of valve. The part on the left is a keeper. You will have to compress the valve spring while the valve is held closed to replace it. You can use compressed air supplied through the spark plug hole while that cylinder is on its compression stroke (both valves closed - cam lobes up) to do this. I use a hose from my compression tester. Another option is to put that cylinder's piston about half way up on the compression stroke, feed in a bunch of nylon twine through the spark plug hole (hang onto the end), then turn the engine to use the twine to hold the valve closed. The part n the right is the lash pad. The shiny spot makes it look like it may have been damaged. If it has been nicked there, you will have to replace it with one of equal thickness. Sam
-
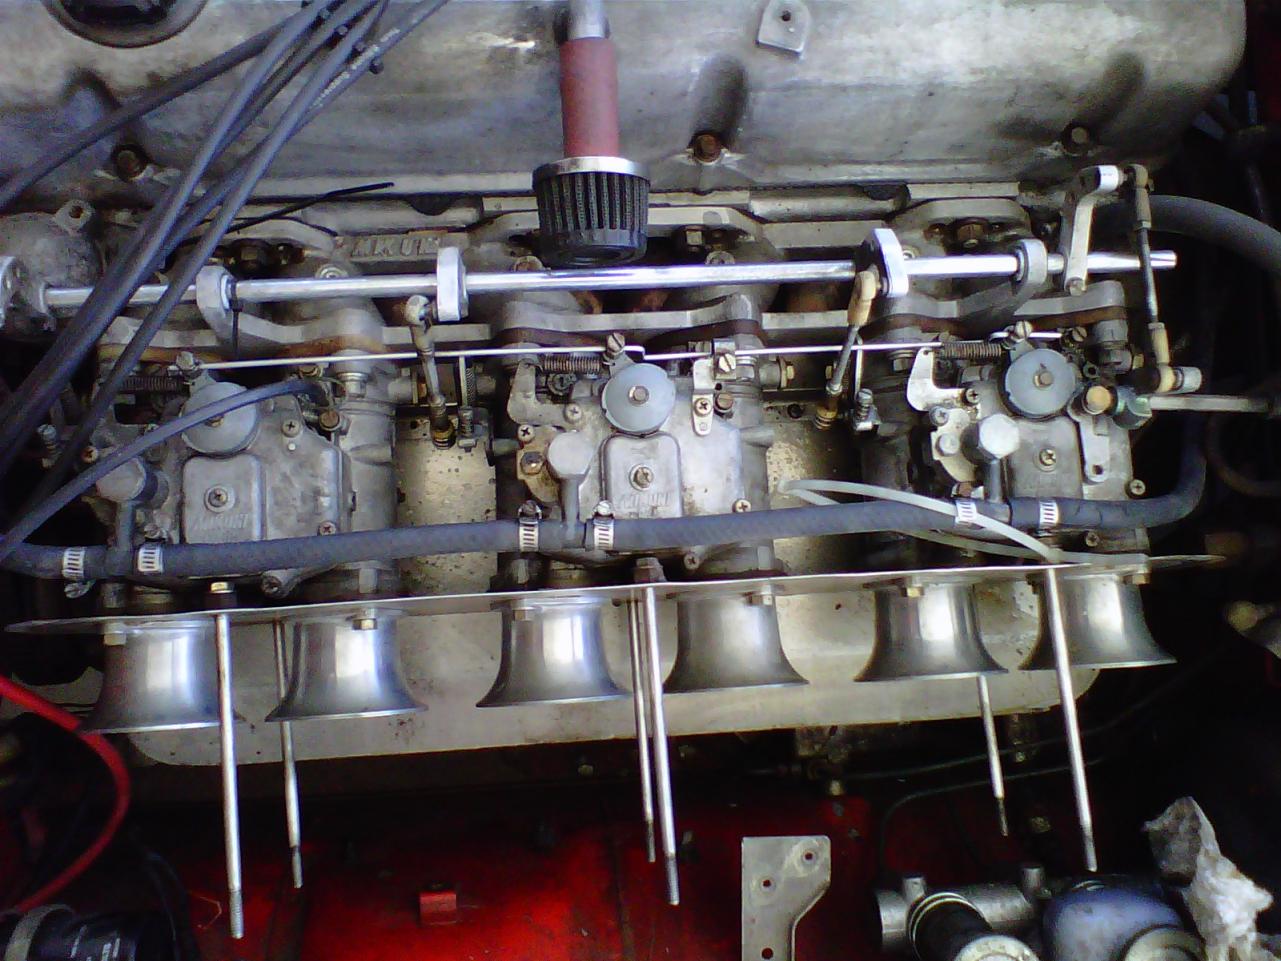
I do not have that setup anymore. The picture is of the "stock" Mikuni system. Glad to have helped. Sam
-
The "stay holder" bolts to the cover of the last carb and holds the "terminal holder". You should be able to make one pretty easy using something like this: http://www.jegs.com/i/Mr-Gasket/720/3811G/10002/-1?parentProductId=763730 I have attached a pic of my old setup so you can see where everything bolts together.
-
"I am thinking of cutting my SU rod and mounting this bellcrank on it " This is what the Mikuni instructions call for. I've attached a scan of the instructions. Sam mikuni.pdf
-
You're over thinking this. Just pull the line off of the modulator and stick it into the seafoam. Engine vacuum will pull in the seafoam and it will get distributed evenly enough. YOu will want to kick up the engine speed. Sam
-
You can use DOT5 in a daily driver. I did for the past 10 years with no maintenance. Just pulled the brakes off of that car and the fluid looked brand new. One downside to DOT5 is if water gets in the system, it will pool in the lowest point, causing corrosion. Easy to prevent- don't get water in there. Another downside is a slightly softer pedal - DOT five is slightly compressible and entrains air very easily - don't shake the container. These two factors combine for a less than hard pedal feel. I put the fluid in a mason jar and use a mityvac to pull a vacuum on it before installing to get the entrained air out. I have never rebuilt a MC. Always replaced them. Sam
-
1: Get a can of kroil and spray all the flare nuts. 2: Get a name brand flare nut wrench so you don't round off the flare nuts. If they won't budge after treating with kroil, use a butane torch to heat them. This will save you from having to change the hard lines. 3: Plan on changing the flexible lines as well as the parts listed by Blue. If this is an occasional driver / show car consider using silicone (DOT5) fluid. It is not for racing but extends the life of seals and does not absorb water. If you go this route, you will want to flush the system with alcohol and compressed air. One thing to be careful of with the master cylinder, if you elect not to rebuild or replace, the act of bleeding the brakes can damage the seals if there is any corrosion inside the MC. This is because the piston will move past areas that it normally does not encounter. Sam
-
Brian, Are you sure the oil is coming from between the head and block? Often a valve cover leak will cause oil to accumulate at the head/block interface. There are only 2 tiny places where oil moves between the head and block. Usually a bad head gasket will seep water/lose compression. I would clean the engine very well and recheck for exactly where the oil is coming from before I attempted to change the head gasket. That being said, you need to purchase a manual - Haynes at a minimum - Factory Service is best. I also recommend the How to Rebuild. These have explicit instructions on how to do this. To answer you questions: Yes, You have to remove the sprocket to get the chain off. Yes, but not recommended without setting a TDC first and not without removing the sprocket. In a perfect world, if you put everything back exactly like it came apart, not important. In the real world, very important. Find TDC before you wedge the chain. Sam
-
Most likely cause is your brake booster diaphragm is leaking.
-
I'm curious about the ability to re-key Datsun door locks, especially 77-78 locks. At least the ones I have are assembled by crimping the chrome face plate over the tumbler when it slid in from the front. The only way to disassemble is to un-crimp the faceplate, and I don't know how you would do that without damaging it. Has anyone actually had their door locks re-keyed? Sam
-
If you were me, you'd do a leakdown test to start. It will tell you what's going on or at a minimum remove most possibilities. Sam
-
sblake01, Thanks for the link. I had seen that thread, but it doesn't say where he got the evaporator. I read the evaporator R&R instructions in the FSM I saw that it supposedly comes out w/o removing the dash so I am now considering this option. I tested all of my expansion valves and my friend's new one by blowing low pressure compressed air through them and spraying the sensing bulb with the liquid from an electronics duster can of "air". The new valve and the one I had played with the setting screw shut off the flow of compressed air after a few seconds of being frozen. The other two did not, so I assume they are broken (lost the charge in the sensing bulb). I installed the one that seemed to work after trying to get the screw in about the same place as the others. It cools, but not nearly as much as it should. When I get the highside pressure to where it is supposed to be, the lowside pressure is a little low. I think I have the super heat set such that the valve closes too soon limiting the amount of R12 in the evaporator and limiting the cooling. My thinking is that if the these EV's are that fragile I should find an alternative. Another option I'm considering (if I can't find a supplier of the aftermarket evaporator) is making an adapter that fits where the stock EV goes that would allow the use of an aftermarket EV. It would basically be a gutted and opened up EV that would attach to a functional EV. the biggest issue with this is the 90deg bend required on the inlet hose.
-
Andrew, Where did you source the evaporator and expansion valve? Sam
-
Andrew, Thanks for the offer. I have already flushed the whole system. I'd rather not remove the evaporator because I have an un-cracked dash and I don't want to risk cracking it with the removal. I have the system charged with R12 now and it is cooling marginally with high side pressure of 250psi and low side of 30psi. I foolishly just stuck the valve that was in the car back in with new O-rings after blowing through it with my mouth and comparing it to a brand new valve that belongs to a friend. I should have cleaned it out, but didn't. I think it is partially clogged because the EV housing is sweating and the high side line gets pretty hot in the evap housing. By pretty hot, I mean it will burn you if you touch it too long or too hard. Does this sound right? I'm not running the system without gauges though until I get all these issues sorted out. of course, I'm in Louisiana with 90% humidity and high 90's F. So the suffering continues. When I charged the system, I had bypassed the pressure switch, thermostat, etc. and activated the clutch directly because the AC relay was missing. In hindsight, this was a mistake. Upon replacing the relay, I discovered the pressure switch was bad. So, I have to pull the system down again to change that anyway. I have an expansion valve that was pulled from a recently operating system - the compressor seized after ten years of use. I went through all these same issues getting it going back then - except the EV was completely plugged (took me a while to figure out why the suction side was pulling a vacuum no matter how much freon I put in). Back then you could still get new EVs so i just dropped a new one in. Thanks, Sam
-
sblake01, Thanks. This one was pretty shot. Don't know if a flush would have gotten the rust out, so I don't feel to bad if i've ruined it for good. Is there a way to see if they are even operational before installing? I'd like to test my other ones. I've found the following in reference to converting to other refrigerants at http://yarchive.net/ac/expansion_valve.html "The superheat must be set. This is normally done by an adjustment accessable through the outlet port of the valve. To set the superheat, one needs a source of pressure, a gauge and a thermometer. Connect the gauge and pressure source to the outlet port (flow backward.) Measure the temperature of the capillary tube. Subtract 10 degrees from that value. This is the superheat. Look that temperature up on the refrigerant's vapor pressure table and note the PSI. Turn on the pressure source regulated to a low flow and adjust the superheat screw to achieve this pressure. For example, if the temperature is 70 degrees, subtract 10 to get 60. If the vapor pressure is 30 psi, set the pressure to that value. (these are made-up numbers - consult the vapor pressure table for your refrigerant of interest. Put the system back together, charge it with the new refrigerant and enjoy." Does this sound reasonable? Sam
-
I'm trying to get AC going in my 78 280Z. I have everything installed and ready to go. I tried to buy a new expansion valve but they are NLA, so I am stuck using an old one. I have four and will use the best one and keep the others as spares. One of them was pretty corroded. In cleaning it, I managed to take it part before realizing that the screw that holds the spring in also sets the superheat of the system. Now that it is apart and cleaned, is there a way to set the superheat back to specs? Every instruction I have found online indicates setting it with the expansion valve installed on a running system. This won't work on the early AC systems because the setting screw is inside the running system. I only want to do this once - R12 is not cheap. My questions are: How do you set the superheat? Is there a way to test an expansion valve before installing it to be sure that it is working? Thanks, Sam
-
The FSM specifies using a soldering iron to split the hose under the crimp and then push new hose in there. No need to cut off the crimp and use hose-clamps (Even though I have done that in the past out of ignorance). It pays to read the FSM... Sam