


ezzzzzzz
Free Member
-
Joined
-
Last visited
Everything posted by ezzzzzzz
-
-
Actually, I'm a man and no I haven't posted any pictures of women here. Maybe I misread the initial post but it appeared to me that Fun was looking for more pictures of p****...err I mean women. While I am not opposed to this I was simply stating that I felt this forum was not the place for it. There are plenty of other sites and forums that do this as norm. I visit many forums involving cars and NSW pictures abound there (www.LS2.com as an example). I come here seeking and giving advice in our hobby. If I want to see a hot woman I'll just look at my fiancee' as they don't come any better.
-
Just a note to say that I have an L28et with the P90a is a solid lifter configuration. It has been said that these didn't exist or only came from the Japanese market. I don't yet know if I'll hold on to it, sell it complete, break it for parts or move the head and turbo over to my triple Dellorto L24...decisions...decisions. I'm breaking down the whole car so if anyone needs a particular part let me know. I'll be posting bits to eBay shortly.
-
There is the long-lived "boobs" post. Otherwise, there is plenty of free porn on the web without bringing it in here don't you think? I'm not personally for or against it but feel this forum is bested suited filling the needs of newbies and oldhands with their Z hobbies. IMHO
-
Coated headers are sprayed with a gun and then baked to cure. No one to my knowledge is capable of spraying completely through the interior passages. It is typically sprayed as far in as possible/reasonable. Most of the paints (JetHot, HPC, etc.) are only about .002" thick. The only coating I would consider today is provided by Swaintech. It is a true ceramic coating (not paint) with an average thickness of .015". It is still not applied throughout as it is not really possible. However, this coating (only in white) is as effective thermal barrier as is probably available in the market.
-
It is possible on some headers that clearance is insufficient for the steering linkage. This linkage passes under the motor mount from rack to column. Every header must be designed to clear the motor mount. Only if the primary pipes extend too far out from the head/block should there be an issue. Like the BRE header (designed with a nice sweep but clearing the steering linkage)some others may be designed to smooth the transistion from head to collector with a larger radius. That could be an issue in LHD Z's. Someone with Fujitsubo or such headers in a RHD Z could take basic measurements off their engine (distance of outside edge of primary tubes to frame rail from rear of motor mount going back towards firewall every inch/centimeter as well as height above frame rail at each point). It could then readily be determined if the steering is cleared on a LHD Z using these headers.
-
Stahl makes a 240Z header (plain steel) for $775...OUCH! Fujitsubo makes them for around $ 520 to $700 (if I converted correctly)... OUCH again. I can't translate all of the lingo so I don't know if these are SS or not. It makes my JanSpeed purchase look good. I'll have about $400 in them when it's said and done.
-
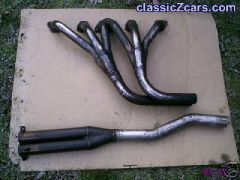 Early JanSpeed square port SS header
 -
I've run the ceramic coated headers. Some are better than others and preparation is critical. None have ever lasted as they should unless the car never saw rain and was parked in a low humidity garage. I found they rotted from the inside out in most cases. I did pick up a JanSpeed SS header on Ebay. They are darkened from use but that causes no discernable problems. JanSpeed warrants their SS headers for life. It won't apply to me since these are secondhand. It can be seen in my gallery. Other pictures of my project can be seen under "ezzzzzzz" at www.hybridz.com so enjoy.
-
Arne asked about a parts list for this mod so I'm giving a synopsis.... You'll need the 260Z R180 mustache bar, 260Z driveshaft, and 260Z curved rear crossmember. 280Z pieces may also work but I'm only addressing the parts I used. The front diff mount can be turned around. The straight rear crossmember is replaced with the curved piece. The older driveshaft can be lengthened 1" or replaced with the 260Z unit. If you replace the driveshaft make sure you get one with replaceable u-joints (caps held in place with cir-clips, NOT staked). You can replace every bushing you feel like during this mod. I rebuilt the whole rearend suspension. Other than the crossmember, I also had to lengthen my old driveshaft instead of using the newly rebuilt and powder coated 260Z driveshaft. I run an early Type A 5 speed which uses an output yoke. The 260Z driveshaft wouldn't work in my case much to my dismay. If your driveshaft has a slip yoke at the front then you'll have no problem. Lastly. the restraint strap over the front of the diff will not fit properly. You can force it back some to use it, extend the strap brackets backwards to relocate the strap between the diff bolt holes (look and you'll see what I mean), or use a different restraining setup which I'm choosing to do. That should just about cover it.
-
I picked one up on eBay for $17 and another $15 to ship. It included the uprights, all nice and sandblasted. I gave the crossmember another blasting and rinse. Shot it with Hammerite last night. It's ready to go on this weekend if time allows. I'm in SE Va a few miles from East Coast Z Center and tried to get one from Barry(?). He wanted $150! I laughed and said I could pick it up for way less. He offered it at $50 and would pull it for me. Needless to say, he lost that sell. I'd heard he was ridiculous with his pricing and now I know firsthand.
-
I have done a small amount of searching and surfing on this to no avail. Does anyone make a SS header for the early Z's? All I've found is plain and coated.
-
That looks remarkably like my present setup. The BIG problem with mine is the relocated R180 differential now contacts the lower crossmember. I'm replacing it with a later model curved crossmember. I haven't heard of others having that problem with moving the diff back unless it is a R200 swap.
-
I have relocated the diff using a 260Z mustache bar. My original setup only had one rubber mount stopper, upper and lower, on each end. These stoppers are basically solid rubber. The VB catalog shows double stoppers, upper and lower. Their upper stoppers are wavy (poor description) in the catalog, page 91. I have two of these in a spares box at home but it appears I need two more??? I noticed that the drain plug is blocked by the crossmember. If these extra spacers were in place that plug would be accessible. The only issue then would be if the mounting bolt is long enough the accomodate the extra spacers. Can somebody clear this up for me? Can someone provide pictures of these pieces installed on a Z later than mine??
-
That's the direction I'm taking. I am still curious how the strap is installed in later Z's with the diff moved back. Maybe the mounting holes are located further back as well?
-
I'm installing the R180 LSD that came in the car. I keep wondering about that strap and the drawing depiction of the rear suspension. It clearly shows the front diff mount installed with the holes forward. This may be due to the original flat rear diff mount though. I'll instal the driveshaft shortly. If it goes in without a problem then I know I'll need to mod the rear crossmember. One more observation...the lower drain plug is inaccessible without removing the rear crossmember. Is that correct? Damn, I wish I'd taken pictures prior to disassembly! :stupid:
-
I'm too tired. It just occured to me that if I install the front mount reversed that I'm right back where I started and the rear diff support would have to bow forward. I guess I'll have to cut away at my beautiful powdercoating. :tapemouth
-
I could pull mine and do a little metal work. The plug is about three threads out. Maybe I could just grind it down. How about a spacer between the rear crossmember and diff to move it forward enough to use the front mount as shown in the FSM? I planned on eliminating the strap and fabbing a torque restrictor that goes under the front crossmember.
-
I have started installing my rearend. The diff is in and I installed the front mount with the bolt hole offset (the bolt holes in the mount are not centered)to the rear because things lined up better. Now, the lower drain plug is in contact with the rear crossmember. Come to think of it I also had the remove the torque strap because it was right above the bolt heads. The main purpose of this was to relocate the diff back 1 inch to correct the early design problem. Did I screw up? I'm guessing I did the more I think about it.
-
This is a subjective topic. I highly suggest installing 220V for air compressors, welders, and any heavy equipment. You can do a 100A sub panel to feed all of your needs (assuming there is a 200A service at the house). Back to compressors. The bigger the better. A small unit will burn up if you put it to task. I've seen this too many times. I personally have a 120 gallon horizonal tank and a SpeedAire 7hp 175psi head. It's driven by a 5hp 220v 184T frame motor. My investment was about $900 all told because I picked up the tank at auction then purchased to head, motor, mag switch and pressure relief valve to assemble. It is capable of keeping up with ANY load I put on it. To it's testimony I've had it for over ten years and the only maintenance has been regular oil changes. It depends on what you have to invest. A cheap investment here will be an expensive mistake down the road. Consider the MOST cfm you'll ever use (blasting, spraying a car, or running multiple tools) and shoot for that. I also recommend buying name brand if you can directly from a supplier in a nearby industrial park (shopping realy apys off here). SpeedAire, Campbell Hausfield, etc. are typically built better and have longivity. I also recommend a automatic bleeder for the tank. Water build-up will eat through the tank and add unnecessary moisture in the air feed.
-
Sounds like the FPR is belly up.
-
I learn something new every day. Thanks
-
I'm not versed in Z EFI but I do know GM EFI very well. 30 psi at idle should be okay. The manifold vacuum is probably used to control fuel pressure at the injectors at any given rpm/load. If you gun the engine the fuel pressure should rise upwards to the 37-38 psi and then settle back down to 30 at idle again. When accelerating or cruising at high rpm's the fuel pressure is probably in the max range. A fuel pressure gauge in the cockpit would prove this. As a side note, NEVER run fuel lines into the cockpit for ANY reason! Only use an appropriate isolator! Fuel pressure dropping (it should hold for a few hours anyhow) quickly once the engine is shutdown is caused by one of three things, a bad check valve at the pump, a leaking injector, or an external leak. The last would be very obivous....
-
You should pick up a Mighty Vac at the auto parts store. It can be used with a short piece of hose or the existing vacuum to test the dashpots (vacuum motors) for proper operation. The nice part is you can apply vacuum to individual components or the whole system to isolate problems. It isn't terribly complicated just a bother in those tight quarters under the dash. Like any other system, don't look at it s a whole but only individual parts that make the whole. As to your specific problem...the MV can be used to test that vacuum motor for functionality. If it's good then just hand-over-hand back to the next component, then the next, until you've found the source of your problem. Don't assume anything is okay, especially those hoses in a 30 y.o. vehicle. You'll only know what is good or bad by checking everything that is applicable. It's only a matter of applying simple analytical troubleshooting.
-
Fork over the money for a tie rod separator. It is money well spent! You'll save the boot and not damage the knuckle either. The fork is the cheap man's tool. I've got some collecting dust now. Do a web search for the separator.