ezzzzzzz
Member
-
Joined
-
Last visited
Everything posted by ezzzzzzz
-
I run 215/45R17 Wanli's on my 17x7 RacingHart C2's with spacers from MM.
-
Try this. Relax 'cause you're trying too hard. Reset the the carbs to the initial settings, 1 turn on the idle screws and 2.5 turns on the mixture nuts. Start the car and adjust for equal flow and best idle around 750 to 800. When the engine is idling smooth then slowly (1/4 turn at a time) turn IN (lean) one mixture nut until the engine starts to miss or idle rougher. Turn that mixture nut OUT (richer) 1/4 turn from there. Do the same thing to the other carb. Reset for equal flow and idle around 750-800 using the idle screws. That should be close enough as this is only applicable to idle. If it just doesn't want to idle as before then turn the mixture nuts out one more 1/4 turn (you probably won't need to do this though). Turn the linkage screw up at the balance tube IN until the engine is revving at about 2700-3000 rpms (it will be loud). Now, adjust the screw on the linkage between the carbs (it's nearest the rear carb) until the carbs flow equally using the unisyn (you'll have to turn the center section of the unisyn out to allow enough airflow at this rpm). When you've got that sync'd then turn the screw up at the balance bar back out until the engine is idling again and the screw is NOT touching the linkage. The car should turn off easily without run-on. It should start easily when already warmed up. It should require the choke to start cold. You're done. Enjoy driving the car a little.
-
The white lead is shown in the FSM wiring diagram. It runs from the external voltage regulator connector to the ammeter and the fuse block. The quick and dirty wiring diagram at Autozone does not show this (or a lot of other details). Whether it is there or not I can only tell after I've looked at my 11/70 240Z. I will look when I get home.
-
Remove the fuse panel and look on the back where the white/red wires attach. I believe one of these wires is attached by a screw. One feeds the fuse panel through the ammeter and the other is attached to the alternator 12V output (side note: the white wire is a direct feed from the fusible link at the starter). Over time, this could come loose and quite possibly result in your problem. If you don't find the problem there then I'd remove one fuse at a time in the panel to see if a particular circuit was the culprit.
-
I'm assuming you then had to lean the mixture nuts (raise the nozzles) to set the a/f before/after idle adjustment. That in affect lowers the fuel level in the nozzle. Ideally, the nozzle should be level with the bridge and the fuel bowl level just flea's hair below that. Maybe your method helps induce better atomization at idle with the nozzle above the bridge. My exhaust problems are accentuated during deceleration after a hard run where the system is loaded with fuel. Again, your setup may reduce excess fuel being pulled into the engine during decel? I wonder if simply setting the fuel bowl level slightly lower and having the nozzles equal with the bridge would have the same affect? Any one else want to comment?
-
By default the offset is on a Z is 0. Nearly any wheel with that offset will have nice deep look. Do a search on wheels and be prepared to be in awe. Like most stuff, it only takes money and time to acheive your heart's desire..
-
Jump over to hybridz.org and look in the brake section. There is much to learn. Damn near anything is possible with perserverance and money!
-
I installed the bigger booster and a rebuilt MC this morning. My 10 y.o. girl helped me bleed the brakes (that's cool!). The brakes were upgraded to the 280ZX front calipers/300ZX vented rotors and 240SX rear calipers/300ZX non-vented rotors. The 280ZX NP-valve was modded to completely separate the front and rear systems. I took it for a spin and the brake performance is fantastic. It will come to a halt very fast. The pedal is still firm but not like before. My girlfriend could brake it without too much complaint. I'm pleased with the outcome. I'll have to drive it more to determine if a variable proportioning valve will be needed but I'm doubting it right now.
-
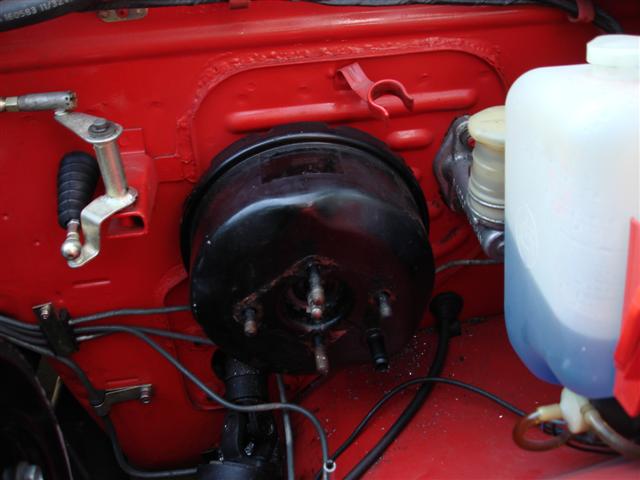
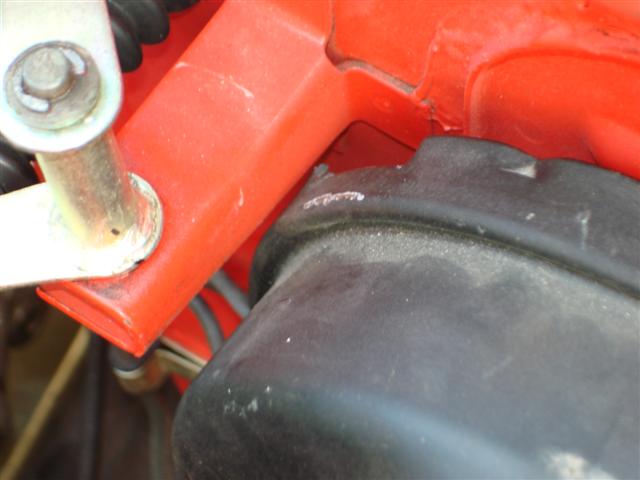
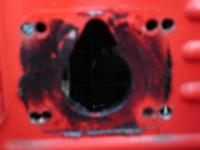
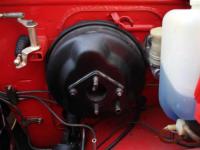
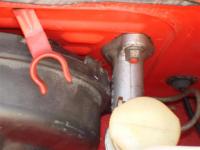
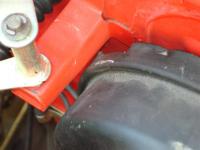
I'm having problems my rear disc brakes not working well so I'm in the process of replacing the possibly faulty MC and modded the NP-valve to fully separate the front and rear brakes into individual systems. (http://forums.hybridz.org/showthread.php?t=114918). I thought I'd try to install the larger S30 booster for less pedal effort at the same time since the brakes were much firmer than with the stock disc/drum setup. Several posts said it couldn't be done but it appeared no one had actually tried and failed. Since I had a spare 8.5" booster I thought I'd give it a go. First, the retaining bolts are spaced approximately 1" further apart on the horizonal but the vertical spread is identical at 2.75". It's really in metric but I used a basic tape measure. I did an eyeball alignment to mark the wider spaced holes to either side of the existing holes in the firewall. I then looked under the dash to ensure there was room for the nuts/washers for the new pattern. Next came the drilling. I drilled the holes in steps and then did a little bit of filing with a small round file to get slip fit of the booster. Oh yeah, I also had to slightly bend the brake and clutch lines to clear the booster. An application of sticky weatherstrip goop will seal the new booster from water leaks. The lip of the booster was lighty tapped in near the clutch MC but it may have cleared anyhow. There was ample room at the throttle bracket. I only wish I'd made a template for the holes to guide me. Damn my lack of patience! The attached photos tell the whole story.
-
Okay, I gutted a 280Z NP valve. The only obvious difference to the 280ZX NP valve is the missing brake failure switch. If I reassemble with only the end bolts (no spring/piston) then the brake system is effectively reduced from a true dual setup to a single setup. I like a dual system which is still reasonably operational even if there is partial failure front or rear. If you look at the guts there is a long bolt for the front caliper section. That bolt is hollow allowing brake fluid to move from front to back balancing brake pressure via the piston/spring located in the rear caliper section. I intend to block this hole, leave out the piston/spring and reinsert both bolts. I'll swap out the 280ZX NP valve for this unit. That will separate the front and rear into individual systems retaining the dual brake properties but no proportioning at all. It should still work as the front calipers are much larger than the rear calipers. All of this because I do not have the rear braking I was hoping for. If this does not provide desired results the next step will be replacing the MC (possibly leaking internally?). Lastly, I may end up with an inline adjustable proportioning valve. Crap, I hope this works...... I want to drive, not wrench, for a while! P.S. I'll consider a booster swap if needed. The pedal presssure is firm but tolerable as long as the brakes actually function well enough to lock them up.
-
I completed the four wheel disc conversion on my 71. The parts include 280ZX front calipers/300ZX rotors and rear 240SX calipers/300ZX rotors. I also used the 280ZX 15/16" MC and the stock 280ZX four wheel disc proportioning valve. The old T-valve in the back was gutted. I used MM rear brackets and replaced all flex hoses with teflon/stainless steel braid. I have adjusted the MC pushrod close to where it needs to be (it should be damn near dead-on). The MC was disassembled and cleaned up. I don't believe there is any MC internal leakage. The brakes are fully bled and I can stop the car without panic. There are no external leaks in the system. My brakes are heavy requiring a lot of pedal pressure compared to more modern brakes. Since the car sat for nearly a year I don't recall the original pedal pressure. There is no locking up (front or rear) and it appears the rear calipers are not applying full pressure when looking at the rotor surfaces. I adjusted the cylinders and the parking brake works okay. Are there any suggestions for improving overall performance and rear caliper function for those that have gone before me?
-
It could unseize by itself but I wouldn't put faith in it not locking up again. I'd replace the flex hoses at the same time and fully bleed the system, front and rear.
-
I have not installed the pre-pump filter but intend to do so. The pump will appreciate the absense of any debris. My fuel tank was in immaculate condition but I had it cleaned and sealed internally since they are hard to come by. The outside was stripped, rust proofed and sprayed with several coats of undercoating prior to reinstallation. I got my inertia switch from a Ford Taurus and will wire it into the green power lead back at the rear panel. My oil pressure switch is similar to yours. The fuse idea is great although I'll probably still install a simple SPST switch under the dash to provide a bypass to the pressure switch for priming the carbs from the driver's seat.
-
I'd like to know more about this too. I offered to pay for shipment and provide a very nice $$$ cache to ensure it's safe return in order to have this reproduced. I hope this doesn't fall to the wayside as it is a valuable part and basically unobtainable.
-
I bought two pumps off eBay for a small sum. One of these siezed up shortly after being installed. The other is doing okay. I priced these at Napa, Autozone, and Advance auto parts. The low figure was about $80 and the high was +$100. I bought two more used pumps for a song off eBay yesterday. If all of these fail then I'll pop for a new unit. These pumps are relatively quiet and provide the proper pressure without a FPR. I still have a FPR in line after the filter set to 2.5 psi though. I'll take some pictures and post them up.
-
After reading many posts on the subject I decided to go with the RX-7 pump too. The original pump worked fine but was very noisy. The PO had wired that pump directly to the battery through a switch under the driver's seat! Not safe at all! I fabbed up a bracket to mount the RX-7 fuel pump in the same location as the OE pump. The wiring was already in place. The pump was wired black/white to green and black to black. My pump has a 90 degree inlet and straight outlet but replacements at the local parts store has 90 degree fittings at both ends. There is a green wire (power) and black wire (ground). The ground is located on the rear frame and is used for the rear lights too. My green wire had a bullet connector in it at the passenger footwell just below the glovebox. It tied into a small harness that ran within the dash and terminated behind the radio. There is a small two blade T-type connector with two leads (green and black/white). The black/white is power from the ignition with the key in the run or start position. A factory fuse holder plugs into the connector completing the circuit (you could easily install an aftermarket fues holder if the original isn't there). I chose to use an oil pressure switch to stop the fuel pump if the engine stopped running or oil pressure dropped. In reality, it is only to reduce fuel spillage in a wreck, not save the engine as it would continue to run until the fuel bowls emptied anyway (unless you're upside down :stupid: ). Initially, I hoped to use a 280ZX sender (idiot light switch) but it opens with fuel pressure turning off the dashlight (duh). I found several GP Sorenson switches that would work (OPS46 OPS47, OPS50, etc.) I picked the OPS47 because that's what was available. A 1/8 npt tee was installed in the block using a small double-ended nipple. I ran a 1/8 bsp die over one end of the double-ended nipple to fit the block. I notched the threads (to simulate a tap) on an old OE sender to cut threads in the 1/8 npt tee for the OE sender. The OPS47 threads into the side port of the tee. Back at the footwell I installed a 12v bosch relay. A fused 12v lead (power block installed by me) goes to #30. The bullet connector is separated and the green wire going to the pump is connected to #87. The OPS47 is connected to #85 (another wire installed by me) and the other bullet connector green lead from the dash is attached to #86. When the ignition is on and oil pressure is available then the relay closes providing 12v to the fuel pump. I will add an inertia switch (in case of an accident) in the rear near the pump. I will also be installing a simple "momentary on" switch to bypass the oil pressure switch allowing for priming the carbs if needed. Based on my 11/70 build date I'm assuming this OE wiring is available for most early S30's.
-
I replaced all of the hoses, grommets and gaskets. My new S/S exhaust, from header to tailpipe, is leakfree. The tailpipe extension is approximately 10" from muffler to tip and slants slightly to the driver's side. I drove my Z around the neighborhood briskly and never experienced the fumes I dealt with prior to just going over everything properly. The real test will be out on the highway when I'm legally tagged and inspected though. It's great not stepping out of the car reeking of fumes and wobbly from poisoning. You can see the exhaust at http://forums.hybridz.org/showthread.php?t=103301&highlight=magnaflow. Look at post 17 and 18.
-
I have another question regarding this strut. I have a 71 and the single strut tends to tweek the hatch such that it is gapped higher on the DS. Has anyone used the 280z struts/brackets on an early Z? How did you go about doing it?
-
Float type or weight is only relative to setting fuel level. Once done it is not an issue. Ideally, the level should put fuel just below the nozzle tip when the mixture nut is backed off andthe nozzle is fully seated in the up position. There are several books on SU carbs that you could use for reference and learning purposes. Ztherapy's tape is very useful too. Needle and nozzle sizes would make a difference once you have the engine anywhere off idle (accelerating or cruising). It's easy to determine if your carbs are 3 or 4 screw. The number of screws holding the dome to the carb body is one or the other.
-
Try this... remove the damper from the dome. Loosen the four screws at the base of the dome. Gently wiggle until the piston drops fully. If it won't drop fully then you probably have a bent needle or misaligned nozzle. If it does drop then slowly start to tighten the four screws continuing to test piston drop. If all is well, you should be able to tighten the dome screws with proper piston movement. If not, remove the dome and clean the interior with brake cleaner and a soft cloth. Blow it out if you can. Remove the piston careful not to damage the needle and clean the fine grooves that fit into the dome. Reinsert piston and install dome as suggested above. If it still won't drop you can test for needle binding by pulling the nozzle downward (as if choke were on) to see if the piston will drop accordingly. If so, loosen the nozzle locking nut (not the mixture screw) and gently wiggle the nozzle until the piston drops then carefully tighten the lock nut again. Test for piston drop again. If nothing is bent then you'll get it to work properly. Worse case will be replacing the needle(s)/nozzle(s) or entire carb(s). It is a bit time consuming but not difficult. The Ztherapy video is a big help for the visual assistance alone.
-
Somehow, I think you'll find that the two carbs are not using the same needle/nozzle. It is obvious that a mix-match of parts were used. The rear carb has either a JDM, british or volvo bowl top most likely. I'd look into getting a matched set (3 OR 4 screw) of carbs. They aren't terribly expensive or hard to find. Your ignition is probably fine if it runs and allows acceleration. I think timing should be around 16 degrees advance@700 rpms. Be sure the nozzles are not hanging and go up completely when the choke is off. Be sure you have oil in the damper wells. Be sure the pistons are not hanging in the domes and the needles are seating correctly in the nozzles by performing the drop test. You need to remove the dampers in the domes to perform this test. All of this is easier if you'll remove the air cleaner completely too. As for adjustment, loosen the top screw completely at the balance tube linkage. It is only used to balance the carbs at cruising rpm. Loosen the sync screw completely on the linkage between the two carbs. bottom out the mixture nuts (under carb body) and turn out 2.5 times. Turn idle screws in 1 turn. Start engine and allow to warm up. Using the unisyn or a length of heater hose (old school trick using your ear) adjust the carbs for equal flow by adjusting the idle screws. Readjust idle to 700-750 rpms by making equal adjustments of both idle screws. Resync for equal flow. Using the lifting pin (under body of carb on rear) raise the psiton about 1/16 inch to test for best air/fuel mixture. Rpm's should momentarily rise then drop back to normal. If rpm's stay up then the mixture is too rich. If the rpm's drop then the mixture is too lean. Turn the mixture nuts in or out in 1/4 to 1/2 turns to achieve the ideal effect (momentary rise of rpm them drop to normal rpm). Now, turn the top screw in until you achieve the cruising rpm (about 3000 rpm's). Using the unisyn adjust the sync screw between the carbs to balance the carbs for equal flow. Turn the top screw out until it does not contact the linkage at all and leave it there. Leave the sync screw alone at this point too. You should be close to the mark for the engine to run well assuming there are no other issues (vacuum leaks, valve adjustment, mechanical problems, etc.).
-
Get the basics in place (timing, plug gaps, wires). As stated by Bloxman, pull the distributor cap and watch the rotor while turning the engine over by hand and bring the #1 piston to TDC. #1 on the distributor cap is basically facing the radiator. Check for a timing mark on the damper and make some mark on the front cover or a simple wire pointer to attach the front cover. I'd back up and put the old distributor in first. You may have actually introduced more problems on top of the existing ones. Firing order is 153624. DON'T throw parts at it. Make only ONE change at a time and note any improvements or deterioration. Be sure all vacuum hoses are good and no other vacuum leaks exist. I'm assuming the backfiring is coming when trying to throttle up the engine? You also never stated what the other problems were. You could be starving for fuel too but you need to know the ignition is close before moving on to that.
-
I have one from a 77 280Z that I pulled just yesterday. It is in like new condition! PM me if you want to get it cheap. Just make a decent offer and cover postage. I have a bunch of other bits from this car for sell too if anyone else is interested. The body is total rot but there are a lot of good salvagable pieces.
-
I bent a piece of 1" wide stainless in this same fashion to hold my red top down. It does not have the small tabs shown to steady the battery front and rear though. I haven't put the car on the road so I don't know if it will shift. Oh yeah, my red top has the plastic cover relocated to the bottom to raise the battery up about an inch. It works fine and looks great.
-
Quick note...when testing the piston drop remove the damper from the piston dome. Otherwise, the damper will restrict piston movement and you'll not get the classic "thunk" or readily see the needle hanging in the nozzle (if that's the problem).