240K&Beyond
Free Member
-
Joined
-
Last visited
Everything posted by 240K&Beyond
-
 Mikey, I have a BNR32 and a couple of C110 coupes and as much as I like the original C110 fronts, I love the 32's fronts. They hold you well if you tend to drive whilest looking through the side windows, if you know what I mean. As for being 15 years old, who cares, as long as they are clean, they are great. The only problem is they are hard to keep clean. Unfortunately I am off to Sydney for a week, but next weekend, I could compare the two models footprints and see how easy the 32's would fit into the C110. If you want? If your at the wreckers looking at seats, you might want to review the seat belt situation as well. The BNR32 belts might be able to be grafted into the C110. Just a thought!
 -
Lachlan, What about filing two flat sides onto the bolt then backing the nut back on. Then clean up the nasty end of the bolt bu either file or hacksaw (Removing the end of the bolt) And then undoing the nut straight off? I think I have a spare rear light panel somewhere, not sure if it's left or right. If you need to replace a mangled one.
-
Hey Kent, According to my plans for the conversion plate (As shown in the gallery) the R30 conversion plate adaptors holes are 114mm apart. (Centre to centre). Damn ! What about the dimensions of the actual disk rotor? I have measured my R30 rear hatch rotors that suite my conversion plate diagram and they are as follows: 1) When placing the rotor flat on the desk with the wheel stud bolt holes up and the actual brake surface on the desk: the distance from the top surface down the side to the topside of the braking surface is 37mm. 2) The diameter of the top surface where the wheel stud bolt holes are is 170mm. 3) After flipping the rotor over so that it rests on the blot holes: The diameter distance ove the visable hole in the middle where the axle goes is 151mm 4) The distance from the edge of this "hole" to the outer edge of the rotor braking surface is 51mm. 5) Finally the actual width of the rotor (from one braking surface to another) is 10mm. The minimum spec is 9mm. How does this compare to yours? If the offsets are the same and the length (51mm) of the rotor is the same: You may be able to adapt my design to suit your rotors. Else, you may wish to consider a R30 modification instead of a R31.
-
Hi 440K, As far as I know, the plates in use are roadworthy - they passed. You are right. Over the last couple of weeks, reviewing the CAD drawing I was given with Engineers quoting to make them, there is a discrepancy around the "hard" corners. I chatted to the bloke who had them made and he has informed me that this is because the guy that made them for him used a machine that puts a 3mm radius on these edges, hence he did not put it on the drawing. So yes, it is a good idea, and yes, they are made like that. If you want to ask your "Gun", for sure !!! I am guessing that we will need around 10 pairs all up, first run, with all the interest shown. (I need two pairs myself.) If your fella can design a program to make them on an automated machine, this would probably be the easiest and cheapest way. It needs to be made from 20/22mm plate mild steel with a minimum grade of 200, but 250 is prefered and used in the already construded units. As soon as I hear back from the guy, I shall let everyone know. I was planning to make one set to "test" their construction, but if I use this guy who has already made them before, then I was planning to have them bulk built.
-
Hi Fellas, I have hd a bit of trouble getting someone to make these conversion plates up for me. There is considerable expense envolved when making mutliple units. The need to make a program up to cut it via a machine, rather that a once off hand made pair of plates. Consequently, I have had a chat to my mate who has already made and completed his conversion. He is going to ask the bloke that made his: "How much would it cost to make 10 pairs of plates?" Hopefully this would be enough for all of us for now. I will get back to you when I know the price per unit/car. Kent: I you would like to PM me with the dimensions of the R31 rear disc rotors you have, then I can compare them to my R30 ones. If they are the same, then you could use a set of conversion plates too. Better measure the distance between the centres of the caliper bolt holes too.
-
Ah Yeah Mike, Tom is right. Your 240K offset's are completely different to 240Z/260Z/280ZX Systems. There is a CAD design in my gallery for the conversion plate required to use R30 (1981 to 1985) Skyline Rear Disk Rotors and Calipers. I am trying to get them made over the Xmas Holidays to test the design, however, a freind has already used it successfully. Once the Done and Tested, I shall Post the Question to members: Who Wants a Pair of Conversion Plates? So that we can have them made in bulk as several people have already expressed inerest. (I have a second Car to do too.) But, by all means use the design, thats what it is there for. Cheers, Bruce.
-
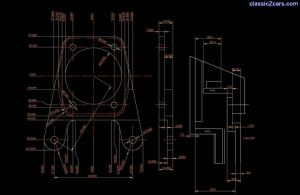 This is the Adaptor plate required to convert the rear brakes of a 240K from Drums to Disks. This is to be used with R30 Skyline Hatch Rear Disks and Calipers. This will not work for a Z as the offsets are different.
 -
Seasons Greetings Everyone, Sorry to hear there wasnt a S20 under the tree, Joonix. I did get the Kriss Kringle bottle of Vodka `though ! That and a soon to be delivered "Nissan Turbo" rocker cover from the States.
-
Liama, Give Warren a call on 02 9476 0111. He used to wreck 240ks in Sydney. He might have one in home garage. He has posted stuff to me in Melbourne before.
-
Welcome Mike, Nice purchase, if it gets any lower, your going to lose something! I understand your decision to go down the SR path, myself, I'm heading down the L28 Forced Induction way. (By any chance) Do you have a spare Turbo Oil Line setup you want to get rid of? I have everythin else. Anyway, if you want to post some pics of the flare setup, we would all appreciate it. Especially what has been done to the original panels underneath. Have they been ripped, flared or just cut away?
-
Sorry Joonix, I have not looked at this form for 2 weeks, yes I found this car hiding in the SA Trading Post. It ia an Oz Spec GT, which basically has a Single Carby with the longer inlet manifold. Not much different from a GL. Personally, my Yellow GL from Ebay 2 months ago is in better condition and if you remember, I paid ~$2K. But this one does have the GT Compliance Badge and other GT Badges. Larry (From the Auctions) sent me 2 extra pics, but they do not what to attach currently. I'll post them when I can. Note: (To Mike) I cannot upload single jpg images to this message. Since your server move, have others been sucessful? Or is there are problem?
-
Hi Joonix, There was a 4 door down in Melbourne recently, but he wanted too much. I'll keep my eyes open. keep an eye on OZDAT as well. http://www.ozdat.com/classifieds/index.html I have just found a Coupe for sale in SA's Trading Post. Some how this guy a "shoe-horned" a Chrysler 6.6 Ltr V8 into it. If you are interrested, make sure it's straight by getting a photo of the bonnet and front quarters. They should match up!!! I'm guessing it is not to Legal.
-
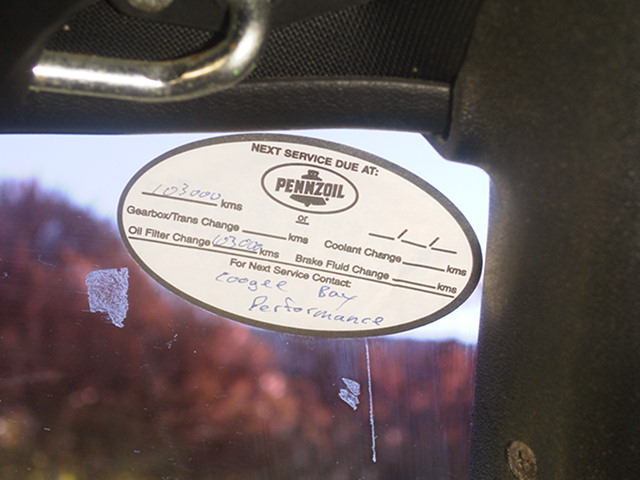
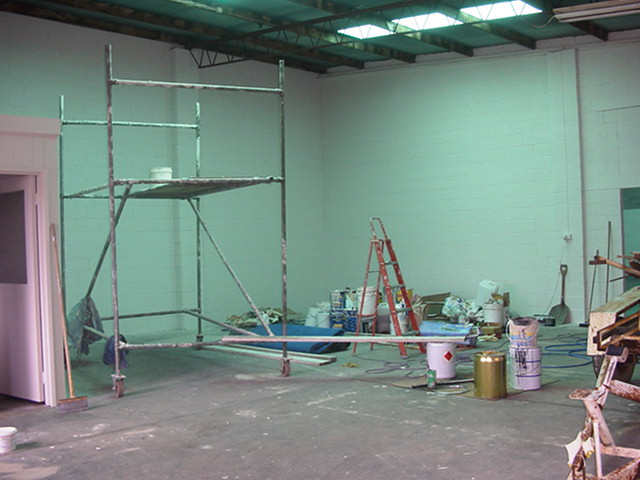
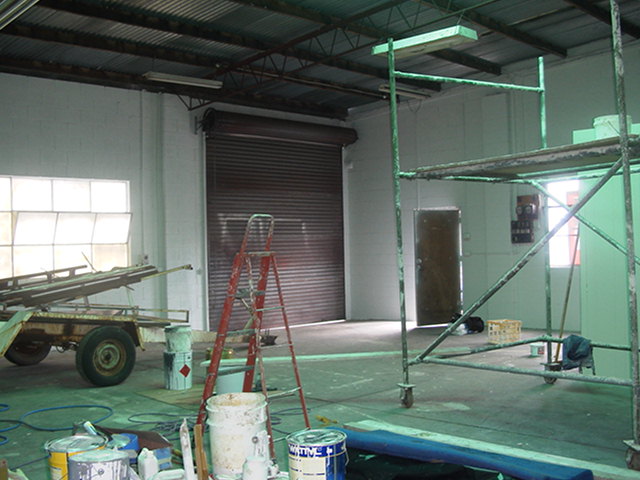
Hey Guys, Well it's not pics of cars, but I have just leased a small factory for the next 6 months. I get it on Wednesday the 1st. And I have 2 months off . . . The Yellow Coupe is being Rego'd tomorrow with the original engine in it, then 1st thing after moving everything into the factory is to change over the engine to the F54 block L28 and get the rego/engine number changed. Then it's back to the factory for a serious rework. Oh, I found the service bookes for the Yellow Coupe the other day and the Kms are original, have a look at the pics.


-
Cheers Tom, I have PM'd you back. I'm fine with that! Get a big bid in early if you like. Good luck. As for the dizzy, way to go.
-
Well I'm keen on getting/making a mould. I am not after an original piece of kit. I would be more than happy to go 50/50 with you Tom, so that the mould could be made. That would increase the total bid to increase our chance of winning it. But I have no idea on this bidding forum. As for the I'tnl shipping, does anyone know some either going to or living at Japan?
-
Thanks Michael
-
Hi Tom, Glad to hear you got it going. The single 10mm with the philips head is the one you loosen to adjust the timing. You know, by spining the dizzy around like normal, like what you said above. The two other 10mm bolts below left the whole pedestal off. It's a bit of a tight fit, but if you pull up with one hand whilest tapping the side of the dizzy, it should pop off. YOu might find that when you get your timing light runing, that the car is not making the correct adjustment. This could be because of you "strange" modified timing adjment plate you have created. You may need to put it all back together using all the bits from the electronic dizzy only. I have ordered a timing light, but for now, I have adjusted mine by running the motor and adjusting the dizzy by sound. Single the dizzy around one way until you hear the car start to slow. (Not position, this is too retarded). Swing the dizzy around the other way until the car starts to race higher (Not position, this is to advance). Now, adjust the dizzy 1/2 way between both positions. (This is a safe position) I prefer to adjust it 1/3 more to the "advanced side" of the 1/2 thats left between the middle position and the max advanced position. The best way to test it is to go and find a large hill and drive up it in a high gear like 3rd slowly and put your foot down. If you can hear the car pinging (Like the engine is rattling) the car is too advanced. You must the back the timing a little off, back to the centre position. If you don't hear pinging, adjust the dizzy to be more advance. Just a little at a time, until you hear the ping. Once you hear it, adjust it back one step. You have now used "Bush Mechanics 101" to find the optimal timing for your car. When you get your timing light make a note of what the timing is. I will bet it is a little more advance than what the manual says to use. As cars get older and part's tolerance greaten, I find this tends to happen. Good Luck and have fun.
-
Hum, Does anyone know how to read japanese? Would anyone be interested in biding for me? I would real like a true grill so that we could cast duplicates into fibreglass.
-
Okay Tom, I have just put my 280 electronic dizzy in my 240k. I noticed a couple of things through doing it: 1) There is no balast resistor. Not on my `73K anyway. 2) The wires connect as previously stated. 3) YOU NEED AN EARTH. I noticed that there was a terminal around the other side of the dizzy that mounts straight on the metal side of the dizzy. Thinking about it, how would the electronics of the thing work without it. There is a gasket isloating the dizzy from the rest of the alloy front of the motor. Although the bolds may help, Putting a lead from this pin to the body helps. 4) Looking at the picture of your dizzy mounted, it looks a little out of scew! That is, the vac advance can should be point the the corner of the radiator. And the lead connecting to the 1st spark plug should be facing the fron of the car, not around to the side. It looks to me like you dissy timing would be shot and there would be no chance to start. 5) I did not mess with any of the middle part of the dizzy. ie: the timing adjustment plate and alike. I just unbolted the 2 10mm bolts at the very bottom of the dizzy stem. Then swapped them. 6) I have not even set the timing yet, as it works and it should have been okay from the other motor. Let us know how you went again. Cheers.
-
Hi Tom, it's 2am now, Ive had freinds over all afternoon and evening. Sorry to hear all the troubles. Time permitting, I have my dizzys ready, and I'll try the conversion tomorrow and make notes. I took the Yellow 240 down to the steam cleaning bay today, two hours later, the engine and bay is spotless. It's amazzzzing what a couple of bottles of Nifty, a tooth brush and a shi#load of sweat can do. After cleaning my mechanical dizzy and leads out, she started 1st time. Pitty it flooded 100 metres down the road. I think I shall be going down the EFI track sooner that I thought. Chat tomorrow, I'll let you now how my dizzy swap went. That and find that bl@@dy balast resistive dova-lacki. Cheers,
-
Your getting there Tom, Connect the existing dizzy wire to the "C" pin and run a new wire from the "B" pin to the "+" side of the coil and you are away.
-
Tom, I traced out the wiring of the dizzy for you. It's pretty simple. 1) The Brown Wire which connects to the PIN in the Dizzy which points away from the dizzy goes to plus 12 volts. And you might even see a marking under the Pin contact that says "B" for battery. 2) The Blue wire which connects the the Pin which is flat to the side of the dizzy goes to the negative side of the coil. You may see a "C" marked under the Pin for Coil. 3) Last but not least, the positive side of the coil to battery. Now depending on how you car is wired, you should be able to use the existing wire from you coil. Just remember, some cars only power their coils with 8 volts because of a "ballast" resistor. You new electronic dizzy is not going to run well on 8 volts, so you might have to buy another coil that runs without a resistor. And then simply place a short circuit over the resistor, affectively removing it from circuit and giving you 12 volts again. Note: You could perform this bypass and run with your old coil, and it will work. For a while ! That is, until you coil burns out ! ! ! Regards,
-
No worries Tom, I'm sorry it took so long. Now I have the question where is my Lense? Spares You say, I'm slowly collecting a small stock pile ready for my conversion/play in Dec/Jan. My side yard is sarting to look like a small Wreckers Yard. Hee hee hee. Cheers.
-
http://www.c110-skyline.com/index.html