ZCurves
Free Member
-
Joined
-
Last visited
Everything posted by ZCurves
-
 Generally, the hoses don't wear out. The vacuum check valves can get gummy. When I was looking for the parts for my Z, I found that the vacuum valves that Nissan used were the same across several models. I replaced mine with one from a Sentra. Some of the vacuum check valves have a rubber spacer donut that can be removed - then it will fit perfectly on a Z.
 -
I had my suspension components powder coated, I never really thought about coating with POR. Everyones pictures sure look sharp!
-
After the Dogleg has been repaired, you can access the backside by removing the Seatbelt assembly and shooting the POR material through the bolt hole. Just make sure that the POR does not dry on the threads!
-
See my earlier post here: http://www.classiczcars.com/forums/showthread.php?t=37335 I think that it would be fine anywhere that is not going to show (e.g. Floorpans, Rockers, Doglegs, Underside...).
-
I would be interested too. But he needs to stay competitive to what is already available. He could contact MSA and BlackDragon to see if they would consider reselling them...
-
Your description is exactly how I came up with my Username/Moniker. "ZCurves" is all about the beautiful lines and the gentle curves of the body. The Z3 is very much the same! But for me it just does not have the coolness and nostalgia I feel for my Z. I love my Z and it really does love me back!
-
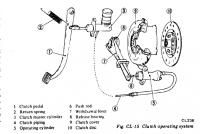
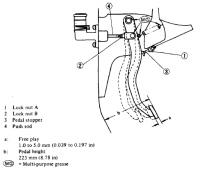
Ok. Look at the first pic I attached in Post 53 (below). If you replaced the Slave and bled it great! Did you replace the Clutch Master Cyl or the Break Master Cyl?? It was not clear in an earlier post. Assuming that you changed the Clutch Master Cyl, make sure that it has been bled. Have a different friend pump the Clutch while you look underneath and check for movement of the Clutch Fork. The Hydraulic Clutch setup on a Z is pretty simple (first pic I attached in Post 53). Let us know what you find. As for damaging your Z, that sucks and I am sorry for you. However, Don't get bummed out! Time passes and if it is possible to just stop for a while until things improve for you, then I would encourage you to keep the Z. You don't have to post pics, that would be putting salt in your wound! Just concentrate on getting the clutch to work and finding another door. Chin Up!
-
Everyone has good advice here...FWIW, I think that you should carry a ignition tester with you in the car (something simple to see if you are getting a spark). When the problem reoccurs, check for spark. I am thinking that there is a intermittent Ignition Module issue. Check the connections and wiring harness to the distributor. I believe that a member (OldHemi) had a similar issue. You should PM him. As for the White Smoke, it is actually Steam created from condensation in the exhaust. It is completely normal and should go away after the car has run a while. What is not normal is little whiffs of steam after the car has warmed up -especially in the summertime, that could be a failed Head Gasket or cracked head.
-
Fantastic! I like the shot of the underside showing the carpet. This summer, once they get hot you'll see them conform even better. FWIW - Perhaps you should post where you picked up your Covers and Foams along with some more pics. I am planning to do the same! I guarantee that someone else will be looking for this information in the near future!! Great Job!
-
Speaking of tools, I happened across a set of these Flare Nut Wrenches during a visit to Harbor Freight Tools. I was particularly attracted to the "Fat" head on the 10mm, especially since the break lines on the Z are so soft. I picked up a set and I have been very happy since. Here is a link for anyone who is interested... http://www.harborfreight.com/cpi/ctaf/displayitem.taf?Itemnumber=99993
-
Be careful when using the Z as a "Date-Car". Girls love Z's, When I was in college twenty-five years ago, I started dating this pretty thang who happened to have a '79 ZX and liked the fact that I drove a Z too! You have two guesses what happened next (and your first one doesn't count)...
-
NO GOOD DEED GOES UNPUNISHED. Please post picks of your new "Book-End"LOL
-
Give it a massage with some Lexol or Armorall and let it sit.
-
You need to really think this one over a bit before you commit a bunch of time and $$ to a paint job sitting on top of this stuff. There have been a number of these "rust proof" coatings that folks have applied over the years that have lifted off and pocked the surface of the paint! I experienced this my self on a Z I used to own with some real early POR and again with another product from Eastwood only to end up with a strip and sand. Todays paint is more of a "System" whereby the painter starts with an acid sealer and etching primer and then works his way out to the final top coat. The system (and all paint mfg cos. have one) components are engineered to work with and compliment each other. Do some more research, ask more questions and check to see if there are compatibility issues with Rust Bullet and the Mfr of your desired paint (e.g. PPG, Dupont, Sherwin Williams....). IMO - I would say DO NOT use these coatings, but rather locate a paint shop that will prepare the surface and apply the proper sealers and primers that will give you the protection you desire and provide a base for a beautiful, slick top coat. You will not be disappointed.
-
These look pretty awesome! The seats will look better as the material begins to relax and conform to the frame - and your AzzLOL. Moogrr, lets see some pics! I will retake mine and post.
-
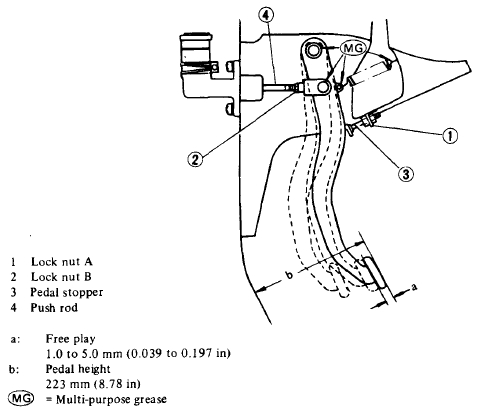
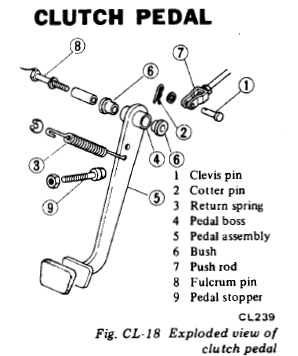
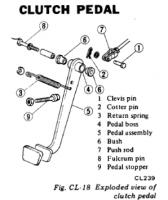
Here you go! These pics are for a '78, but the Clutch and Brakes are fundamentally the same. Make sure you clean up the fluid, it is very corrosive!!
-
Questions to elicit some thought... Is the transmission Auto or Manual? An Auto Trans could have a Torque Converter or "Stall-Out Issue" Have you checked the Fuel Regulator? Does it hesitate when it is NOT under a load (In neutral)? Does it "Pop" when you give it sudden hard acceleration? Have you replaced the exhaust system? (Clogged CAT / Bad O2 sensor.) Have you tested or changed your AFM? It still sounds like a Vacuum Leak or Timing to me... That is all that comes to mind without further cross examination by our fellow Zed Heads.
-
When I installed my Prothane Kit, I made a evil concoction of Silicon Grease (supplied with the kit) and Anti-Cease compound. I applied this to every surface the bushings come in contact with on the suspension, making sure that the little pockets within the bushing were full. Since this was pretty messy, I just wiped off the leftovers with shop towel. Also a good trick is to use a wire wheel to clean any of the OEM Shackles prior to install. No squeeks in three years!
-
No Problem! give an update after you are done.
-
These are generic springs that come in a roll. The are slightly heavier gauge than the original and once cut to length, offer a perfect replacement. There is a little effort required to remove the originals, but it just takes a screwdriver, a couple pair of pliers and some patience! The results are outstanding! If I could ever find the pics I took of the work, I will post them. I have the finished seats sitting in my garage waiting for me to get my Z re-assembled. I can take some shots of those if anyone is interested.
-
Well, lets just say the extra material that could be used by someone else.
-
Bryan, Short of just using carb cleaner spray, you will have to loose your adjustment at the TPS if you want a complete breakdown for cleaning. If you are to do a proper total breakdown, you would need to adjust the TPS and Idle Speed after cleaning anyway! This is not a big deal... I would use a file to mark the present adjustment of the sides of the TPS, and then count the number of turns for the Idle Speed Screw as you remove it. These will be your baseline settings when you re-assemble. Take the Throttle Body apart, making sure that you do not loose any screws from the flap. Make sure to be careful with the Throttle Return Spring - If it is rusty, replace it (these are VERY hard to find from Nissan though! :mad:). If there is a B.C.D.D. and it looks ok and seems to be working - LEAVE IT ALONE! Do not disassemble. Blast out the Throttle Body with Brake-Kleen and/or Carb Cleaner (Watch your eyes). Buff the throat and the flap with fine steel wool and re-assemble. Blast again with Brake-Kleen and/or Carb Cleaner (Watch your eyes- again ), follow up with compressed air - everywhere! If you polish the Throttle Body, make sure that you get all of the compound out of the various ports/passages - compressed air would be very helpful with this too. Reinstall the Idle Speed Screw and the TPS from the marks and settings you noted earlier. Find a FSM and/or the Fuel Injection Manual (Search the Forums), Start your Z and begin adjusting to the specs from the FSM. Check your settings again after the car has warmed up. It is important to reset everything to the FSM Specs because the settings that you started with may no longer be appropriate for a clean and shiney Throttle Body. So there you have it! Have fun!
-
'78 280Z, Production Date 11/77, VIN See Below..
-
Yep, my '78 doesn't have lids either. It would have made a good place to put a sub-woofer though. I would like to see if anyone has a mod where they made these useful -BUT still retained the look of the raised deck. I never really understood why Nissan used the raised rear deck on the later years.. It seemed kind of silly to incorporate all that additional hardware just for aesthetics and close off a useful space. Hmmmm - now that you have me thinking.....
-
If you are interested, pay for shipping and you can have my leftovers.