ZCurves
Free Member
-
Joined
-
Last visited
Everything posted by ZCurves
-
 Carl, Seriously - If your car has been there since Sept 2008, you need to go and pick the damn thing up and take it elsewhere. In Texas we have this law called a Mechanics Lien that which allows a shop to TAKE YOUR CAR for none payment of services. It is a good law when used ethically (e.g. Protect shops from non-payers) but it can be abused....All I am saying is -It is better to be safe than sorry.....yada, yada...
 -
If the pitting is shallow AND external, then I would polish and then seal with a clear sealer like Eastwood Diamond Clear Gloss. I have used it on the exact same part you are talking about and no problems! This is not spray paint clear, it can stand up to high temps and all kinds of chemicals. Good Luck. Andrew
-
Yeah, I hear you! Normally, I do the same but I was just having a devil of a time finding some of the small-obscure seals. Hope it is working out well for you. Andrew
-
Just like Arne and Orange_73 have said. Tell him to paint the car! The headlights are irrelevant to the painting of the Buckets! It sounds like this guy spent your $$$ and doesn't have the capacity to move on and complete the job. Gitter Done or get your car out of there!
-
I purchased the MSA kit. I went with the New Foam and Leather, it turned out fantastic! I still have the seats out of the car and will post some pics on request. Some advice for everyone: Be Patient, if you get pissed off STOP and come back at it later. Whatever material/style you choose, allow it to warm up before you start trying to put it on the seat frame. It will come out better if the material is warm and more flexible. Paint the frame, it will look nicer when finished. For 240z's be sure to buy the restrapping kit, for later Z's consider replacing the metal springs. Do not Force anything, if you get stuck - Post for help or PM me. I have PLENTY of left over Seat Spring, If anyone is interested PM me.
-
Ha, Ha!! That was great! My wife calls my Z the 2800 lb. Mistress. She is sweet though! The handwork on the boots are VERY nice. You could sell them by the dozen on eBay! I saw some for $30 that were not as nice.
-
Hey all, When I rebuilt my suspension a while back with poly bushings, I lubed them up with an evil concoction of the Silicone that they provide with the kit and Anti-Seize compound. I learned the tip from another forum and it really works! It kind of makes sense if you think about it - Have you ever tried get Anti-Seize off your hands?!!
-
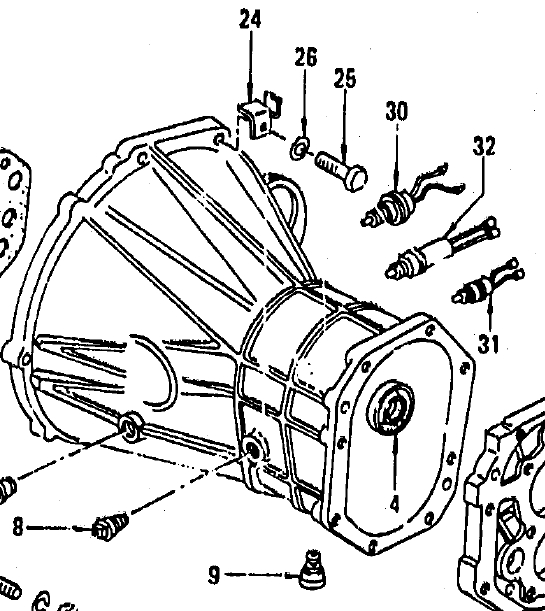
I believe that you will find the reverse lights switch on the Passengers Side of the transmission. It will be two wires that connect to a harness that goes up toward the Starter and the Battery. I am attaching the best pic I could find. Hope this helps.

-
When I was restoring my instruments and the dash, I had my Z clock repaired by ZClocks (http://zclocks.com/). Some might consider them a little pricey $110, but I did not want to have a hack job going back into my ride or have to worry about it any further. The repaired clock works like a champ.
-
I think I understand, but is it possible for you to send a picture. You can pm me if you would like.
-
I have dealt with this before, it turned out to be a bad injector. In your case, I would eliminate the following variables first: Is the cyl getting a spark? (Check Plug, Wires, Cap, Rotor) Is the Injector getting a pulse signal? (You can use an Idiot Lite, Long screwdriver to the ear or Mechanics Stethoscope to listen for the pulse). Work your way back from these into the wiring harness. There is also a chance that you could have a bad Dropping Resister (these are the dudes hanging out behind the window washer tank). If you have to take out the Injector, replace it with a new or rebuilt one. I put a new set it from Dr. Injector (http://docinjector.com/). Injectors are often brittle and plugged up anyway so it is cheaper AND safer to just replace them. Fooling around with injectors is a quick way to a Car-B-Que. Be sure to buy new seals/o-rings before you begin. This would also be a good time to evaluate the wiring harnes to see if the Injector Plugs need replaced. PM me and I will email you the 280z Fuel Injection Book or search the classic z car forums for: '280zfuelinjectionbook.pdf' good luck
-
I have 1978 coupe and I have always been interested in possibly converting from a AFM to Mass Air Flow. Has anyone done it? How did it work out. Thanks.
-
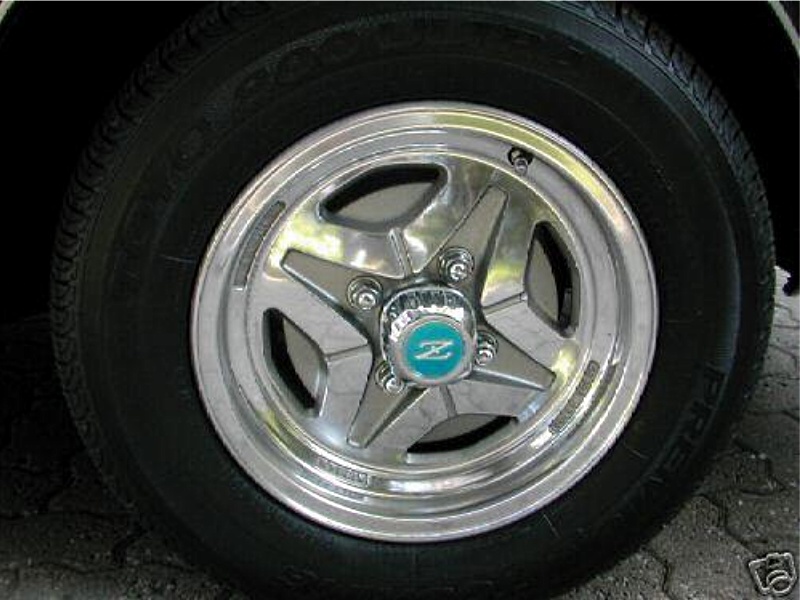
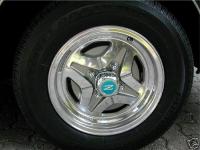
Those sound like the REAL hard to get kind. I know, because I have been looking my self. I am assuming that your wheels look like the attached pic, correct? I will let you know if I find any, if you will do the same. I am going to see if I can restore the few that I have. Let me know, good luck. Andrew (ZCurves) UPDATE: These can be found at http://www.nismoparts.com/ The new part number is 40343-P6700, and they are $26 each.
-
Thanks! FWIW, I would like to see your door panel setup. I am not planning on cutting anything, I just can't bring myself to do it. Besides, these cars were not fine acustical masterpieces(except for the exhaust!). I am thinking that I will use the original speaker mounts behind the seats but use REAL NICE speakers and a decent Head Unit. Andrew
-
MLaw7 - You make me soooo jealous!! My Z is a couple of weeks away from where your car is now! I still want to take some pics of the two when I get mine back together. That Plum color is fantastic! You know these cars look better than original showroom with proper paint and modern materials! Great Job!! I noticed that your Bumpers look new. Did you re-chrome or polish? Very nice! I need to have mine done too. Andrew
-
-
Hello, I ran into something like this when i performed my rebuild. I had everything TDC and only to find out that the Distributor was 180 deg out. It is an easy mistake to make. Pull the Distributor out and then set everything back up to #1 TDC (Pull the #1 plug to make sure), now look at the little "Half-Moon" line up on the Distributor and the socket on the engine. Make sure that it is aligned properly, I am betting that this is you issue. I can send you FSM pics to get into more detail if you need. -Andrew
-
I am considering the speaker in the door panel option. Could you sent pics? Please PM me in you need to. Andrew
-
I AM BEGGING YOU! NOOoo. With all of that nice body work, you would leave the holes? These were an aftermarket install anyway.....Sorry, I just really do not care for them, but if you insist! In Fact, I will give you mine (I still have most of the parts) and if you can make use of them, then they are yours. I will put some pics of my Z paint work this weekend! Andrew
-
Zedyone_kenobi - I think that it would be fine to use the "RED" LOCTITE on the portion of the stud that is going in the head, then use Anti-cease on the Manifold side. I believe that RED Loctite has the lowest "Release" of the different Loctite compounds so you might want to be sure. It would suck to have them permanently bonded to the head. The Anti-cease is best for the Exhaust studs, but I put it on all of the outboard side of the studs. Remember, a little of this stuff goes a long way. I will check on the Torque Spec for you, but I think that you will be fine. Just remember to re-torque after a few months. BTW: Your silver Z looks fantastic! Send more pics. Andrew
-
NO. Do Not "Preheat", This would be a waste of time. You are not going to gain anything by attempting to temper the metal. The only thing that you will have to do is check the torque of the bolts after a month or two.
-
Looks like youre on the right track! :laugh: To answer your earlier question, I have broken some of the studs off but if you use lots of WD-40 you should be fine. More than likely what will happen is that you will back the entire stud out of the head when you are loosening the nuts (but that's ok because you should be replacing these anyway). I have reused spacers in the past if they were in good shape, but use new ones if they are available. $50 is too steep, unless of course they are stainless or have some other specialized feature. I would still go with the MSA kit that ZMadnez referenced earlier. Do not bother with a hardware store, those bolts are not designed for this application and may end up backing out from expansion/contraction. If your exhaust manifold is ok and you are reusing it, it might be a good idea to clean it up with some High Temp coating or Calyx Coating from Eastwood before you re-assemble. Calyx is cheaper and would last longer, I used the High Temp coating on mine and it still looks nice too. Here is the link..http://search.eastwood.com/search?asug=&w=exhaust&p=Q&ts=custom Anyway, time to get started!! Andrew
-
I have tackled this problem a couple of times here are my suggestions: FIRST - Order ALL of the Studs, Nuts, Washers, Spacers and Gaskets from Nissan or Whomever BEFORE you begin this work, this way you will have them on hand for the job. Soak all nuts/bolts on intake/Exhaust with WD-40 the night before, then soak again right before you attempt. Start by disconnecting the EGR piping FIRST, use a giant Cresent Wrench or Jumbo Crows Foot for this. You will need an Mechanic's Mirror and a couple of long 3/8" extensions so that you can see and remove the nuts that are UNDER the intake. Sounds like a pain, but if your are patient it will come out fine. There is a bolt under a little cover in the center of the intake -get that one first! Now once the intake is off and you should inspect the exhaust for leaks cracks, etc. If you were thinking of a Header -now is the time to do it. NEVER EVER go to all of this labor without replacing ALL of the intake and exhaust studs! If you have a broken stud(most likely #6 near the firewall), then you can try to chisel it out with a small chisel and a hammer. Just back the stud out by tapping with the chisel - believe me it will come out (Lefty = Loosey). If the stud is broken off way back in the head, then it is Helicoil time! (Drilling out takes some skill to stay level and not drift into the softer aluminum). Stop here and have a good drink. Reassemble by locking two nuts together on each stud and torqueing it in. Be sure to coat all of the threads with Anti-Cease compound as you reassemble everything. PM me if you have any other questions, I can give you my phone # if you need. Best of Luck, Andrew (ZCurves)
-
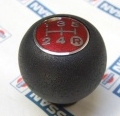
The 1977 zcar knob was black plastic with a green shift pattern for a 4 speed and red shift pattern for a 5 speed. See attached pic.

-
So you're going back with the aluminum channel moulding? or an adhesive type? The side moulding that I previously mentioned is held on with 3M tape and is paintable - I couldn't bear drilling holes in her again!! Anyway your pics are nice can't wait to see in person. I hope I can get mine all back together so we can take pics. Andrew