ZCurves
Member
-
Joined
-
Last visited
Everything posted by ZCurves
-
 Are you attempting to maintain a stock appearance? If so follow Jim's advice. Otherwise you should go to NAPA with your old lines and get std. fuel line replacements. For example, For my '78 280z, I went to NAPA (on advice from others on this forum) and purchased 5 feet of 5/8" fuel line, 8 feet of 1/4" fuel line, 1 foot of 3/8" fuel line, 1 Clear(See Through) 3/8" Fuel Filter. Make sure that is NOT fuel injection (EFI) rated. Fuel injection line will be about ten times the cost and it is not required because you are replacing lines that are on the tank and before the fuel pump. Finally, only buy 1 Foot of 1/4 EFI Rated fuel line. So what to do with all of this hose? The 5/8" line should be cut in two lengths: 1 foot and 4 feet respectively. 1 foot will go from the Fuel Filler to the Vapor Tank, the remaining 4 feet will go from the Fuel Tank to the Vapor Tank. There should be plenty of line to practically route from tank to tank since this is not a 'Formed' hose. Four Feet of the 1/4" hose will go from the EVAP line on the underside of the car near the fuel pump to the top of the Vapor Tank. Another 4 feet of 1/4" line will go from the top of the Fuel Tank to the side of the Vapor Tank. Use the One Foot of 1/4" EFI Fuel hose on the return line from the EFI system to the Fuel Tank. Cut the 3/8" Fuel Line in half and install the Clear(See Through) 3/8" Fuel Filter. Install this line between the tank and the Fuel Pump. The Clear Fuel Filter will allow you to see what the condition of your fuel before it gets into the EFI system. Make sure to discard the tired, old style hose clamps and replace with modern ones. We are talking about fuel systems here -and you want to avoid dangerous leaks and harmful vapors. The cost for everything I just described above was under $100 bucks.
 -
Aww yeah, thanks to those that have submitted pics so far. It looks like to do this project properly, I will have to make several different volumes to show all of the great Z cars we love. I am especially looking forward to including Franks Z's (both deceased and newbie). I will upload each of the files or provide a link as I complete them. The best part is that once you download a theme, you can add more of your own pics to suit your taste... Thanks,
-
I did what Zup did. I painted the block after I masked off the brass Water Jacket plugs. I kept the Head and Intake clean- brushed aluminum. I got tired of polishing the valve cover so I had it powder coated silver (I have a couple of spares in case I get motivated to go back to a polished finish). I purchased a can Stainless High-Temp paint from Eastwood and painted the exhaust manifold and heat shields with that. P.S. If you want to remove paint, try coating it with Brake Fluid. It should peel off without messing up the aluminum finish.
-
PM me for my email address, then you could send them too me.
-
Wade, I too believe that Poly Suspension bushings will serve you well. I have them throughout my '78 model and love the tight feel. Make sure to take the silicone lube that comes with the kit and mix with anti-seize to coat the mating surfaces when installing - this will ensure a squeak-free experience. Be aware of the 'ZX Squat' on acceleration! Many moons ago, when I had a '79 ZX and an '81 Turbo ZX, I had new rubber everywhere and the KYB struts installed, but the ZX's still would squat on acceleration. I finally had some custom springs made that had the same free-length, but 20% more compression - this way I got rid of the squat and maintained proper ride height. So, If you are considering springs/struts, choose a combination that would eliminate the squat and not merely lower the car.
-
Clock Sound - Another good one!
-
That's superb! I forgot about that one. I will see about recording it. My favorite is the Turn Signal, kind of like a spring -then the old school click....
-
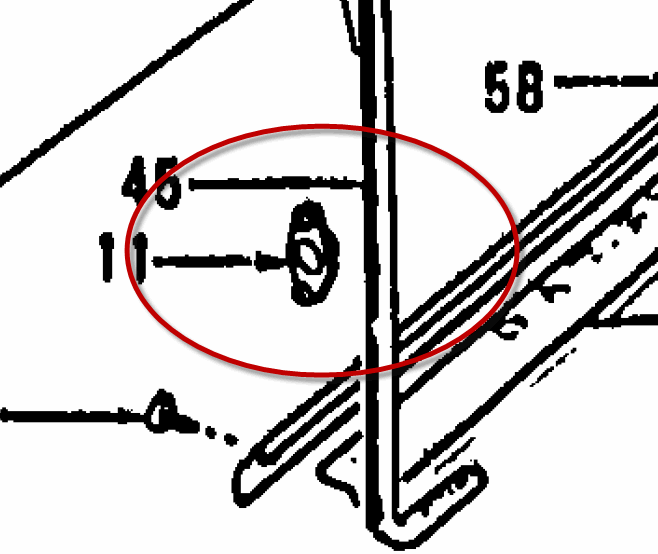
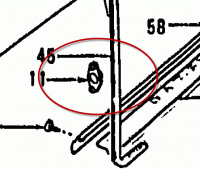
Here is more information: Attached is a pic. Original part number is 76818-T3000, it is called 'Rubber - Seal Door Switch'. Even a pair of good ones from a wreck would be great. Your help is appreciated.
-
Does anyone know where I can get a good set (preferably new) of Door Jamb Switch Seals (Rubber) for a '77 - '78 Z?? Courtesy? Nope. Black Dragon? Nope. Banzai? Nope. I will check with Arizona, but I am really hoping for new. These are hard buggars to find.
-
SportBikeMike: Check this out:http://www.ebay.com/itm/280z-Gas-Tank-/221004105917?pt=Motors_Car_Truck_Parts_Accessories&vxp=mtr&hash=item3374df08bd#ht_500wt_1341 It is a 78 gas tank, it needs flushed and coated but it would work for what your trying to do.
-
Fellow Zed-phomaniacs, I am considering creating a Classic ZCar Theme for Windows 7. I know that it is not a enormous feat to create a theme in Window 7, but there are NONE available and I did not want to scam random photos off of the web to create it. My plan is to get those interested members of the Forum to submit some sweet pics of their Z to me via a PM and I will chose the best 10 or so and assemble the theme. When I am done, I will upload the themes here and each will be free for the taking (and customizing). This would be an artistic endeavor of my own - I will not be copyrighting or selling anything. There might be several themes created from the collection of submitted photos. I do ask that if you PM your photos to me to please keep them 'clean' and be sure to include your name or handle so I can place it on the photo. I will also be looking for sounds -from your Z Cars. I am thinking the Horn, the Turn-Signal (That's a classic sound), Starter, Twice-pipes, surprise me...In the end, we could have a collection of themes that are of OUR cars.
-
Are they anything like the 280z? I have some from a '78 you could get.
-
In your case, I would use the aircraft stripper and then wet-sand out with 2000, 3000, 4000 grit sandpaper. Finally buff with some Mothers Aluminum Polish. Years ago when I first got my Z, I kept the valve cover pretty and polished, then over time I let it slide. Now it is powder-coated Silver - which I prefer much more. Not as pretty as polished aluminum, but I am older and need less to polish.
-
Sorry Sarah, just now seeing the responses, I believe that KurbyCar32 hit it spot on. After you repair whatever is exposed by the dye, make sure to clean the area with Brake Cleaner and then something soapy to remove the dye -This way you will get a 'Clean Slate' for future leak detection. There is also the possibility of borrowing a Halogen Leak Detector to check for leaks. I say borrow, because these dudes are mucho $$$ to buy for the casual user. Just thinkin.....
-
FastWoman - Here is what I would do. I would get a little Florescent AC Dye and get that into your system, then let run for a bit to circulate the dye. Hit everything with a LED Blacklight Lamp to expose any leaks. There are little LED Blacklight lamps avail at the autoparts store (good to have in the toolbox). With the cost of R12 Refrigerant, really all refrigerant - AND your time, it makes sense to identify where the leak is prior to dumping more R12 and $$$ into the effort. Check the Condenser, Compressor(behind clutch), and Evaporator, with the dye it will be very obvious! I believe that it would be a good time to start lining up modern replacement components.
-
If you are looking for a replacement, remember that you could source a part from ANY L28 powered Datsun since they all had the same linkage. I wonder what the latest 810 (Maxima/Bluebird) linkage would fit my '78 ?? Also I have found that when lubing the Ball and Socket assy, you can clean the tiny hole in the socket piece with a Brad Nail and then fill with White Lithium. When you pop it back on the excess will squeeze out of the tiny hole, which tends to leave an adequate amount in the socket.
-
Besides a return line for fuel from the fuel rail what is the difference? You might consider altering your existing tank to accommodate the return line. Just thinking...
-
When I went over my BCDD, I just cleaned it out and made sure the magnet valve functioned. But I have never been sure that it was working properly, so I am intrigued by removing it without problems.
-
Dave this is a great list! Thanks for taking the time to put it together.
-
-
No dummy face required....So problem solved?
-
From your pics it looks like it is the Finisher that goes between the Quarter Window and the upper Door Window Frame. The seal is attached to the Quarter Window by three screws. There should be a small lip of rubber that seals against the Door Window frame when the door is closed. I'll post a pic for you later unless someone beats me to it.
-
Wow, NICE!
-
I used silicone "Tire Shine' and the plastic tool. Take your time and seat the trim glass side first, then work the rubber over the trim on the opposite side. Begin with the top piece, it is easy and straight. Next work either of the two vertical pieces making sure that it lines up with the curves of the seal at the bottom of the window - this will give you the proper gap for the elbow pieces. Finish with the elbows at the top corners and the little finisher at the bottom.
-
Ditto to Jim's response.