ZCurves
Free Member
-
Joined
-
Last visited
Everything posted by ZCurves
-
 Are your seat belts intact and functional? If they are merely discolored by the sun, you might consider purchasing some Fabric Spray Dye from SEM or Duplicolor (here in US). I recently did this to mine and they turned out great!. I also used Duplicolor Bumper Black Spray to paint the housings, etc. The seatbelts in your pic are nice though. How do they compare with the originals? Does the 240 have the retractors as the 280z?
 -
The past Saturday, Ben's Z dropped by the house to show off his new Z (He bought it 30 mins earlier!). A very nice '77 model in near mint condition. Very clean, original interior -almost no rust! But wait -I don't want to steal his thunder! I am sure that he will be sharing a lot with us. I took a pic of a happy man! Welcome to the family!

-
Thats a cool feeling when you lick a problem like that. Removing Hillbilly wiring is always a good thing. Good luck.
-
Do you have access to a wiring diagram for your 260? I bought a color wiring diagram for my '78 from Prospero's Garage, it has helped me very much. Do you have any spares of the various relays so that you could compare their operation. Having been in this situation before, I think that if you can study the wiring diagram first and isolate the components for that system, then it is a matter of eliminating the variables. Like SteveJ mentioned before, get the grounds handled first. Then check and clean all of the Fuses - if they are old then discard and replace with new ones. Clean the contacts in the Fuse Block. I encourage you to clean the Combination Switch (take apart) I bet this is where your problem is. Tip: After you lick the wiper issue, buy some braided ground straps and place one from the ECU to the Body and another from the Engine to the Body. I live in Spring - if you want to get together for a closer look, PM me.
-
FWIW - After you have finished with the Rockers and the Dog-Leg repair, you can apply paint or other rust preventative from the backside. Access the Interior vents along the floorboard for the Rockers and through the seatbelt bolt hole for the Dog-Leg. Nice work all around!
-
Given your last comments, I would look to sell it -Maybe on eBay. You could free up some cash for another Z project.
-
There are very few parts from this model that would fit a early model S30. Maybe the Hatch, Hood, some glass and odds and ends. But it would not be period correct. The fact that it is a 2+2 does not help things either - not because it is a 2+2, but because the dimensions are different (longer). From the pics, certainly it could be fixed. A clean - restored 2+2 is always cool to see. The work could be done in phases so that it is affordable and not as overwhelming. Frame Rail and Pan rust are just part of the deal with old cars. This car is not a dog and parts are available. The Fender could be replaced easily enough and the lower wheel well is available too. The fact that the top side is solid and the engine has low mileage is definitely a plus. Perhaps you could get a Body Shop estimate...
-
Buy and re-sell, you might just double your $$$.
-
Here is a link to a post a started a little bit back.. http://www.classiczcars.com/forums/showthread.php?t=41709 Good to link to other efforts.
-
Dan, Is this something that you really want to do? What about just replacing the tube/fitting instead? The work effort is about the same and you would avoid some potential funky stuff with the rest of the EGR, EFI setup. I think I have some spares. On the other hand, you could change your intake to a '75 model and eliminate all kinds of EGR garbage -Still need to plug the manifold though unless your using headers. My 2 cents.
-
I had the same bloody problem with a Pacesetter Header. When I was putting my engine back together, I did a dry fit to see how it all matched up and noticed a 5mm offset on one of the tubes from the Exhaust Port. What a POS! I went back with the original manifold. In the future, I would like to make up my own flange and re-weld the tubes in the correct configuration - or just throw the hole mess in the scrap bin. It has been years and it still pisses me off :mad:. Pacesetter = Wasted Time and Money!
-
While I was recovering the door panels (with a kit from TooIntenseRestoration), I did the Fiberglass Resin first, then I simply brushed on the Polyurethane (2 coats). I finished up by painting the metal shell on the top of the panels. When everything had dried for a few days, I installed the re-upholstery kit. IMHO, I would try alternative fasteners before using the Butyl - That stuff is horrible to work with. Good Luck!
-
I would suggest Coutest, MSA or BD. But being impatient as I am, I found high quality, brand new ones at the local parts house here in Houston -so I got them that day! I am glad that you didn't crack her up. I bet the veins in you neck were pumping! - you know that feeling. Stay Safe!
-
I repaired the fastener holes with Fiberglass Resin and then used Polyurethane to completely waterproof the remaining panel. For the replacement fasteners, I used an off-shelf set that fit the panels and were a wee bit larger for the hole in the door. I believe they were for Dodge Trucks. The fit is perfect - got them at Advance Autoparts. I like the industrial strength velcro idea that Hogie mentioned too! In other projects, I have used Dual Lock that is made by 3M - this stuff has incredible Shear strength and the adhesive sticks like crazy, you almost have to remove it with floss. It is almost Evil -but in a good way! Here is a link: 3M Dual Lock Whatever you do, make sure to cover the inner door with some heavy ply plastic to aid in protection from H2O. Good Luck
-
There is an article in today's NYTimes that discusses a class of cars called "Pike Cars" which Nissan produced for a while in the 80's and 90's. It is not a Z-Car article but it is interesting non the less. I thought I would share: Nissan’s Cartoon Cars, Once So Hip
-
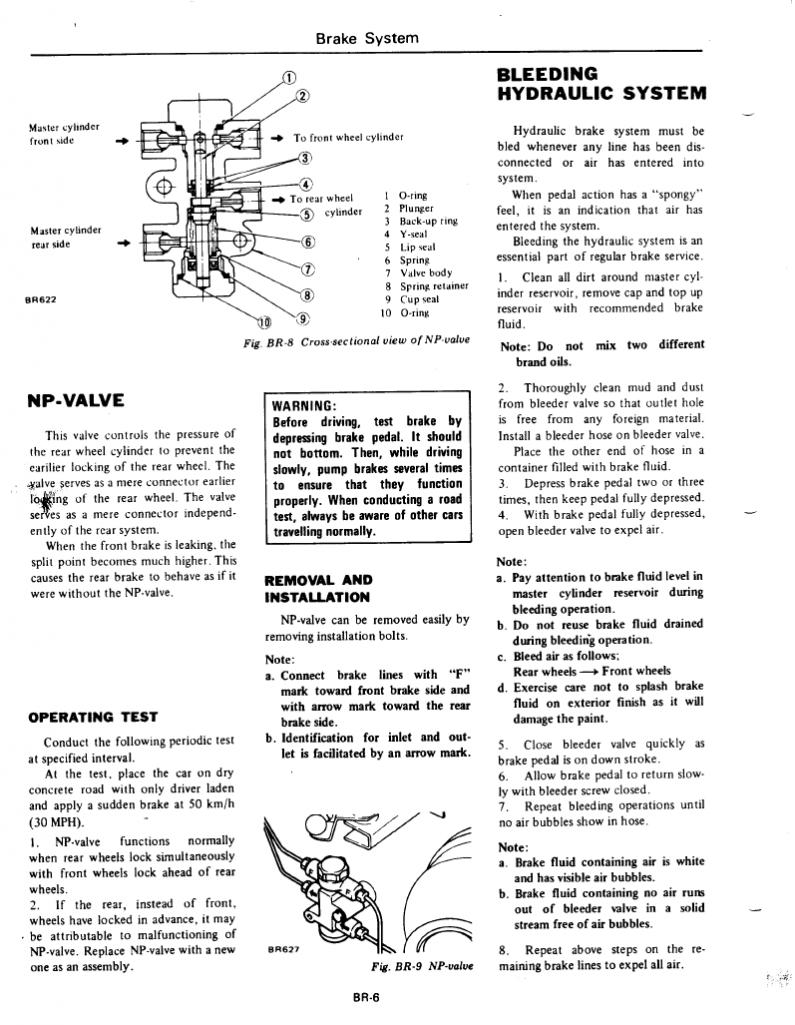
I concur with Zed Head and EverRude - looking more like the Booster. But I wanted to add my suggestionz as well. After all of this work that you have done, I strongly suggest the following (in addition to changing out the Booster). Here we go. Check the Vacuum Check Valve. Many modern Nissans use the same check valve - the Z has a big rubber spacer over it. You might find one off of a wreck. Check the rubber line going to the Check Valve and then on to the Booster. It should be snug, if not RTV it. Check the movement of the Caliper Pistons AND Rear Cyl. Look for binding. Clean,Lube and Properly Adjust the E-Brake Adjusters. There should be significant drag if you are doing this by hand. Remember, the drag will be nothing when a 1000+ lbs is sitting on it. Remove and clean out the Proportioning Valve. The last one is almost always overlooked. Most of us know that it is there, but few have removed it and cleaned it out. You will be absolutely amazed at what comes out of it. More than likely the Plunger is seized up with years of crud. I urge you to take the time to clean it out. If you choose to accept this task, be gentle with the flared fittings -they are soft like the others on the MC. I am attaching a .pdf for your viewing/rebuilding pleasure:).
-
Koalia, I have one that you can have. I am not sure of the Mast, but it otherwise appears complete. It came from a '78 Z. In the spirit of "Paying It Forward" just pick up the shipping and it is yours. PM me if interested.
-
Wow, this is great! Thank you very much. I hope others chime in too.:classic: This is the making of a great Archive. Here are some other relative links within the forum: http://www.classiczcars.com/forums/showthread.php?t=35809&highlight=decals by Travel'n Man http://www.classiczcars.com/forums/showthread.php?t=35807&highlight=decal+position by motorman7
-
It is the responsibility of the shop to replace a component of your vehicle that they damaged while it is on their premises. It is well documented how to replace this part and you provided that documentation! They could have also gone to AllData.com for instructions. It is a matter of what a "Reasonable" person would do. Ohio has some good consumer protection laws. Below is their contact information. Consumer Protection Section 30 E. Broad St., 14th Fl. Columbus, Ohio 43215-3400 (800) 282-0515 Now being practical, I would ask them to reassemble the car so that it may be safely removed. You should NOT pay them anything, since they damaged the car! They know that they are Liable and have no grounds for a Mechanics Lien. Be sure that you tell them you know this!! They would be stupid to try it - there is no Theft of Service. You can find another shop that can perform this work or locate a stub from a member of this forum and do it yourself. Worst Case (until you find a replacement Stub Axle): You could use the old nut on the stub. Properly torqued, it shouldn't come off -you could even spot weld to lock the nut to the axle (since it is shot already) -just be sure to use your old nut. Good Luck.
-
I like Nutz approach, except that I would add Anti-Seize compound to the threads. I used this stuff all over the place to keep problem fasteners from sticking in the future. A lot of the OEM fasteners are soft, combine this with rust and age and Snap! It is just a cheap bit of insurance.... Good Luck!
-
Ok, so I have my 78 that is finally getting to the last tidbits of restoration and it just dawned on me that I did not take care in documenting the positions of all of the various factory decals when I tore the car down. The FSM only shows vague pictures but without measurements. I searched the forums and found some great shots of the 240 Radiator and Color Code -but that is about it. So my fellow Zed-Heads, I am asking for your assistance. Can you please post pictures of the locations the various factory decals on your Z's AND be sure to include a tape measure to a nearby panel or structure so that I can get the orientation correct! I know that this might seem a bit nit-picky, but I have a lot of effort in my Z and really want to get the decals applied correctly. Although I am particularly interested in the 78 model, I believe that feedback from this posting could provide a great deal of value to others in the future. By The Way.... I purchased my decal set from Mike at Banzai Motorworks (http://www.zzxdatsun.com), give them a visit -you will not be disappointed with their products. Thanks to everyone in advance! I really appreciate your time and effort!
-
A while ago, I spoke with the product manager at Precision and he told me that they definitely were re-tooling the molds to make a better fit. Perhaps they run the stock out to make room for the new kit. I would call them and ask, they seem very open to questions. Go to www.prp.com.
-
Well in the spirit of "Paying It Forward", you pay for shipping and its yours. I will not be using it and it is gathering dust and taking up space. PM me if you are interested.
-
I would remove any Fiberglass that you may find. It looks like the PO left you a present! Since you have the tank out, you should avoid temptation to keep the filler tube, it is 38 years old! Just replace it and be done. The other brittle lines were likely your problem. Just flush your tank real well, clean the Sender and you should be good to go!
-
I have one off of a 280z, would that work??