


rocketdog
Free Member
-
Joined
-
Last visited
Everything posted by rocketdog
-
 My new toy: 2010 Aston Martin V8 Vantage Roadster. Only 4700 miles. Automated manual tranny. My poor 40+ year old Z is relegated to the storage barn.
.thumb.jpg.0ced016cbc2edc673f7151212ddcf748.jpg)
.thumb.jpg.a496fbeab7d3d8a4acedbf2a5e19bd48.jpg)
-
One year update: I reinstalled the OEM electric fuel pump. I've been getting some fuel starvation and possible vapor lock this summer. After hard acceleration through the gears, once in 4th it starts cutting out till enough fuel gets to the bowls. After sitting and heat soaking at a store I get stumbles the first 1/2 mile or so after leaving. My pressure gage reads 3-4 psi when cold but hot it fluctuates between 1 and 3. I don't think my mechanical pump is putting out enough so I reinstalled the electric pump today. Cold or hot I'm now getting 3-4 psi and no fuel starvation after hard acceleration. I did have a minor stumble driving through traffic accelerating from a stop light. Temps about 90 today. My mechanical pump might be weaker than spec. I've studied all the posts covering aftermarket electric fuel pumps, but want to avoid the hassle of the wiring and inertia cut switches and redoing/adding SS braided fuel lines.
-
Read my thread as a reference "Remove/replace fuel tank" from last month. I used Performance Radiator, I think they are a national chain. $165 and they do a thorough job, even banged out a dent I had and repaint the outside. It was worth the two hour drive to their shop.
-
I put Cibie Series 95 driving lights above the bumper way back in the late 70's when I lived in the boonies of Wyoming. They are halogen.....fairly new lights back then... so I could see the "prairie goats" (antelope). They are wired with a relay direct to the + of the battery but with the switch tied into the high beam switch so they'd only have power if the high beams are on. I put a rocker switch into the dash heater duct trim so they can be on or off with the high beams. The front bumper is the ground so there's only the hot wire to them. The plastic covers got weather-beaten so I've "bondo'd" and patched them and repainted because I cannot find replacements and the car is also a show car now. Everything still works.
-
I have been getting lots of crud in the fuel filter requiring a change every several hundred miles. So after 40 years the tank needed cleaning. I downloaded the Z Tech Tips for tank removal from the atlanticz.ca website. Most of the tips are similar except on my late 260 there is no need to do anything inside the hatch. The day before the removal I shot PB Blaster on the tank strap bolts. Removing the two vent hoses from the rear of the tank was my most difficult task since there is so little room to work. I had to cut the larger old braided line off the tank connection. The filler line actually came off easily using the weight of the dropping tank to help slip the filler hose off the tank connection. Performance Radiator in Phoenix did the cleaning and also banged out much of a dent I had in the rear of the tank. Cost was $165 and took them about a week. They are a national chain I believe. While the tank was out I checked my fuel sending unit as I was not getting any reading on the fuel gauge. The ohm readings for the sending unit were in spec and fluctuated correctly when the float was moved. This meant the fuel gauge was the problem. I tried several tests trying to see if the gauge would work and I got no results. I dropped the gauge off at Z Car Source in Phoenix (they have a website) and they recommended a rebuild to make sure the wiring was compatible. They shipped the completed gauge back to me within a day. Installing the cleaned tank: After regluing the rubber bumpers back on I jacked the tank up and canted it at a angle to get the two rear vent hoses attached. That was the worst part of the reinstall as there is little room for hands to work. Also having to cut one of the vent hoses required a splice of 5/8" heater hose to make it long enough to attach. Replacing that hose would be a huge task as it winds up through the rear and side of the back hatch to the evap tank. Once I got those attached I used the jack under the tank to push it up to help reinstall the filler tube which takes more finagling. I put all new fuel lines on and new filter of course. Connecting the fuel sending unit wiring is fussy. Those connectors are the trickiest to get on and 40-year-old rubber covers don't flex easily. I put dielectric grease on the connections. I reinstalled the fuel/amp gauge, filled the tank and got a full reading!!! Finally after all these years. A bit of cranking to get fuel up to the front but she runs fine and probably likes all the nice new clean fuel.
-
Dropped the fuel/amp gauge off at Z Car Source (they are available via the web) in Phoenix. They recommended doing a rebuild to assure compatibility with the wiring versus buying a used unit. They shipped the completed gauge back to me within a day. I installed the now cleaned tank and gauge, filled the tank and hurray!... the gauge now works. It actually reads full for the first time in years! The cost of the rebuild after many frustrating years was worth it.
-
I dropped my gas tank for cleaning. The fuel gauge hasn't worked in a while. Checking the sending unit I'm getting ohm readings close to spec plus fluctuation from full to empty. Back at the tank area upon doing the gauge check by grounding the yellow (live), the gauge is supposed to bury the needle, nothing happens. Connecting the hot and ground to the meter I'm getting continuity reading. From those indications it appears I need a new gauge. Rebuilt are $200 which I will get if what I'm doing I is correct. Are there any other tests available?
-
I am a wood worker as well as Z owner. This looks really cool. Think I'll order it. One of the big problems with multiple hobbies as wood working, home renovation projects, my wife's kilns for glass fusing and Z show car is they demand different environments. Sawdust and nice paint on Z's don't mix well. Fortunately my new 800 sf garage allowed me to put in a dust collector system and somewhat isolate the car. Now just to move some of the wife's glass stuff out of my "man cave".....yeah, right
-
-
Installed the mirrors per instructions and they look great. The connection point is extremely strong. The screw goes through the plastic insert which increases the grip. These are very solid connections. The mirrors feel more firmly connected than OEM. No vibration either. Best after market fix. The new mirrors didn't have as long a base as my old ones so had to try my luck at body filler, sanding, priming, painting and clear coat of a small area. Impressed the hell out of myself, though a body guy would know I'm an amateur. Since it's only 2 screw holes and the area around it, it's not very noticeable. The clear coat did wonders and blended everything in nicely. At car show last weekend one would never see.
-
took out the electrical pump and checked the filter. Sloshed it around in gas and some crud came out but not enough to plug it. It's the original so 39 years......... Blew dry it with compressed air and stuck it all back onto car...mostly for the bracket so I have someplace to anchor the plastic fuel filter. Did not reattach fuel lines to it. Did plug the return line at the carbs and now I'm 4-5 psi vs. 2psi with return. I would suspect that with the electrical and the mechanical running together there would be more pressure as I was getting 4 psi with both when the return was used. If I remember I think with the return plugged it was too high like 6 or so with both operating. Car runs fine. Anyway big local car show tomorrow, only a couple of miles away. 10/5 I go to the All Datsun Show in Winslow, AZ 3rd Annual Multi-State Datsun Classic (75 miles for me). Certainly don't want to croak in the boonies on I40. Great show with pre 1985 Datsuns only....lots of old roadsters. Found a new problem tonight. After detailing I started her up to pull into the garage. Decided to turn the headlights on. Dash lights didn't work till you hit the high beams. Anyway started smelling smoke from electrical so turned them off. Another project, another day.
-
Success! Banjo screens clean. Disconnected the fuel line at the electric pump and the mechanical pump and blew out the line....just in case. Then connected the outlet from the fuel filter directly to the hard fuel line bypassing the electric pump. After serious cranking to get fuel up front she fired up and ran flawlessly. Still need to check out fuel pressure issue and gauge only reading 2 psi. I do have a fuel return line with regulator but it never seems to do anything. I will block off return line this afternoon and see what pressure is. I'd like to be 3-4psi. Hope the mechanical pump isn't wheezing out. Haven't tried car under load yet as is on jack to get to rear pump and filter. The filter at the electrical pump may be plugged but bypassing was way easier than taking that thing all apart. Per all the threads here and other sites I don't really need the electric pump.
-
The 260 has run fine (triple Webers) though infrequently. Drove fine last week. Today after hard starting (usual if it sits awhile) it ran rough then died. Lots of cranking and a few coughs of life but nothing. My first thought was clogged fuel filter. Sure enough it had junk in it so put in a new one. Unscrewed the fuel line pump to carbs and had fuel from pump go directly into a plastic bottle. Did get some fuel ( but didn't seem to be a lot) but connected everything up and the car started but didn't run well after a while and then died. Unhooked line from tank to filter and drained about a quart. Fuel looks fine. Tried again to start but same symptoms: Runs awhile then dies like not enough fuel. If the OEM electric pump is faulty (or plugged) can it impede flow? My thoughts are to bypass the electric pump and use only the OEM mechanical as it should be enough for the Webers as it has in the past. Comments?
-
yeah, unplug the sumbitch! I dumped all the Fed imposed crap decades ago: seat belt warning including under seat sensor, ignition interlock and other junk. Car still starts and runs fine..........for 39 years. I always wear my seat belt, just don't need Uncle Sam telling me to!
-
Whoa! After years? Decades? I finally see a mirror that really looks and performs great. Most mirrors offered by MSA and others are crap. Think I got mine at Checkers (O'Rielly) after I had the car repainted...they are less than adequate to lousy. Comment: It would seem as bolts through the door with backing plate like OEM would be way stronger. I can see bumping into it (me or some other bozo) and it rips out. A couple of sheet metal screws do not hold much. I know it's a PITA to take apart the door panels and stuff and deal with the backing plate that you can only really install by feel. Comments?
-
I know there's lots of threads about this...and I think I've read them all. I installed my triples last year and decided to keep the stock mechanical fuel pump. It puts out quite adequate volume and pressure for the triples. I have a pressure gauge before the carbs and regulator on the tank return line which keeps the pressure at 3-4 psi. The car runs great even under heavy acceleration...no fuel starvation. My question: why does it take so much cranking to get fuel to the carbs for the engine to fire when cold and the car has sat for a while? The pump is supposed to have a check valve to prevent draining of fuel back into the tank.....correct? It seems I'm pumping new fuel from way back at the tank. I do have the stock electric fuel pump at the tank, but that doesn't kick in till the engine cranks up to a certain rpm. When warm the engine cranks quickly. I had the same problem with stock SU's....lots of cranking when cold. I know most have gone the electric pump route with inertia switches and stuff. I know the carb bowls will eventually evaporate, but the mechanical pump volume can easily fill those. (I know the fuel evaporates as my garage stinks for a day after running the car...that's a question for another thread: Stinky Webers) What simple, dumb thing am I over looking?
-
I think the interior has a lot to say about what color the exterior should be. It's far eaiser to change the paint color than the interior. I personally like the blue with a white interior, but green with a saddle/butterscotch interior is #1. Black is elegant, but takes a lot of TLC to keep it that way. You gotta look at the whole package.
-
I've been in many car shows over the past 6-7 years and so many of them are full of the Detroit iron. Most times I'm the only Z in the show among a few other sports cars. I enjoy the conversations with viewers about their story of when they had Z years ago...heard hundreds of them. If you consider your Z car among all the others YOU are the unique one in a sea of Mustangs, Camaros and Vettes. Have I won anything..sure and it's fun, but that's not the reason to go. I just recently entered a Tri-State All Datsun Show nearby in Arizona. Whata Hoot! I don't think I've talked so much with so many great Datsun enthusiasts ever! Z's, 1600/2000 roadsters, 510's, pickups. It was the best show ever. I didn't win an award though many stated they voted for me...there were some great pristine 240's that did and should have gotten the trophies.
-
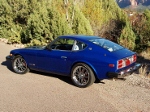
Been gone a while and just saw this tread...What a "barn" find! Like the car has been frozen in time. Definitely a lot of maintenance things to do as outlined by the forum. You'll never make it a driver till you do things methodicaly. What intrigued me was it is real close to my original 260 in all aspects except color. You manufacture date is 11/74, mine was 12/74. Your VIN 66522; mine 69276. O fcourse I've owned mine since new so know everything about her, but you've got a real classic there and hopefully some good bones to keep her on all fours.
-
I had similar problems with the Unilite I installed after I installed the Webers. Got totally frustrated and worked with an MSA tech and we figured out it was defective. It was Summit purchase so sent it back with full refund. Have been running since on the stock 260 Dizzy with stock electronics and the vacuum disconnected. BTW, I know you are a stickler for detail: Take some acetone and a rag and clean off those sloppy factory baby blue markings on your Webers.
-
I just put Webers on my 260. Read my write up under S30 carburetors: Triple Weber Install. They are pricey but no where near the monsterous finicky things some have made them out to be. You just need to understand how they work and what needs adjusting...once. They will add considerable HP to your engine. I've run round tops SU's for years and these triples blow them away. The Webers offer way more tuning capabilities if you want to "track/autocross". There are other threads on this subject. Lots of good writeups with problems and solutions.
-
I just bought the chrome finishing piece from MSA last year: $28 for one! But I've been looking for one since I redid the interior years ago and the original got conveniently lost and then found but crushed begind the workbench. Do they have the piece you are looking for? Might be $$
-
In my earlier reply hiking/camping outdoor stores have different widths of typically black webbing used for daypack and backpack belts and straps. The 2" can actually be seat belt webbing. Climb-spec webbing, called tubular webbing, is way strong and typically comes only in 1" and 9/19" widths. It does come in colors though which your store may have a choice of if you wanted a bit of bling.
-
Most hiking/camping outdoor stores carry webbing on spools that can be cut to length in 2", 1 1/2", 1" and 3/4". They also have climb-spec webbing (thicker and rated to hang your life on it). They also carry all sorts of buckles and fittings that you don't even have to sew anything. (I know because I own such a store) I did my straps years ago.
-
No lock washers. Just installed triple webers with new intake manifold and new intake and exhaust gasket and new studs and washers....no lock washers...and none came off the old studs.
.jpg.ac815c2181ff5ccc89d6c0a63fcb76a7.jpg)
.jpg.ade5f60b0681f47c7f0d43b5a8991a4b.jpg)
