madkaw
Community Member
-
Joined
-
Last visited
Everything posted by madkaw
-
That FSM is handy for those kind of questions. Bet your ready to get it running!!!
-
That's pretty weird. It seems you have covered the basics and more! It seems if you had excessive fuel pressure you would be dumping fuel . No holes in your floats is there?
-
Okay guys, revisiting an old but still lingering issue. I still have a rear main seal issue, but not as bad. I will cut to the chase, I removed my oil pump to examine the passages and to check everything out. Am I missing something here, there was no ball under the spring. There was a piston type deal under the spring, but no ball anywhere. I have been trying to find a breakdown illustration, but everything I found shows a ball and spring. This is a high volume pump from MSA. I'd appreciate some insight here.
-
Steve, you haven't tried the shut-off switch yet for the fuel smell? I think just breaking in a motor and and getting bugs worked out in your new engine is a great place for SUs. Though the Mikuni's and or Webers can be made to run better than the SU's, the SU's being more simplistic are a better way to get started. It's important to break in a motor properly and I wouldn't want to be dialing in triples on the fly with a new motor. Now Todd at Wolfcreek could get you close with a rebuilt set and you might get lucky to dial it in fast, but the SU's are almost full proof and cheaper to rebuild and maintain. Oncce you get the motor where you want, someone will gladly buy your SU's so you can upgrade.
-
What dizzy are you running?
-
Have you done a leak down test on the motor? You might be losing compression because of the head and nothing else. Time and money would be better spent on a head swap if the bottom is okay. These bottom ends are about bullet proof, so I would suspect it is all head problem. If the motor is shot you might as well do the complete turbo swap and not break the motor apart and source out stock electrical to get you going. Then again you will spend more money than you think doing that. I think the turbo engine without the turbo will be a dud
-
Without having to look it up, where does that put the pistons are far as deck height? What HG are you using?
-
Looking good! I almost forgot you had this project going on.
-
Thank God your almost done, now maybe you can clean that shop . When I see these engines dressed up with the triples, I DON'T say "WOW, I could of had a V-8". The L-6 screams exotica dressed up like that. Very nice work Stephen.
-
Good catch. Just replace everything like you said. I imagine with new chain and tensioner the tensioner will be back in it's place. Check your FSM for the proper placement of your guides. I agree with the statement about your valve timing- this should make your engine run different and probably better. You can find timing covers used pretty cheap on these forums, winding spend much money trying to fix that one.
-
Damn, my I phone won't support flash player
-
Well, how did it run?
-
Those rubbing points would be difficult to see because they would be close to the top of the bar, which is very hard to see. I will be taking a closer look this week when I get time. Meanwhile I was wanting to look others and see how their spacing was.
-
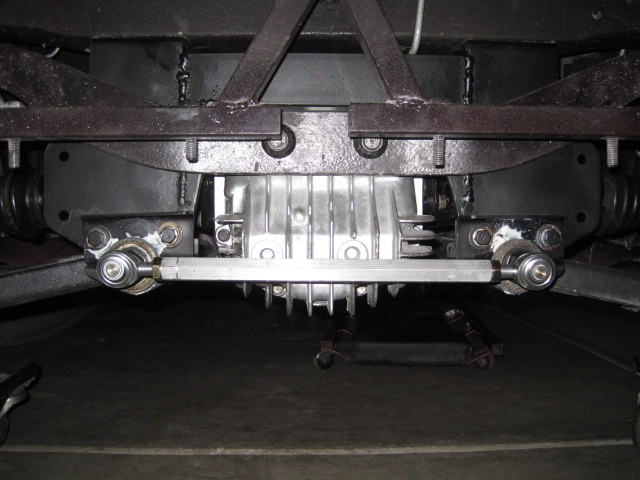
Well I thought I had some pictures, but I must have deleted them and I am out of town. I used the GM poly mount and have removed the lower mount. I have checked everything, but I will check again for tightness. Mike posted a pic of what I was looking for, but his year is so early that his moustache bar is straight, which is different then mine. I was looking for the spacing or gap between the moustache bar and the down-brackets. With a curved-type moustache bar it will be closer than Mike's car. I think mine is too close and with any flexing of the moustache bar it is coming in contact with the down bracket and creating a clunk. Now that I am running a R-180 STI limited slip, I believe the flexing might be more prevelant-coupled with the fact that the r-180 moustache bar is not as strong as the r-200. Also, I had done some reinforcement-gussets that actually connect the control arm brackets which makes the clearance even less. I will post this pic of my set-up with the r-200, so you see what I mean
-
It's not worth going coil overs for a daily driver. Most if not all coil- overs mount solidly to the tower and will increase road noise-a lot. New struts will make for a nice ride and good handling Make sure you check to see that the gland nut that is supplied with the struts threads in far enough to hold the strut in place with no movement, or you will develope a clunk in the suspension. You might need to use a spacer on top of the shock to make sure it the gland nut seats the shock!
-
Mike, The first pic was what I was looking for. It looks like you have about an inch between your moustache bar and the vertical brackets for the control arms. As far as what they did with the moustache bar on the later 240's, I'm not sure, so enlighten me. I thought I remember reading that they changed things ,but I can't remeber why or how. I was also hoping someone will chime in that has installed the RT mount with their r180 diff.Hopefully a model later than 71
-
Anyone- please!
-
I prefer the look myself
-
How do we know he installed 73 pistons?Did your machinist cut some small reliefs in your pistons? From what I read, with a stock Nissan gasket( .047 or 1.25mm) he would be around .035 head to piston clearance, which is good for squish. That is what I am running. I had .005 taken off the deck and stock piston height--no problems.
-
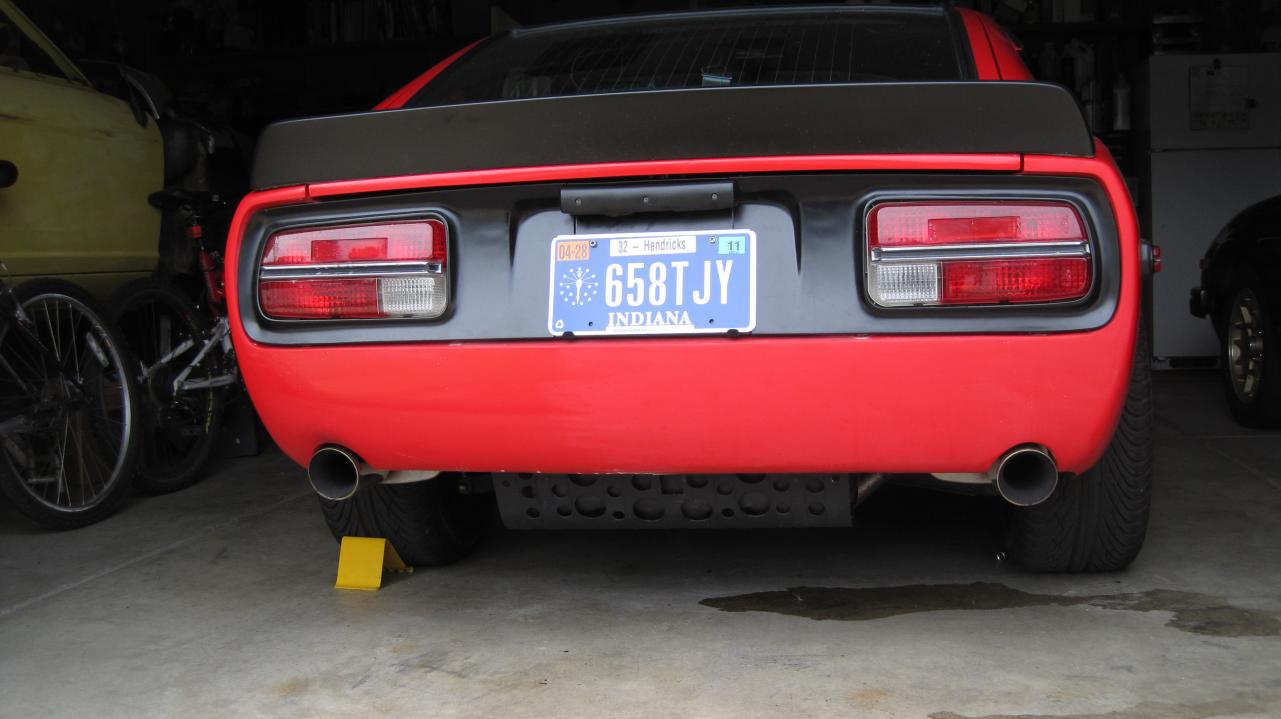
Who's Herman, well he's the guy actually making these flares-Hartman Fiberglass. He admits to making probably 400 sets of these and selling them to MSA(biggest buyer) and Les and probably others. He was aware of the situation and knew who I was. I guess I am one of few who has voiced a real problem with the driver's side flare. Though I have read many complaints on these forums about flares not fitting properly. Herman said flat out----this is not Les's fault, it is his. Les pointed out to Herman what the problem is, but Herman can make money selling them just the way they are, so why take time to fix them(paraphrasing what herman said). Time is money to Herman, and he is just a poor small business man. This fix would take an hour of bondo and redoing the mold, which Herman said he will do next week-we will see. I said to Herman,'maybe I'm just picky, but I want my car to look right', and he agreed that he would be picky too. I recieved an e-mail from Les and he will refund me, but I don't know, I might stick this out and pester Herman for everyones sake. If I eventually give up, I will return the flares to Les and move on. I wish someone could drop a driver's fender off for Herman so he can see how the flare fits
-
Les, I am sympathetic to your issues as a small business man, and I have tried to conduct my business with you keeping this in mind. You know I have had patience, I I have tried to give you time to work this out. I guess my biggest issue has been the communication, or should I say lack of. It took you 4 weeks to acknowledge that you recieved back the bad flare-which I paid to ship to you. It is obvious that you can type by looking at the novel above. I would have been pleased with a one-liner every once in a while, but I always had to persist to get a response. And to be clear, the refund was pending on whether you could come up with a fix. I was never given a choice of refund or wait. I guess I can look at this a doing a service to the Z community as far as noticing the flare had a defect, so maybe we can get these out of the system. As far as you Les, I will say again, there is nothing personal about this . It is obvious that have pleased many customers and I hope you continue to do so. regards Steve
-
My e-mail string with Les-note the dates, and still no satisfaction; I went with Classic Datsun to try an avoid such issues that I thought might occur with MSA, I guess I guessed wrong. This is NOT personal, this should be BUSINESS. June 21,2012 Steve Yes I know that I returned the flare to the shop nearly 3 months back immediately after getting it back from you it has been my goal to re-do the flare my way with a different shop but so far I have been way too busy to do so. That leaves the shop I now use who is the same shop that make the flares for motorsport auto. he is alway involved in some kind of project that is a big deal to keep him in business and he has beenb thrashing on the newest one of those for Honda which is true and not just a lame excuse. he has promised that he has a guy fixing the flare today and will also fix the mold. he is apparently delivering the Honda racing project today and has promised again so if this happens I should know sometime next week and if not resolved Then we can figure out what to do. Sorry Les Les Cannaday Classic Datsun Motorsports 345 Olive Ave Vista, CA 92083 (760)940-6365 (866)288-8340 fax --- On Thu, 6/21/12, stephen finnerty <s_finnerty1018@comcast.net> wrote: From: stephen finnerty <s_finnerty1018@comcast.net> Subject: FW: ZG flare To: "Les @ Classic Datsun" <z432@pacbell.net> Date: Thursday, June 21, 2012, 9:23 AM Les, I looked thru my e-mails and you have had the bad flare for 3 months. I need a decision here, Steve From: stephen finnerty [mailto:s_finnerty1018@comcast.net] Sent: Monday, June 18, 2012 7:32 AM To: 'Les @ Classic Datsun' Subject: RE: ZG flare Les, I really need a determination from you on this issue. Sorry if you think I’m not being patient, but this has gone on for months and I need to do something about my tire rubbing issue. I would like to move on and find another source unless you can resolve this issue this week. Thanks Steve From: Les @ Classic Datsun [mailto:z432@pacbell.net] Sent: Friday, May 04, 2012 10:33 PM To: stephen finnerty Subject: RE: ZG flare Steve They promised to get on it right away and I have suspended selling them until I resolve this issue. They told me that it was in the queue to be repaired and remolded but I called the other day and they are trying to get something finished over the weekend. We can only hope to see the results next week to see what happens. Les Les Cannaday Classic Datsun Motorsports 345 Olive Ave Vista, CA 92083 (760)940-6365 (866)288-8340 fax --- On Fri, 5/4/12, stephen finnerty <s_finnerty1018@comcast.net> wrote: From: stephen finnerty <s_finnerty1018@comcast.net> Subject: RE: ZG flare To: "'Les @ Classic Datsun'" <z432@pacbell.net> Date: Friday, May 4, 2012, 9:14 AM Les, It’s been about a month and was just curious if you ever came up with some flares for the driver’s front? Steve Finnerty 317-979-9929 From: Les @ Classic Datsun [mailto:z432@pacbell.net] Sent: Wednesday, April 04, 2012 4:45 PM To: stephen finnerty Subject: Re: ZG flare Steve Got the flare and got to compare it to about 6-7 others at the fiberglass shop on Thur. last week. Had to leave at 5am the next morning for the track and their is very poor service up there so I did not e-mail the results yet. ALL the flares going back to my original molds have the same exact shape as the one sent to you and all the ones MSA sells have it as well so my guy decided to fix the flare and use it to repair the mold and is making us a new mold and a new part for you. As soon as I know more you will too and sorry for the bad communications. We are trying to do too much right now!!! Just called him and no news yet. Les Les Cannaday Classic Datsun Motorsports 345 Olive Ave Vista, CA 92083 (760)940-6365 (866)288-8340 fax --- On Sat, 3/17/12, stephen finnerty <s_finnerty1018@comcast.net> wrote: From: stephen finnerty <s_finnerty1018@comcast.net> Subject: ZG flare To: info@classicdatsun.com Date: Saturday, March 17, 2012, 7:12 PM Les, I fed-exed the bad flare to you. It is the driver’s front side. Tracking # 045782815054616. Please let me know when you get it. Thanks Steve
-
I repaired a 71 a couple of years ago that had sat around for 18 years. These engines are tuff! I bet you can get it to come back to life with less effort than you think. Squirt some oil in the cylinders and turn it over by hand with the plugs out--have you done that yet?? Another thing that will be helpful--please try and post here using proper grammar and punctuation. You will be better recieved by the members if we don't have to try and decipher your posts. We aren't the grammar police, but you will get more cooperation if we completely understand what your telling us. Example:rebuild? i have all the equipment to do so. and mechanically? im not so sure yet havent look much into it. I have no idea what you just said! .
-
Watch out- I think that's what starting my bulging disc in my neck. That's why the last time I pulled the motor and left the tranny in why repairing my rear main seal. You really have to jack the car up high and then it's a lot of grunting while on your back. Good job cursing your way thru it!!
-
Breathe----ahhhhhhhh, another breathe-----ahhhhhhhhh, yes ,relax my son. You seem to be spinning here, so you might want to slow down. Welcome to the club of Z's. Might I recommend you do a lot of searching of what others have done. Might I also suggest that you shoot for just getting the car running so you can enjoy it. After you have it running you can decide where to go from there. There are actually many threads of people who were in the same scenerio with acar that sat around for a long time-you might want to search those. Don't get all worked up on high HP numbers or fast the car could be, they are just fun cars to drive and look cool too. If you get in to deep in the beginning you will get discouraged and not finish the project. It's much more fun to do enhancements as you go, so your ride is down too long. Start with the basics and we will help you get it done. Get fuel(clean fuel), spark and some air and that engine will probably be fine. You can get fuel tanks cleaned and coated or do your self . Good luck Alex