madkaw
Free Member
-
Joined
-
Last visited
Everything posted by madkaw
-
 You will hard pressed to improve on the cooling over the original 3 core radiator. The radiator shop that flushed mine was VERY impressed on how well the radiator flowed. It's a shame to have to redrill your support for the new radiator. I think you will wind up cutting your tunnel about an inch to move the shifter foward- If it is the same as the t-5 tranny. Then your console will have to be moved foward or replaced by a newer console. But maybe this is only true with the t-5.
 -
That was mine actually! sorry there is a patent pending!
-
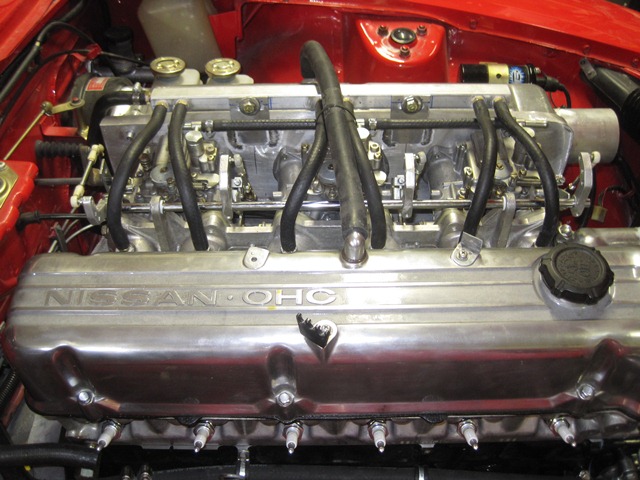
Have you visually checked to make sure the jet NOZZLE is seated up against the body of the carb. There should be no brass tube showing with the choke off. If that nozzle hangs down it will cause a very rich mixture. When you put the needles back into the piston of the carb- did you fit them flush or how? Now you have it running- what do the front plugs look like? Did you check the syncro balance at 3000 rpm?( air flow) Do you have a picture of your current set-up so we can see
-
You never answered whether you experience any bobbles or any hesitation during hard/fast throttle tip-in??
-
Talk about a time capsule!
-
Nothing personal was taken, we are exchanging thoughts. I DO have some idea of what my AFR's are doing, but in a limited range. At cruise-where the pilot circuit lives, my gauge seems to work okay. Only large swings in AFR throw it off. At cruise with the 65's I am running around 14(which I could dial in richer), which seems lean based on what you have learned and what seems typical with Mikuni's. Examining the plugs seem to verify this with the fact that they don't show any color, or soot, or anything but a slight tanning on the porcelin. Also my tail pipes are clean, actually cleaner than anytime I was running SU's with SM needles. I can't explain the difference, but my engine runs better than it ever did with the SU's. I don't see going backwards on the pilot jets and Todd agreed with me to go bigger. As far as the main air jets-not sure if I understand your statement. My understanding is the bigger the main AIR jet, the higher the rpms needed to draw in the main jet. Also, you are saying that Todd suggests 12.7-13 under load-are you refering to cruise?
-
I guess I never had much discussion, or Todd never mentioned about the BS associated with the pilot setting. I have been going by the Mikuni manual refering to the 1 turn rule. I am pretty sure that I am not running as rich as you, but I do believe that is where these carbs like to run. Todd never really gave me numbers to go by as far as jet sizes, infact he thought the 57.5's would be close on my engine, but they weren't even close. Like you said ,every engine is different, and my engine is especially unique running a CAI and a vacuum log. I have been trying to listen for detonation more than anything and using the butt dyno-which is usually not accurate. Sounds like you and I are keeping Todd busy with all the jet orders!! The biggest suprise for me is the size of pilot jets my engine likes to run, I haven't found many threads showing engines running this big of jets. Do you have any bobbles at all during a hard tip-in of the throttle? I'm talking a quick tip-in?
-
Mitchell, I wish i could tell you, but this where my wideband fails me. It hasn't been in the budget to replace it, so I'm just doing the best I can going off my AFR's at cruise and looking at my plugs.
-
I have the car running pretty good, power feels decent and the wideband shows a nice 14+ at cruise. Still have a slight bobble that only happens at the hardest tip-in. I went ahead and rechecked my adjustment on my pilots(62.5's)and I was out over 2 turns. So I reinstalled the 65's , and dialed them in-but I am still over 1.5 turns . My useless wideband really didnt give me a good indication of any change. Infact my gauge seemed to get more erratic with the new pilot size. I did get the engine running smoothly and-- at first, it seemed to be a bit torquier at the low end. So I am giving these tid bits of info as background to what I did next. I decided to bolt on my vacuum log again to see if I noticed any difference. The most immediate thing I noticed when driving the car with the vacuum log installed was-- a stabilized AFR on my guage. I couldn't seem to get a stable reading when I first installed the 65's , but with the vacuum log the reading was very stable?? Also, the vacuum log also seemed to lean out my AFR. I don't believe I have any vacuum leaks, the car has a rock steady idle at 750rpm. One last thing, is there a secret for starting the engine after it's hot? I don't have any issues on initial start up, but after driving it and shutting it down, it is difficult to get started. It usually takes a second try. I've tried different things like -one pump of the gas pedal, or giving no gas at all. Maybe I am trying to run it too lean at idle? Current set-up 65 pilots-1.5+ turns 200-main air 160-main jets 40 acc. pumps-set on the highest setting Vacuum log is 3/8" lines to ALL runners, and 3/8" to the PCV, and 11/32 to the MC booster I'm going to the Midwest Heritage Z show, so I will have plenty of miles to play with the mixtures!!

-
I would think any leaks between the AFM and the throttle body would be of signifigance. Your AFM is measuring the amount of air going to the TB and you are sucking more air past the AFM that is NOT metered. You could try the old propane test and see if you are sucking air in that area. Some guys use carb cleaner to spray around possible leaks also. If you note any change then I would suspect that the tape is not holding or other cracks have formed. Not sure what the second pic is
-
Hysterical!!
-
The little rubber flaps are stock and you are right on their purpose. I replicaded these using some rubber sheet. It is a good idea to close this area off from stuff getting trapped back there and rusting out things!!
-
Break in is all about the rings seating. Since they haven't seated yet I would assume your compression wouldn't be very high yet. The good part is all your numbers are the same , so it seems you got it together right!
-
Not sure what your testing for on the vacuum side of the dizzy, but the vacuum side is probably not your issue. More then likely it would be your mechanical advance is not advancing. Put a timing light on there and check to make sure you are advancing past 30 degrees above 2500. Check you dizzy cap Rotor Wires Coil- will show up under heavy load
-
Normal stuff like the pcv line and any other vacuum lines, brake booster. Then you can double check your ignition wires for firing order, points, ect... Go back over the basics to make sure you didn't miss something simple. I am assuming you checked the SU pistons for the drop test. Is the choke actually moving the nozzle?
-
Have you checked to make sure you are actually getting fuel from the tank? If your carbs were that gunked up, what does your tank look like? Do you have fresh fuel? Remove the fuel lines and crank the motor and see how much is coming out. You also cleaned the inlet fuel screens in the carbs? Make sure you have no vacuum leaks.
-
No offense taken:) It all makes for good argument. It seems to me Racer was just pointing out an inherent flaw with a large cam chain design. There is no way to eliminate this-even with a good chain and tensioner. I think a qualified engineer could work this out mathmatically. Yes the holes are for adjusting out additional slack in a chain, but it's more than that. The effect of a loose chain retards cam timing, so you can counter that with advancing the cam timing. Also, think about how times someone has come along and taken the original design from a manufacture and made it better by further R&D process. Nissan engineers developed something for mass production and it will have inherit flaws, but not a bad design. I don't think Racer would have made such comments without seeing something on a dyno. Overall, the article you are refering to is a great educational tutorial on how an engine works, and I am glad he liked to mess with Datsuns, but he also made a name for himself with Mopars too. I actually came across a racer Brown cam on an e-88 head, I wish i had kept it, but I didn't know any better. It had the single valve springs and it was a mild cam. I would love to hear from the person who bought it to see if they are running it and how it performs.
-
Mechanical engineer making his own cam designs - and pretty good too- writes based on conjecture Really?
-
Forget about the bright link, it would be pure luck that the link would end up your setting. Think about how many links are on a 40" chain and you have 2 bright links
-
Racer Brown is one of those readings that you have to do 4 or 5 times before it starts clicking. Take small doses, he really does a good job explaining things,but it's a ton of info
-
I made my own RT mount for my diff and I'm thinking I didn't make it quite right and it is causing my clunk in the rear. I'm looking to compare my spacing between the moustache bar and rear control arm down braces to your set up. I think my diff mount pushed my diff and moustache bar back too far and it is hitting my braces for the control arm. Pics or a measurement would be great showing the spacing between the two. I am running a r180 diff and moustache bar
-
That part is too rusty and nasty to come from your car- might check your other vehicles:)
-
If you read Racer Browns article on cam timing he states that the rather long Datsun chain induces a retarding effect on cam timing- so why not counter act that by advancing the timing. I think a stock engine would benefit most by trying to gain low end grunt
-
I would disconnect the brake booster from the system and anything else vacuum related and see how it runs. Definitely get your timing figured out. You need to get the FSM and check all your resistances. Especially the AFM sinceyou messed with the flapper door. That flapper door is tied into a potentiometer, so you if you bent things around you might have changed things. There are tests you can do witth a mulimeter to make sure it is right
-
Cliff, I'd do it. I think I would install it on #1 hole first, drive it around and really take notice how it runs in every situation. Then flop it to the third hole and drive it again. Once your timing chain is set, it's pretty fast to make an adjustment to 3 hole.