madkaw
Free Member
-
Joined
-
Last visited
Everything posted by madkaw
-
 Well it's not the floats if you can remedy the issue by moving the PISTON. Sounds like the jet is not centered and the PISTON needle is getting hung-up. You need to call Bruce and see about getting the jig they use to center the jet in the carb------IMHO:)
 -
Bought the same header with the same warpage, bolted down fine-No Leaks so far with over 3000 miles. Just start from the center and work your way out slowly and it should lay down fine. Checked the torque later on and nothing came loose.
-
well I figured I put out there my numbers since I have had members ask. I am running 245/45/17's on the above wheels. I have 1" lowering springs all the way around with kyb shocks. I had to trim back the front spoiler a little and the spring perch has to be flattened on the wheel side. You can gain atleast a 1/4" by just flattening the perch right up against the spring(atleast in my case) No rubbing issues on the front so far. The rear rubs, but just barely catches the sidewall of the tire. The tire rubs up inside the wheel well above the fender lip-just in the curve of the rear quarter. I believe 235's would have cleared-but I got greedy. I really wanted ZG flares, so here's my excuse:classic:
-
Sweet, can't wait to get some Rota's for my daughter's 280zxt. So those are 240sx coilovers dropped how much? The profile is good.
-
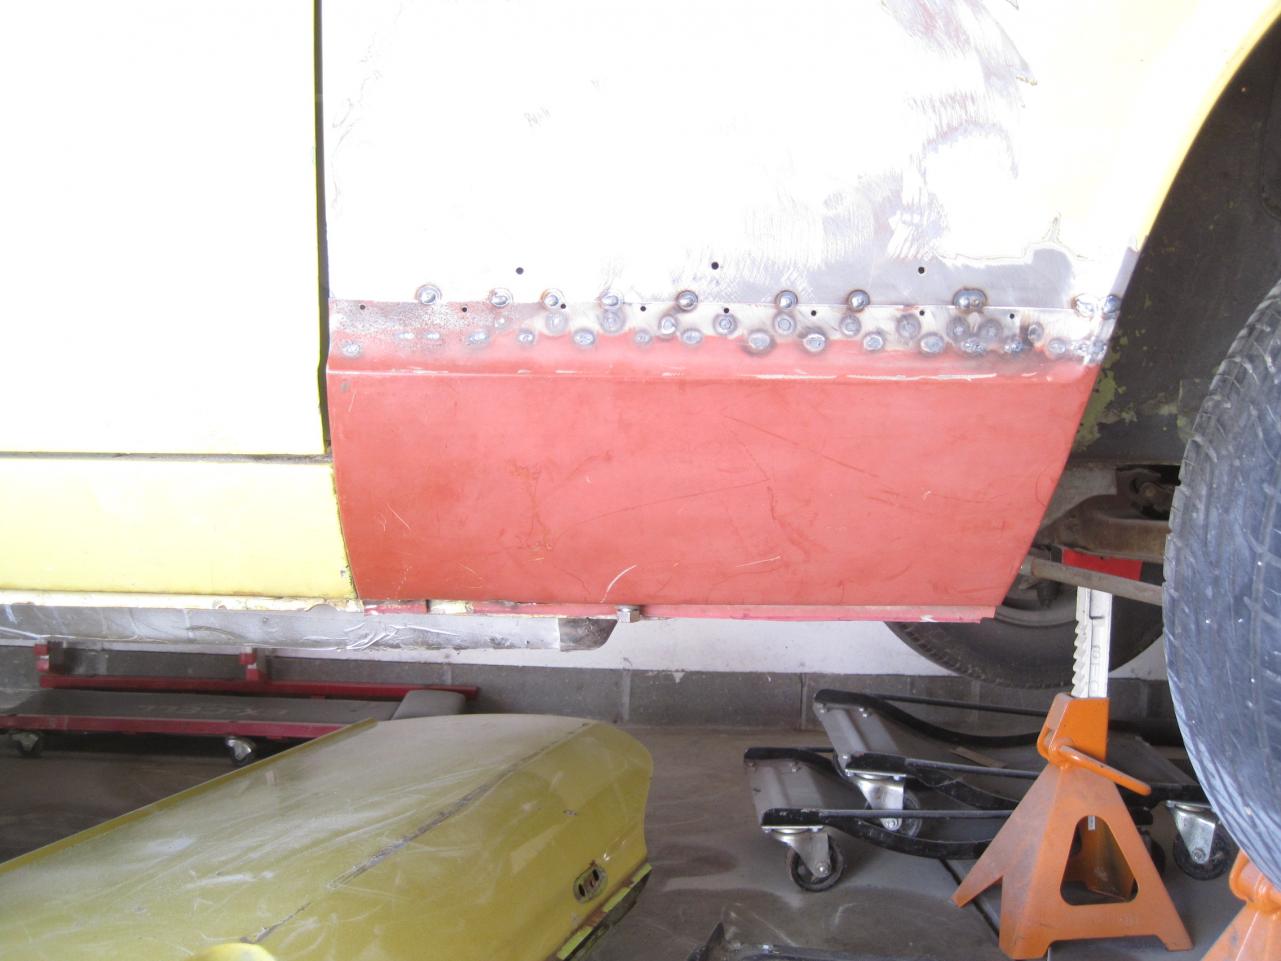
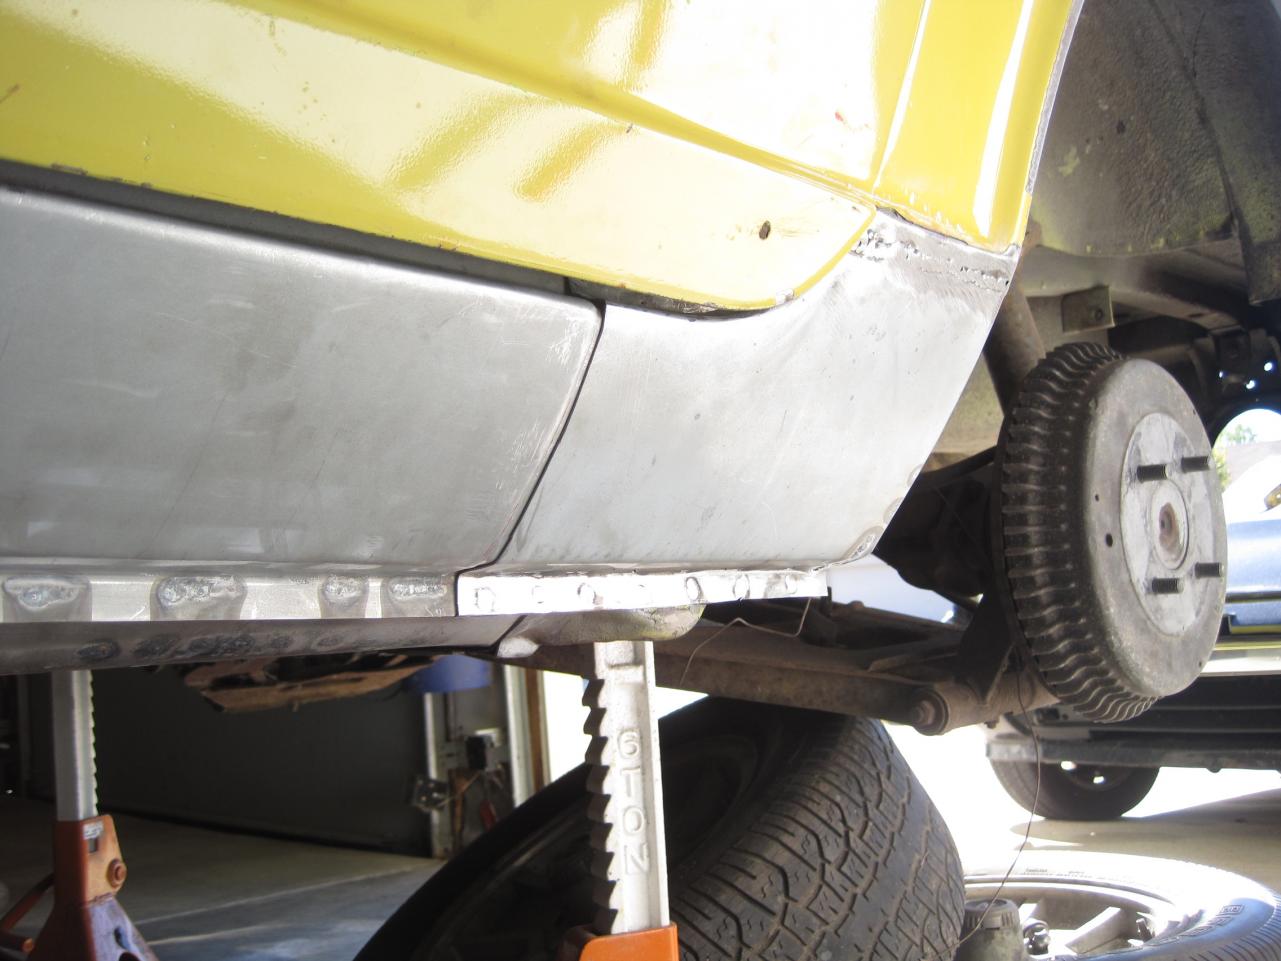
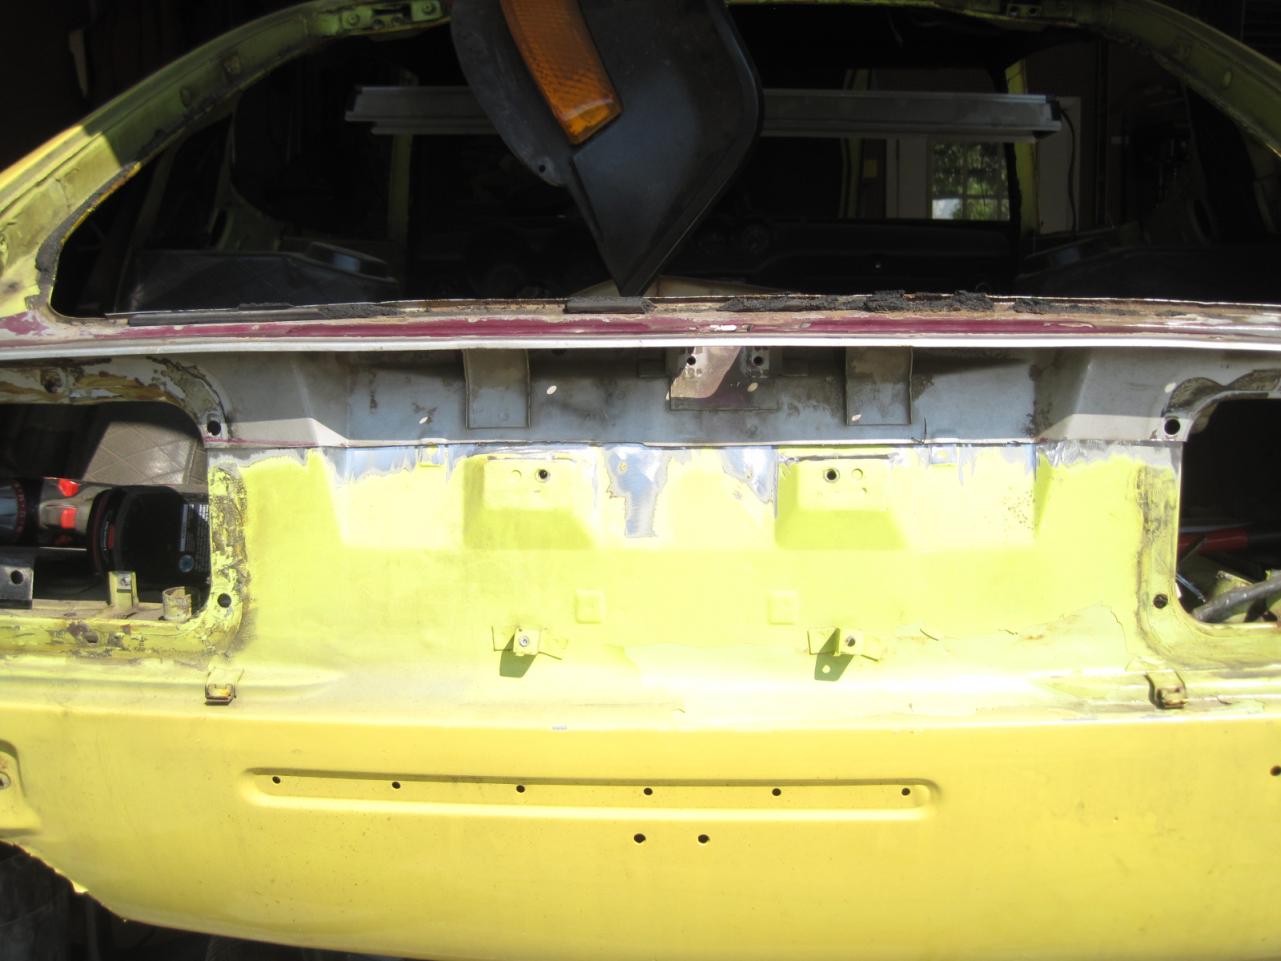
Well after a year of working on this car, when it fit into my schedule, it is about ready for the paint shop. The last hurdle was the passenger fender. There was a pound of bondo in the lower section to fill rust and damage. I was skeptical about patching in a lower, but it seemed to work out pretty well. A few more tac welds and I'll call her done. Now it's time to do some metal prepping and seam sealing to keep the rust at bay for the rest of her life. It was also time to close up shop for a while so I can spend a winter working on my car.

-
I am wanting to install a fuel pressure guage in my car. I thought it would be as easy as picking out one on the Summit Racing site, but I guess I need to be schooled first. I have noticed that some guages are for OUTSIDE installation only. I want to install this in the clock slot, so it's going to be inside the car. I would like to see some other installations of a fuel pressure guage including where you tie into under the hood. I will be using this on my SU set-up right now and then on my Mikuni's. I want to verify fuel pressure at all times under load----or is that necessary? I have an aftermarket mechanical pump and I question it's ability to supply enough fuel pressure.
-
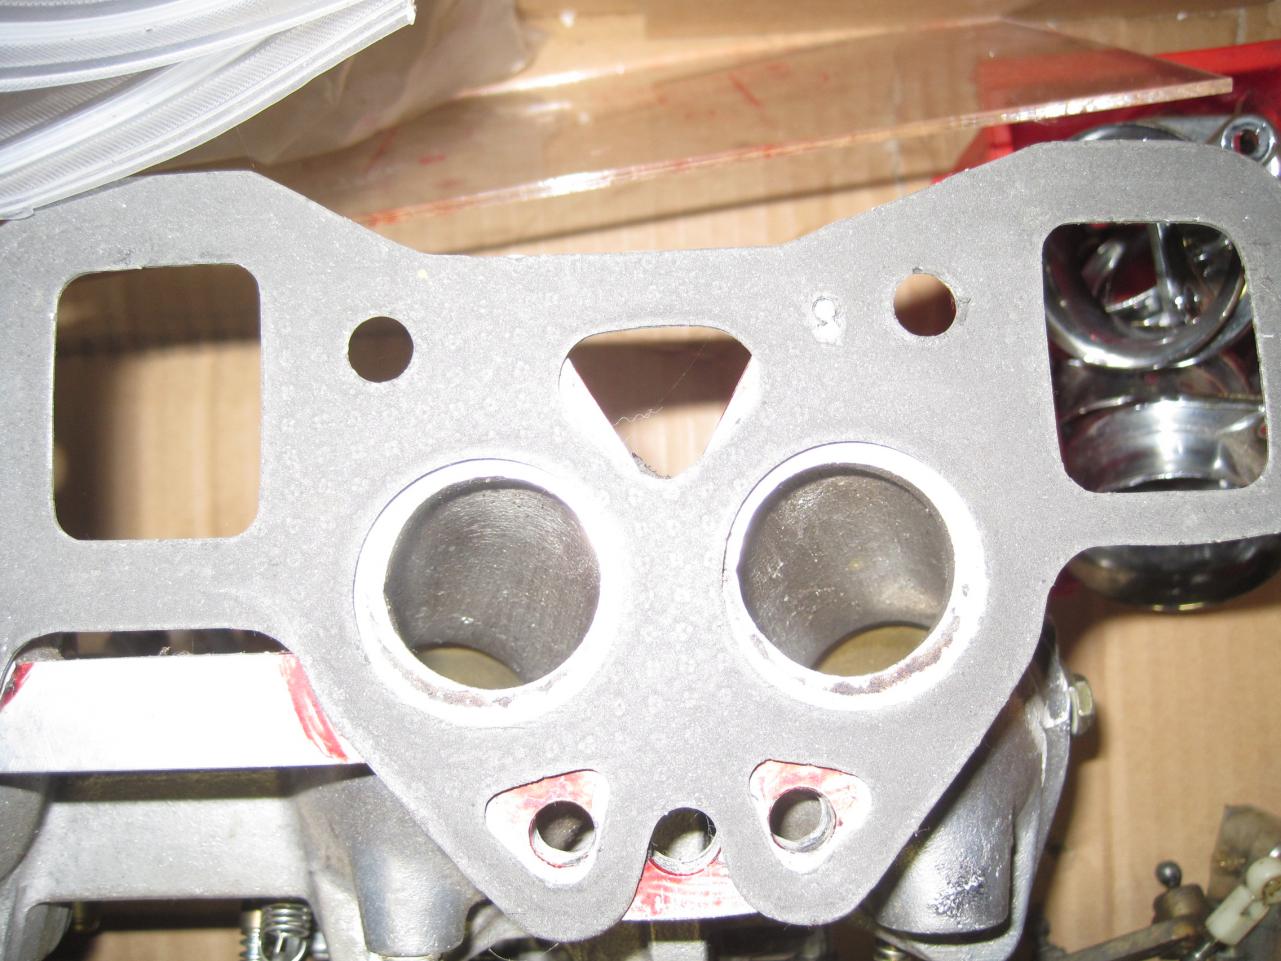
The head ports are basically stock, all I did was gasket match for the SU manifold. It was suggested that this manifold was supplied for many applications including the l20, so the runner port was kept smaller. I understand what your saying but I can't believe it would be better to leave that much of a size difference. I am also looking ahead to possibly a blow thru set up, so I would want a good gasket match on the intake to head ports.
-
I broke out my Mikunis to look them over for the future install on my Z. I wanted to check out jet sizes and such to get my base line for future tweeks. I went thru great trouble to gasket match my SU's to my e88 before install and thought I would do the same for the Mikuni set-up. But WOW, i couldn't believe what I saw when I layed an extra intake gasket against the manifold. Am I missing something here or is this right? That is a huge difference-not sure what to do here guys, I just seem baffled over this. These are 40phhs by the way. Comments please.....

-
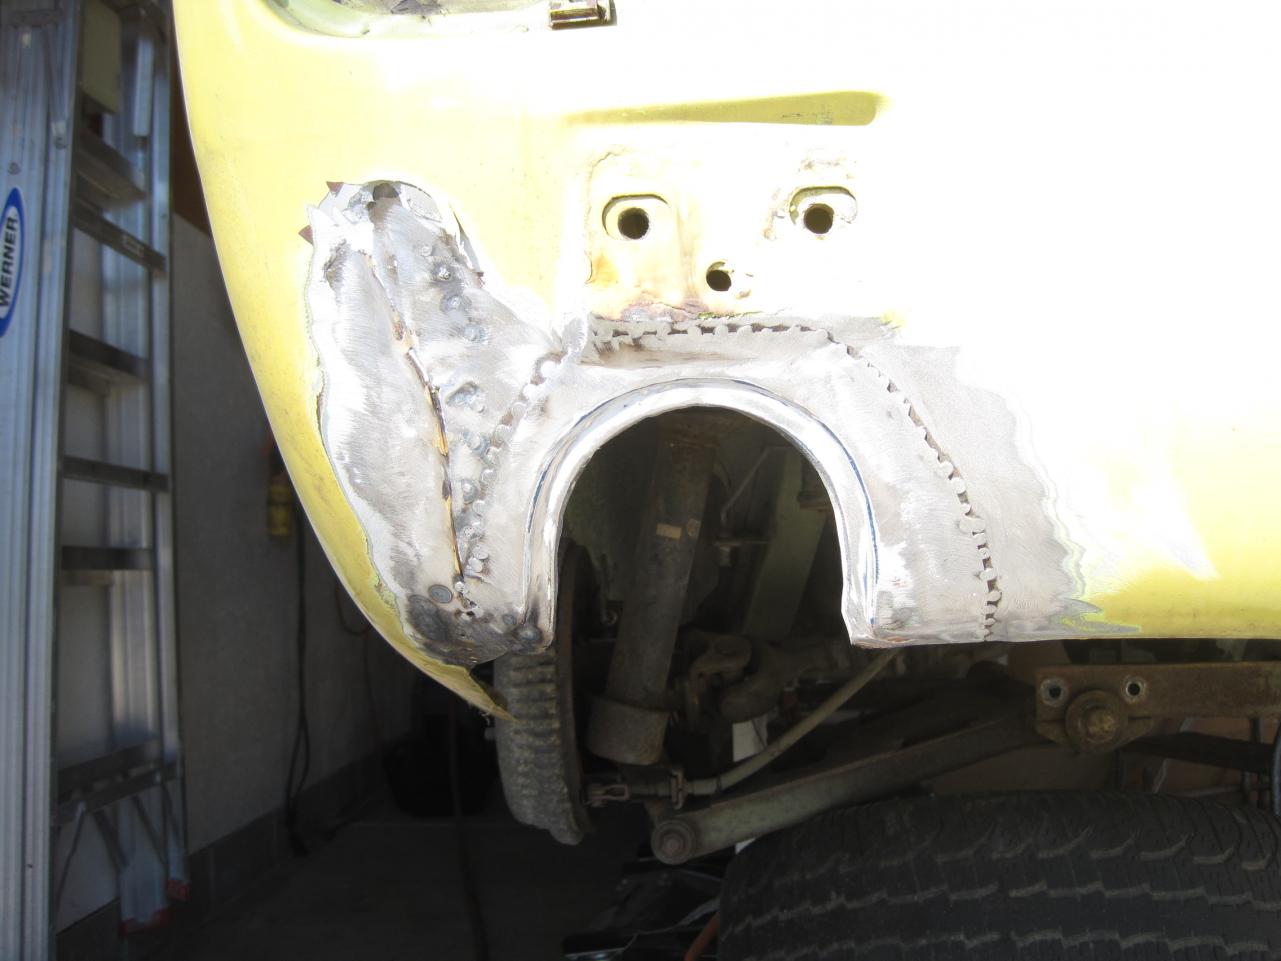
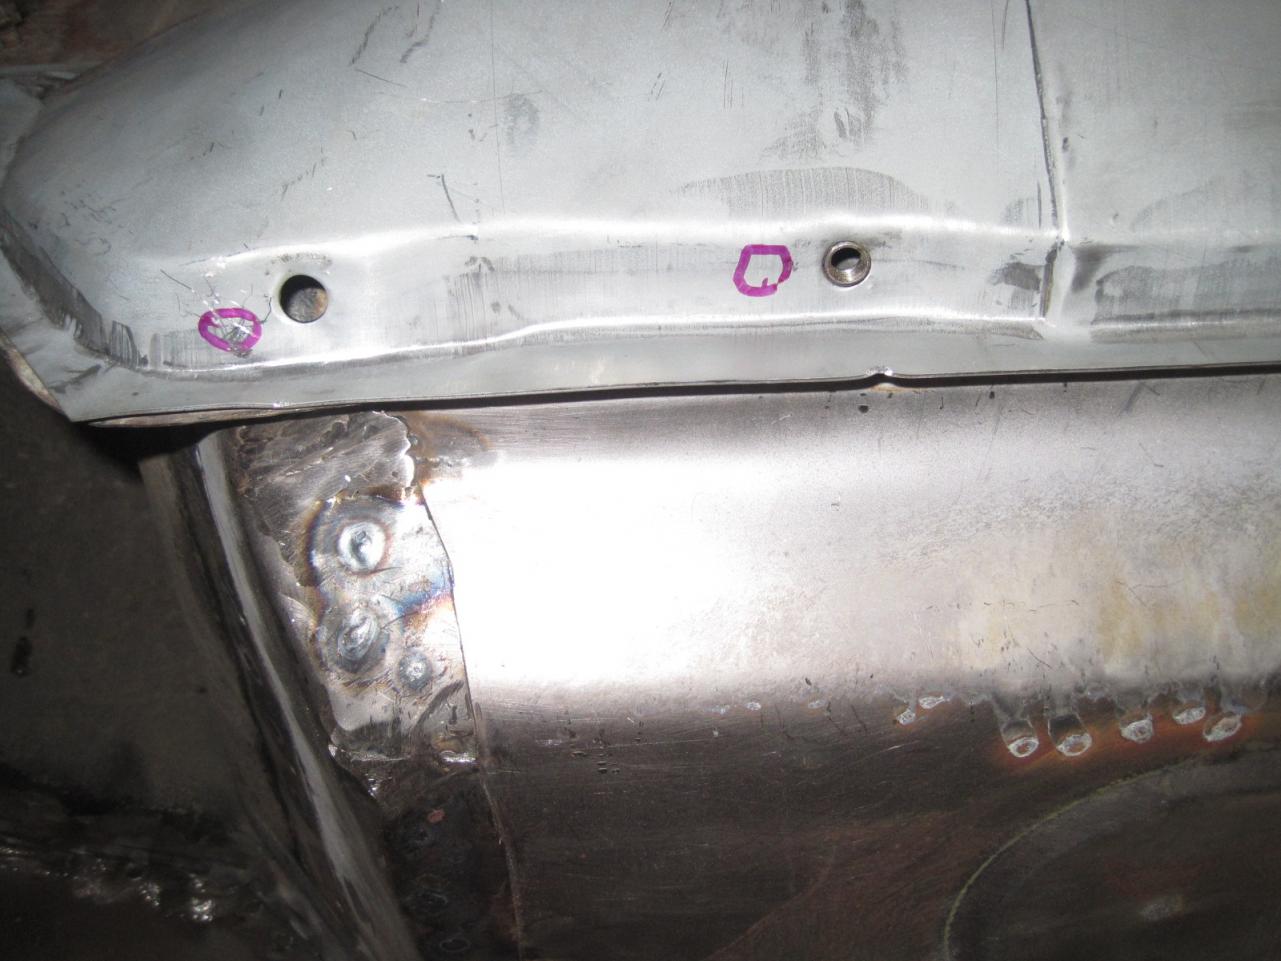
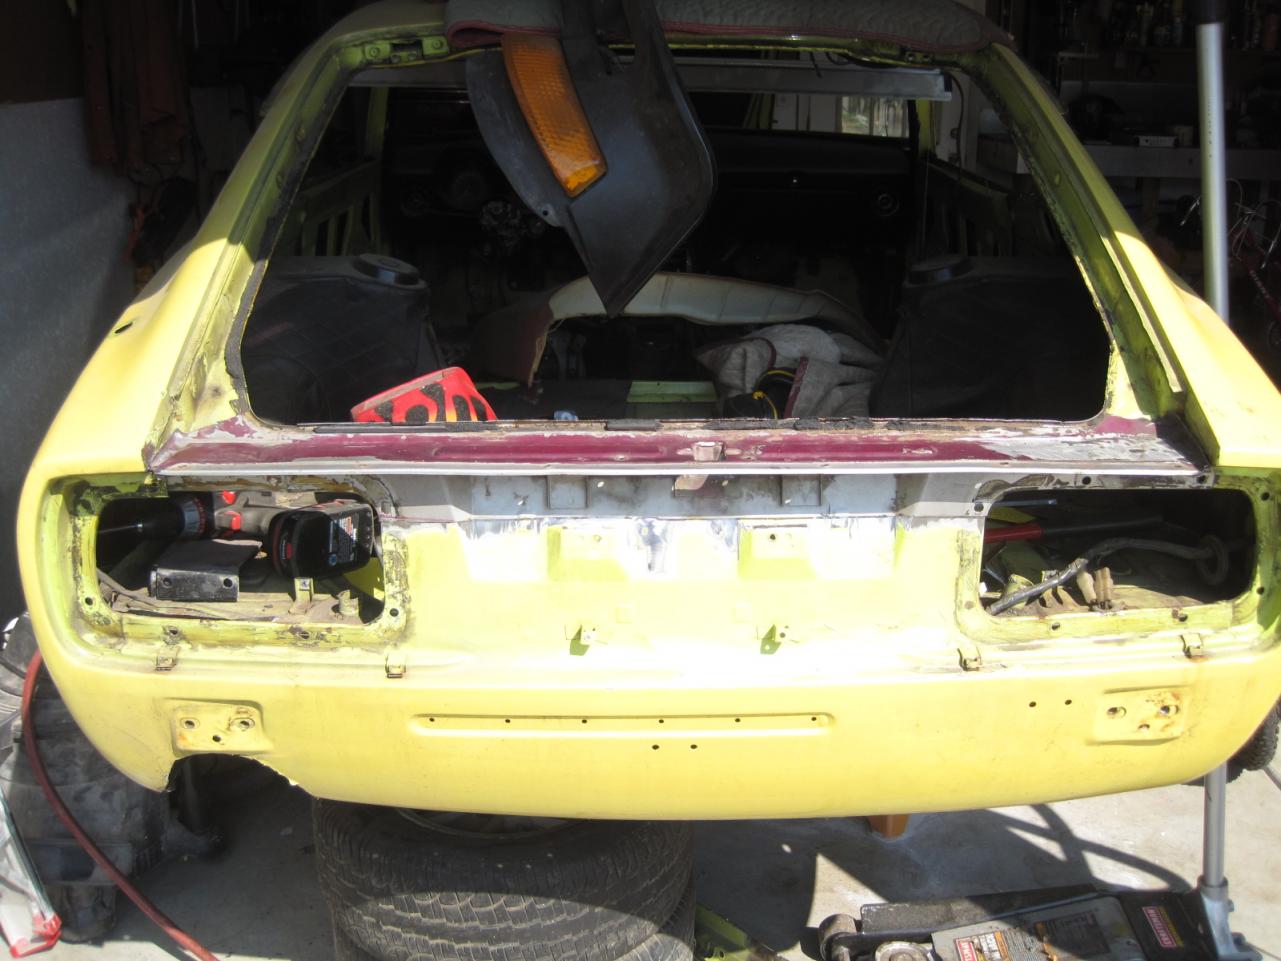
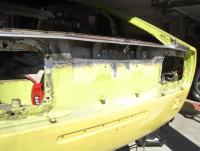
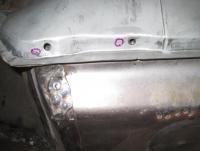
Well it has been some busy Z days around here. I am almost finished with the sheetmetal work done on this car. I was able to haggle with the vendor over the bad rocker attachment points and he refunded me 40$, so crying does help sometimes;) All in all the rocker fits pretty well. The dogleg wasn't bad either, but great inconsistancies between panels. The passenger side had barely enough material and the driver's side had too much! I finished up the hatch area and that panel was a lifesaver. The more I dived into this car I realized it was hit pretty hard in the rear. The rear frame rail behind the valence is 1/2" away from touching the rear valence. I'd say these repairs were done many years ago since everything was brazed together, but good welds though. Also had to weld in an exhaust outlet since the old one was mangled-thank god for donor cars


-
Okay, checked out a few things today. The barrel mesh filters weren't bad at all, but sprayed them down and reinstalled them. Purchased a new fuel filter, though I would be suprised there is any issue with it. I do have a new tank in this car. I need to install a fuel pressure guage and I guess in line with either fuel bowl would work?? I was also reading the tech stuff in the SU forums here and found it interesting when they talked about different springs for the chamber. My thinking was backwards on the effect of heavy springs or a slower moving piston. Also I was suprised to read about the heavier weight oil in the dashpots and the effect of to light of oil in the dashpots. It seems to be a tricky compromise to slow the piston down in it's upward movement, but to have it fall quickly also. I was using marvel mystery oil, but that seems to light according to the tech article. What type of oil should be used? Too often people use light duty (sewing machine or general purpose) oil in the dash pot assembly. This type of oil does little if anything to impede the upward movement of the piston as the throttle opens. Engine oil can be too viscous (depending on climate). After 2 hours of driving it ends up in the bottom of the piston, the majority of it sucked into the engine. This happens because it is too thick to pass through the damper as the piston falls causing the oil to flow out of the top of the dashpot. I use a mix of 20W-30 to 20W-50 and sewing machine oil. The ratio is three parts engine oil to one part sewing machine oil. When you use the aforementioned oil mix if you attempt to raise the piston when the engine is cold you will find that a lot of force is required to move the piston to its uppermost position. When you release the piston, it will drop to the bridge quickly (less than half a second). Still lot's to learn about these carbs. --------------------------------------------------------------------------------
-
Thanks for some ideas guys. The pump is new, but not a nissan and I guess I can go back to the previous post by Walter regarding the pump-time for a fp guage also. I will check out the filters-thanks.
-
I took my car to ORP here in indy. 20$ to run all night on the quarter mile is a great deal. Well anyway, I was a bit disappointed at my 15.5 second quarter mile. I will say that I suck at launching and I am very inexperienced at the drag strip. The car felt strong off the line, but getting into 3rd gear it seemed to rev in slow motion. It seemed to take forever to run up to 6500, like it was running out of gas or power to power thru the gear. It never missed or anything like that, but no power. My timing was 20 degrees initial with no vacuum advance, and about 36 total. The weather was really cool. I still haven't afforded a wideband so I am just guessing to what my afr's are doing.
-
Sorry for the mispost-didn't see the key word "if":stupid: I would definetly do the compression test. You might have a valve stuck open because the shim on top of the valve spring is turned sideways. Good thing is that the car is already set-up for any L6 motor, so you should be able to find a decent engine at a reasonable price to plop in!
-
I'm confused, is it a tired old engine or a rebuilt one? Running on 5 cylinders with a fresh bottom end and using oil. This thread is not making sense. You might want to start over agin from the beginning. Interesting-if not very cool-application of the Z motor in the Healey. The car oughta really go with that Z motor-if you get it running good.
-
The salesman was explaining about the "secret steel" that comes right out of Indiana to make that hoop, but don't tell anyone about the secret steel-ok:)
-
Surely you can find some rust free z's out there to cut up! Besides, yours might not be that bad. I was starting to fab up my own structure as shown earlier in the thread and it was coming out pretty decent-and I'm not a body man. Though I do have a state of the art bench vise and 2X4'sLOL
-
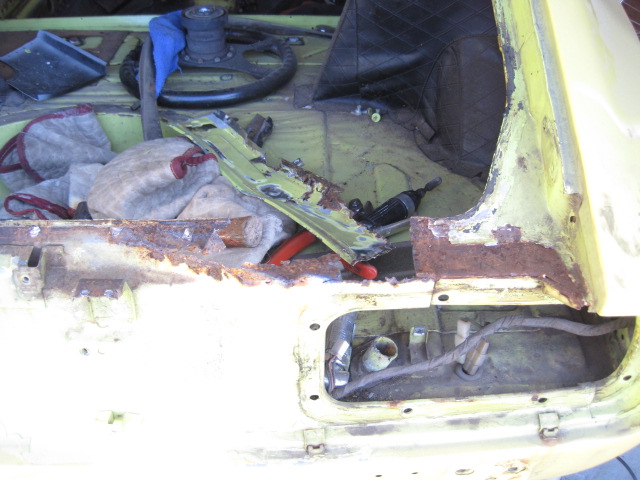
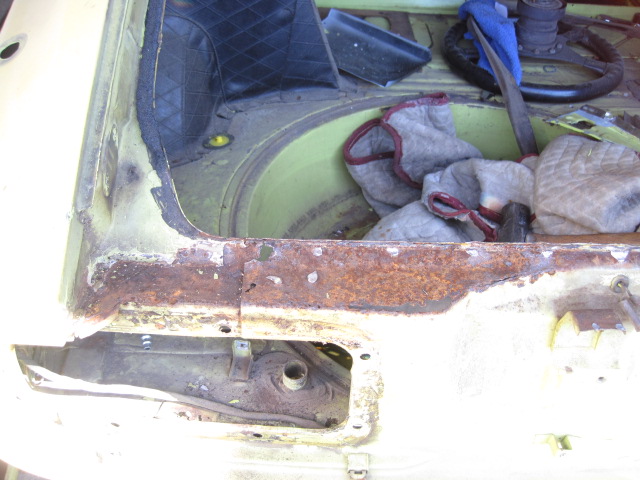
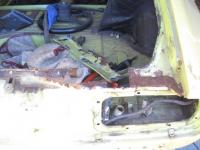
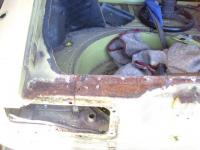
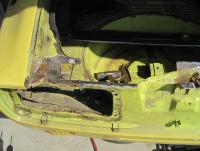
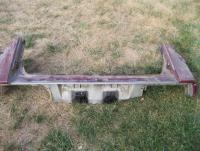
When it comes to working on Z's, I have all kinds of pictures of rust:D These are pics after the removal of the hatch sill.
-
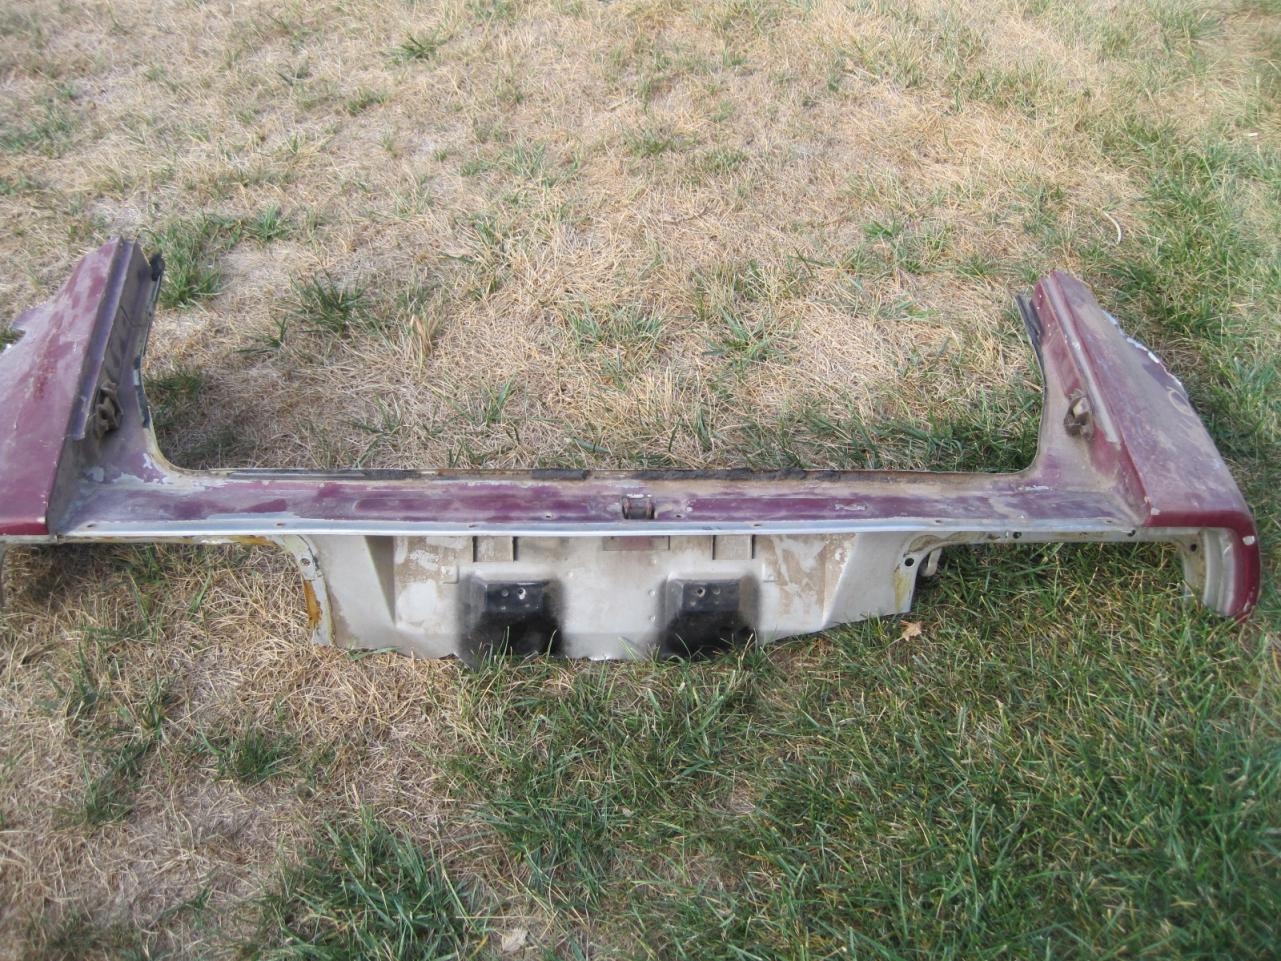
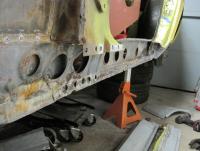
Well my Tabco rocker didn't quite fit -actually it did fit but the holes to bolt down the fender underneath are over an inch off:mad: So I sent pictures and a nasty gram to Mill Supply where I bought it from and they are dealing with me now. I mean I could redrill and weld back in place the nutplates, but I paid good money for this panel. I let everyone know how this turns out. So I went back-literally to the back of the car again to press on with the rear valence area. I am very fortunate that a member here so my post and brought me a little present the other day. I guess he felt sorry for me seeing all that fab work I had to do. What a nice guy and what a nice panel he brought me. This will make things easier, but this will still be a challenge to splice in. As you can see I have it roughed into place for right now. It is just laying there, but it will look a hell of a lot better then me fabbing everything. This replacement is 98% rust free, so I just need to get it fitted correctly and be done with it. I spent several hours this morning fitting it and now it's too dam hot to do anymore. maybe I can get this knocked out by the time I settle over the rocker panel.


-
Have plans to go to OPR tuesday night(september 28) to run at the dragstrip with my Z. It's Tuesday night drags from 5:30 on till atleast 9pm. 20$ and you can run allnight, what a better dyno then the 1/4 mile!! I plan to play with timing and mixtures and just have some fun the legal way:D They sell racing fuel from 5 till 7:30 if you want some.Bring a helmet if your Z is going under 14 seconds(loosely enforced I heard). So if you got the time-- come out and play!
-
it's a shame that things are that way, but you know it happens all the time. The projects i have done for customers has always been documented by a digital camera and e-mails. yes it takes more time, but not that much time. If there is something that needs to be replaced or extra work involved I prove it with a photo. Fortunetly I have patient customers that don't mind slow work:classic: Of course i have a full time job that pays the bills, so i don't have to rely on a big payday working on these cars. Hopefully people like that will get their just rewards in the end;)
-
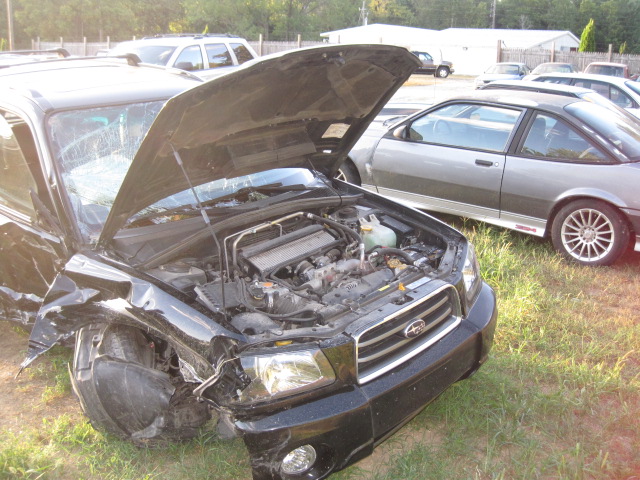
Greg, to answer your question the 19 year old ran a stop sign and came out on the highway at about 40+ and dina was doing 60+. She spun out about 5 times and took out the "do not enter sign" on the other side of the median. He said that he had never been on that road before and didn't know it ended there at the highway. What I did today was to get off my rocker, or get off your rocker:) probably should have done this first, but I am not looking foward to aligning this panel to look good everywhere. I also signed off on a new Forester for the wife, it's sweet! maybe someday the old man can buy a new Z!!!!!!!!!!!!!!!!!!!!!!!!!!!!!!!!!!!!!!
-
Well didn't get much Z stuff done today, although I did squeeze in a valve adjustment on my car. A few were off just a little, but to be expected after break in I guess. My Schneider cam looked good despite all the horror stories out there about these cams. More importantly I am trying to find another Subaru for my wife. Her baby, a 2005 Forester XT got broadsided last week and it was totaled. Thank God my wife is okay except for some major bruising. The way the Subby handled the crash only reconfirmed that we need to get another Subby. And of course my wife has tasted the Turbo power and she will only settle for it. I'm gonna tell ya guys, if you haven't ridden in one of these forester turbo's, your in for a suprise. They really do haul arse! And they handle too!! You know anyone looking for a 2.5 turbo, I know where there is a fresh kill;)


-
My car was apart and sitting so long I forgot about the Z experience. Now I'm just looking for a reason to drive her. i am so happy with the whole driving experience of the Z that I wouldn't trade her for nothing. Bonus thing is that I can't go a day without someone giving me the thumbs up or "nice car dude".
-
By the way Greg, that panel was already replaced once. I found all the brazing when I was tearing it apart. So the fact that it was messed with once already probably caused more rust. Hell- my car also had that panel replaced by the PO. Even with a metal brake this would be a PITA-like I said, too many angles.
-
Put some Marvel Mystery oil in the oil and gas and drive-a lot! All that sitting around isn't good for it. Get some real heat in the cylinders from some long drives and short ones too, then see what she does. I have been amazed more then once how these engines will come back to life. The marvel might help loosen the valves.