madkaw
Free Member
-
Joined
-
Last visited
Everything posted by madkaw
-
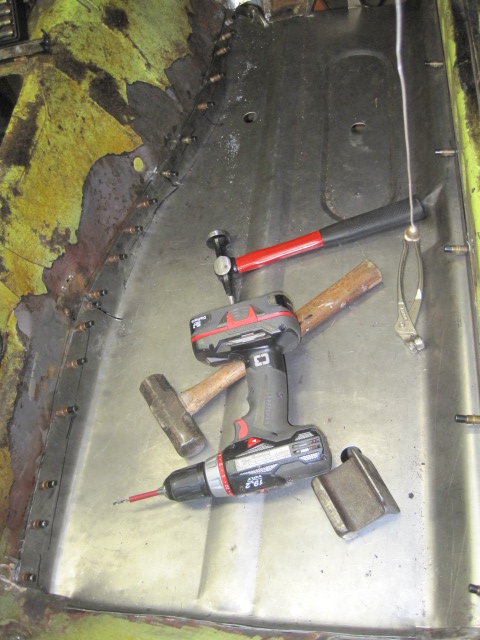
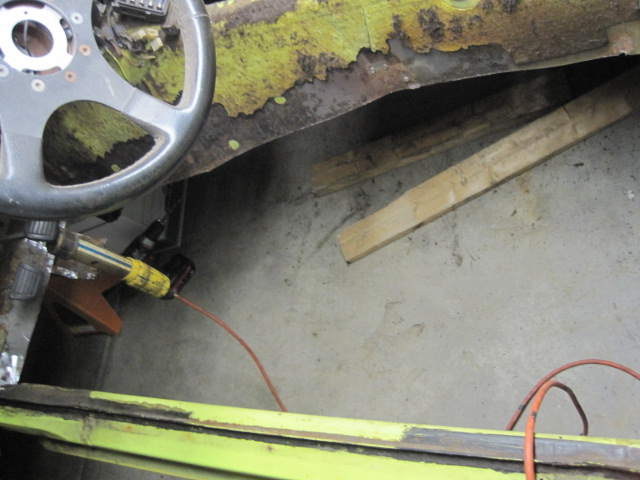
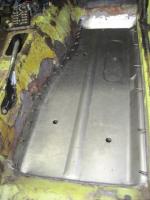
 I will continue with pics of the passenger side. The pics show how I worked the tunnel side of the Zed panel good enough to fit it in place. Then I starting installing clecos to temporarily install the floor. The clecos take a 1/8" hole and hold very strong-like a rivet. There are 3/16" clecos also for heavier stuff-i used both. You wind up having a hole to fill, but it's small and you can pull the floor in and out in about 60 seconds with the clecos. On the tunnel side it went slow since I had to cold work the Zed panel so it would lay flat against tunnel. This is where the trans being removed is helpful. I could hold a body dolly against the back side of the tunnel as I beat the Zed panel into submission.
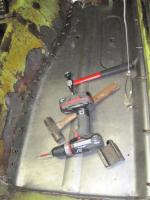
-
I hope it helps folks see what's involved in a job like this. It's a good way for me to give back to the z community for the help I have received . Also a good way to kill sometime sitting in the hotel!
-
The bracing process! Atleast my body working tools are getting used:)

-
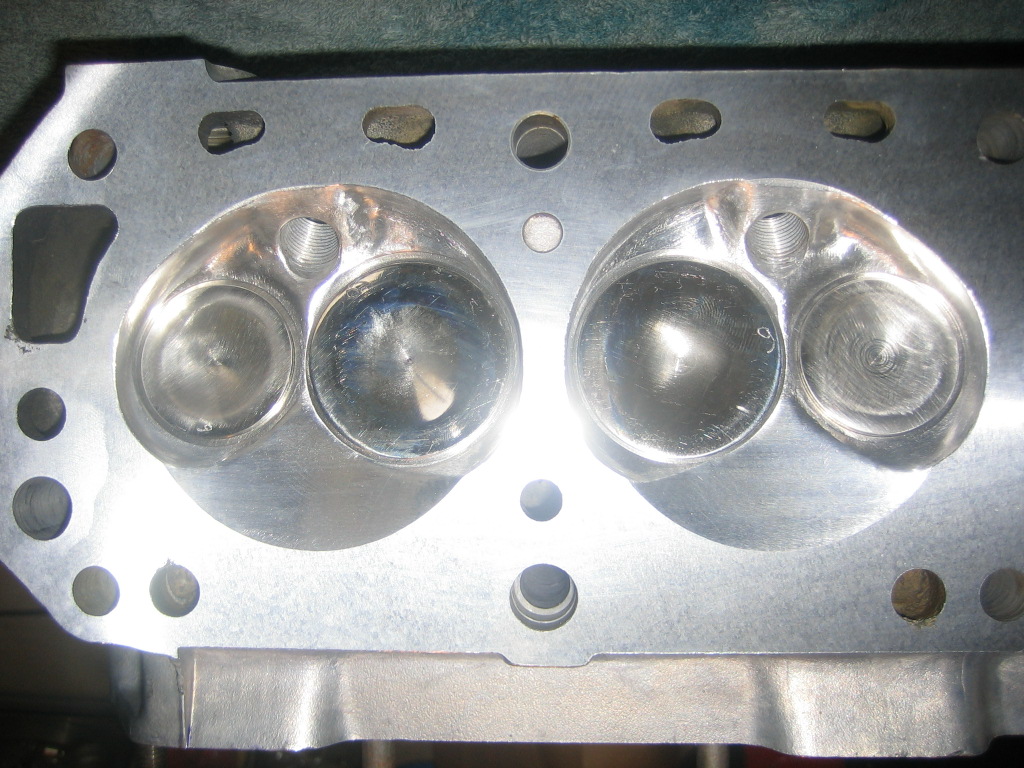
Which goes along with why I have asked several times about valve size. If this is an unknown head-how do you know whether the valve sizes have not been upgraded in size. If the larger exhaust valve has been installed( a popular upgrade) the valves probably will NOT clear the cylinder bore--ouch! You need to make sure of what you have.
-
Make sure the struts are getting fully sitted with the gland nuts. You will get fooled by the gland nut bottoming on the threads and there will be play in the struts-then clunk, clunk over the bumps.
-
The color is a tricky issue. I tried some Armour all on the cover and it darkened the color quite a bit. The lighter color does match the center console in it's original condition. Back to trying to rig bracing for the glue job!
-
Color! The cover seems a bit grayish-but since I have never seen an original dash color, not sure if that is correct. The cover color actually matches the glove box door pretty well, but the lighter grayish color is a stark contrast to the defroster panel that is very black. There is a contrast of color to the original dash vinyl that is not covered by the cover. The original dash is definetly darker. I really didn't want to paint this cover, but I want it to blend in better-any one else deal with this or how did you deal with this.. Pictures are tuff in the garage because of lack of light.
-
Well I have been reading this and I am confused, so you bought this head from another member-just the head? So you are going to install this unknown head on your L24 to just get it going right?
-
You should be fine with 18 gauge. I'm not even sure where they used 16 except the frame rails. Don't envy your workload. I started a thread for floor replacements, hopefully you will find what you need on there as well as anyone else.
-
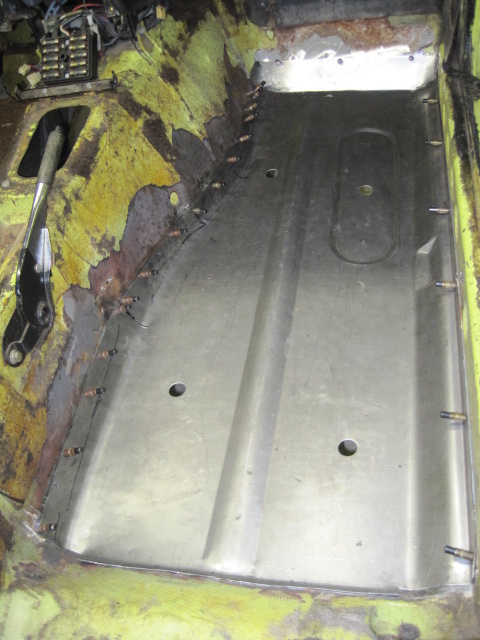
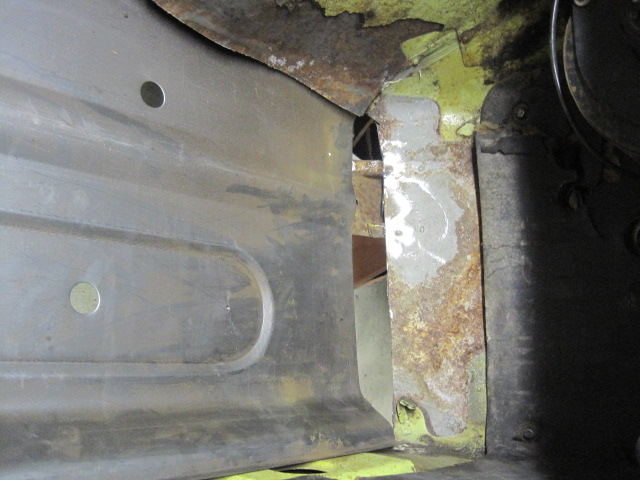
OMG, I had a bunch typed out and i lost the page:mad: Hopefully enough is out of the way to do some fitment. Since the tunnel side of things will not match up very well, I fitted first from underneath. Your points of reference on the panel to line it up are; frame rail lining up with the 'bubble" on the new panel Inner rocker panel attachment point to the outer edge of Zed panel The rear part of the Zed panel should lay right on top of the rear floor that angles up to bulkhead The floor should be level and run parallel to the tunnel bottom edge that you cut As stated above, the Zed panel gives a bunch of extra material at the rear, probably won't need it. The Zed panel will have to be worked along the tunnel. You can see from the pics how things line up and how i marked(crudely) the Zed panel so i could see how to work it.

-
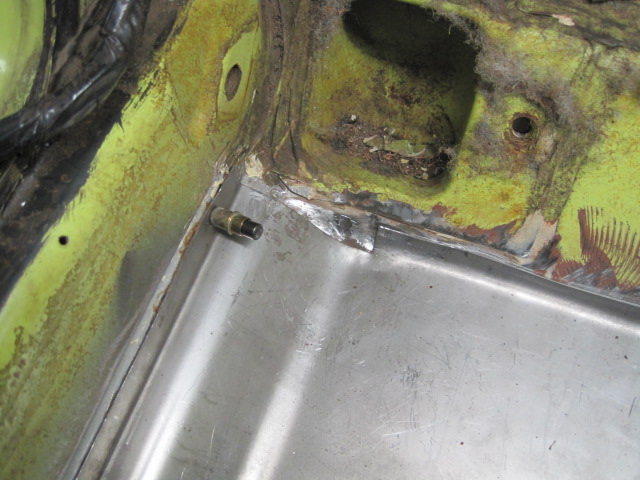
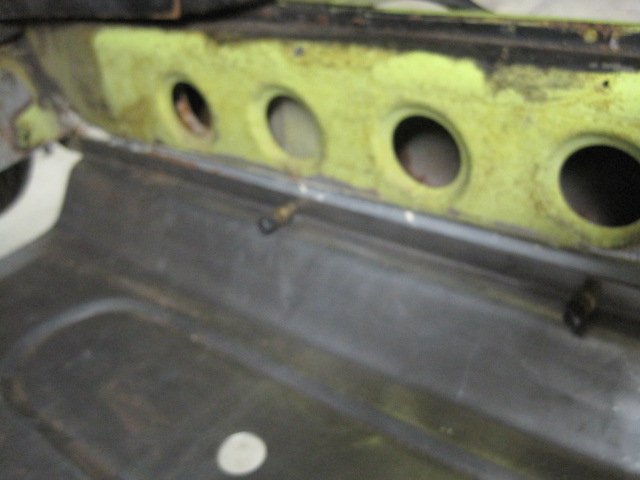
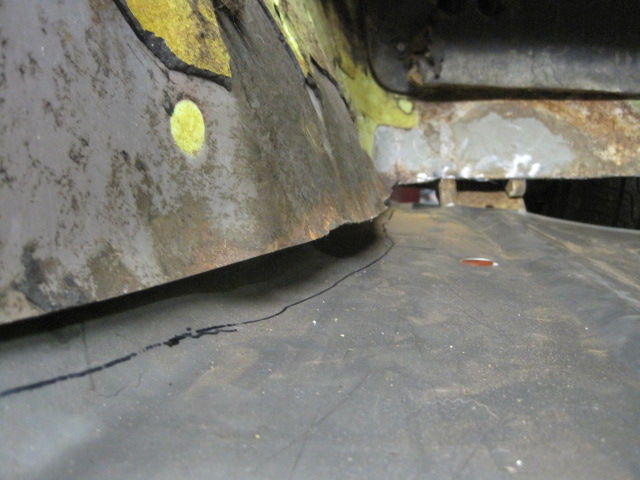
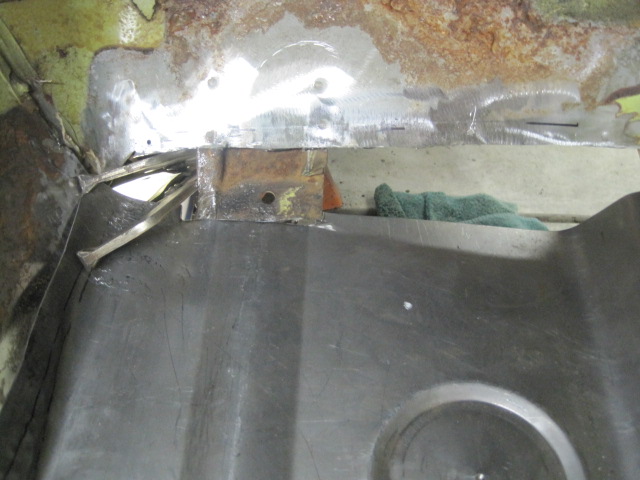
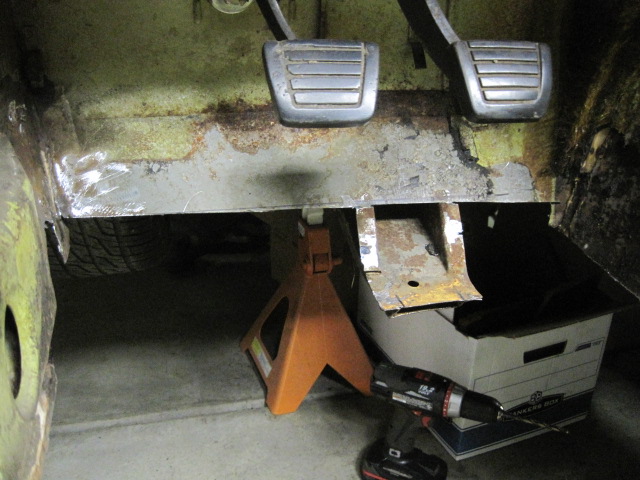
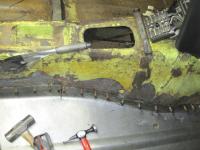
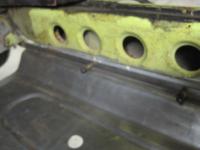
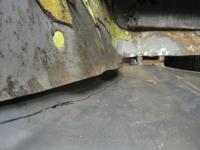
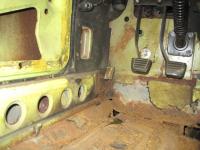
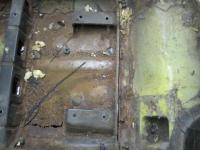
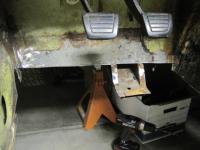
Somewhere along the line here you have to decide what your going to cut out and how you are going to fit the panel. My choice was obvious, I was using all of the panel-and then some. I cut out the most of the floor as you can see. There is always questions regarding bracing the body to keep everything square when cutting out this much metal. The only bracing I did was on the tunnel. I tacked a brace under the tunnel to keep the width of the tunnel the same. Since my inner rocker was still intact and strong, i didn't see a need to brace across from the floor to the tunnel. To remove the floor from the inner rocker will take removing all spot welds holding it there. hopefully the metal behind the floor will be solid. I tried various methods to remove welds. Spot weld removal bit works pretty well, but it takes a good one to hold up to all the drilling. You can simply grind the welds down to a point that they are so weak you can cold work the panel apart. Dirty nasty hard work and I LOVE IT! I cut right at the floor bottom along the trans tunnel. The rust usually doesn't creep up the sides too much and if you cut the floor nice and straight and parallel, you will have a nice guide for the new floor. You might also get lucky and get to keep your seat mounts and they will have to be spot drilled also to seperate from the floor. I didn't have such luck, and they get pretty flimsy once the floor is not under them. Replacements can be had, not all that cheap, but nice new metal to weld with and you have to consider time is money or the aggravation factor. Also consider that with the seat mounts out of the way the new floor can be dropped in from the top for test fitments easily. Once you have all this stuff out of the way, you can start fitting the new panel.
-
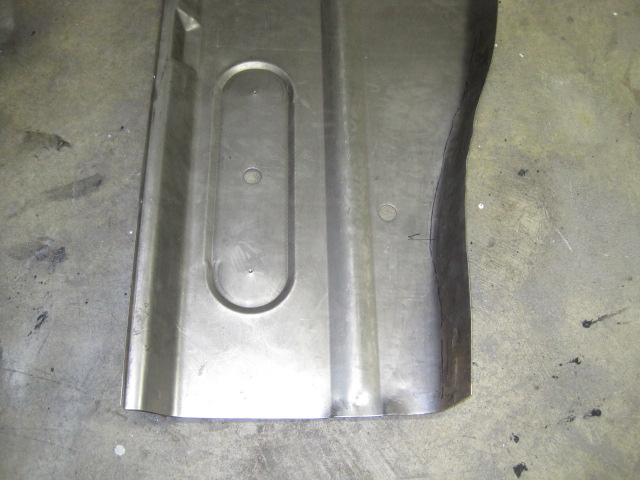
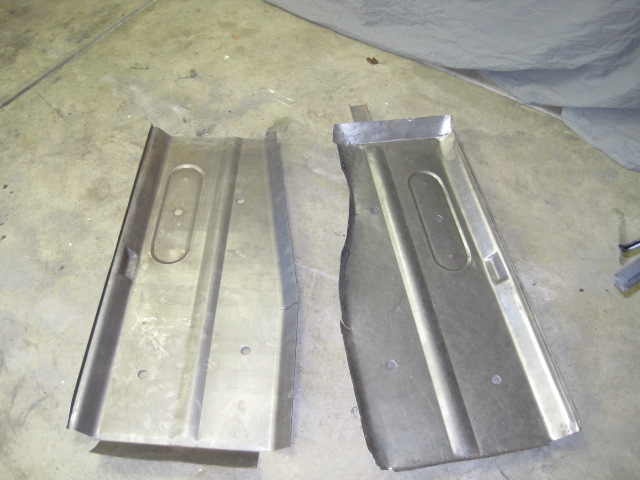
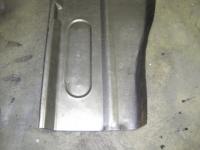
Ahhh, the panels. The Zed panels are very sturdy being 16 gauge-probably thicker than original. They are pretty heavy when you start moving them around all day. From the pic you will see 2 side by side. Onepic I have worked to fit the trans tunnel and the other pic as it came. Like I said -no plug and play here. They are meant to attach to the inner rocker lower edge and the rear floor behind the seat rails and along the tunnel, and finally the seam under the pedals. You will be drilling or grinding off a lot of spot welds to fit the complete panel. Some might get lucky and beable to patch the panel just below the inner rocker and not have to mess with the spot welds there. I wasn't that fortunate since the rust ate right thru the forward inner rocker. You will also find that the panel falls a bit short covering the forward floor. It seems to me if there was a fault in these replacement panels, it is that extra material was put on the rear of the panel and not the front. The only other issue I had as far as the panel itself was that the outboard panel edge that attaches to the rocker was not quite formed right. The bends to form the panel make the footwell too deep on the outward edge. Hard to explain, but maybe you can see this on the driver's side.


-
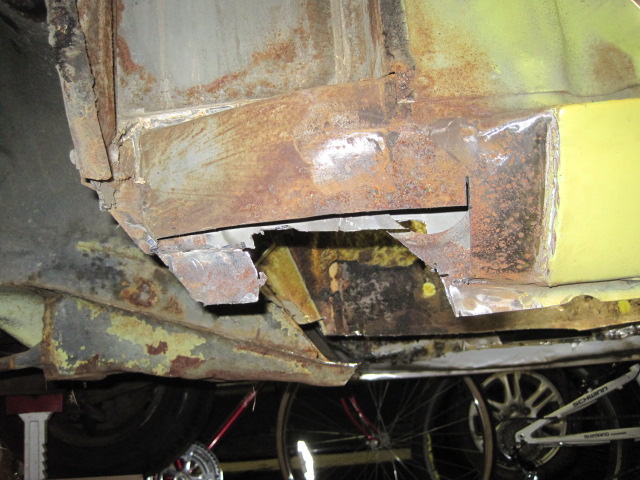
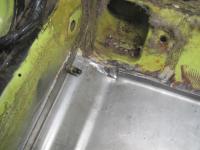
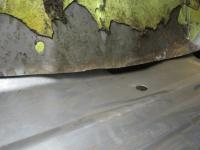
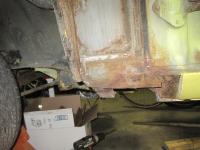
The pictures illustrate that that little bit of rust you saw under the carpet is probably a lot worse. In this case the cancer ate into the forward inner rocker and started up the front floorboards behind the pedals. It wen all the way back behind the rear seat mounts. Somewhere in here you'll need to decide how much metal to cut out. might want to wait till you get the replacement panels first so you will know what they will and won't cover. It is also prudent to cut out a little at a time till you find good steel. Just because the panel is such and such wide-you don't need to use it all. If the original steel is clean enough to weld and has good integrity, it can stay. Don't make more work for yourself. If you ordered complete panels then you might have serious rust and you will be using all of the replacements.
-
I have read many threads and posts about doing floors on the s-30 and using the Zed findings replacement floor panels. I recently was asked for pics; and I thought I had a thread on this-but maybe I never did. Sooooo, I am going to post up pics of the floor replacement I did and what was all involved. This is NOT an easy project-especially if you are shooting to make the car look original. Nothing aftermarket is plug and play. Expect to spend 40 hours of hard work to get this done and look original. I had plenty of tools that made this possible, i.e. air compressor, air tools, mig welder, grinders, cleco sets, welding clamps, etc... I am in no way endorsing Zed Findings floor pans with this thread, just letting you know what path I took. You can read the thread and make your decision. First-the carnage. Remember, it's what you can't see before tearing into a project like this that will take time. DISCLAIMER; I am in no way a bodyman. This part time fun and mad money for me. There are probably many other ways to do this, but i am sharing my adventure. I have had no training on such skills-just school of hard knocks!


-
-
Ummmm-if your not sure, you might want to make sure- or you WILL be doing a complete head rebuild.
-
Well hello Bo-haven't seen you around these parts lately. Like Bo said-and you said you weren't hurting for money. Find another shop that can get the basics done in a reasonable amount of time. You do it right and that little l24 will reward you nicely! This is what you want it to look like!! Again I ask-stock valve sizing?
-
-
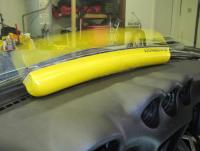
Thanks for your input Mike. Yep-preperation is everything, that's why I got the heat gun out. I was so unhappy with the fit that I wasn't going to even put it on unless I could make it look better-and i still might not. I must say that the heat gun and pressure works pretty well to get the dash cap to hug the corners. IFFFFFFF I had time , andIFF it was my car, and I had other reasons to pull the dash, I would probably go with a repair.I don't like the fact that the cover does NOT COVER all the areas. Not sure why the cover comes up short on the ends. This cover comes up short at the bottom of the dash center section down by the console-again--why? The last problem is that I am a perfectionist, and this seems like such a bandaid fix. Of course I am installing it so I will know where every imperfection is, but most people will think it looks good and better than two large cracks at the top.
-
Skim cut like JC said and it shouldn't effect your shim job. You want the right surface for the HG to seal. That e31 wlll have some pop to it- what block?
-
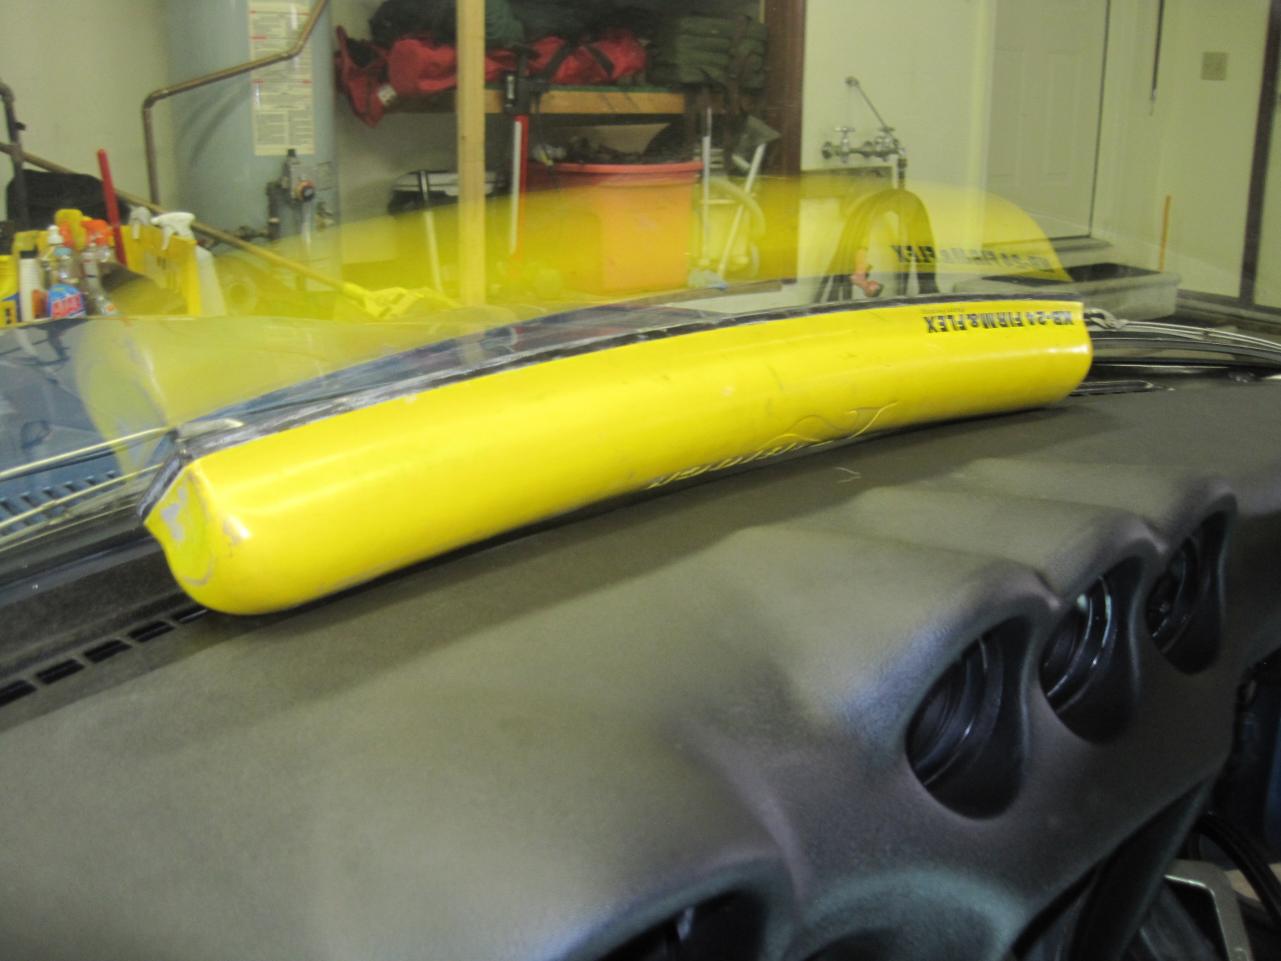
I will try and add pics- but this is not plug and play at all. Everyones dash will be different, but the cover seems sprung laying on the dash. Sprung enough that I wouldn't trust the silicon to hold it in place. The worst area has been in the hazard switch and blank plug area. The cover seems to sit to high off of the dash. I have resorted to a heat gun and reforming the cover. I am shooting for the cover to lay on flush everywhere on the dash. So far not too bad of results, but be careful with the heat gun- it will do some damage quickly The dash is in the car
-
Working on the fit right now. Things I would recommend removing before install hazard switch Ignition lock assembly-unless you want to scratch the cover-very close Steering wheel-why work around it when it is so easy to remove I will report back as I go It is a Dash Top Brand that MSA sells. Grain looks good and color
-
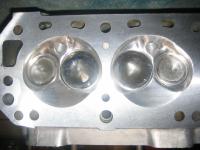
Strictly by looks i WOULDN'T run that head-if i couldn't get the mating surface to look better than that. Have you checked it for flatness? Why the reluctance to have it skimmed-looks like you have done the expensive part by taking it apart.
-
sooo, you don't have a synchronizer of any kind? "one carb FEELS like it is pulling more air", that's a tuff way to tune carbs.
-
Not trying to be a ****, but what do you think we can determine from this pic-really. I can't even tell if the valves are still in there. Looks like you took them out. Like said above, the mating surface doesn't look clean, it should be bare aluminum-that's it. The stuff you can't see is what to worry about.