madkaw
Free Member
-
Joined
-
Last visited
Everything posted by madkaw
-
 Jacob, if the "no-rust" is true, that's worth big bucks right there-but in CA you might be used ti that. SU carbs are a nice upgrade from stock. Need to be tuned seems questionable, unless the owner doesn't know what he is doing. The carbs should have been bolt on and go for the most part. Are you buying without driving? I'd want to drive it. The pics look good. For me the money saved is NOT having to do bodywork, everything else is pretty easy and inexpensive. These motors are TOUGH. Ask the typical stuff History on car Engine condition-compression test?? Drivetrain quiet Any suspension work done Any wrecks
 -
200.00 $ for red paint? If you are saying that it's all bling, I will strongly disagree. But I can understand money!! As far as the subi rear, the adapters are the expensive units. John Coffey sells them over at hybridz for about 500$. Very nice pieces and John does good business. The good part is that Subi-LSD units are avialable and at a reasonable price. Weigh it against a 35 year old r200 that sell for 750.00$ and it sounds much better.
-
WOW, your in deep-I love it. You better get deeper and put the STI diff in there now so you have traction for that beast. Also, a trick T-5 shifter on that trans and you'll love shifting that car all day long. I have a Pro-Tower-I think that's the name-and I am really impressed about the positive shifting. Are the springs slightly shorter? Forget the truck brakes, get some Wildwoods for the front and don't look back. Just leave the stock drums on the rear. I love spending someone elses money-
-
Yes Tony can be grating on the nerve, but you have to read between the lines sometimes. You have started many threads on this build with seemingly nothing but problems. Some might think that your project has not been well thought out(searched) and you seem to be in a panic in all your postings. Take a step back and reevaluate things. As far as the cam, retorque the cam while striking the cam towers(deadblow or runner mallet) to assure they are seating properly. Torque in steps and check the cam every round. If it starts to bind, try a different order of torqueing. It should spin easy, but it will get in a bind sometimes. From there, you might bolt it to the block and try also.
-
Glad I could help Steve-we Steves need to stick together- Hope you ordered a decent one. That plastic one I got might not have lasted two windshields, or might have, I don't know. I believe we are putting more stress on it than was intended.
-
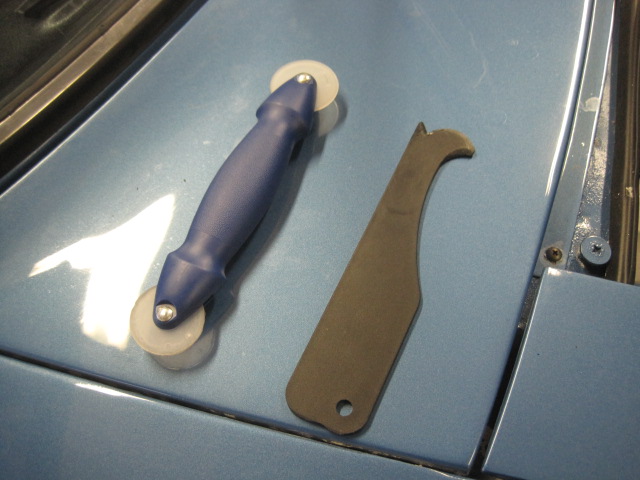
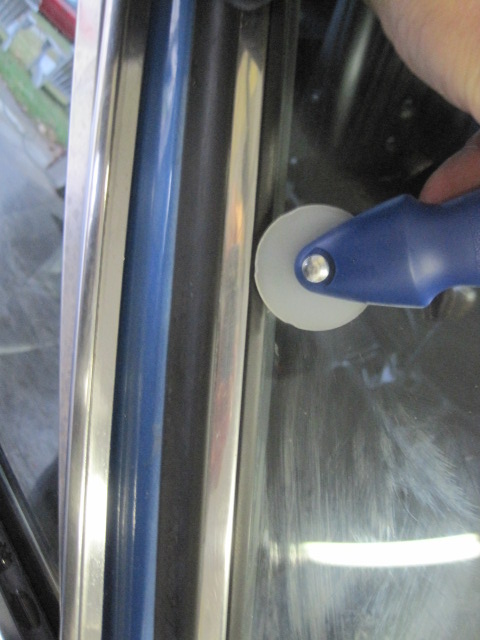
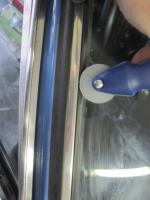
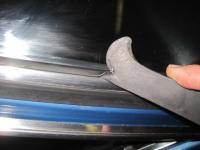
Well I was able to get the picture manager to cooperate. The pictures aren't real telling, but they do show my weapons of the windshield battle. Like I said earlier, the double roller tool there has one roller that is actually grooved in the middle. Great for holding on that sharp trim. The other tool I seem to remember buying this as a caulking removal tool at Lowes or something. Tough little plastic tool that does a great job of lifting the seal. So maybe you can kind of picture the roller applying pressure to keep the trim from springing out of the seal lip ,while the second tool follows pulling the other edge of the seal over the trim. You can see that the seal lip rides nicely in the fork of that tool. Though the tool looks like it maybe to sharp, it doesn't cut the seal, only the SS will do that. As far as suggestions earlier, not sure that the little water I use is going to cause rust. The alcohol sounds like a great idea as long as you don't have any cuts on you hands before or durng the operation-that would make this process even more painful!!! And you can find someone you can pay to do this, you better grab'em. I have read posts where even the "experienced" glass folks walk away from this job.
-
There's no doubt that this is one of the hardest jobs to do on the Z. It's hard on the fingers, back and patience. The best advice on this site is removal of the glass and installing trim- on the seal and windshield-- off the car. I did do that on the rear hatch, and with decent success. I did nick the seal in two places, but I will take those results being I don't do this for a living. Another thing that might things easier is spending the money for the Nissan seals. One area you should go cheap on. Better coverage, better seal, probably tougher rubber too! Anyway, I decided not to pull the front windshield on the car, or altleast try it installed. First thing I did was carefully clean and polish the SS trim. You will never get a better chance to polish it than when it's out. I rummaged thru my tool box for something that would work to assist me on putting pressure on the trim. As you know, this SS trim will cut you up. I came up with this tool that I purchased to install storm door screen. The beauty of this tool is that the one side wheel is actually grooved to help push in the rubber seal that holds the screen in place. Well that groove also does a wonderful job of putting ample pressure on the SS trim-without slipping off. That groove rides right over the edge of the SS and rolls:cool: Thsi makes it nice to roll along the SS while pulling the seal over the trim. I kept the roller in front of the direction I was working -keeping the SS shoved down into one side of the seal, while I was pulling the other side of the seal over the SS. IMPORTANT; keep everything wet with some soapy water-all the time. I prewetted the grooves of the seal before ever starting, but the water will dry up, so you need to keep wetting things as you go. As far as the other tool in the picture, I can't remember where I got it or what I have previously used it for. I've had it forever and used it before when I needed something plastic without a sharp edge. As you see it has a kind of forked end; I used the the small pointy part to get under and grab the seal. So as the roller tool was keeping pressure on the SS, I followed with this tool riding against the SS and prying the seal from out behind the SS and over the edge of the SS. This is where the wetter the better happens. The challenge for me was getting things started. I started with the side pieces and I started at the top. It is important to get it started to where the seal fully holds the SS at the point you started. If not, it will keep popping out. The first 3 inches are a bit of a challenge to get it to hold. Don't worry if you start to high or low, if things are wet enough you can slide the SS around a bit. I worked the SS into the outer lip first. I tried to set it in there in as much of the length of the seal as I could. Once you get some of the SS started, you can use the roller to keep pressure applied to keep the SS in the outer seal groove. I used the meet in the middle method as far as getting the corner. When I had most of the SS set along the roof pillar, I went to the bottom middle of the windshield to try and set it in. The SS has some spring to it, so it's tought to get started, but you will find that it will set in the bottom part of the seal pretty easy. I worked the top part of the seal from the middle of the windshield back to the corner. The corner is tricky and things slow down quite a bit. Did I say keep it WET. Take lot's of breaks, this is a very tedious job. Save the top for last, it is a piece of cake after doing the sides. Hope this helps someone. Damn, the picture manager is not working so I can't post pictures of the tool. I will try later
-
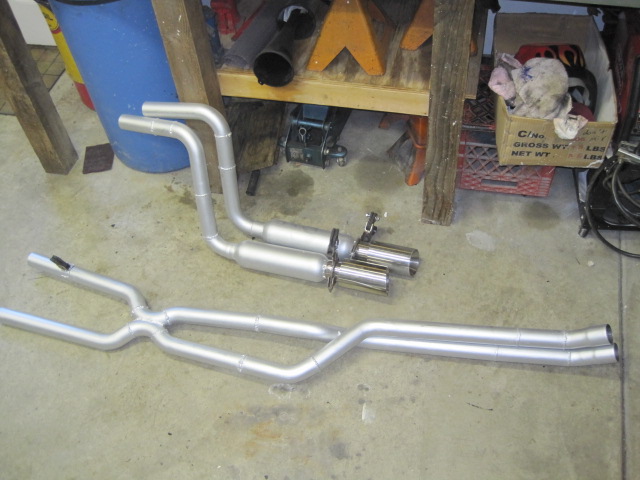
There's been a ton of threads on the exhaust for these cars, but not much in hard dyno proof of the advantage of one over the other-except it's given that mandrel bends and bigger than stock is better for the performance engine. The possible idea of the center section might have been for scavenging-loosely based on an X-pipe configuration. It might be for packaging reasons-it's really hard to tell. It might have a more profound affect on sound of your exhaust than the actual performance. I don't make light of the advice that has been given, because weight is always good to avoid. For me, the experience of driving a sports car involves a good sound. Will I get more enjoyment knowing I saved a few pounds with a lighter exhaust or a constant smile from the sound of my motor singing thru a great sounding exhaust. I have a similiar exhaust on my car, and for me, it is one of my favoriye parts of the car. I just love the sound of this motor with duals. http://youtu.be/NGh6urUlzcQ http://youtu.be/yo2M0F0DCVI


-
I would stay with 1 since you said it sounds the best- who cares about the weight- really.
-
You guys are awesome! When I said force-I guess i meant assist the key back to the 'on" position. It does feel like it's catching. But the ignition switch seems to work fine in all other positions. And where do I get this 'switch"? I did try the wd-40 spray, but not too much.
-
It's a little unnerving to have the starter still engaged when the car is running. I have to force the switch back to the run position. I've been searching and coming up short. I found some posts refering to the back of the switch needing replaced and also lubrication thru the key hole. Anyone want to share their experience with this with their solution? links to other threads!! thanks
-
Are you sure that's not a black wire? Also, on a 71 I will guess that the wiring is NOT complete behind the radio. There are numerous threads about fuel pump wiring on these early Z's. I would have gone with the RX-7 pump, which is also highly recommended on this site-and very quiet compared to the Carter. I would strongly recommend running a relay kit that you can order from jegs or Summitt. I believe I touched on this wiring in my Triple Mikuni Thread
-
Carl, that's exactly what my feeling are about the Wildwood upgrade. It's the linear control at any speed and the confidence I feel when braking that sets this system apart from maybe others. I have driven stock Z's, but not with minor brake upgrades, so I can't judge one against the other. In a lot of hard driving-not track days- I have never locked up, only once in a panic stock to avoid being crashed by someone else. I would bet the stopping distance would NOT be the same.
-
From someone who is running a complete Wildwood kit from AZ Z car, this is a very nice upgrade. Yes, very spendy, but an upgrade that will never need to be upgraded. It's done concerning brakes. I considered many options and in my opinion the extra money was worth the ease of installment and not looking back again. More than enough for my HP rating and my driving habits, but has never felt overpowering and actually the brake feel is as good as any modern sports car I have driven. Yes the rears are way overkill, but my logic was that I will never visit any kind of rear brake work in this car's life time.(kind of miss the parking brake though:)) Yes it was also about the bling of having 4 wheel discs, but these work very well and Dave sells a well thought out kit.
-
Thanks for all the input guys. Glad to hear this isn't the only A trans that makes this noise. The problem is that the car is going to be going on the market soon and I am just trying to make sure it's mechanically sound. The noise is really prevelant at high idle-like when I first start the car and the choke has raised the idle. When idling at 700rpm, it is tough to hear. I don't have a lot of miles on this car since it has just now getting road worthy. I will see if i notice any change in fourth gear. The other problem is that I believe the diff is noisy too-which is making it hard to differentiate between the two noises. Again, I need to get more miles on this car. I imagine a lot of these issues are from the car not being driven enough. This 71 has 85k original. It probably sat close to 20 years wihout rolling anywhwere, which i would think caused dry spots on the bearing that led to rust. Not sure if some driving will help wear anything in or not. I have a spare r180 coming for the diff incase that is part of my issue. I think I better find a spare A trans.
-
Yes all parts are new and yes the noise was there before. Need to drive it some more- just got it back on the road - let you know about fourth gear
-
http://s2.beta.photobucket.com/user/_mad_kaw_/media/jimderk002.mp4.html Might need decent speakers to hear this, but I'm just idling in the garage and depressing the clutch when you hear the noise change.Basically- depressing the clutch makes the noise go away. New clutch, PP, bearing, pilot bearing, tried adjusting slave unit and doesn't make a difference. So maybe trans input bearing? Car also makes a whine noise going down the road that only changes with speed-not gearing. I thought it might be the diff since they do have a reputation, but maybe this is all trans related.
-
An NA cam would be fine, but aren't the p90 valves shorter length- not sure what that would effect . Hell - you could just throw on the NA head complete and b done with it!!'
-
Love to see this car in person if you ever travel south. Please try and make to the next Midwest Z fest in Nashville Indiana. You have about sold me on the fender mirrors-looking good. Brave to do black, but the rewards are nice.
-
Is it me or is this section hard to read and use? There is no breaks between ads, or at least the breaks are not obvious. I don't know what to click on to see the ad, but sometimes I just get lucky. The OP is not easily defined because of the non-sectioned pages.
-
Wasn't one of the bigger issues with the dealer installed early units was the weak fan ? The fan was to weak to draw and circulate the cold air.
-
You guys are awesome! What the problem wind up being is that my antenna is a reproduction or a later year and the original bracket does not mount up with this antenna-(sorry Dave, but if I use the original broke one I will have the bracket thanks to you!) I managed to make a bracket to mount the antenna I have and got installed . Problem is the antenna worked twice and quit Also the replacement antenna I have seems to missing some kind of grommet. With the antenna installed i could see day light around the mast-water would pour in there. The OEM antenna is definetly built better. The pain with all this is that it is keeping me from finishing the interior install in the hatch area. I'm about ready to order a plain old antenna-non-retracting- and be done with it. Any suggestions??
-
Dave, thankyou for sending that bracket-but I still don't see how this antenna attaches. I can tune some triple Mikuni's , but this antenna is killing me! The thing that throws me off is the angle the antenna must have to sit at to utilize the stud. Also the offset that is needed to clear the interior plastic panel. Someone want to make it even more simple for me. I did google the pics on the antenna. The bracket for the 280z as shown above seems a better choose. The antenna that I have to put in the car looks identical to the original as far as mounting points, so I think I have the right antenna.
-
Guys, still following this thread-even if I'm a Mikuni guy- I have contacted mr. Franck and he responded. I have never been able to get into Sidedraft Central Yahoo group-which was mandatory if I was going to be part of this experiment. I have resorted to getting a Yahoo e-mail account to see if that helps. keith wrote me saying that I might benefit from the tubes if my car did not pass the F.I. test-you guys might have touched on this in this thread. I'd say I am border line in that aspect. I have been reading the last few posts and it sounds like I am where you are as far as a slight hesistation during hard tip-in at lower rpms. No coughing, sputtering, spitting-just a millisecond of hesistaion, so maybe i'm at a pretty good point. At higher RPMS, above 3500, there is no hesitation. I have tried quite a few things, but don't know if I have ever completely gotten rid of that slight studder. Other than that, these carbs have really been wonderful. I am going to put some fresh needle&seats in the floats so I know everything is good, and i am going to take to the dyno! This weekend I even played with valve timing to see if that would change anything concerning hard tip-in at lower rpms-it didn't. I did quite a swing on the cam timing and basically put it back where it was-slightly advanced. I have noticed watching my AFR's that WOT AFR is dictated by when hard tip-in occurs. If I stomp it at 2500rpm the AFR's look super rich for a while thru the rpms before getting to the 13 range. If I start out at a higher rpm the AFR's look much more optimum thru the remaing rpm range.
-
I see a ZX parked at the Napa truck repair place under the bridge-looks like someone is working towards a brake job.