


madkaw
Free Member
-
Joined
-
Last visited
Everything posted by madkaw
-
 We'll consider it as helping you with the first stage of restoring . The PO did all the tearing down for you- A good body saves ton of time an money so you are ahead of the game. Get some pics up!! Welcome
 -
My buddy has a lift and if I ever have time enough I am going to get over there. I need to experiment in duplicating this noise without actually moving. With my Wildwoods I can balance all my braking up front and try loading the driveline . A buddy also recommended rocking the car in gear which would be easy enough on a lift. I will have camcorder in hand to record this moment if I get it work!!! I have to pop on two new mufflers/resonators anyway and maybe swap out trans, so why not just do it all.
-
So LSD also .
-
Jim, Thanks for the report. This is a r180? My clunking still persists and it has been definetly worse since going all rubber. I like your idea and wish I had some old urethane bushings to tear up like that. Keep us updated, might be my next project!
Google is your friend!
Datsun P79 cylinder head mods
Thank God we got a second page, it takes forever for my phone to scroll that first page- I am 99% positive a have an ignition problem= Megasquirt. When plugs 4,5,,6 look carboned on triple carbs, then it's probably ignition. I've always ran the 6 with good results.
That sucks- so much a grinder wouldn't fix?
Fuel pressure gauges reads steady at idle. Checked the filters/screens when checking floats. I'm not in town right now, but I have decided that first thing I'm going to do is readjust valves. Bouncy idle, low vacuum reading , miss, it's text book tight valve lash-and I know my valves are tight. I went beyond specs to quiet bad rockers basically, and maybe it's tightened up more to the point that the valve(s) is not sealing.
That's the first thing I jumped on.Everything is holding. This issue is worse and effects all parameters. Basically it's running like poop! It acts like a slight miss, just enough to hear and notice in performance. AFR's are not stable which is easiest to see at idle and it causes the idle to sound like a galloping 3/4 cam. For now I am going to readjust my valves to stock specs to eliminate that. Maybe an internal fuel leak that is allowing some fuel to bypass normal metered paths and causing the roughness. I am going to recheck the needle/seat assemblies. I also eliminated the brake booster and PCV by plugging them at the vacuum log.
As far as the dizzy - go with what you can get away with. I think there should be a number stamped on the pull rod of the vacuum advance. Double that number to get advance. My ZX only had 17 degrees vacuum. I didn't run vacuum, just static at 19 + mechanical 17=36 total. The vacuum advance units seem to be trouble in a lot of these old units.
That plate on the scale reminds me of the show Gold Rush-
Nice job- that will make a big difference in the way the engine looks
Had a long day of getting my hands smelling like fuel. I pulled my float covers off and sure enough my settings were off. Probably a case of not properly adjusting the float within the parameters of the adjustment screw. There is only about 5mm of adjustment externally but the float has to be set so you can get 2.5 either direction. Anyway it wasn't off much and didn't help my issue so I moved on for now. Plugs looked good. I checked timing on my MS and timing light- that was good. Sprayed starter fluid everywhere looking for vacuum leaks an couldn't find any. Checked vacuum at idle and it was 12. I can't ever recall measuring this before so I can't compare, but it seems low. I measured at my vacuum log . Checked valve clearances and some are tight, but I knew that because I set them that way- might need to undo that. It's been that way for many months with no issue. My issue seems to be getting worse- maybe it will just break so I can figure it out. Sounds like a miss and my AFRs are bouncing around at idle Compression check next
Chasing my tail lately I believe. My 'studder' is back(randomly) and seems to be directly tied to a rough idle I intermittently get. These carbs use to idle at 750rpm -rock solid, but now everyonce in a while the idle bops around. I no longer have a working tach, but my idle speed hasn't changed much, but just gets erratic and shows super lean . It seems when my idle gets crappy my transition issue re-appears. I guess it's time to start from square one. Tomorrow I'm pulling the float covers off and start double checking all the settings and looking for anything that would cause a float issue. Yes I am focused on the floats because it is one of the few adjustments that can effect all parameters of operation. Not to say I don't have something else going on --and I will check. The mikuni manual eludes to checking for carbon build up of butterflies or pilot screws, but these carbs are clean.
Wow- Rebello can't believe these engines made it out of the factory with the close piston/head clearance . Just having a hard time believing this. I guess the extra clearance would be the safe route. And I am not questioning Rebello s engine building capability, but to prefer an open chambered design head for piston clearance doesn't quite make sense.
Mitch, thanks for the filter advice. Not sure how the main air jet change leaned you out. The smaller jet should have richened you up a bit at WOT and brought the main in sooner. The cruise is ALL pilot to a certain point. I haven't read anything about the idle needing to be 1000rpm. I have been able to keep it around the 750 rpm range pretty consistantly. It gets a little lopey sometimes, but still idles well. I have noticed that hot starts are easier with a rich idle .
Check for loose connections especially around the dizzy and follow Carls advice
I haven't forgotten the accel pumps and I have chased those tiny cotter pins on the rods too many times. That is one of the hardest adjustments to do on these carbs while mounted on the engine. The accel pumps seem to be doing there job, and I wonder even about going a smaller size yet. but this doesn't have effect on the transition issue I am dealing with. My issues comes in high vacuum, mid rpm range ,light tip-in, moderate loading. It goes beyond the expectations of accel pumps. Changing the bleed pipes had the most significant change, but not perfect. I am chasing perfection-which will not happen, but still fun yet. These carbs were about brand new when I got them. Idle is kept in the 750 range. I did check throttle plates by measuring the opening and setting all alike.
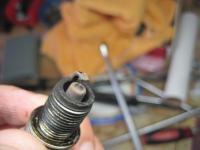
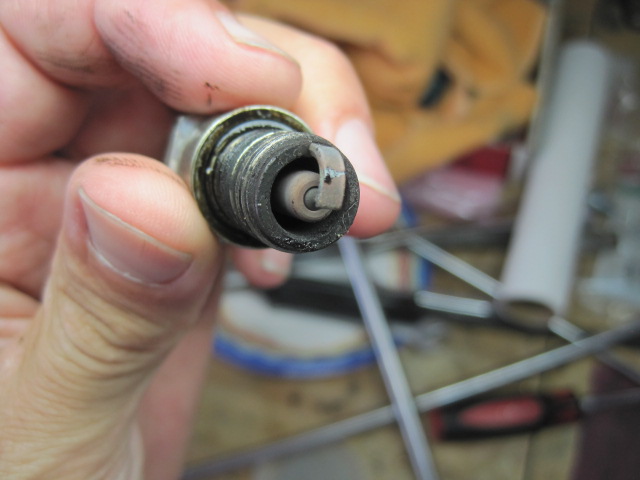
So I have the 70's pilots in there now and I watch my AFR's hang right in the beefy section on 13eens. At 75mph I was probably hanging around 13.2-13-5 at best. I was also watching my gas gauge thinking it was going to plumit at anytime. What happened was un eventful as the engine purred as good as it ever has and the gas gauge didn't move much different from before. I made a round trip to work which is 50 miles each way 80% highway. I tweeked the pilots to 1&3/4 turns out. That gives me 14.5-15 AFR idle. I'm telling ya-the engine/carbs love fuel. It just sounds better and runs better. Putting around town the engine responds quickly and decisively. Now look at my plugs. I have done nothing with these plugs since I installed my megasquirt. These plugs have seen everything from flooding carb to len mixtures. So after last nights run a pulled number 3. It is way better then I anticipated. The blackness at the top of the threads is dry soot and I always seem to have that. My tan line goes all the way down the plug! I might still turn in the pilots another 1/8.
 You need to verify by checking plugs too. Are the rear three sooty or fouled?
So you are advanced now already? What dizzy model are you running and what's your static timing
Guess I sounded snarky there - sorry. Maybe not the best dizzy and they are all different as far as mechanical advance. How much timing all in? Might consider a ZX dizzy or electronic ignition .
To Hell with stock specs - you aren't running a stock motor. Any pinging you might have had might have been from vacuum advance. Unplug it and play around with advance. If you don't have a timing light- you shouldn't own a Z
You need to verify by checking plugs too. Are the rear three sooty or fouled?
So you are advanced now already? What dizzy model are you running and what's your static timing
Guess I sounded snarky there - sorry. Maybe not the best dizzy and they are all different as far as mechanical advance. How much timing all in? Might consider a ZX dizzy or electronic ignition .
To Hell with stock specs - you aren't running a stock motor. Any pinging you might have had might have been from vacuum advance. Unplug it and play around with advance. If you don't have a timing light- you shouldn't own a Z

Important Information
By using this site, you agree to our Privacy Policy and Guidelines. We have placed cookies on your device to help make this website better. You can adjust your cookie settings, otherwise we'll assume you're okay to continue.