


240260280z
Free Member
-
Joined
-
Last visited
Everything posted by 240260280z
-
 Does tach stop instantly when engine dies or does it mach engine speed and chug to a stop slowly?
 -
Glad to help.
-
http://www.britishracecar.com/MichaelSnowdon-GRD-272.htm
-
Yup,the one on the left is the outer. There is a seal that goes on the inside. (below) Read this and you should get a better idea: CLICK
For a super system: - Read up on megasquirt. - You will need a new intake, injectors, high pressure pump, high pressure fuel lines some sensors, fuel pressure regulator, and a controller/computer. - An ITB intake would be great. For a workable solution: - Quickest and easiest is to gut a 280z and transfer the parts over.
Excellent! You should also re-torque your head bolts and check valve lash after a few hundred km of driving just. Good Luck!
You learn from doing and you learned a lot! I am very happy for you...your are in the realm of Bosch L-Jetronic experts Now go tune a Porsche, BMW or Alpha from the 80's and strut your stuff! Alpha BMW Porsche
What do plugs look like? Black and fouled?
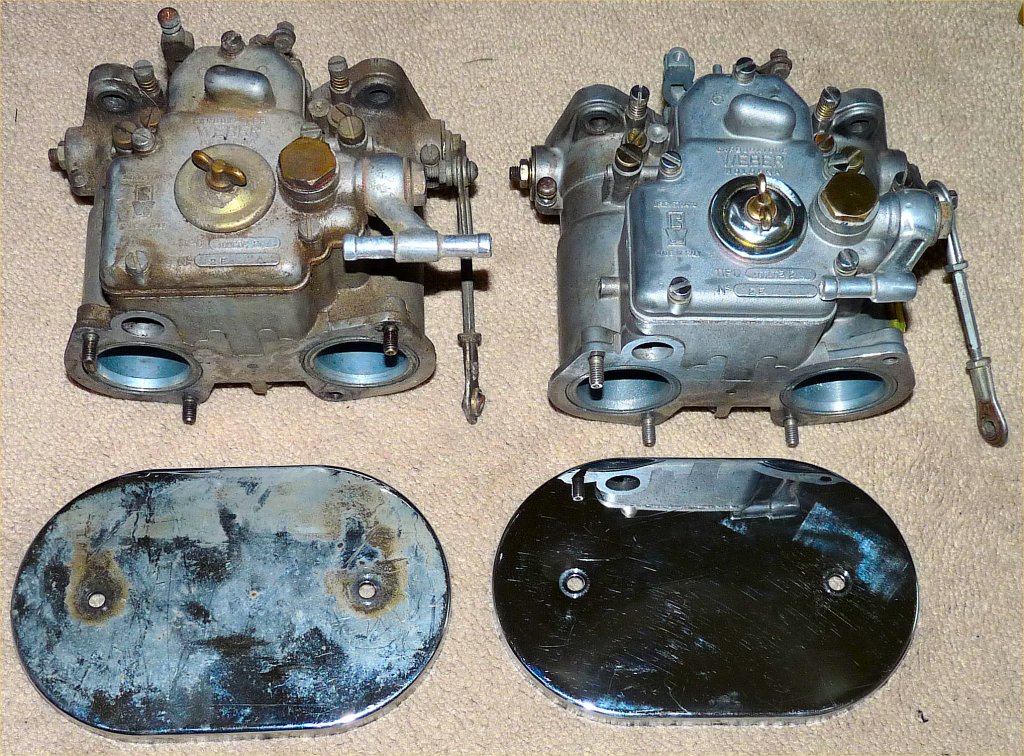
My Weber carb book is in Canada (1,000mi away) and not much luck finding baseline config for a friend's 1.8 litre 510 online. Here are the specs for the carbs that came with his 510 (not installed) Cannon Intake two Weber 40DCOE 2 Carbs Aux Venturi: 45 Venturi (Choke): 32 Main Jet: 135 Air Corrector Jet: 170 Emulsion Tube: F15 Idle Jet: 55F2 Pump Jet: 40 Needle: 200 Spill Pump: 55 Thanks!
Outer bearing has built-in seal on outer side.
Change oil because debris could have entered it. Also make sure with the damper at O degrees check the marks on the cam sprocket to make sure it is correct. THIS IS VERY IMPORTANT.
Trying to find a low pressure quiet reliable fuel pump for a 240z resto however; not much out there that is quiet. I was thinking that maybe lowering the pressure of a 280z FI pump may be do-able: - remove some of the cylinders in the impeller to reduce flow (item 2 below) - lower relief valve pressure (item 3 below) These mods and a good low pressure FPR up by the carb may be suitable, reliable and quiet. Any input before Count Dracula and I go down to the lab...Fun Time.
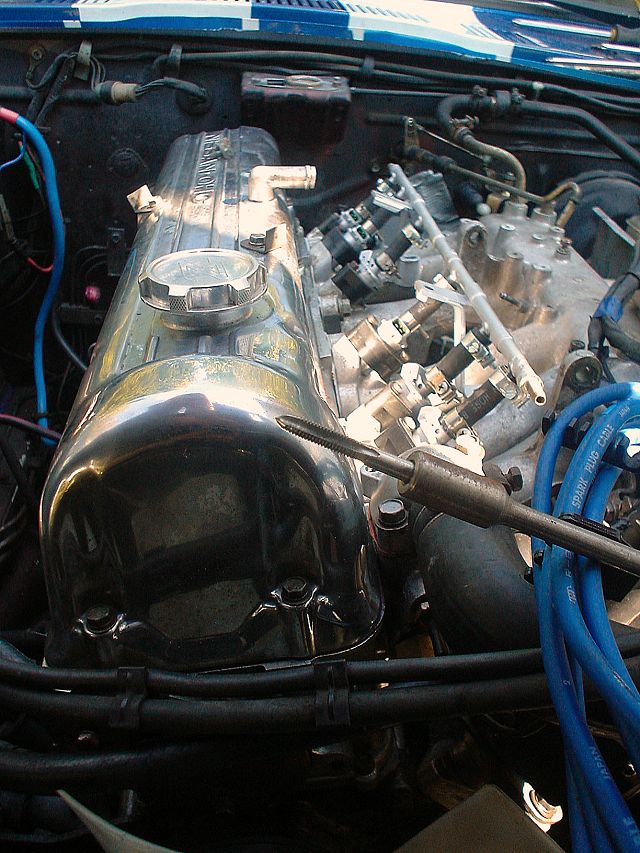
 I once used ~ 1' of a broom handle and a hole in it with wire. Wood is not best because it can splinter into the oil. The good old Barbie hockey stick does the trick.
Waiting for carb gasket kits in mail.
I once used ~ 1' of a broom handle and a hole in it with wire. Wood is not best because it can splinter into the oil. The good old Barbie hockey stick does the trick.
Waiting for carb gasket kits in mail.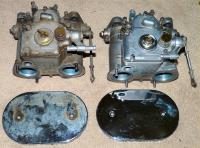 nice run
 I also cut and reworked my "bugle" shaped rail into a straight line. I am not sure if it will help but it holds less fuel and has less surface area than the original thus it may clear faster and absorb less heat.
 Too bad you could not cobble the cold start valve outlet back to the tank and use it to pre-flow cool fuel through the rail. OR Connect one of these in parallel with your FPR and activate it to flow fuel through the rail
Best kept secret on the net
Z's for sale in florida here
Hitachi and Denso made most of the electronic parts that I have seen. Here is an E12-92: Note the Hitachi stamp/seal/logo/icon above the "V" in 12V
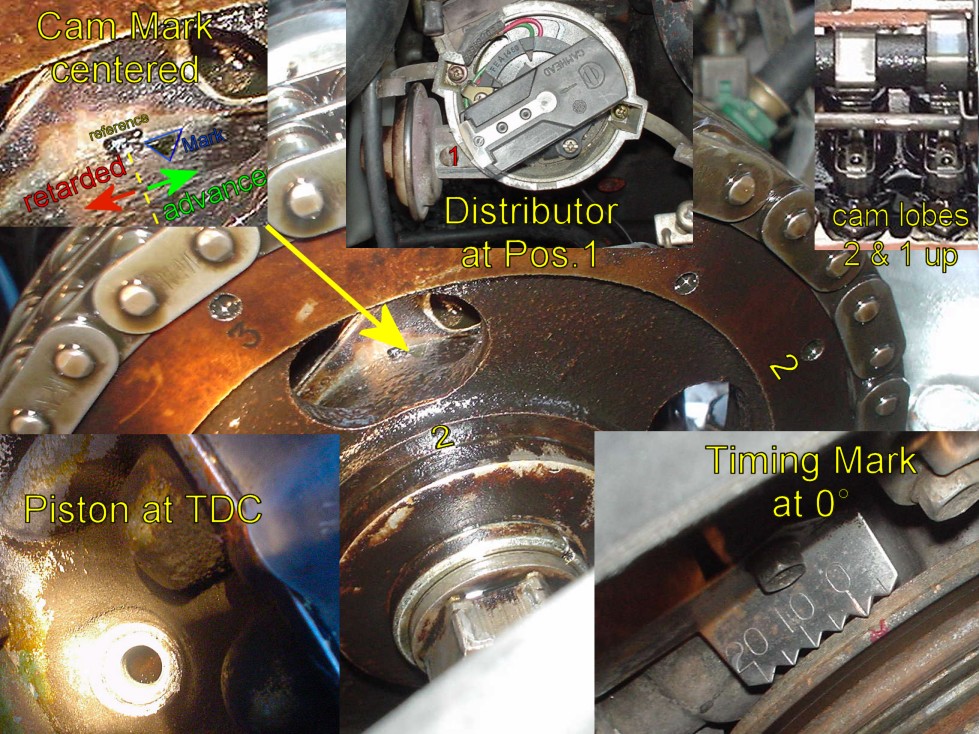
If you are absolutely sure that the sprockets on the cam are meshed with the same links on the chain then you are ok. Other wise you may be a link or two off in advance or retard direction. This will result in a problem. The best thing to do now is to continue with the chain attachment (assuming head is torques down) then remove the wood (keep valve cover off) then : 1, Turn the crank using a big socket. (hopefully the valves will not hit the pistons so be careful and stop if you feel any interference) 2. Do 2 revolutions then align the timing mark on the damper to 0 degree mark and the \ / angles for cylinder 1 lobes (you know what I mean) "TDC" 3. Check the cam sprocket alignment reference and triangle marks. If the triangle and reference marks are close then you are good. If they are significantly to the right or left then you must remove the cam sprocket (using wood again), then re-install the cam sprocket rotated either way so that the dash and the triangle line-up. See the picture below.
Too bad you could not cobble the cold start valve outlet back to the tank and use it to pre-flow cool fuel through the rail. OR Connect one of these in parallel with your FPR and activate it to flow fuel through the rail
Best kept secret on the net
Z's for sale in florida here
Hitachi and Denso made most of the electronic parts that I have seen. Here is an E12-92: Note the Hitachi stamp/seal/logo/icon above the "V" in 12V
If you are absolutely sure that the sprockets on the cam are meshed with the same links on the chain then you are ok. Other wise you may be a link or two off in advance or retard direction. This will result in a problem. The best thing to do now is to continue with the chain attachment (assuming head is torques down) then remove the wood (keep valve cover off) then : 1, Turn the crank using a big socket. (hopefully the valves will not hit the pistons so be careful and stop if you feel any interference) 2. Do 2 revolutions then align the timing mark on the damper to 0 degree mark and the \ / angles for cylinder 1 lobes (you know what I mean) "TDC" 3. Check the cam sprocket alignment reference and triangle marks. If the triangle and reference marks are close then you are good. If they are significantly to the right or left then you must remove the cam sprocket (using wood again), then re-install the cam sprocket rotated either way so that the dash and the triangle line-up. See the picture below.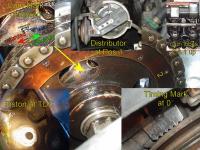 Step 39 on this page is very important when disassembling. Did you follow it?
Nope, do not remove the wooden stick. The common way to get the chain on the cam sprocket is to use a long flat screw driver (with some electrical tape around the end to protect threads). Simply stick the screw driver through the cam sprocket then push the screwdriver into the nose of the cam. Then pry up using the screw driver as a lever to lift the sprocket while, at the same time, pushing the sprocket into place. If I recall correctly I may have used the top front of the head as a fulcrum so put a rag or rubber there to protect the aluminum from the screw driver. To do this step easily it is best if the head is in place. Be sure the block is still near TDC and also that the head is at TDC so that the valves stick out correctly underneath and do not hit pistons. When putting the cam sprocket in place, be sure to align the correct "dimple" with the link on the chain that you painted.
Step 39 on this page is very important when disassembling. Did you follow it?
Nope, do not remove the wooden stick. The common way to get the chain on the cam sprocket is to use a long flat screw driver (with some electrical tape around the end to protect threads). Simply stick the screw driver through the cam sprocket then push the screwdriver into the nose of the cam. Then pry up using the screw driver as a lever to lift the sprocket while, at the same time, pushing the sprocket into place. If I recall correctly I may have used the top front of the head as a fulcrum so put a rag or rubber there to protect the aluminum from the screw driver. To do this step easily it is best if the head is in place. Be sure the block is still near TDC and also that the head is at TDC so that the valves stick out correctly underneath and do not hit pistons. When putting the cam sprocket in place, be sure to align the correct "dimple" with the link on the chain that you painted.


Important Information
By using this site, you agree to our Privacy Policy and Guidelines. We have placed cookies on your device to help make this website better. You can adjust your cookie settings, otherwise we'll assume you're okay to continue.