240260280z
Free Member
-
Joined
-
Last visited
Everything posted by 240260280z
-
 You can get the 1973 Factory Service Manual here: http://www.hammondsplains.com/fsm/ You can get the wiring diagram here: http://atlanticz.ca/zclub/techtips/electrical.htm
 -
It is not the size of the master that is wrong. There is an adjustable part that allows you to control how far the rod in the clutch moves. If the rod is adjusted differently in the new part then that could be your problem and it can be solved by a simple adjustment and re-bleed. Here is some info to give you an overview: http://atlanticz.ca/zclub/techtips/clutchfreeplay/index.html To check the clutch disc, simply drive up a hill at low speed in 5th (or 4th if you have 4speed). A bad clutch will slip under load and the revs will go up but the speed will go down. It seems you have a hydraulic problem with master or slave.
-
I forgot fuel filter in the list of consumables You may also wish to check compression too.
-
Quick Checklist 0. Visual Inspection: belts, hoses, wiring, rodent damage/nesting 1. drain gas and flush tank with acetone. 2. drain oil 3. drain coolant and replace thermostat, flush out system with a garden hose (there is a drain on the block near cylinder 5 on drivers side). 4. pull plugs pour ATF or spray anti-seize (pb blaster/liquid wrench) into plug holes 5. turn motor at crank nose to ensure rings are not seized 6. remove valve cover, oil cam, remove oil bar, use canned carb cleaner and straw to spray all holes in oil bar to back flush 7. re-install oil bar, replenish oil, and crank engine with plugs out and watch for oil bar to start squirting. Make sure all holes are oiling the 12 cam lobes. 8. blow gas lines back into tank 9. replenish coolant and gas 10. crank and check for spark 11. Check electrical system. Voltage at battery should be 12.6 to 12.8 with car off and ~13-14.5V with car on . Also check for corrosion in wires and at fuse block. 12. Verify injector operation 13. Check fuel and brake system 14. Check suspension and wheels/tires 15. Start car and check gauges/engine function/exhaust/ cooling system/ charging (watch for burning wires in cabin, coolant leaks in system and in cabin) 16. Take on a few drives within pushing distance to your home and resolve any issues. (gunk in fuel tank may take a mile or two to clog the filters or fuel pickup!) Stuff you may need to replace: fluids plugs plug-wires coil distributor cap & rotor tires battery water pump air filter clutch slave (seals) rear wheel cylinders (seals) fuses Thermostat fuel filter
-
It may be that your L28 is de-rated through design due to smaller carb and smaller exhaust..... thus your results I found this cool cedric post with a nice satin blue http://retrorides.proboards.com/index.cgi?board=readersrides&action=print&thread=48875
-
Quick Checklist 0. Visual Inspection: belts, hoses, wiring, rodent damage/nesting 1. drain gas and flush tank with acetone. 2. drain oil 3. drain coolant and replace thermostat, flush out system with a garden hose (there is a drain on the block near cylinder 5 on drivers side). 4. pull plugs pour ATF or spray anti-seize (pb blaster/liquid wrench) into plug holes 5. turn motor at crank nose to ensure rings are not seized 6. remove valve cover, oil cam, remove oil bar, use canned carb cleaner and straw to spray all holes in oil bar to back flush 7. re-install oil bar, replenish oil, and crank engine with plugs out and watch for oil bar to start squirting. Make sure all holes are oiling the 12 cam lobes. 8. blow gas lines back into tank 9. replenish coolant and gas 10. crank and check for spark 11. overhaul carbs (clean lines, clean carb internals, check fuel flow and fuel bowl operation) set jet and needle 12. Check electrical system. Voltage at battery should be 12.6 to 12.8 with car off and ~13-14.5V with car on . Also check for corrosion in wires and at fuse block. 13. Check fuel and brake system 14. Check suspension and wheels/tires 15. Start car and check gauges/engine function/exhaust/ cooling system/ charging (watch for burning wires in cabin, coolant leaks in system and in cabin) 16. Take on a few drives within pushing distance to your home and resolve any issues. (gunk in fuel tank may take a mile or two to clog the carbs or fuel pickup!) Stuff you may need to replace: fluids plugs plug-wires coil distributor cap & rotor tires battery mechanical fuel pump water pump air filter clutch slave (seals) rear wheel cylinders (seals) fuses Thermostat
-
You can adjust the clutch-pedal-to-master-throw by turning the locking nut on the master cylinder's rod. It is possible that the new master's nut location or rod length is different from the original. (I hope no one every quotes that line out of context!) After you make an adjustment, redo the bleeding.
-
Yes, a stock tuned 280z is ~ 125-130HP at the rear wheels on a dyno. Here is a good read: http://www.zcar.com/car_talk_forum/my_z_dyno_pics_836239.0.html
-
So here is data: Stock exhaust and carbs: 60kw / 80hp Stock exhaust and Holley carb: 65kw / 87hp High flow exhaust and Holley carb: 80kw / 107hp But most tuned L28's 280z stock put ~ 95kw / 125 hp?
-
Most people don't seem use their turn indicators but when they do, why do some manufacturers cheap-out and not use orange plastic lens'? I never understood the safety issue being outweighed by penny pinching? Most of the world uses yellow for separate turn indicators and the human eye is much more sensitive to colours near yellow than red. Am I missing something or is it just cheap-arse manufacturers?
-
Please show us dyno data for stock and modded exhaust to make this post complete. I recall seeing graphs on zhome.com that showed ~ 4HP increase from stock.
-
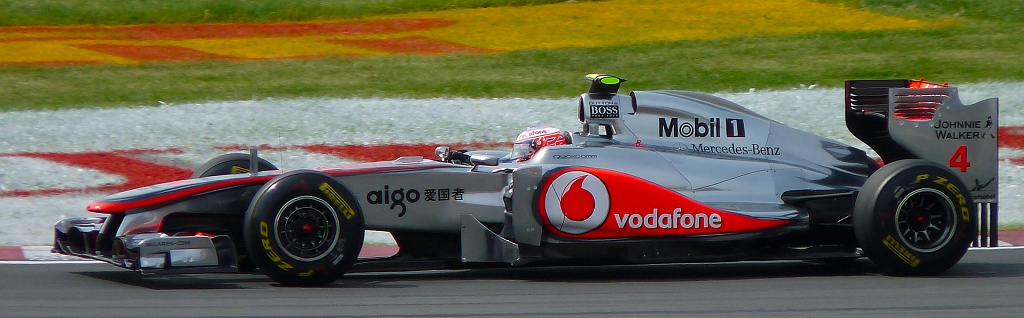
Thanks All! Had a great time. I sat in Grandstand 15 Section 4 (south side) and was high enough to just see over the protective fence. Here is a photo I took of button on the sunny saturday before the wet race.

-
when "you can smell how fast you are going".
-
http://atlanticz.ca/zclub/techtips/fuel/gastank/index.htm
-
There is a connector and fusible link that powers the whole EFI system (including ECU and injectors). The fusible link is in a small wire from the firewall that goes to the +pos battery terminal. There is a good chance it is loose at the connection or the fusible link in it blew. You can see the EFI Power Connector in the top two photos on this page: http://atlanticz.ca/zclub/techtips/electricalconnections/index.html The cable from the battery to the connector is the fusible link. The efi fusible link is circled in lower left of this photo. It is separate from the other fusible links that are bundled near the strut tower:
-
You can replace with a DIY cable system from a junkyard donor car and some figur'n
-
Hamilton From hairpin grandstand #15 section 4 seats 26 NN

-
Here is another: https://www.napaonline.com/Catalog/CatalogItemDetail.aspx?A=NCP2749099_0131108418&An=599001+101975+50018+2018014
-
Yup that is it. Part Number MRC HB1175. Interesting what NAPA Online has for parts. More than I imagined! https://www.napaonline.com/Catalog/CatalogItemDetail.aspx?A=MRCHB1175_0323256997&An=599001+101975+50018+2018014
-
Sea Foam is Pale Oil (Machine shop cutting oil) ~ 50% Naptha (coleman stove fuel) ~30% IPA (Isopropyl Alcohol) ~20% Make it yourself. You can also throw harsh solvents into the cylinders with the oil drain off and plugs out to get the pistons clean. Let it sit/drain through the bottom of the pan past the rings. After a while suck out the remainder in the cylinders through the spark plug holes and maybe chase with a light oil or atf. Change motor oil in car and enjoy.
-
I reluctantly will refer you to this due to the great Tony D's posts ( FYI I detest that site and their administration's "ways"): http://forums.hybridz.org/index.php/topic/68381-lash-pad-source/
-
Thanks Diseazd! I'll probably get the new stuff. Just had to scram back to NJ for work. Car is 1000mi away.
-
2 questions: 1. How did you get the zinc plating to look so golden and shiny? 2. How can this post be converted to an "article"?
-
Luv da cool blu mota'
-
Did you try what Cozye suggested?