240260280z
Member
-
Joined
-
Last visited
Everything posted by 240260280z
-
 Did this a while ago: 1. Start early in AM on a Sunny Saturday morning 2. Plug all holes (thick saran wrap, or balloon with elastic wrapped over it) I used tape but elastic band and balloons from a dollar store would be better. 3. Prepare a flap that will plug gas sender hole using the backing ring, 2 vinyl discs cut from kitchen place mats or a yogurt/icecream container lid should do fine 4. Buy marbles, muriatic acid, "must for rust" or phosphoric acid or "Osphor" and rubber gloves. 5. Drop marbles in and move take around to break up some rust for ~ 5min 6. Put on safety goggles, slowly pore in 1 gal of muriatic and seal and swish for 5 min (have spray garden hose on and ready in case it leaks on you. 7. Fill tank to brim with water and let stand for 1 hour 8. Drain and rinse with water a couple of times quickly, use spray hose to get sediment out (a high pressure washer would be super for this part). (Use baking powder to neutalize the acid water). 9. Blow out quickly with air hose to dry (do it quickly as metal will flash rust) does not have to be bone dry. 10. Pour in "must for rust" or "Ospho" or phosphoric acid and swish for 5 min have a break and repeat a quick swish every 10 min for an hour. 11. Drain then flush with water a few times. 12. Dry with air hose and hot sun (bone dry). 13. Check for water in tank, if bone dry, stick a cheap dollar store funnel on sender opening and pour in POR 15 liner and swish for 15min (slowly rotate the tank as the stuff moves like molasses so give it time) Repeat a few more times in the hour then open drain plug and position tank so that excess POR-15 drains. 14. Let set for 2 days. Here is another: Seal all holes with thick plastic bag material then wrap tightly with tape. Cut circular pieces from butter containers and stack on the Oring for the fuel sender to seal Swish and Soak with acetone or lacquer thinner 1 Gallon to get the old gas varnish/goo out first Swish with Muriatic acid full strength 1 Gallon for ~ 1hr (swish every 10min). Drain and collect acid then have a peek inside to ensure rust is gone. If not pour acid back in and fill tank to top with water then soak over night. Drain acid and pour in water with backing soda and swick for 15 min Power wash and rinse with water drain water then stick a clean rag 1/2 in to sop up the water drops that won't come out Dry with hot air gun or hair dryer for 1hr. Make sure it is bone dry. Shake and stir a 1 pint can of POR 15 fuel tank sealer then pour in via a cheap plastic funnel Rotate tank to spread the por 15 everywhere for 30min then suspend tank horizontal with drin plug out and a catch can under the drain hole Let sit for 3 days in warm locating ~ 70F (Do not blow hot air in the tank)
 -
Looks like a nice project. For gas tank cleaning, I found acetone to work best when swishing. If you have rust and want it removed, follow up the acetone with a swish of muriatic acid then rinse, dry and coat with por15 gast tank sealer. You can also do the acetone then follow with phosphoric acid to neutralize the rust. Muriatic (Hydrochloric) acid will eat into the metal, phosphoric acid will not eat into it very much.
-
They look like wheels made by a German company called BBS or a knock-off.
-
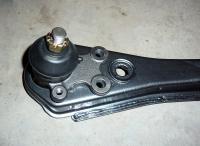
Shorter throw at pedal, same throw at transmission. It will allow pedal to be closer to the floor.
-
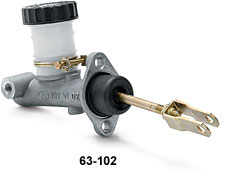
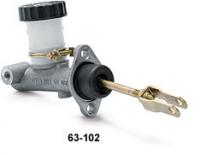
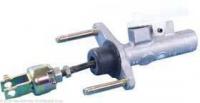
Just changed the master and slave clutch cylinders and clutch on my 98 Rav 4. The newer parts pushed the clutch pedal bite point way waaaay up. I tried to adjust the Toyota master's threaded rod but it had limited adjustment due to a stop in the "lump of a" clevis. I figured the 3rd party manufacturers in Japan would standardize and remembered that the Z had an open clevis so dug into my spare parts, grabbed a spare 280z master and swapped out the clevis. It worked like a charm: - same rod diameter and thread - same lock nut - same cross pin hole size - no stopper I have a feeling that clutch masters and brake boosters from many Japanese cars may be swappable after this experiment... wish I had time to experiment further. I'd love to find a 1" dia or bigger master clutch for my 280z.
-
http://www.baddogparts.com/
-
-
-
here are some photos:

-
72 looks nice here: http://www.jaxed.com/cgi-bin/mash.cgi?cat=cp&itm=datsun+1970s&loc=NJ&fil=&ys=&ye=&ps=&pe=&pgs=100&submit=++++go++++
-
I'll be back in Bridgewater NJ next week. It would be nice to meet up some time.
-
Here are schematics for the fuel sender and the gauge. If you have the wires reversed then you may get the problem as the sender wire (yellow) may ground when you connect the sender to the tank <<<<watch out for sparks when you do this!!!>>>>
-
The resistance on my 77z's sending unit is from 4 ohms to 80 ohms. You should be able to read this using an ohm meter first on the wires at the top of the sensor on the tank then on the wires to the fuel gauge in the dash. If this is ok then your sender and wiring is good. The next culprit is the fuel gauge. It works off standard bi-metal heating and cooling. Just clean the "carboned-up" contacts within it and you should be good to go.
-
Don't forget the FS5W71C (200sx, 240sx and 300xz's) with 5speed "guts" that mate to machined stock bell housings and a bit of drive shaft work. Tech Tip: http://atlanticz.ca/zclub/techtips/240sxtransmissioninstall/index.html Tech Tip2: http://home.comcast.net/~zheimsothtn/transmission.htm 200SX 240sx Z31 300ZX
-
You can also take the inside panel off the rear hatch and seal the big hole by cutting polyethylene plastic "Vapor barrier" and affixing it with silicone or similar sealant.
-
I'm doing a resto and this is what I went with. Just got shipments 2 weeks ago and will install in a month or so. The Vinyl covers all stock places including front pillars, roof and edge of roof (many kits do not cover so much). The carpet is pretty much the stock. Vinyl Kit: http://www.blackdragonauto.com/icatalog/zr/full.aspx?Page=75 Carpet Kit: http://www.thezstore.com/page/TZS/PROD/SIC103/40-2580G You can buy modified carpet kits that cover more including the transmission tunnel as well as the vertical section behind the seats and also up to the door sill.
-
Here is a great photo someone from zcar.com took that makes it easy to describe parts.
-
Found this too: http://www.new-datsun-parts.com/nissan-skyline.html
-
You may be able to scale up some measurements here: There are a few C110's http://carblueprints.narod.ru/datsun.htm Sample:
-
A lot of significant tectonic activity in very recent years (indonesia, chile, china, japan). I have a hunch the plates under calif or alaska will soon make adjustments given the stress releases in other areas.
-
Glad you are ok. The canal area in Guangzhou is nice place to walk and relax.
-
Walk away... there are always great deals for cars... no need to jump at an early find.... be patient and be ready.
-
Like this (paint code 112): keep the black interior too.

-
Here is an online Java version from many years ago that I wrote with a Z addict from Quebec. http://atlanticz.ca/zclub/techtips/calcs/engine%20builder/index.html NOTE: You can manually edit the smaller green fields for customization.
-
I read when changing pulleys you should always replace woodruff keys. This part fails on 1990 Miatas (well the crank nose slowly fails where it holds the key)