BD240Z
Free Member
-
Joined
-
Last visited
Everything posted by BD240Z
-
Thanks for the feedback & ggarrard, thanks for the photo. I like the idea of leaving it white but there are several logical reasons for painting it black, I just need to make a decision. This car will be driven at least weekly so no trailer queen here. My oldest son gets his license this fall, he might get the car. Scanlon, I didn't notice the drain tube gasket until I was painting over top of it. I was hoping no one would notice! Thanks for pointing that out:laugh: Good luck with your cars!
-
Nope, not true. The lock-washer still compresses and maintains the outward pressure on the bolt. Since you've decided to use flange-bolts, try one in an inconspicuous area and then remove it to see what happens. A few tests might answer your question. Good luck with your car.
-
Enigma, I'm not sure what you mean by a flange bolt but if it makes sense, try it in a few spots to see how it works. Here's what I've done in the past and what I'll do when I paint my car this fall. Ace Hardware has a nice supply of thin nylon washers as well as a bunch of other connectors/fasteners that has saved my butt more than once. I paint the nylon washer with some rattle-can paint that closely matches the cars color. I place that washer between the lock washer and the paint and it's kept the paint from getting gouged. Good luck with your car!
-
I just finished sealing up my floors, inside & out. Here's what I did and I hope it's gonna keep the floor metal from ever seeing any moisture. I removed the factory tar sheets, undercoating and paint with a variety of chemicals & tools. I then sand-blasted the inside floors and the bottom of the car, (yes, sand went everywhere in my garage). After I weld repaired some rust areas on the floors I used Marine Clean & Metal Ready to prep the metal. I then applied three coats of POR-15 to those areas. Then I applied two coats of Ti-Coat primer to the POR. Then I scuffed the Ti-Coat primer with scotch-brite and then sprayed three coats of acrylic enamel over it. (I followed the instructions on all the cans to the "T"). I then applied Evercoats "Q-Pads" to the complete inner floor, transmission tunnel & firewall. Then I sprayed two coats of the same acrylic enamel on top of the Q-Pads. The last thing I need to do is decide what to spray over the paint on the bottom of the car. I'm thinking rolled on bed-liner materials and then rubberized undercoating on top of that. I recommend that you get some POR-15 on the inner rocker panels while you have everything out of the car. I also sprayed POR into the frame rails with an undercoating spray kit. I'm hoping this will do it for my car and that I can claim that my floors are "rust-free". Good luck with your effort. Bruce
-
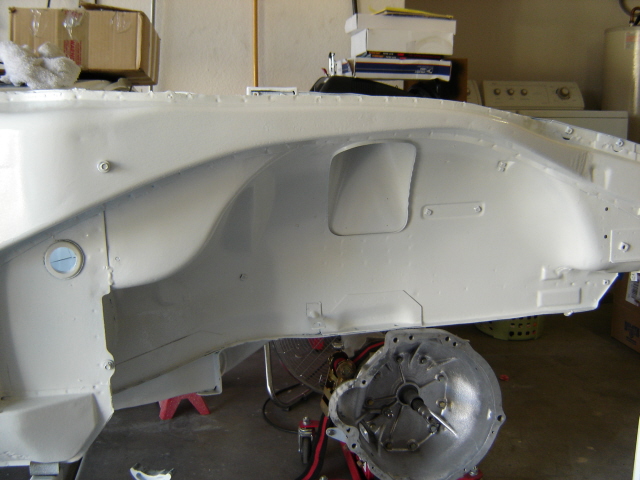
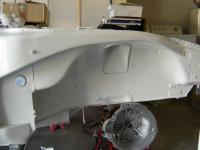
I'd appreciate some feedback. I've finished the welding & grinding and have painted the shell of my 240Z, this includes the wheel-wells per the attached picture. I realize this is the way it came from the factory but I'm tempted to paint the wheel-wells black. It seems it would make the appearance a little nicer not being able to see all that white. I've searched for pictures trying to see what difference it would make but haven't been able to find many that helps with the decision. Would it look ugly/goofy being all white? For those that have made this decision or have an opinion? Which way did you go and were you happy with the results of your decision. I'm ready to install the front and rear suspension and don't want to re-paint after everythings on the car. Thanks
-
You won't get that u-joint with a remanufactured rack. The micro-fiche calls it an "assembly joint steering lower". I have no clue if it's still available from Nissan or if anybody has developed an aftermarket version. Good luck with your effort.
-
That steering wheel is from a 280Z, possibly a 260 as well.
-
2007 Kawasaki KLR 650, just got it! 2006 Infiniti FX35, my daily driver 2003 BMW X5, wifes buggy, (you should see the maintenance bills, whew!) 1995 Mazda pickup, 4x4 V6, for hauling the big/dirty stuff 1986 Porsche 944, keeps the miles off the daily driver 1970 240Z, #4880, to be determined I agree with the truck comments. I got tired of asking friends/neighbors if I could borrow their truck so we decided to get a used one and boy do I like having it.
-
Gary, The two stage referred to base-coat/clear-coat. Using the Preval system wasn't hard, just prep and mask like you normally would and then paint. IMO, the hard part is getting the new paint to blend in with any old paint on any adjacent panels. In other words, when you remove your masking tape, how do you blend in the masking line so that it looks right. That's the beauty of a clear-coat, you can wet sand and then buff/polish. Other members appear to be much more knowledgeable about painting, maybe someone can pipe in on how to blend in the line. Follow the paint manufacturers data sheet and practice on something to get the hang of how the Preval sprays/covers. Sometimes that only way to learn is by doing it, that's the fun part of working on our cars. Good luck!
-
I've used the Preval system on a number of small parts/projects, (motorcycle gas tanks, mirrors, etc). I've painted single & two stage processes and liked the results on both. It doesn't atomize the paint as much as I'd like it to but they're pretty handy on smaller jobs. I'm going to try the rechargeable cannisters from Eastwood like HLS30 suggested the next time I need something small painted.
-
I've done lots of bodywork on my cars and have gotten excellent results but I don't consider myself an expert. You'll want to get the panels flat BEFORE you apply the sealer/primer and definately before painting. This involves getting the metal as close as possible, then you'll apply your body filler. Block sand that filler and when you think you have a flat panel, apply a skim coat over the whole panel. Block sand the panel and use a guide-coat to find any high/low spots, repeat the process as many times as it takes to get it right. I've use Evercoat Rage & Extreme for my body filler, they're easy to work with and don't clog the sandpaper up. Once you're satisfied the panels are flat, then apply your sealer/primer. Block sand again. I use a high-build primer as my last defense against anything I might have missed, it also fills in any pinholes. Spray paint the car, block sand again. You can also use a guide coat on the paint, some consider this overkill but others consider it a necessity. If you want extremely flat panels, there is a cost in elbow grease. It all depends on what your goal is for the finished product. The more time you put in the better it will look. The color of paint you're using matters as well, white hides imperfections and black magnifies them. Prep before painting is 95% of the effort! My project cars are just that, projects. I do this for a hobby and take my time. If it were my daily driver, I'd probably settle for what I could get done in a weekend. I've seen a number of freshly painted older cars that have very shiny paint but the panels are wavy as hell and it looks terrible. Google search for how to do bodywork, you'll get enough information to get you going. Good luck with your effort.
-
#248 is an awfully low vin number with a matching numbers engine, very tempting! If the rust isn't too bad, the motor is capable of running and not blown and most of the parts are there, I would buy it. Unfortunately you can't evaluate the rust until you see the car in person. Are there any members here that could look at the car for him? Has the Seller explained why the car is in so many pieces? Good luck with your decision.
-
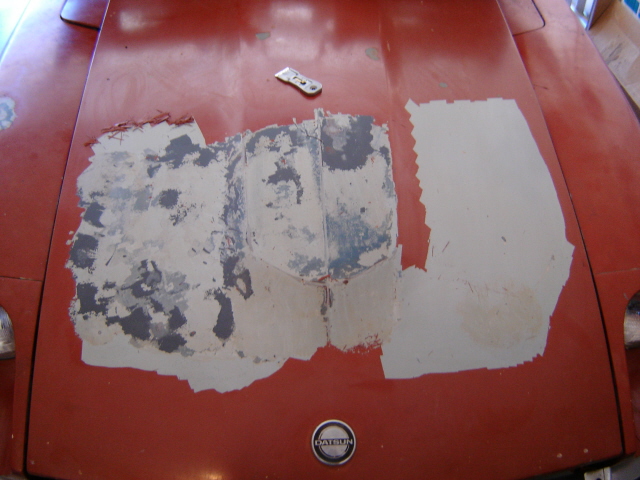
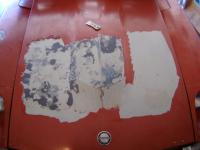
Per the picture below, I used stripper on the left side and a razor blade on the right. The orange paint will come right off with either method but the underlying layers seem much more solid. The original factory paint was removed at some point in the past so I don't know what's underneath the orange. In reading the above threads it seems I can save myself some time by not going down to bare metal on the whole car. Some spots I won't have a choice though. Since I'm going to skim-coat a good 90% of the car, can I just remove the orange paint, block sand the surface, apply a sealer and then begin my bodywork? Do I even need to apply a sealer? Can I apply a sealer/primer after I complete the bodywork? Thanks in advance for the expert advice!
-
blue leaf, Sometimes the problem with chemical strippers is that you don't get it all off and then end up painting over top of it. After awhile, the paint can start to lift and flake off. Others here can explain this better than I can but that's the jist of it. With all the work/cost involved in prepping and painting a car you wouldn't want some chemical residue ruining things. Good luck with your car.
-
When I read Theianmonster's reply of using a razor blade, I thought, there's a crazy idea!!! Then I went down to the car and tried it, works great. The left side of the picture was stripped with paint stripper, took 15 minutes plus the cleanup. The right side of the picture took about one minute, a little vacuuming and no odors. After this worked so well, I tried a number of other areas that weren't as flat, same results.

-
Here's a picture of my 280Z with 205-60-14's, the tires are Kelly Platinums. I'm satisfied with the ride, handling and the way it fills up the wheel-well. The springs on the car are stock/OE. Neither Costco or Discount Tire would let me go oversized on the tires because of the liability issue. Good luck with your decision.
-
I'm going to use a combination of paint stripper and media blasting on my latest project. I'll use paint stripper on the large flat panels of the exterior body, I'll then use an orbital sander to get those panels to complete bare metal. I'll avoid seams, nooks, crannys, etc. where the stripper can hide. I'll use the media blasting for everywhere else. I hope doing it this way will minimize any potential excess heat caused by blasting. Good luck with your cars!
-
It's getting more and more rare to see Cad specified on engineering drawings for plating steel, zinc plating per ASTM B-633 seems to be the favorite replacement. I believe clear was the original color but I'm not certain, I'd plate the mounting screws the same color as the rod. While you're at it, consider any of your other fixtures, brackets, bolts, etc. that need plating as well. All of your nuts/bolts/washers/small parts will get sent through a barrel plating process, other large parts will get racked. Since the plater has a minimum charge, see how much you can get done for that price. Good luck with your car!
-
If you find a possible candidate in Arizona, consider where it's garaged/parked. There are a number of places and cities in Arizona where it snows alot and they salt the roads, those same places get rain throughout the summer. Ideally you'll want to find a desert car. Good luck with your search!
-
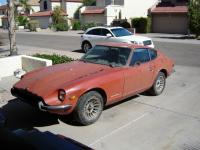
Yesterday I got an Arizona title for the car. I used the Bonded Title process and it wasn't that bad, the Bond is for $2,000 and cost me $75. I never got the car to my friends shop, I kept it in my driveway so I could tinker with it. I have a vehicle storage problem and had to park my daily driver in the street, I've since moved the 280Z to my friends shop. While waiting for the title process, I was able to get the car running. I did the Marvel Mystery oil, PB Blaster, WD-40 soaking in the cylinders each day for about a week. New ignition wires, points, oil/filter, clean & gapped the plugs with fresh gas fed directly into the pump and she fired up after about 15seconds of cranking. A little rough at first but after a few minutes the idle smoothed out somewhat and I let the car run until it was warmed up. The following day, I let the car warm up again then did a compression test. The numbers ranged from 155 to 160 and the exhaust is clean with no smoke. I think I got really lucky here!! I'll have a leak down test performed as soon as I can get the car to my mechanic. I removed the valve cover to oil everything before I tried starting the car and was surprised that the top end was pretty clean with no discoloration or buildup of any gunk. At this point I'm going to start removing everything from the car so I can have the metal media blasted. Here's a question for those of you that have done this; What process have you used to seal the metal after blasting? After I weld/repair any rust, do I POR 15, phosphate wash, primer, paint, undercoat the metal? Do I have the bottom and floors powder-coated? My goal is to preserve/encapsulate the metal so tha car will survive for many, many years. I'm in virgin territory here and appreciate any feedback, thanks in advance! BD
-
I also mixed mine up. I wasn't smart enough to buy the complete kit, I bought them individually. :stupid: My car gets driven maybe once a week so my selection process was based upon what was less expensive, the rubber or the urethane version. I bought the less expensive part and I'm happy with the ride. Good luck with your cars.
-
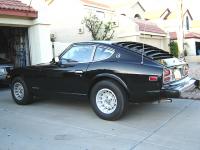
Thanks Kenny, I also used PPG's Omni AU series and I'm pretty satisfied with the results. I thought it was easy to work with. Palmer, I like your car man!!! This is the first time I've painted a complete car. In the past I've painted various panels, fenders, mirrors, etc. I did all the bodywork on my car and took my time doing it. I repeated the skim-coat, block-sand, guide-coat routine until I knew all the panels were straight. I skim-coated the complete car. I easily spent over a hundred hours working on the body alone, however it only took a couple of hours total shooting the primer, base/clear coat. I used Evercoats "Rage" for body-filler and lots of sandpaper. I alternated the color of the hardener with each coat, (red/blue) so I could see where the last coat of filler, filled in. Everything I read about painting a car explained that preparation was the key to success and I have to agree. With the HVLP spray-gun I used, I didn't have to cover the walls, just the floor. My tires are Kelly Platinums, 205-70-14's. I like your wheels, I have a re-finished set of those hubcaps that I'll be installing on my car someday. If you decide to paint your car, good luck! Meanie, I hear what you're saying, the car is dirty before I even get it dry. Dust is a real bugger here in Phoenix but I have a California Duster and I pay my daughter a quarter to wipe it down, she does it once a day. Good luck with your cars!
-
Quick update. Today I got a notarized Power of Attorney and Bill of Sale from the Seller. Tomorrow I'm stopping by Arizona Z Car Source and getting some wheels & tires and heading out to the car. I'm going to have the tow-truck driver take the car straight to DMV for the Bonded Title inspection and then on to my house. With some luck I'll be vacuuming out the mouse crap by lunch time.
-
Virto, the 944 is in almost pristine condition and handles better than anything I've ever owned but it's not as quick as my 280Z. It is fun to rev it out though. A 951 would be a different story. Matt, I have no mileage figures, I've just never checked. The car runs well and I'd expect to get some good numbers. I asked a local Graphics House about recreating the SAP graphics and they said no problem. Quote was $325.00 Since I didn't use the Black Pearl paint color, I've dropped the idea. datto, I had many dust specks and some insects in the clear coat. I used a nib file and wet sanded with 2000 grit to get to the buffing phase of the job. You can't see them anymore. sblake, thanks for posting the pictures. What I have is what's in picture number one, the hubcap. Lonetree, I'm already working out a budget on the 240Z. I'd like to use all of my experience from the 280 and do an even better job on the 240. I got a quote from a Media Blasting house yesterday of $450 to do the complete car inside and out. I'm getting a little ahead of myself though, I need to get a title first. jmortensen, I used the unit that's on sale for 79.99. My primer was a 2K high build primer and it took me a number of gun adjustments to get it to spray/atomize to the right pattern for a nice even flow. I still had my share of orange-peel but I had to block it our anyway so it didn't bother me to much. The basecoat & clearcoat went on just fine. I recommend you practice on some scrap sheet metal to get the feel of it, thats what I did. My opinion is that I'd use the same unit again. I feel it was the amount of preparation I did getting the car ready for paint that made the difference. There was a number of times I found myself starting to cut corners because I wanted it DONE. I had to walk away and not work on the car for a week or two to get that out of my system. Enigma, thanks for the compliments. I recommend when the time comes to give it a try. It's the second most satisfying thing I've done on a car!!! EScanlon & sblake, I've considered buying a set of the OE wheels but all that I've seen are too expensive. I have the hubcaps re-finished and ready to go and I really like the way they look. I'll always try to return the car to stock/OE unless price gets in the way. Thanks everyone for the compliments, questions and feedback. Good luck with your cars.
-
Sorry about any confusion, the car has already been color sanded. Per the recommendation of the paint supplier, I did the sanding about 10 days after spraying the clear-coat. Any remaining traces of orange peel will be guide-coated because when you put this many hours into a project, you want to make it as nice as possible. Not to say the completed work is anywhere close to perfect, it's not. I was able to sand most of the mistakes and flaws out, those remaining I will live with. I just always wanted to paint a car and this presented a perfect opportunity. I can't wait to do it again!! Escanlon; I'm torn on the wheels because I have a re-finished set of OE/honeycomb hubcaps for the car and they're stock for a 1978. However, I like the looks of these, they just need a GOOD cleaning and the center caps need re-chromed. Sooner or later I'll get a set of steel wheels and install the hubcaps. If you're interested in these wheels, let me know and I'll expedite the process. MDBrandy, I was (cough) supposed to (cough) use a respirator, (cough). Just kidding, I used a cartridge respirator and I got it at the same place as my painting supplies. Good luck with your cars.