Jeff G 78
Free Member
-
Joined
-
Last visited
Everything posted by Jeff G 78
-
 Great advice. I lost one on the highway when I hit a bump. ?
 -
I would suggest not running poly bushings on both sides of the body where the Tension/Compression Rod attaches. The common process is to run the poly bushings on the front side and use stock rubber bushings on the back side of the body mount. Poly/poly is too stiff and won't let the TC rod articulate properly. You didn't say if you have a full poly bushing set, but if not, be sure to install new poly steering rack mount bushings. While you are at it, your steering rack boots are likely old and dried out, so when you do the tie rods, install new rubber boots on the rack.
-
Depends on the brand and model of tire. My Hankook RS-2 225/50R16 tires on zero offset rims rubbed on my car. The very high performance summer tires tend to have squarer profiles and can rub.
-
My dad bought my mom a vacuum in the mid-70's and she's still mad about it! I learned my lesson at an early age and never made that mistake. ? Merry Christmas everybody!
-
Front reservoir is for rear brakes and rear is for front brakes. Are you getting fluid out of the rear bleeders? Did you bench bleed the MC? If not, do that first. Put a 6" long hose from the front bleed port on the side of the MC and with the cap off, put the other end into the reservoir under the fluid line. Crack the bleeder just enough to get flow and slowly pump the brake pedal. Close the bleeder and repeat for the rear port. Once done you can start bleeding the rear wheel cylinders starting with the driver's rear. If you are not getting fluid, you have a blockage somewhere. Either a hose has collapsed, you have gunk in a line, or there is something in the proportioning valve.
-
Your neon sign looks much bigger than the one I listed. Very cool Guy!
-
Hey Guy, Is this neon sign the one that is currently selling or is it an old sign? The one for sale now looks pretty nice for about $150. EDIT: Now that I actually pulled up the new one, I see it's not the same one. It still looks pretty nice though. https://www.brilliantneonsigns.com/optin-25175707?fbclid=IwAR0wwYZkdAzPb2M0YVxIUJeNw7UApDsmbR87wI7PdTBeCdHJMM8mYEu9n10
-
-
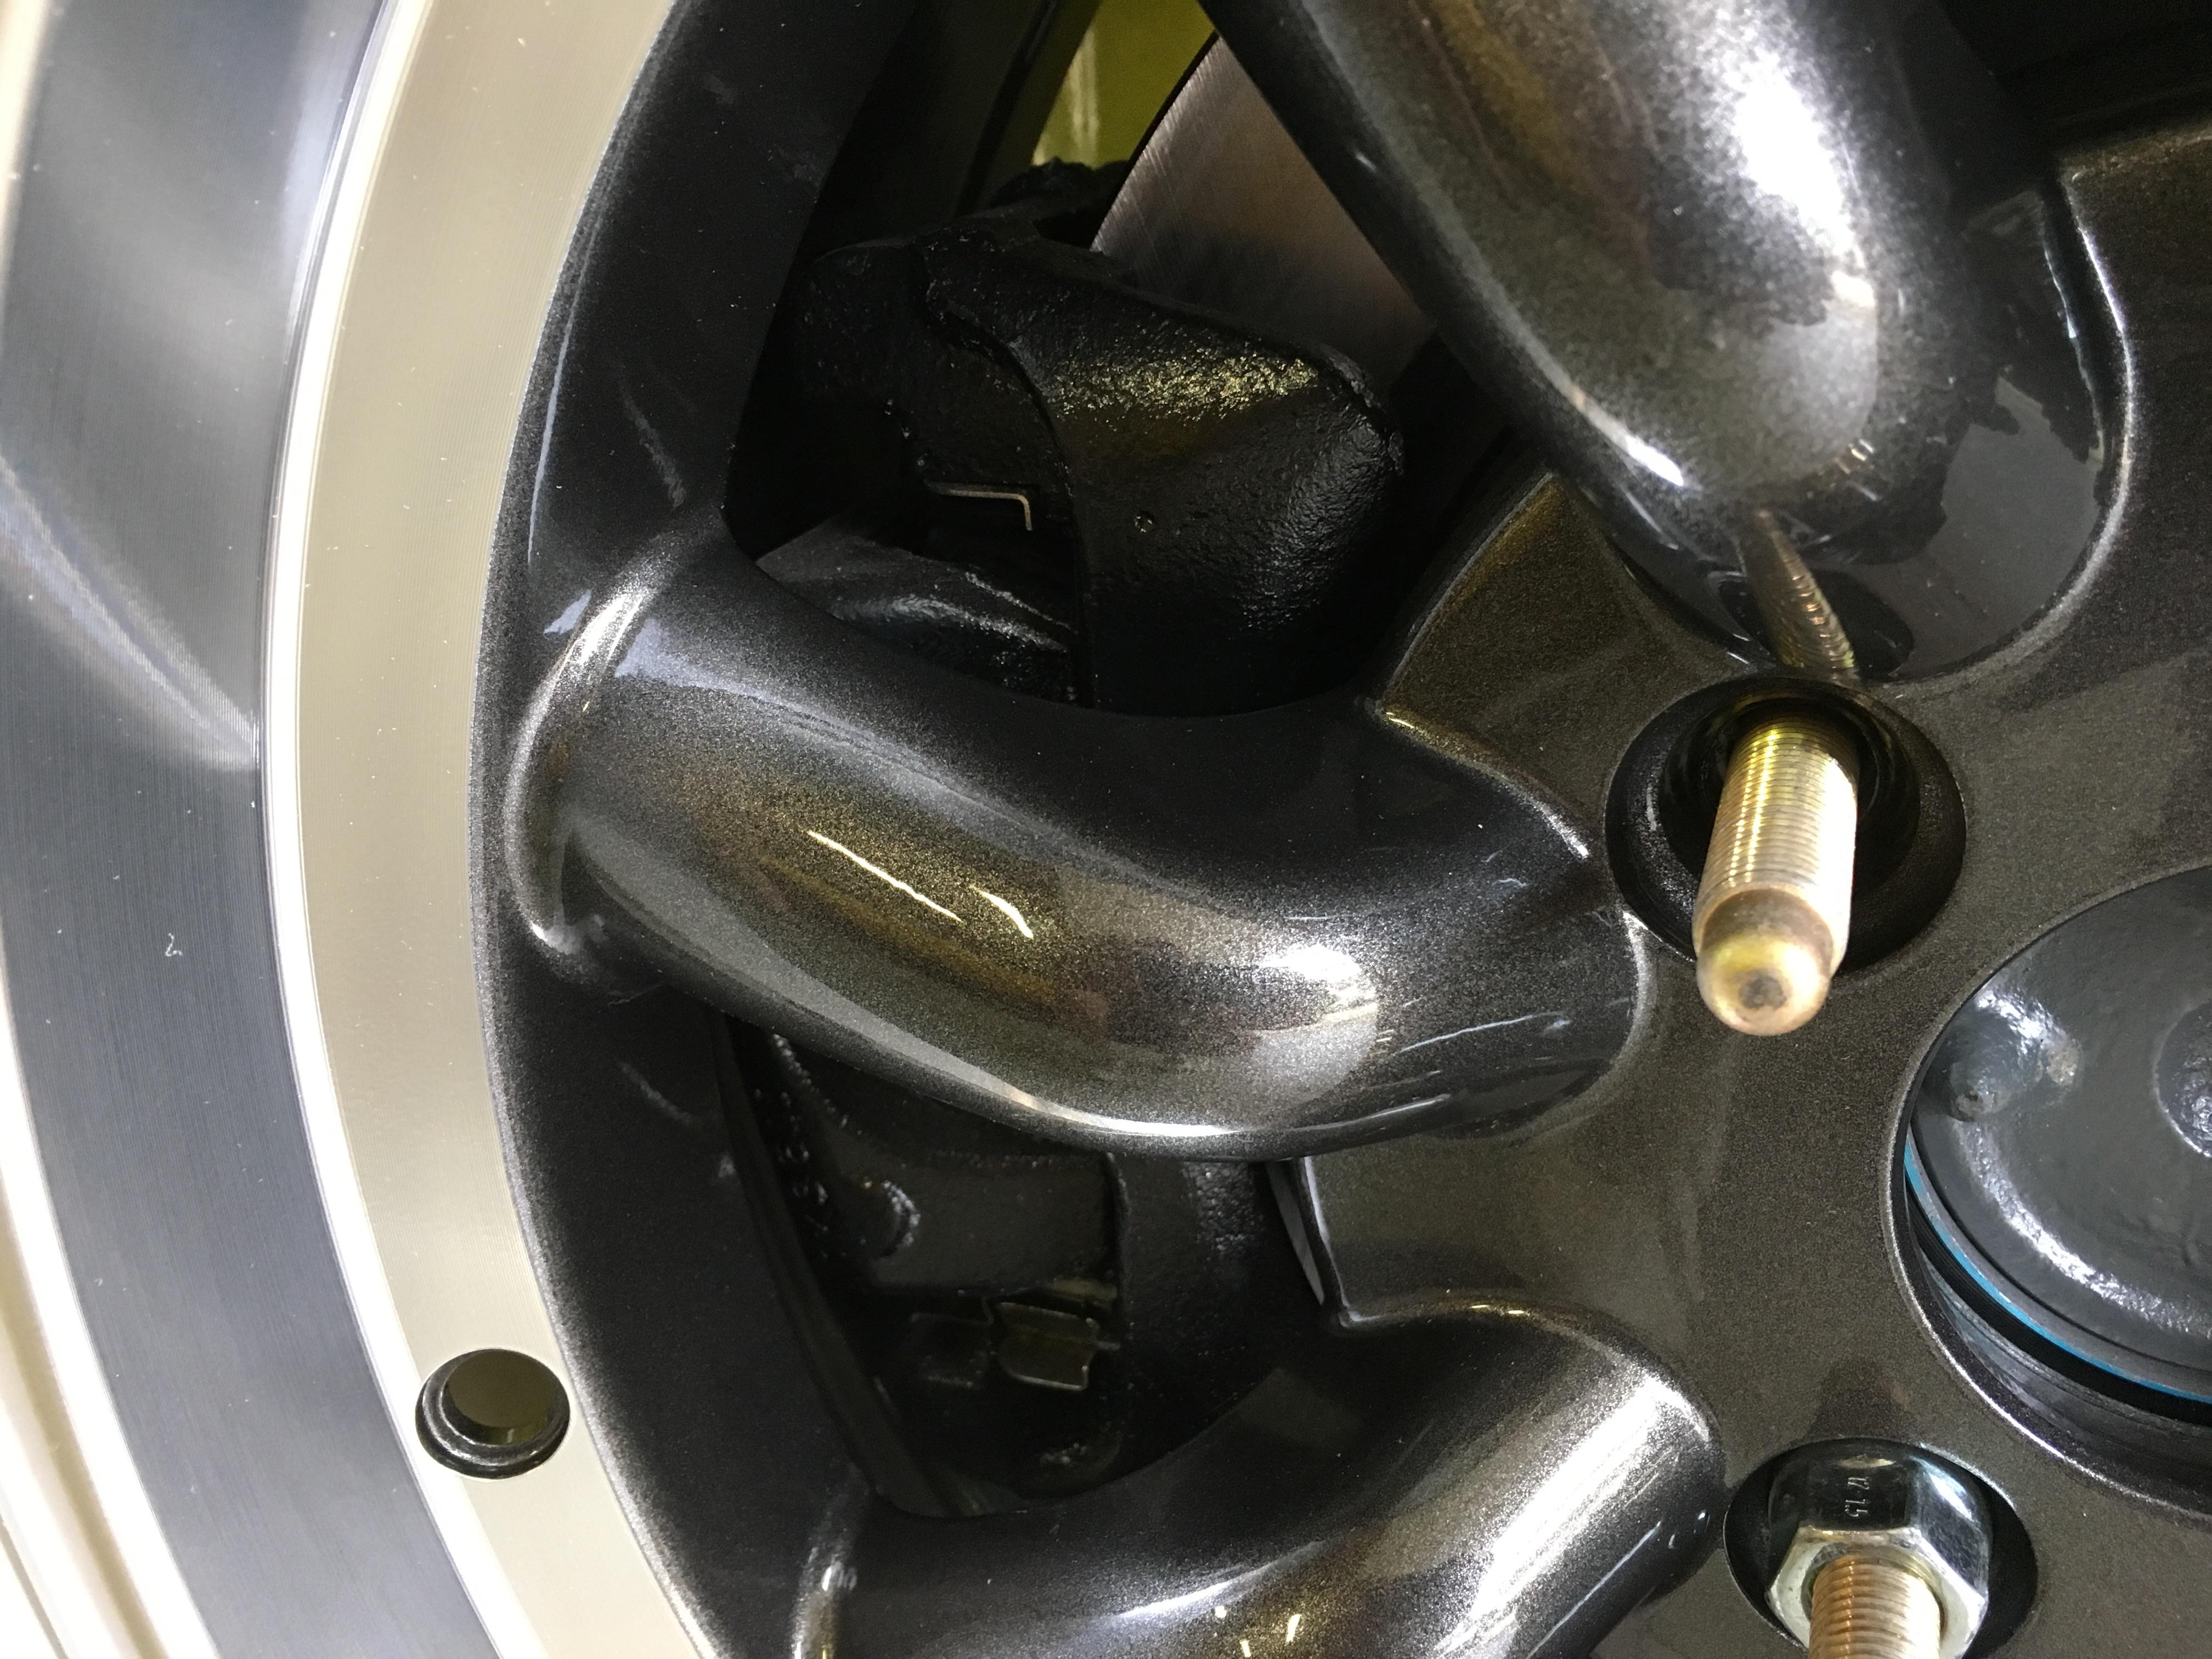
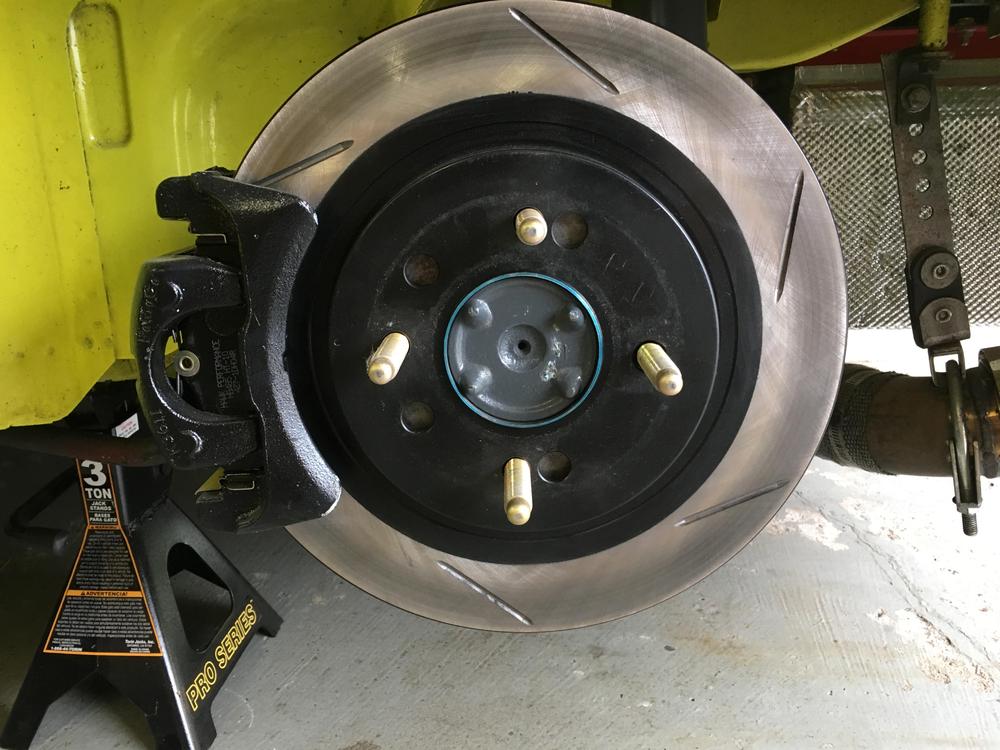
My friend is going to go back and get the part numbers for me on the exact rotor and calipers so we can determine the model years of each.
-
They should be S197 which is 2005-2014. I looked up 2010, I think but it doesn’t matter.
-
According to Rockauto, the Mustang is a 43mm and the Maxima is a 38mm
-
Probably the same supplier for both. The Mustang rotor is vented. Unlike the Z31 rotor, it has to be drilled for four lug. I plan to make a drill jig to make replacement rotors easier.
-
@grannyknot Is the Maxima caliper the same as the photo I posted? Silver mine has different brackets for the Maxima and Mustang calipers. Weird...
-
The Silvermine stage 4 kit is Mustang GT rotors and calipers. The Maxima kit is stage 2, I believe. From everything I've read, the Maxima kit is too small for the 4 pot fronts just like you have found. That is why the stage 4 rears "should" pair well with the 4 pot vented fronts. I just haven't found anyone yet that has actually used them on a track.
-
How do you like the Mustang GT (stage 4) rear kit @grannyknot? What front brakes do you run? I am about to get the Silvermine stage 4 brackets and piece that rear setup together from Mustang parts on hand for my 260 endurance race car. I plan to pair the Mustang rear setup with the typical vented Toyota 4 pot front setup and likely a Wilwood 1" MC. A friend has the same front and rear brakes on his 240Z vintage racer, but he hasn't actually tried it yet. I did take one of my Konig Rewind 15x7 wheels over to his house and it fit over the rear brake setup. His Enkie Classic Compe 15x7 wheels have a ton of room, while my Rewinds are fairly tight, but both fit.

-
Hey Cliff, what's new? That plant is only a few miles from my office. I am on the car side though, so I haven't been there in years. I am finally about to start working on the Z race car again. I have all the engine parts needed and right after Thanksgiving, I plan to put the engine back together. Once that's done, I am going to rewire the entire car and upgrade the brakes.
-
It's funny that I'm way more worried about the body of my Z cars than anything mechanical, but it's the exact opposite for my Porsche 996. At any moment, the engine could grenade and I'll be left with a giant repair bill.

-
Here, play with this handy website. http://www.rimsntires.com/specspro.jsp
-
Dale Manufacturing is another repair option. They charge about $130. http://www.hbrepair.com/
-
There was a very good reason the R180 failed. Bought the car after it had been in a barn for 20 years and in 12 weeks, turned it into a caged race car. We had about 100 items on the to-do list and the only item that never got crossed off was changing the diff fluid. My teammates couldn't get the plugs out of the diff. Once we ran out of time, a decision was made to not change the diff fluid. There was no signs of leakage via dirt or stains. 4 hours into the race, the diff broke. Upon teardown, we found no more than a few ounces of oil. I was shocked it made it 4 hours! I had to drive an hour to get a R200 diff and then engineer the mustache bar to fit and make the mods. It was a long repair, but it got back on the track and ran the final 4 hours to take the checkered flag. The mustache bar worked so well, that I left it in for another 14 hour race even though I had a R200 bar ready to swap in. I didn't press my luck any further and the fabbed mount is now wall art.
-
I broke an R180 during a 24 hour endurance race. I converted it to an R200 and finished the race. I even fabricated the R180 mustache bar to make it fit. ☺️

-
At first glance, it looks like a very bad investment. It's cleanish, but I'd expect better for that money.
-
Thanks CM. I checked ARP’s site first and they list lots of damper bolts, but nothing specific in a M16x1.5. I will call them once I have the damper and see what they have. The washer seems to be just as important. I’m guessing they have a something that will work. I did verify that the Kameari bolt/washer is the right length for the BHJ damper that I am now going with. Jonathan, I thought about just using a rebuilt stock damper, but decided to try to make the engine more reliable this time around.
-
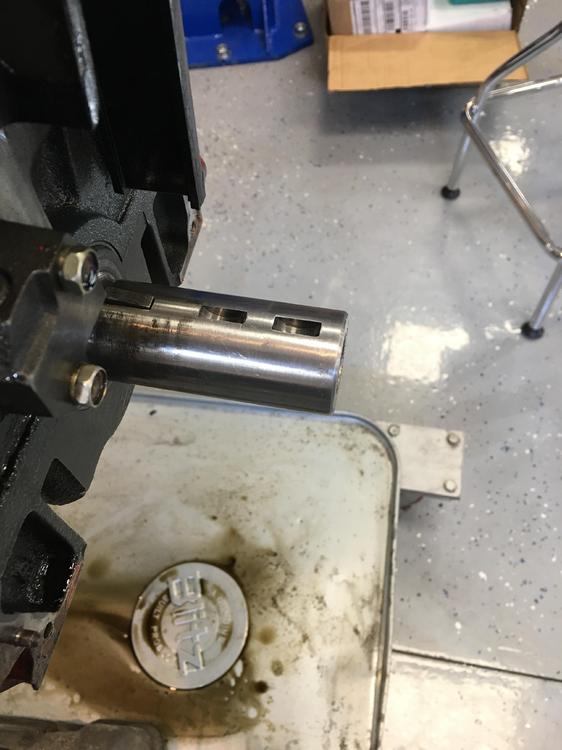
I thought about not even tearing the bottom end apart, but I’d hate to get this far only to have micro cracks in the crank. ?
-
I feel better about the situation. Today, I filed and polished the galling and metal transfer off the snout enough that the gears will go on and off properly. It actually looks fairly decent other than one depression left from the rocking damper. Now to have the machine shop magnaflux the crank and fit a new damper. Still looking for bolt recommendations.