


EScanlon
Free Member
-
Joined
-
Last visited
Everything posted by EScanlon
-
Currently planning on Sunday for sure, possibly Saturday. E
-
Check out the Steel Frame Carports at Costco. At $169 each, and measuring 10' x 20' they're ample enough to park the car in and still have room to get in and out of both doors and STILL park the lawn tractor behind it. FWIW E
-
EXCELLENT! I'm glad you posted as I was hoping to hear how things were going. Looks as if it's going good for you. The points you make are ever so important, as they point out the one basic thing that folks need to remember whenever they're dealing with Bodywork and Painting...TANSTAAFL (There Ain't No Such Thing As A Free Lunch). If you want the "Looks Great in Black with Clear Coat" paint job, you need to pay the painter AND the body man. Thanks for posting. Enrique
-
Having worked for years in International Sales, and having seen a number of ways that people try to save money....only to lose in the end, I would suggest one of three companies....DHL, UPS or FedEx...as opposed to the Postal system of ANY country. Not to disparage them, but as the famous line says...."You get what you pay for." Any one of those three companies offer not only insurance, customs services, and tracking number but also confirmation and proof of delivery. Cheap? No, but in the long run...it is. Besides, if you state on the auction that that is the way Int'l shipments will be handled....then they either acquiesce or they don't participate. BluefairladyZ's claims of non-receipt may very well be true...as Camo pointed out...it may have been delayed or disposed of by Customs. So many shipments are simply not documented properly.....and Customs just performs it's published duty as published. That is, no paperwork....it gets returned IF the sender guarantees return postage. No guarantee? Item is disposed of via the least expensive method to Customs. Notification to either sender or recipient? No-UNLESS the paperwork included such instructions with the proper postage-paid post-cards. Sadly the post office is not the place to find out what it takes to ship to country ZZZ. What can and can't be shipped there is something to find out from country ZZZ's Customs Department. Many people know that Islamic countries will not accept any kind of "pornographic" material through their mail system. The DEFINITION of "pornographic" is not subject to YOUR interpretation, it's up to that countries Customs Office. You might be surprised to find that a woman's panty-hose catalog is considered pornographic, or that a body-builder "muscle" magazine featuring women is also considered such. Try to circumvent the rules and "hide" it and you are guilty of smuggling, and the RECIPIENT may find themselves in hot water. All that being said, I would still have to question such a string of "non-receipts" for such varied and high-dollar items. Is it all his fault or the seller's? Maybe a good combination of both, with one very outspoken and vindictive seller leading the charge. JMO E
-
Since, as you state, the odometer has rolled over two times, that means it's up in the 280,000 mi. range. Make sure you have as much of the dealer maintenance and repair paperwork as possible, otherwise it will be hard to interest people past $5-6k regardless of how good it looks. Either that, or you'll have to be shady and not tell anyone....which we trust you won't do. Cars DO wear out, and careful maintenance is the difference between a beater and a well-maintained cherry. JMO E
-
 OOOOhhh... Ok, Stephen, how many points did you need to score with your wife, and did this plate do it? E
 -
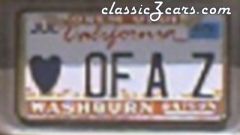 This has to be the most ~UNIQUE~ plate. I don't know of any other state or country where you could get the "heart" symbol. Nice piece of advertising trivia, Stephen. E
 -
WOW! Wireless Spark Plugs...... J/K Good Idea Dave. Looks sharp also. How did you get the blue anodized look over everything? But a word of caution, don't forget that too many fuses in any circuit will also lead to voltage loss as well as difficulty in tracing failures. E
-
If possible, and it isn't always, is to get a REVERSED Pole battery. This would place the Negative pole under the fender and the Positive out and closest to the motor. (This is for LHD cars, and NOT for RHD.) This does entail getting a longer Negative Cable, but the additional safety factor of not having to worry about the battery's positive post coming into contact with the body, or when you jump start or are jump started is a plus. Unfortunately, it isn't easy to find them. FWIW E
-
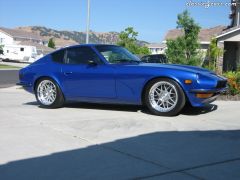 Good Wheels for this car and color. Nice Job!
 -
 Can you say....Race for Pinks? Sure! E
 -
 Boy, doesn't that paint job REALLY change the look of the car. E
 -
 Good Job!!! Congrats. E
 -
Actually, the problem lies in that the Daniel Stern lighting switches the SOURCE of POWER to the lights to actuate the lamps. That is, GROUND is constant. The Z on the other hand, switches GROUND to actuate the individual bulbs. Here's a wiring diagram that might help: http://www.atlanticz.ca/zclub/techtips/wiringdiagrams/F77ZCAR-WIRING1.pdf E
-
Be careful of major shifts in tire sizes though. If you get them too wide, you may find that the front end rolls around ok....until you go for a hard curve while going downhill, and then the tire contacts the lower front valance. This occurs from the flexing of the tire. More often than not, however, the problem is when you are backing up OUT of your slightly inclined driveway and the tire now grabs the valance and folds it. This is a common problem due to the curve of the valance AND it's proximity to the tire. I've seen guys with as little as 1/4" of clearance while stopped...you do the math. There are things you can do to reduce this, all of them involve playing with the alignment of the fenders to the hood, sugarscoops, bumper etc, but that would take hours to explain out properly. In the meantime, I found this formula for determining actual tire dimensions at www.tirerack.com (don't know whom to credit) : Width x Aspect Ratio = Section Height Section Height x 2 = Combined Section Height Combined Section Height + Wheel Diameter = Tire Diameter The example they give: 185/60R 14 85H or 185/60HR14 185mm x .60 = 111mm 111mm x 2.0 = 222mm 222mm + 355.6mm(14") = 577.6mm or 22.74" Now, with a little bit of playing you can sit in your driveway and find out what your max tire size is, or at least get a good idea. I went to the tirerack and punched in a 71 with the example rating, and here are their 30 picks for tires. http://www.tirerack.com/tires/Compare1.jsp?width=185%2F&ratio=60&diameter=14&vehicleSearch=true&startIndex=0&search=true&pagelen=20&pagenum=1&pagemark=1&speed_rating=SR&speed_rating=TR&speed_rating=UR&speed_rating=HR&speed_rating=VR&speed_rating=ZR&speed_rating=WR&speed_rating=YR&RunFlat=All&x=75&y=7 FWIW E
-
Yikes!!! Where to begin? That you're using part of the standard wiring harness to "get your 12v" while still using "the relay upgrade 2 relays" tells me that you have some SERIOUS cross-connecting going on. Which model/year are you referring to? That will help define which wiring diagram to use. That you had the lights come on when you powered the power side of the Hi relay says again that something is cross connected. E
-
Pictures!! Take a look at the cruise we just completed with Northwest-Z that Mike posted (you can see them on the front page). E
-
 My mistake as to Mike's coveting Bryan's car. I hadn't yet checked my e-mail to see that Bryan had sent Mike the pictures and Mike posted them for everyone. So, Mike; sorry about that. Now if he IS coveting your car Bryan, I had nothing to do with it. E
 -
Bill; Due to the nature of "bots" on the internet, I would recommend that you send your private e-mail address and home address via a Private Message or e-mail it to Stephen. It's unfortunate, but there is no way to know that there are not some hackers trying to "spy" on this site, nor any way to make it totally secure. FWIW E
-
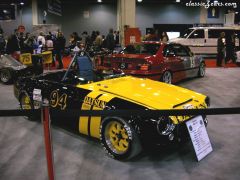
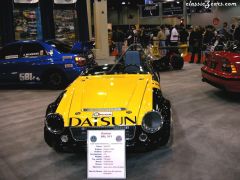
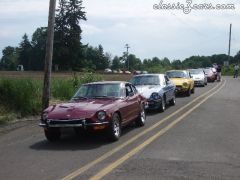
And there's that "Arrest Me- Yellow" Z in the back...... E
-
Oh oh. Bryan, from this collection I'd say that Mike has his eye on your Z...... You have to admit though, that Burgundy sure does look nice. Hey Mike, does that mean you'll be repainting yours? That was a fun trip. E
-
Or he doesn't use soap.......... (Just Kidding) The reason I ask, is that they show an article where they painted the school buses in California with the stuff, which due to their stringent VOC requirements that style of paint made so much sense. Now I ~know~ the song says "It never rains in California...", but I find that hard to believe...... However, I can't imagine that they'd then have to coat them all with a non-water based clear which would in turn shoot the total VOC thing out the window. E
-
Dave; I went to the site you mentioned, but I couldn't find where it says that they'll wash off. I like the line you mentioned because of the larger color, metallics, pearls, transparents etc, but again....can't for a fact find where it says they'll wash off. Can you point that out for me? E
-
Hmmm......Thanks for the info! Although the color collection is very basic (Black, White, Red, Blue, Green and Gold --although it looks more like plain yellow), it should as you mentioned give you something to play with. E
-
No, not necessarily. The e-brake pulls on a cable, which in turn pulls on the individual drum mechanisms. Problems with the Parking Brake are usually of the "cable is rusted and won't move" , or cable is broken/disconnected. Your post just said it didn't work, and my error in not qualifying it better. I've just have had the unpleasant look at what happens to the rear drums when you ignore the cable (shoes to the rivets scoring the drum useless, overheated and out of round drums). It should be mentioned however, that poorly adjusted shoes can make it so that the parking brake will not hold the car....even on level ground. At that point, the amount of pressure required to actuate the rear brakes properly is enough to cause an imbalance between the front and rear systems. I'm not a brake mechanic, but these are key points that I've been taught on how to watch out for problems. Probably the most important is that the early Z rear brakes did NOT adjust by driving backwards and stepping on the brake (U.S. cars of the era did that). That's why I mentioned the lift-click method of adjustment. FWIW E