EScanlon
-
Posts
5,117 -
Joined
-
Last visited
-
Days Won
2
Content Type
Profiles
Knowledge Base
Zcar Wiki
Forums
Gallery
Events
Downloads
Store
Blogs
Collections
Classifieds
Everything posted by EScanlon
-
Years ago, when I lived in Iowa, my first wife and I were returning from a concert held at Iowa State University @ Ames. We were in a hurry to get back, so we took the back roads back to Marshalltown and proceeded to zip along @ 90mph or so. A friend of mine was in his Camaro up ahead of me, and he was advising me on the CB of any hazards/traffic etc.. On the L O N G straight roads, I could just make his car out, so I knew he was only a half mile or so ahead of me. Iowa isn't perfectly flat, and the land does roll up and down a bit. As we popped over the top of a gentle roll a male pheasant jumped up just in front of my grill. I was driving a 74 Mercury Capri II and that bird literally exploded all over the front of the car. The grill was gone, the hood had a dent and the radiator had taken the rooster's beak right through a couple of the combs in the radiator. The impact of this 8 pound or so animal was enough to shake the car as well as cause the damage mentioned. I calculated that we were only doing 75 or so (had just slowed down for traffic a bit back) and I was just getting back up to "speed". We were lucky, I didn't lose control of the vehicle, and we were able to make makeshift repairs to get back home. I don't even want to think what might have happened at 90mph or if, as sometimes happens, more than one bird had been on the road. When I called my buddy on the CB and told him about my "fun", he was surprised as he had not seen ANY birds. But it goes to show that unexpected things DO happen. Now, change the speed to 130 mph.... FWIW E
-
Believe it or not, you might just check with the dealer. It might be expensive, but at least you will find it. You'd be surprised at what parts they STILL have or are required to have in inventory. 2¢ E
-
This is exactly what happens with most U.S. cars, however in my experience with cars imported INTO the U.S. (i.e. "foreign" cars) the SPEED of the blink increases on ALL bulbs that light. I can't speak for the Z so someone else speak up (I haven't had a bulb burn out yet). You notice this when you're stopped in a turn lane behind a friend's car that has a "high-speed" blinker, and you later find out that their front light bulb has a burnt out filament. 2¢ Enrique
-
For my money, M.B. Anderson gets ALL of my mechanical work. M.B. Anderson, 360-573-7314, Works by appointment ONLY, call to set up a time to either take the car in for a specific job, or for him to take it in for his look-over. He is busy and don't be surprised at 4-6 week waiting periods. However, once he fixes it, you won't be mucking around with it again for a LONG time. He's also not cheap, but in the long run, he is by far the BEST, which in turn makes him VERY inexpensive. Auto parts stores in Vancouver will refer you to him, and the Nissan dealer has referred Z owners of all years to him. Hope this helps, Enrique
-
This one I have to see. If the light bulb is burned out, how will it light? What I think you are referring to is that the hazard lights and the turn signal lights use the same filament in the dual filament bulb up front. If that filament goes, neither the turn or hazard can operate. The parking light is on the other filament. (Note: this refers to the FRONT bulb.) In the rear of the car, the Stop Lamp ALSO uses the Turn Signal / Hazard filament. (This is why you can have a steady brake light while the light on the other side of the car can blink.) All of these circuits come together between the Hazard Light Switch and the Combination Switch at the Steering Column. Note that the Brake Light Switch wires ALSO head there to actuate the brake lamps. So check items in order of increasing difficulty. Check the Brake Switch wiring. Make sure that there is a good connection between the switch and the wiring. Make sure that there aren't any spots where the wires may have become chafed or pinched between items. Next, check the Hazard Switch connections. Many times this switch is the CAUSE of problems such as these. Check / replace the actual Flasher unit. The piece that causes the intermittent circuitry and the clicking noise and/or the "clicker" (the little round base the flasher gets plugged into to intensify the "CLICK" sound), can cause problems. Sometimes just removing the clicker, or swapping out the flasher units can rectify problems. This lets you figure out where the problem lies. Once you've done all these, then tackle the Comb. Switch. Not that it isn't a good idea, it's an excellent explanation and suggestion, but it does require a bit of manual dexterity and care. By the way, instead of the #400 sand paper, I would recommend you find an item used by model rail road buffs, it's a contact cleaner / track cleaner pencil. This "pencil" is just a bunch of long fiberglass strands, tightly packed inside a tube. As you slowly push them out (whether with a screw/ plunger), you use them to clean the contact with the sharp ends of the strand. This method removes oxidation while minimizing the amount of material removed from the piece, i.e. it doesn't sand or grind off material. This is more desireable, and usually all that is required. Hope this helps, and no offense meant to preith, just struck me as funny... Enrique
-
Me thinks the lady doth protest too much. E
-
Fusible Links?
-
Maybe that is what I should have said. One other note, if you choose to use the new cable you bought, and it proves to be too long, LOOP the excess back by the antenna, but do it in as big a loop as you can or as few loops as needed.. I remember the rep for one of the stereo lines we were selling way back when mention that tightly wound excess antenna cable did something, but I can't remember what it was. I DO remember that he insisted that you should use up the excess antenna cable in as FEW loops as required to fit in the space you had to hide the excess in. This also coincides with what I remember the CB radio guy said. FWIW Enrique
-
From what was explained by Dave on the original thread for the headlight relay was that the EARLY harnesses he made had that problem, but not later ones. Apparently the 73's had a slight circuit change that required a modification of his harness' circuitry. Contact him if you originally bought your harness from him. Otherwise, Dave's product is definitely worth the money. Enrique
-
That's correct. Were they stereo? The earlier ones were Mono, so I'm wondering what year they began offering stereo as a stock option. Then it would be easy to find the speaker bracket for the RH side. Enrique
-
Sorry Lance, but the antenna coax is routed along the driver's side, unless the 75's are different. Other than that, you're correct. As far as splicing the antenna coax, if you have access to the coax cable crimper AND the end piece necessary to make it into a car radio antenna and not tv cable, then you should have no problem. Without that tool, I would not recommend it, as the antenna cable and signal doesn't take well to splices. Enrique
-
Sleepy; Although the squeegee may LOOK good, it isn't how good it looks, but how pliable the rubber squeege is. If the rubber is stiff, it's shot and it's definitely going to need the interior trim to be pushing the glass out. I'm not sure what you mean by "pushing the rollers", but if my fears are correct, someone told you to bend the pressure roller in the door outward because that way the glass wouldn't be pushed away from the squeegee. Well, in a nutshell, that's BS. You don't destroy or damage another piece because another one isn't functioning properly. Your original thought of replacing the felt on the door panel is the proper fix. Ask Beandip to tell you how his are working, he just recently replaced the felt strip on his door panels. Lastly what do you mean by "run channel"? That one left me stumped. E
-
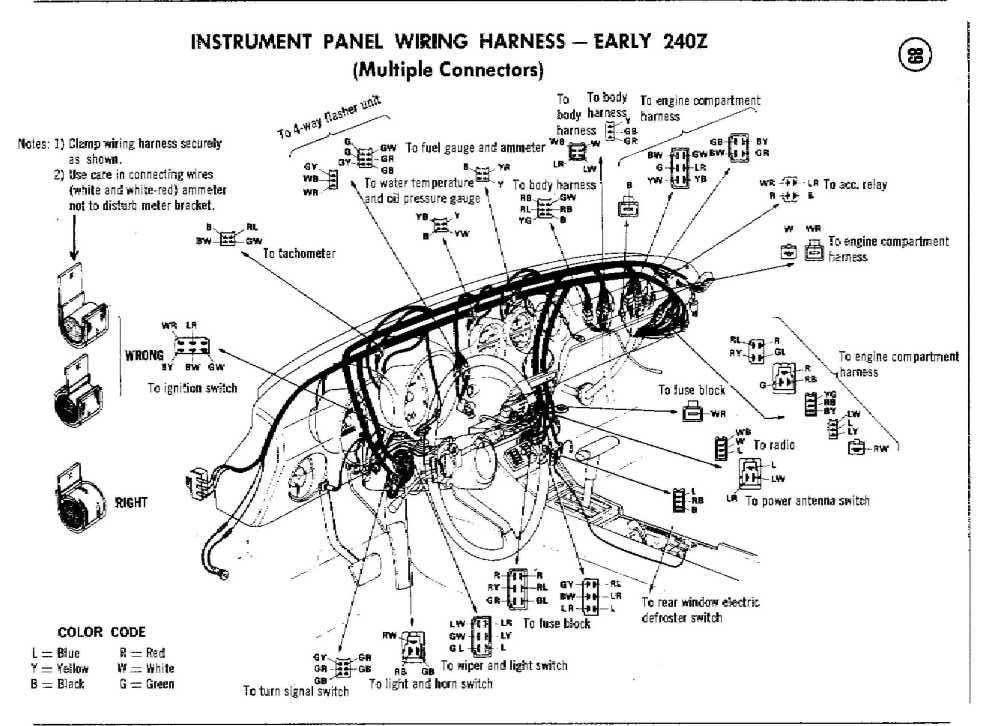
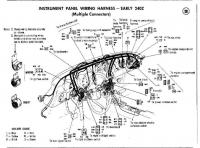
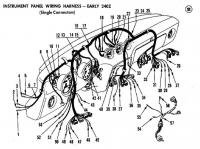
Aw..gee...BLUSH!!! Thank you again. Glad it can be of service. I am not sure if I should offer my condolences on your daughter's boyfriend's recent hospital stay.....(whether past or future), or recommend that you keep your daughter away from him (as impossible as that may be). You don't mention the reason for removing the dash, and therefore I'm not sure if you removed all of the wire harnesses from the car, or simply masked them off. If the harnesses were removed from the car, as you put them back, try to maintain the original curves and bends that the harness exhibits. Not only will it be easier to put the wiring back into place (you won't be fighting the wires), but it can often make it easier to reconnect the car back up. If on the other hand, the harnesses were NOT removed, then you should find it easier to return everything to it's original condition. As you put the dash back into place, you should see the connectors generally sitting near their corresponding mate. This isn't error proof, but you'd be surprised how often it is. Last possibility, that you removed the wiring from the back of the dash. If, again, you put the harness back into place following it's tendency to lay in place, then chances are very good that you can re-connect using the "location" technique. Otherwise, take a look at the type of connections in a given area and you might find that there are only one or two situations where you might get them reversed. If this is the case, try to use your wiring schematic to identify what is the most probable component that wire goes to and reason out where it's corresponding connector would be. Obviously a tail-light will not have it's component in the engine compartment, nor an alternator in the back. But I hope you get the idea. As a final note on the prior pictures, remember that those are the connectors for Early Z's, I don't know how valid they would be for a 73 or later, as the book they came from did not include the 73 vehicles. Hope this helps; Enrique
-
Bob: I'm glad you found the article helpful. That's what this site is all about, making it easier for others and at the same time point them away from problems. Unfortunately, as you've found out, the wiring isn't always the same color on two sides of the connector. (Bad Pun, I know, save your e-mail) I did find a couple of sheets from an old Clymer's manual that address the single and multiple wiring connectors in the earlier Z's. So when you look at the pictures, remember that this is the wiring colors from the HARNESS and not the ones coming from the SWITCH. So go by the Harness to address which connector connects to what component. Additionally, also look at connectors themselves. It may sound trite, but you're not going to connect a bullet male to a spade female, nor to a spade male. Also as you look at the wiring, with your back on the floor of the car looking up, look at the comparative LENGTHS of the wires and see what you can eliminate as being a possible connection. You'd be surprised how often you can connect 75% of the connections just by matching connector and location of the individual wire connectors. Even if you removed and replaced the wiring harnesses, combination switches etc, the wiring will still tend to fall into place to where you can often discern connections. Now maybe the cataloguing of what wire colors are used on what components may be a good project. Here's the pics Enrique

-
New pics!! Grrr look at my big aluminum teeth!! arggg
EScanlon replied to PrOxLaMuS©'s topic in Open Discussions
Paint the turn signal lens surrounds and the brackets in white, then the tongue with a pinkish/blue border, put 4-5 corners cut from styrofoam boxes along the center valance and you'd have a Lovely set of teeth. And with the car being red.....it's got a big juicy set of lips..... E -
Possibly the Early 71's, I'll have to check. But if you look at the 71-72 Wiring Schematic, look at the wire that is between the Reverse Switch and the Turn Signal Flasher. That powers the blower and also leads to the connection for the wire below that...AIR COND POWER. Enrique
-
You might also check the wires going to the resistor coil at the exit of the blower fan. The blue wire you see in the bundle going to the blower motor is for the air conditioning portion of the harness. If you don't have A/C then you don't need that wire. Just tape it off. Enrique
-
I didn't doubt for a minute that you would NOT consider anything I posted as PROOF. While you insist on documented, scientific testing provided by some authority accepted by you, you accept HEARSAY as the basis of your "knowledge". Your Dad's and your uncle's experience says that in the period of time that they worked with a car, they had no problem. The problems with Armor All aren't due to one time use, or even a half-dozen. It is in the NON-REGULAR use of it. I have seen vehicles where the owners have been very dilligent and methodical in always cleaning, vacuuming and detailing their vehicles on a REGULAR basis. Their vinyl surfaces look good, a bit greasy and "shiny" for my taste, but otherwise in good condition. I would be interested to see how many of the cars your Dad and Uncle worked on, have by now, exhibited cracks on their vinyl surfaces, due to using Armor All. And on the ones that haven't, do they have documented proof as you request, that they have in fact been using Armor-All? Since your Dad and Uncle have been building Custom Hot Rods and doing Restorations, what magazine have they had their showcase pieces in? I worked for a gentleman in Iowa who, at the time that I worked for him, had already had 3 different cars in 3 different magazines, at least twice each. When I worked with him, he was working on his 3rd version of his 68 Camaro, and had already received advance notice from a couple magazines interested in doing a photo layout. Mijo, as he liked to be called, HATED Armor-All. Myself, I have had 3 cars that I have owned and treated with Armor All. Two were before I worked with Mijo, and the last was while and after I worked for Mijo. ALL of them ended up with cracked vinyl, within a few weeks of not having their regular "fix". On the cars that I have worked on, I can cite at least one that goes back to 1986 that has had it's dash cared for WITHOUT using Armor All, and STILL has a dash in good condition. But I guess that still wouldn't be proof for you as it does rely on the owner's memory. As far as companies updating their products, they do, but not if there is no need to do so. That it causes dashes to crack is not a worry to them, their liability is limited to the price of the bottle of Armor-All they sold you. Read your "Satisfaction Guaranteed" warranty and you will note that they WILL NOT pay for damages their product causes....period...just the price of their product. AND as I pointed out before ONLY if you have the dated receipt which shows their product's SKU or name on the receipt. Your statement "...memories do not constitute PROOF of anything." is interesting. I wonder what a trial lawyer or judge would say about that, since Witness Testimony can be used to convict someone. Then again, since you are still in your first couple of decades, I can understand why you feel that way. Wait a few years, then repeat your statement. My comments regarding the inclusion of silicones are in error as you point out. You're right, not being a chemist by trade I erred in citing silicones and not plasticizers or elastomeric compounds as the culprits. As you point out, your opinion is yours and mine is mine. But the difference between the two is that mine is based on my personal experience, yours is based on hearsay since it's your Dad and Uncle who have had the experience with the product and not you. I wonder if your Dad and Uncle use Armor All on their and their families cars? FWIW Enrique
-
Connect power to the clock, and check to see if the flywheel moves at all. If it doesn't at all, then try giving it a light flick. If it doesn't seem to be rotating smoothly, then carefully adjust the pivot points for the axle. Usually a very very small "tweak" of the screws top and bottom of the spindle is all that is needed to get the pendulum to move. Then compare the distance of the magnets on the pendulum to the coil. You want them as even as possible. Lastly, check the advancement gear (don't know if this is it's correct name). That's the funny color gear with the very thin gear teeth that are spaced out on the circumference of it. In the first picture you post, it's the "peach" or "pink" looking gear (orange in mine). It gets driven by a very interesting gear attached to the pendulum's axle. This new gear is basically a "threaded" gear. It "catches" one of the teeth of the orange gear, and as the pendulum rotates, it pushes the orange gear forward. Then on the return swing, this threaded gear once again shoves the tooth over. When the cycle repeats it grabs another tooth. It may be that that "threaded" gear has had it's "threads" knocked out of alignment with the orange gear. Watch this to ensure that it IS transfering the movement. In the clock I have, once I realigned the threaded gear, the clock worked again. For what it's worth. Enrique
-
Emphasis mine.Well, from the "tone" in your post, I wonder if you'll consider this as PROOF. From Armorall.com, a link to their FAQ page. Take specific note of the third question. http://www.armorall.com/faq/index.html For everyone's benefit, this is what the java pop up displays: When you access the SPECIFIC Protectant FAQ page: Now for the OTHER side of the story, which coincides with the Chemistry Classes I took in College. From Meguiars.com and their On-Line forum: http://meguiarsonline.com/forums/showthread.php?threadid=982&highlight=armor+all Take a look at the last post on page one. Again for everyone's benefit, here's what that last post reads: You are welcome to believe what you want, but the fact is that anybody that worked in a bodyshop in the 70's and 80's will be emphatic in telling you that Armor All CAUSES cracks in dashes....period.... They may have changed the formulation since then, but it looks / feels / smells the same. Since the most liability they would have, if you could "prove" their product caused it, would be, to REPLACE your bottle of Armor All, or give you a refund of your purchase price (Which you won't get if you don't have the ORIGINAL receipt with the product SKU visibly ON the receipt). I don't think you'll be seeing them too eager to re-formulate. All in all YOU decide. Me? I've restored / refurbished / refreshed / repainted and repaired more than a few vehicles. On the ones that I was informed of the owner's preference for Armor All, all of the vinyl ALWAYS seemed to be in poor condition. Whether it was hazed (no shine), cracked, cracking, stiff, or just "greasy" the vinyl always exhibited some of these problems. Just my prior experience and a couple of ¢ Enrique
-
As far as how to get rid of the overspray, WASH it with plain old soap and water and a brush first. You might be surprised at how much will actually wash off. Afterwards, before you start using any solvents, you might just start with the Meguiar's cleaner, or use Wax and Grease remover. Then if any is still left on it, then start using solvents. Goof, Oops, and other of the "rag in a tube" products are good, but not always the solution to everything. You might have to resort to using Lacquer Thinner or even stronger solvents(Acetone, M.E.K.). The trick is to be C A R E F U L and work quickly. Start with a dash of gasoline (petrol) on a rag and, in an inconspicuous spot, see if the overspray gets dissolved before the vinyl does. (Gas should NOT melt your vinyl.) Then try something else. You may find that you can actually use Lacquer Thinner (which WILL dissolve most paints) on many surfaces, if you work quickly and carefully, OR that plain old Alcohol did the trick. (You'd be surprised at how many times Alcohol alone will dissolve paint.) FWIW Enrique
-
But in a short period of time it won't matter as the "protectant" Armor-All mentioned is NOT the proper choice. This has been discussed before, and the general concensus is that it WILL cause your dash to dry out quickly and disastrously. Armor All uses silicone oil which binds with the elastomer's in the vinyl. The silicone oil evaporates / dissipates and the elastomers go with it, leaving your vinyl dash to crumble. Then there are the individuals who have used it religiously since the day they bought their car, and vouch for it's use. They will attest to how good it is. Well, if you STARTED using it long time ago, then continue - - don't stop, as it's the weekly or bi-weekly fix that keeps it from destroying your dash. But if your dash has NOT been subjected to the pox of all vinyl "conditioners", then DO NOT USE ARMOR ALL. Armor All ONLY works for those people who can spray it on REGULARLY AND religiously and don't mind the greasy oily feeling all over their car. If your car isn't going to be washed every 3rd weekend of the month, and isn't going to be parked in a garage then you are MUCH better off NOT using Armor All. Use Meguiar's Vinyl products, (or POR-15's Boss Gloss). If you clean, prepare and condition your dash with their products, I can promise you that you will be much more pleased than if you use the Armor All. And if you DO intend to wash the car every 3rd weekend, then you might be able to skip the ritual of ointing your car with silicone because you won't NEED to. (Boss Gloss also does a beautiful job on leather.) 2¢ and FWIW Enrique
-
Take a look at the headlight itself and specifically the sugar scoop as it surrounds the headlight. You'll see a pair of "notches" in the circle surrounding the light itself. If you look in there you'll see a slotted screw head. These are the adjustors for the headlight. You have Up/Down and Left/Right. The notch on the Outside edge is for Left/Right, the Upper one is for Up/Down. Don't overscrew in any one direction as you can bend the tangs on the edge of the headlight mounting ring or strip the screw. Hope this helps Enrique
-
Make sure that the wiper motor is actually running. It's located right in front of the passenger side of the windshield, below the cowl. Turn on the wipers and then listen to see if the motor is running. If it isn't, then your problem is probably a bad connector someplace along the way, or your switch is needing cleaning. (Unless someone welded your wiper posts and the motor is just stopped due to the resistance. J/K ) If on the other hand you CAN hear the motor running but still no wiper action, now you have to remove the cowl to inspect the wiper motor linkage connection. It's just possible that the link wasn't properly tightened and it's fallen off. Just be careful that when you reconnect it that the wipers are left OFF until after you test them, so that if they rotate in "reverse", i.e. they start sweeping DOWN first instead of UP, that's because the linkage was mounted 180° off. Remove the linkage, rotate it, and reconnect. Then test again. A simple piece of masking tape or some other type, taped to the wiper post, will let you see the initial direction of rotation. Hope this helps, Enrique
-
Geez, the ONLY good suggestion so far is Kenz. Zulaytr, not only is sparking a battery an extremely BAD idea, it's very dangerous to boot, as you stated. You stand a good chance of really causing problems by doing that. How do you recommend people check if a gas tank is truly empty, by sticking a match down it's filler pipe? You stand a better chance of blowing fuses, melting fusible links and pitting contact points than to note the intensity of a spark. Leave the sparks to the spark plugs. For the most part, LED's by themselves do NOT cause a major enough drain to drain a battery unless that battery is already on it's last legs. It's the OTHER components attached to that LED that are the ones that would drain your battery. Remember the LED only comes on when the item is powered up. (Except for Stand-By LED's) The signal wire for most newer stereos is for the automatic antenna sensor and again it's draw is minimal. The continuous power lead to safeguard your settings (Time, Favorite Stations, Equalizer settings, etc) again also only draws a few milliamps. This could also be routed directly to the battery and will minimize the drain that it does use. None of the items discussed would have enough draw by themselves to drain your battery that quickly. Now if you've left your lights on, your radio amplifier, fog lamps, or other high current items, then that would be the cause. To prove this to yourself, get a single element light bulb like a running light bulb (1156 in the U.S.). Attach wires to it so that you can connect it between the Negative post of the battery and the battery connector. (or the Positive post for RHD cars, as the battery will be on the LEFT side of the car, and most batteries now days have the + post on the right, the intent is to use the post that's easiest to get to.) Then with the ignition off and all items that you would normally shut down, check if the light bulb glows at all. The brighter the gloiw the more current you have going through it. If there is no glow at all then you don't have any current being drawn, or it is so infinitesimally small as to be of no consequence. If on the other hand you have a glow, then to identify WHAT component is causing the glow, start disconnecting items one by one. If disconnecting an item does NOT change the condition of the bulb's brightness, then re-connect it. (You don't want to introduce other problems.) If however, disconnecting an item extinguishes the bulb youl've found your culprit. Note that it may be more than one item, so if the bulb diminishes in brightness, but does NOT go out, then you still have something else drawing current. For grins, check your Accessory Relay, which on the early 72's should still be mounted on the Passenger Kick Panel. Later 72's have it mounted on the same cluster board on the kick panel, or on the engine side of the firewall. I have had an accessory relay go bad and cause a slow drain (usually 4-5 days to no power) which took several days to diagnose. It wasn't until we used the bulb that we found it. Lastly, if you know that you will NOT be using your car for an extended period of time, then park it with the battery trickle charger on it. Otherwise, your battery should hold charge for at least a month or more. FWIW Enrique