EScanlon
Free Member
-
Joined
-
Last visited
Everything posted by EScanlon
-
Are you sure the motor is still connected to the arm linkage? Steady "clicking" might just be the motor actuating properly but it's the arm of the linkage hitting the motor spindle. FWIW E
-
Here's a link to the AFTER pictures of a process I developed to completely re-chrome the vinyl strip on the door panels: It's not hard to do, just time intensive with the right tools. Unfortunately, it's the shipping to and from that really jacks up the cost. E
-
I think you found your own answer in the installation guide. If it's wired backwards it will run but not pump fuel... which is the situation you have now. Reverse the wires and see if that gets it to pump. E
-
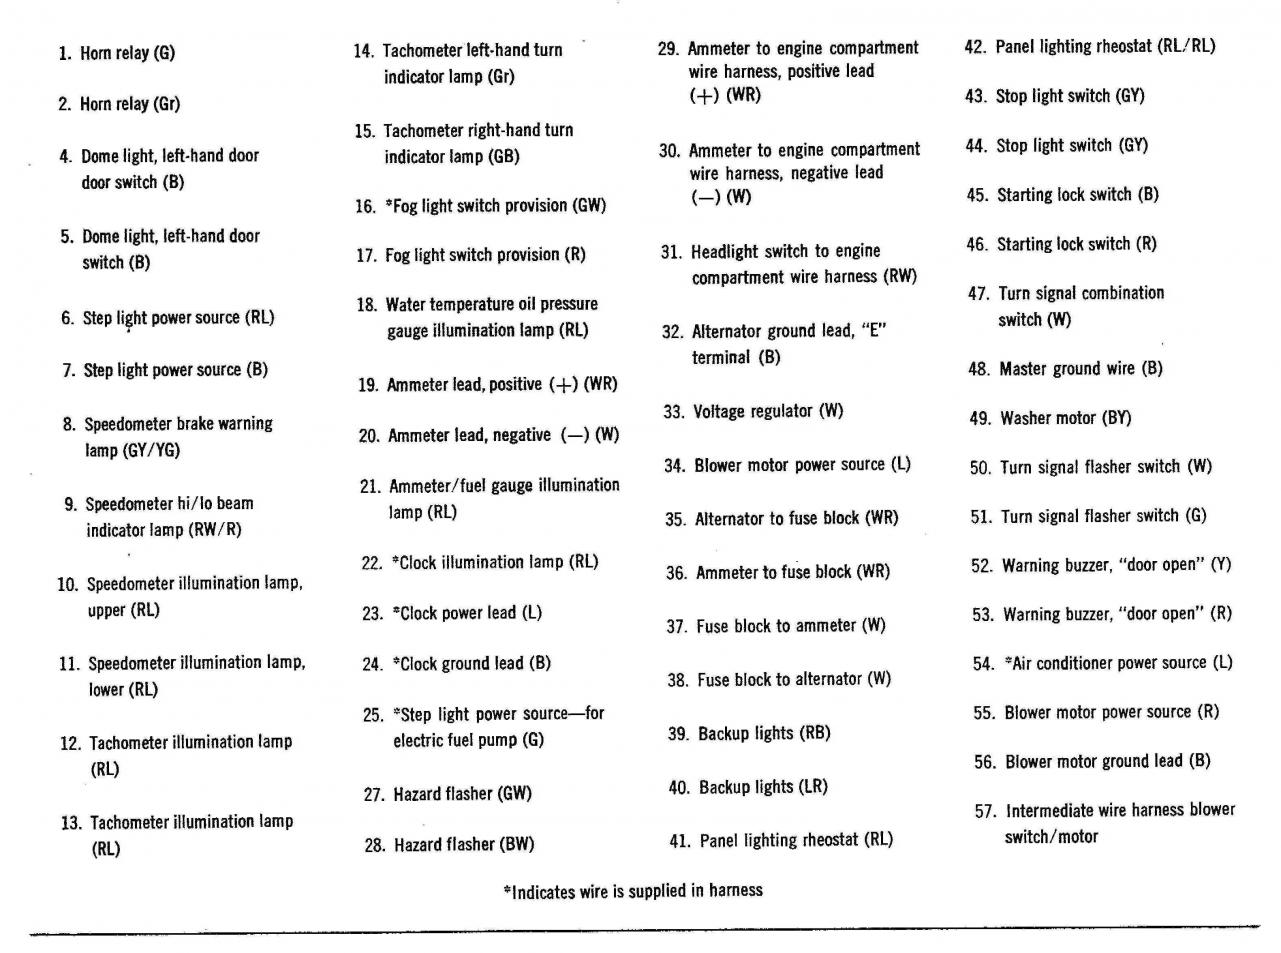
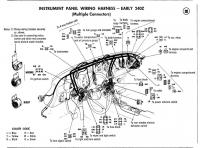
Glad you found it, I'd been going over the first pic Blue put up and in between dinner bites finally realized that the connector is on the other side of those connections, meaning the body harness. As far as the door switches, the early style was a dual wire connector for the Driver's side and a single wire for the passenger, later style was 3 wire for the driver's side. If memory serves, the key-in buzzer needs the separate ground on the driver's side in order to NOT operate with the passenger door, and if you connect it to a single connector, then it will buzz with the passenger door open (and the key in the Ig.Lock.). Another note, if you do connect the step lights to one or both sides of the floor pan, they'll light up with the dome light both with the doors AND the dome light switch. FWIW E
-
#3 is for the Seat Belt Interlock Warning System which didn't appear until late 72 (?73?), and not to be confused with the Key In Warning Buzzer. RH door lead is #26, and can just barely be made out above the second picture I posted above the words "To Fuse Block". All of those wires are Black as the switches just finish the circuit to ground. The door switch leads are on the extremes of the harness, and not too far from them you'll also find the leads for the extra "Step Light" which the US market never got. That's a Red/Blue and a Black wrapped in blue tape. E
-
That's the resistor to absorb the voltage for the different speeds. It is in the air path simply to vent it, doubt it would generate much of a heat increase, although your mileage may vary. E
-
You're missing the second half of that picture illustration, it's one I posted years ago. I'm also attaching a different pic that will help. E
-
I "found" this product at an outdoor spa store looking for pool supplies (chlorine, etc.). I asked the store owner about it and he said he'd been using and recommending it for years for the Padded Hot Tub covers he sold. He showed me one that he had been using as a demo and it looked to be in "new" condition. I say "new" cause you could see the scratches and tears that it had gotten from the many times it had been removed and just dropped onto the asphalt surrounding the tub... but the vinyl was in nice, soft and not faded condition. I asked about silicone oil etc., and he said it's biodegradable and to think of it as SPF 40 for vinyl. I bought some and like that it isn't oily, nor greasy and it leaves a nice sheen. I've been using it on my 30+ year vinyl top on the Roadster and I've gotten compliments on it. The clear windows are clear, soft and after I polished them with Meguiar's plastic cleaner then used the 303, they're as clear as I could expect them to be. I now use it on my dash, seats, and other plastic parts on both the Roadster and the Z. The ONLY other product I ever found that I liked as much was Clear Guard by Turtle Wax.... it lasted FOREVER. That's probably why they no longer make it, I still have a bottle of it. E Here's a link to a website of theirs with information; http://www.303products.com/shop303/index.cfm?fuseaction=category.display&category_id=198
-
Personally, first I'd baby it with warm water and mild dishwashing soap. Once you have it perfectly clean, my vote is for the 303 Protectant. E
-
NOPE, this is false. Epoxy primer is NOT WATERPROOF. As such, it will eventually allow moisture to get to the metal, regardless of any chafing or scratching. In the case of actual moisture (rain) getting on it, it will eventually hold it (it loses it's surface "sheen"). And I'm referring specifically to the PPG DP-40 as that is what I used when I did the refresh/repaint on a 76 Mercury Capri II. I eventually had to D/A the panels back down to the metal AGAIN because of the rust beginning to bleed through the primer. If you want to make the primer truly impervious to humidity... you paint it. E
-
The foam is there to eliminate the rattling from sheet metal contact between the cowl and the body below. Removing it will only guarantee that you'll introduce an awful tin can rattle to your car. I've also heard that even neoprene material will eventually absorb water, and while this may be correct, you're (hopefully) not submersing your vehicle to several fathoms of water pressure. Just make sure it is a CLOSED CELL foam, or a RUBBER pad. (Although rubber may be too stiff.) Closed Cell Foam will take the LONGEST time to absorb any water (hopefully never). FWIW E
-
Let's drop the use of "molestations" as well as the "abominations". Both of those words can be argumentative and to some offensive. A discussion of what you would or wouldn't do to your car, once you buy one, is acceptable as long as you don't intentionally offend others who may see your point of view as abrasive, especially if they have done those things you wouldn't do and take umbrage at your labels. FWIW E Scanlon Moderator
-
POR adheres BEST to etched bare metal. That would mean, yes, remove all the paint, degrease it and then etch it with their Metal Prep product before you POR it. Alternatively, you could just scuff/sand the tank as is and top-coat it with another protective type paint. The big advantage to POR is it's strength and durability, but it will eventually haze due to UV light. (Top coat it with some Chassis Black and it will remain glossy / satin forever.) With a different paint, you would give up some of the durability, but gain the long-term shine/ satin finish. FWIW E
-
There is also a flange that mounts to the bottom sill of the inner fender floor. You should have seen this from the bottom of the car looking up. There are three screws (don't be surprised if they're rusted to dust) holding the flange and the rubber ring that help seal the filler neck in place. This needs to be removed. Once that's removed, the next step is to get the upper flange of the neck down into the body of the car. If the filler neck is extremely hard, this might need a heat gun to soften the rubber enough for you to collapse it and then force down through the gas door "cup". After that, just lift the hose into the body. HTH E
-
Defining "BEST" can be an exercise in an of itself. I personally would have loved to have powder coated a LOT of items... except for the hazzles of disassembly, clean up and CO$T, followed by assembly and concern if it should chip and allow moisture to the base metal (low probability). However, except for the hazzles of masking, clean up, co$t, and concern if it should chip and allow moisture to the base metal (also low probability) a whole lot more of the whole underside of the car would have been painted with POR than what I actually did. That may read as a non-answer equivocation, but I hopefully mentioned the basics... in just a few words. Powder coating.... you'll have to disassemble, and take the items to someone else to do properly. (And no, the Harbor Freight and your wife's kitchen stove are NOT the proper way of doing this.) That means time and money, then re-assembly taking care to properly clean up mating areas so that the powder coating doesn't interfere with function (tie-rod threaded ends, bolt holes, captive nuts that are no longer self-adjusting...) and you still have the problem of road debris possibly chipping the finish and allowing moisture to contact the metal. But powder coating is so damned attractive and pleasant to look at!!! POR... Again, disassembly, prep work (clean, degrease, rinse, dry completely, etch, rinse, dry completely followed by respirator protection as you paint with lots of air circulation) and finally re-assembly taking LOTS of time tapping and chasing every screw hole / thread you have (you can't force thread through POR... trust me), and you still have the possibility of road debris. But POR CAN be done by a do-it-yourself shade tree mechanic at home... and it can generally be cheaper. POR on the inside of the car is an obvious response to not being able to powder coat the floor (it CAN be done, but few have the $400 Quarts Infra-Red Heat Guns or the time required to bake it in 10" square sections). Hope that helps clarify ... if only a bit. E
-
-
-
At a WAG, check the vacuum advance mechanism, specifically the ball-bearing plate underneath the points plate (I know this is an electronic dizzy, it STILL has the mechanical advance system inside). Second, from other posts on the site, most everyone has better luck with the E-12-80 Dizzy and the STOCK coil and the ballast resistor in the wiring. Your research may say otherwise. The bogging under when accelerating and not "catching back up" is a good indication that the timing / fuel mixture aren't synched. Try that and see. E
-
Both went out at the same time....? What about other lights? There is a common ground in the steering column which is the last bit of the headlight circuit, if that wire gets disconnected then you lose both high/low beams and probably the wipers. If that fails then you may have a different problem in the combination switch. E P.S. You might want to put your vehicle information in your signature, as the above definitely applies to the 240 model but I can't vouch for it on the 260/280 or later.
-
While JBWeld or other epoxy will fix the problem.... for the time being, they'll eventually fail in this application. Don't misunderstand, they're good stuff, but the proper fix isn't epoxy. You could take it to a radiator shop, pay for them to clean and purge the fumes and then braze it, but why use a flame at all when it's a simple soldered fitting? (Cost notwithstanding.) Using a heavy duty soldering iron (150w plus) or a heat gun (1500w or more) and some acid core solder and flux, you can do this repair properly. Clean out the tank, make sure you've emptied of all gas, as a safety factor get a small amount of dry ice to dump into it, then take your heat gun and carefully heat the tube/tank joint after cleaning away the crud from around it. Dab a drop or two of flux, wait till the solder starts shining, feed in some more solder while allowing it to weep into the fitting and then simply remove the heat source. Make sur e you don't bump the vent tube as the solder cools and you'll have a perfectly good seal. I've personally done two or three tanks in this exact manner (evap tanks too) and they're fixed properly and they'll even hold pressure. As far as the evap tank discussion: The Evap tank is to allow the gas fumes to condense the gas back to liquid form as well as capturing any return fumes from the engine and from the filler neck. Think of it as additional room to the tank EXCEPT it will never hold liquid gas. It's basic function is to provide an air volume for the fumes to both expand to and from. If you've ever seen a car with a leaky gas cap spewing gas on a warm day, you KNOW gas expands. There have been several members who've removed the evap tank with no reported deleterious effects on performance, fill up problems etc., as far as I've read or been told. There are several write-ups regarding how to eliminate the evap tank. Replacing a missing evap tank for the sake of "originality" ... sorry, but it's somewhat of an oxymoron. Who is going to see it except someone who's disassembling your car? Now, I personally DID leave mine in when I POR'ed my tank, but that was cause I didn't want to research the replacement hoses and soldering up the vent tube opposite the filler neck on the tank. If you can't find someone to sell you an evap tank, I've got a couple (sorry no plastic ones). FWIW E
-
Not really "bend", as you push it down, the bend is so shallow that the clip will hold it in place to the contour. E
-
Mount the new ones starting at the front, as you press down on the clips as you move towards the back, the piece will adjust to the contours of the top of the door. E
-
Wow, sheats the bit out of me! It sounds almost like you've developed some form of electric "back-pressure" in the circuit to the coil which gets released when you're no longer accelerating. That would be an interesting one for the EE's in the crowd to mull over. Is it only on acceleration or also while decelerating? Either way it's just plain unusual. Wish I could help more. E
-
I DID say Sorry! But... are the RPMS ACTUALLY going up or is it just the Tach jumping? That may help solve the problem. E
-
Are you letting your foot come up on the gas while you shift? Sorry, had to ask. E