EScanlon
Free Member
-
Joined
-
Last visited
Everything posted by EScanlon
-
-
As our Aussie friends might say, if we believe the Crocodile Dundee hype, "No Worries, Mate!". You're right in that it's a quick and easy fix to get it running again. Probably the hardest thing is how to pull the Female Bullet connector with it's Protector tube thru the housing. Two other items that need mentioning. There is a pair of screws which adjust the pivot points for the main pendulum gear. That is the gear that you can observe rotating in one direction then stopping and rotating in the opposite direction. If you adjust these screws you need to be extremely careful as they house little "jewel" pivot mounts. Tighten too much and you can either bend the ends of the pendulum axle or crush the jewel points. Loosen them too much and then the pendulum will wobble and possibly fall out. If you want to "prove" that you fixed the recalcitrant motor, you can remove it from the housing. The motor runs intermittently, BUT it never achieves high rpm's. This is important as the function of the motor is to MAINTAIN the main spring in the clock in a perpetually loaded state as opposed to allowing it to unspring before being tightened. As a result, when operating well, the motor operation will seem almost non-existent. Look closely however and you will note that the gear that it drives is in fact moving. The main warning here is to NOT let the motor spin unchecked, as this heats up the motor, the bearings and the armature, all BAD for this little motor. Hope this helps someone. Enrique
-
Peter: What oil hole? The only hole in the back of the clock housing is for the speed adjustment screw, other than the mnounting screws and light bulb opening. If you drip oil in through that hole, you will not get to the root of the problem that the old clocks have. I've taken a few apart, fixed them and put them back in service. Every single one has been because the motor is what needs oil, and you can't get the oil to the motor without disassembling the clock from it's housing. Enrique
-
What about those of us with Automatic Transmissions? This is just another example of how you Manual Shift folks discriminate against us Automatic.......yada yada yada........ J/K Enrique
-
Most taps, and bolt removers are made from super hardened steel. This is why they are so hard to drill with standard drill bits. Since they are extremely hard, they also become brittle (typically). The bolt remover may or may not have space between it and the bolt. If it does it will make this procedure easier, if it does not, it just makes it a bit harder, but it should still work. Get a HARDENED punch with a point on it. Then placing the point on the remover and aiming at an angle away from dead center, hit it hard with a hammer. (Be sure to wear safety goggles.) With a proper hit and luck you should fracture the remover. Remove what pieces you can and continue. At some point you will crack it enough to remove it. Alternatively, heat it up with a rosette torch. The heat will cause it to lose it's temper and allow you to drill it out. Hope this helps. Enrique
-
I had this same problem on another car, and what it turned out to be was that one of the belts on the tire had broken. The only way I was able to fix the problem was to buy new tires. 2¢
-
When I did mine, I used both a folded piece of 400 grit sand paper that had been cut to width of the Female Spade Lug Connectors, and an emery board (courtesy of my wife) that had also been cut to size. For the Male connectors, a simple piece of sandpaper on the end of a glue spreader from the local hobby shop. In the case of Bullet connectors, I used a fibreglass contact cleaner on the ones that were really bad. Otherwise, I just rotated the mated contacts together once or twice. Remember that when we refer to cleaning the contacts between connections, we're not implying that you have to get completely neurotic and anal about getting every last bit of grime and corrosion out of there. What I've found, and others have also, is that poor connections, whether because of corrosion, poor fitting connectors, poorly crimped or soldered joints and the infamous wire wrap and electrical tape connection are the prime reason for circuitry to start having problems. Add to that fuse holders that are purposely spread apart to make it easier to remove and add fuses and you have a recipe for electrical mayhem. Look at your connections first. Spade Connectors and Bullet Connectors typically "scratch" out new contact surfaces when they are properly fitted to one another. When they have been loosened whether by use, vibration, or intentional spreading, is when they don't scratch off the surface corrosion that prevents proper contact. Sometimes the cleaning you are looking to do is nothing more than tightening the connector. As far as grounds, those are typically either a round connector under a screw OR a Spade Lug / Washer combination. There what you want to do is remove the screw and look at the underlying metal. A lot of times you find that there is some corrosion under the washer surface and on the washer. Most if not all of the "cleaning" isn't done with any kind of liquid or solvent, usually it's just ensuring that the MECHANICAL connection is good. Hope this helps. Enrique
-
From experience: Don't use the aluminum tape to add reflective properties to the cup of the instrument. What you'll end up with is a DIRECTIONAL reflector that will do more to shine the light BEHIND the faceplate without more light being sent to the front and around the faceplate. Paint the inside of the instrument cup with the brightest and purest WHITE paint you can find. The refractive and reflective properties of that paint will increase the apparent glow of the instruments better than anything else I've tried. Use Sylvania number 53. You can find these at Schuck's or Dusty's in Hazel Dell, and also G.I. Joe's. The fit is exact and you'll get a brand new bulb with perfect brightness for the instruments. Next, make sure that the bulb holder is free of corrosion, AND that the hole in the back of the instrument is free of paint around the opening. It needs that metal in order to make ground for the harness. Last item to check, is to make sure that your dimmer switch is making good contact. This is a simple rheostat resistance that is open to the air. Because it's open to the air (for heat dissipation) it can get dirty and corroded. Usually all you need is to turn it from high to low a bunch of times to wear off the corrosion on the coil of the resistance. However, don't be surprised if you have to remove the switch (tricky with the dash in) and do a mild wire brush on the surface of it, or re-tighten the contact arm back down on the switch. Lastly, if you are dead-set on removing the green lens, and painting the bulb, don't use a marker. The results will be uneven and barely tint the light. See if you can find INDIA INK, or in a stained glass shop, some dye. Hope this helps. Enrique
-
Here's what I did to recover a couple of "Cascading Icicle" light sets. With a known good set (non-cascading) that uses the same bulbs as a donor, and the non-working set as a patient, I plugged the donor into the wall. This illuminated all the bulbs. On the patient, starting at the FIRST bulb closest to the plug that was not illuminated, I swapped a known good bulb from the donor to the patient. Usually the swap would end up with the donor's new bulb lighting up and the patient NOT lighting up, telling me that the bulb from the patient was good, AND that I had replaced it in the patient, with yet another good one. No gain as far as functionality, but I KNEW that that bulb worked. If the replacement onto the donor did NOT light, I would replace it with a known good bulb out of my spares in order to maintain the donor in working condition. But I STILL knew that the patient had received a GOOD bulb. If this solved the problem on the patient, you're finished. If not, then you go to the NEXT furthest bulb and repeat. Eventually, you will have replaced all of the bulbs whether good or bad, but you will finally trip on the one that is causing the trouble. Don't forget that on many of these mini-lite sets, there are two fuses in the plug. Just like the fuses in our Z's, they're the glass tube kind. Just to be on the safe side, I would swap from Donor to Patient also. While you are inserting the bulbs into their holders, check that the little wires sticking out of the base are aligned properly in order to make the connection. Hope this helps. Enrique
-
 Beandip checking out the 350Z at the Portland Auto Show
 -
 Enrique working on the Z with his Shop Supervisor.
 -
Oh, I wouldn't say I'm not an old fart. But Beandip is bigger and older that tells you a lot. The picture is poor as I was caught by surprise. My wife came in and saw Remington at my feet observing my every move. Beandip's pic is at the car show and he was examining the 350Z so he would know about it when he discussed it. For all his griping about it, he looks pretty happy doesn't he? Later Enrique
-
And here's a poor picture of me working on the Z with my Shop Chief supervising every move I make:

-
Beandip gave me permission to post this picture:

-
2¢ Having bought from Zcar on e-Bay myself, I can vouch for the quality of what he sells. If he claims the items are first rate, then they are probably well worth the money. A proffesionally polished set of rims at $500 a set may seem expensive until you think of $125 each. In my opinion that may end up being cheap, if it weren't for the fact that these aren't the most popular style of rims for the Z. Enrique
-
Just be aware that the "discount" at Courtesy, mysteriously disappears when you talk to them. It's happened to me and others. Call Chloe, she supports our site AND won't jack you around with silly bait and switch nonsense. 2¢ Enrique
-
Well, I hate to be the one to break the bad news to you, but in my opinion you've got a problem underneath that sheet metal and bondo. From what I can determine on the pictures the seam between the rocker panel and the front dogleg of the rear wheel opening is gone, that is how I can confirm that bondo has been applied. The major crack in the bondo is the first clue. Depending on WHY the bondo was applied in the first place is what will determine if you have a Major headache or a simple fix. I concur that it looks as though someone ran over a parking lot tire stop or a shop jack placed in that position. If the later, then it is a clear indication that the sheet metal in that area has been drastically weakened. Whether it was due to a prior bump that did not have the metal properly straightened and tempered or because the metal is so badly rusted that there isn't much strength left in it, is what will have to be determined when you open it up. Thankfully you can still get replacement metal, or at least I think so. If not, it isn't that hard of a piece to fabricate by a good body shop that has a good sheet metal man. The biggest problem is that determining how deep or extensive the rust/bondo damage is can only be done by removing all the bondo and seeing what you find, and possibly cutting into it. 2¢ Enrique
-
I'm glad you posted the part number as this SPECIFIES which one you need. Be aware that there were two types of fuel vapor recovery tanks. One was plastic as you stated whereas the replacement was metal. Unfortunately, due to the Vents on the pillar they differ in shape. Enrique
-
DEPENDS on the date of manufacture for the dash and vehicle. The EARLY 71 dash/wiring is essentially a 70 dash. The LATE 71 dash may have the some / all of the 72 Z changes. These are the differences which we, in the U.S., use to designate a Series I and a Series II, which as discussion on this site has enlightened us are not real or true differentiations. The 70 and Early 71 dashes typically did NOT have the hole above the Hazard Flasher cut out. Additionally, the indent for a label for the Hazard Switch was NOT there. This difference is cosmetic only, but for some people is a tell-tale item. The hole that was NOT cut out was for the Fog Lamp Switch. Most, if not all, U.S. market cars did NOT arrive in the U.S. with that option installed. The label indent was added in the later models because the non-indented dashes would not allow the label to STICK and would fall off. The label was added because apparently the UP-ON and DOWN-OFF was too complex a concept for some people. The latter 71 dashes that DID have the hole above the Hazard Switch opened up typically had the Cigar Lighter mounted there. That's because the Center Console changed, and the Cigar Lighter was no longer placed on the bracket to the side of the Fuse Box and THROUGH the top part of the Ash-Tray / Fuse Cover piece. If the 71 dash you are getting is close to the end of the 71 production year you may find that the wiring harness now has provisions for the following: Choke Warning Light Seat Belt Warning Light These items were now located in front of the shifter, and if your car does NOT have the wiring and relays for this, you will find that your connectors will be different. Another bit of wiring that will be different is the location of the Fog Lamp Switch connections as well as the Electric Fuel Pump interlock. Another item is that the later dashes / vehicles joined the Seat Belt Warning buzzer to the Ignition Key / Door Open buzzer. Another item of note: The method by which the Hazard Flasher Switch and Cigar Lighter opening were illuminated. Early dashes had the Toggle Flasher Switch which did not receive any illumination, whereas later dashes lost the toggle switch and received the Pull/Push switch which used Fiber Optic wiring to transmit light from a bulb holder located behind the dash right by the Instrument Lighting Dimmer Switch. The Cigar Lighter was also illuminated with Fiber Optic Cable. As a final item, and this is a very rare item, is the difference in the Tachometer wiring. The early tachs used a LOOP through the tach which required 2 connections, whereas the later used a SINGLE wire. These are the biggest differences I can recall right off the top of my head. As far as fit, there won't be any problem. The most significant change that I can recall is that the earlier dashes had the lower mounting pads "shimmed" whereas the latter dashes did not. To fix this all you need to do is to bend the lower mounting arms up a bit. As far as the wiring, what I would do is remove the wiring harness from the new dash and mount your old wiring harness. Enrique
-
Have you checked the Vacuum Advance Mechanism INSIDE the distributor to make sure that it isn't shot to heck? I've seen a couple people report that that was the problem. Aside from that, I had a pair of Webers on my car when I bought it, and my mechanic told me that in his opinion, neither Webers nor Holley's were worth the pain and hazzle on the L motor. So I switched to the SU's and have been real happy since. Enrique
-
Kats: Unless I am mistaken that 5th bulb is for the Parking Light. That is why you don't usually find it in U.S. market cars as they did not arrive with the Parking Lamp circuitry. Enrique
-
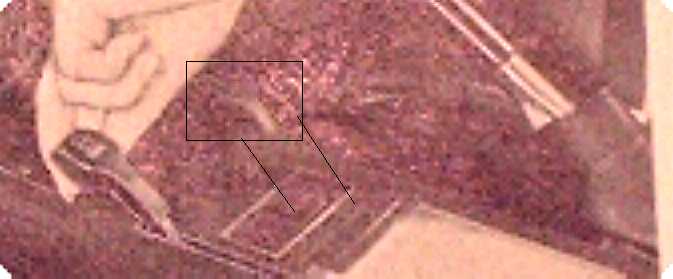
Alan: I am posting an enlarged section of the image. If you look closely, right below her wrist you will see the shape of the lever knob that mirrors the one for the choke. To the far right of the picture you'll see the emergency brake boot. Although the picture on the knob is undiscernible, you CAN see that the angle, shape, and general lay of the reflection of light can only match a knob / lever with the same configuration as the choke lever knob. As such, since the only other control on the car that got installed in that same general location was the Hand Throttle Control Lever, I presume that that is what I am seeing. I could be mistaken so now we have a reason for Kats to provide the picture on the page that shows the instruction for the Hand Throttle. How about it Kats? Enrique
-
Kats: Not since "Interior Ergonomics" have I had so much fun with a post. Your "question" in turn answers so many discussions that we've had. I would thoroughly enjoy reading that Owner's Manual. Could you take pictures of each of the pages and then post? Or if it takes too much time, you could send them to me and I'll post them to the website. Although it may sound like a waste of time, it is not. These manuals give insights as to what was considered "standard" or at least available to the Japanese Domestic Market. It is the differences between the JDM and the U.S. market that are so informative and interesting. A note to the side: The Center Console shown in the picture is what, in the U.S. is considered to be one of the key designations between a Series I and a Series II. (Sorry Alan) Granted, from discussions here we've seen that this differentiation is a U.S. only difference. That console shows the Parking Light Switch as well as the Rear Window Defog switch located in FRONT of the Shifter. The sliding cover ash-tray is also a "Series II" design. However, if you download the picture and then magnify and sharpen the image, you'll just begin to see the presence of a Throttle Control Lever to the RIGHT of the console. This was NEVER seen in the U.S.. Another note: The Headlight Switch to Lamps Light relationship chart shows that the Headlight Switch and Turn Signal Levers are in fact reversed from those we've seen in the U.S.. Additionally, there is evidence that the JDM cars were fitted with a Passing Light Relay circuit which allows the High Beam Lights to be actuated without the parking or turn signal lamps. Lastly, the picture for the Parking Lights. Thank you again in helping me procure that switch for my car. This picture describes the use of the switch perfectly. Thanks again! Enrique Scanlon
-
I think there has been some confussion within this discussion as to which of the plastic connectors each person is referring to. In the picture, the one to the right, which has a rod with a 90° bend in it, that's the one I think you are referring to. It's been a while, but you can do the screwdriver pry method mentioned above, or if I recall correctly, you can turn the rod 90° in the opposite direction of which it actuates and slip the "ears" of the rod end through the plastic retainer. The one that everyone is referring to as being threaded is the one in the "middle" of your picture. You'll note that it has a Hex Head and a smooth shaft. That's the one that is used to adjust the amount of travel that the outside door handle has before it opens the door latch mechanism. The last one, which no one has mentioned, is the one to the far left, which is the one attached to the door lock mechanism. You've already removed that one, so you know how, but for the sake of this post, you rotate the rod body clip to the side so that you can pull the bent rod end from the hole in the lock swing arm. If you'll recall that one also had to be aligned a special way before the rod end would escape. Enrique
-
The blower knob has a screw in that little hole. Using a straight edge screwdriver you then cinch it down on the switch pole. Enrique