EScanlon
-
Posts
5,117 -
Joined
-
Last visited
-
Days Won
2
Content Type
Profiles
Knowledge Base
Zcar Wiki
Forums
Gallery
Events
Downloads
Store
Blogs
Collections
Classifieds
Everything posted by EScanlon
-
If you got the refurbished or reworked clocks from the guy on E-Bay with Zclocks or something like that as his e-mail, he's pretty reliable and trustworthy. More than likely you may have hooked into the wrong power connectors or you're not getting power to the clock. Right by that area of the wiring harness, where the clock plugs in, there is another power connector that goes to the glove box light. Since they're both interconnected no problem. The power to the glove box light and the clock is also the same power that goes to the dome lamp and courtesy lamp circuit, so if you have a dome lamp, you should have power. The clock has a small electric motor that just tightens a coil spring. The coil spring is what actually drives the clock mechanism. As the coil unwinds, the motor kicks in and tightens it up again. To check that you have the right connectors for the clock, look for the light bulb socket that goes to the clock, the black and blue wires come one each from the two trunks of the wire harness right next to the lead for the light bulb socket wire. If they're not right next to that wire, then you're looking at the Red/Blue wire for the glove box light. The blue wire has a Female bullet connector and the black has a Male bullet connector, the clock should have the proper gender on the respective wires. Plug the clock in, worst case scenario, give it a little thump up side the head, you should hear the motor whirr and the clock start ticking. If this still doesn't do it, give me an e-mail, I'm just down the road from you and I could scoot on up there and give you a hand. Enrique Scanlon
-
Take a look at the openings without plugs. From them you'll be able to determine what and how the connectors are clipped in. Then using your new knowledge, remove or actuate the release mechanism for the connector you want to disconnect. It might be as simple as using a pair of small straight edge screwdrivers to pull back a couple of "wings" or tabs. 2¢
-
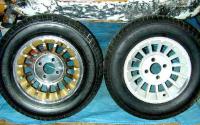
As far as I know, all the "mags" and "rims" that were put on the Z's in the 70's were Dealer Options. Although there are many wheels that are identified as being OEM, not until the ZX's did the Z's have wheels other than the stamped steel wheels. I have a set of wheels that are very similar to the ones you pictured, but mine have a flat center where your spokes go all the way to the hub. Even with the addition of the Z hub from a later Z, they're still Aftermarket Wheels. Alan may know different, and I'd trust his knowledge over my vague recollection. As far as polishing your wheels, you need to examine a few things first. Are the wheels currently clear coated or varnished in any way? If they are, in order to get the metal nice and shiny you'll want to remove that coating. I would recommend a chemical stripper as opposed to sanding, wire brushing or using wire wool on them. If no clear coating, or after you've removed it, is the wheel Aluminum, Magnesium or Chromed Steel? Are the wheels corroded or just oxidized? There is a difference. Corroded Aluminum will have whitish chalky areas that will be crumbly. Aluminum will oxidize with a dull gray cast to it, but that can be polished off, whereas corrosion must be sanded, or polished off. Magnesium doesn't really corrode, but it will get a dark pitted look to it. Be careful of using steel wool or steel wire brush on either of these two as they will acquire a discoloration to it from the steel. Chromed Steel is the worst, as if corroded it must be stripped and replated. If just oxidized you can usually polish them out, but it depends on just how thick the plating is and whether it will take the heavy polish you might have to do to them. Look at the typical rear bumper and bumper guard on a 240Z and see what the exhaust can do to corrode the chrome. I recommend that, depending on the severity of the dullness, you either buy a wheel polishing kit like what is offered at Eastwood, or Motorsports, OR you get some buffing tips to attach to your D/A or Drill and some rouge compounds. There are several different rouges (Red, White, Green, Gray) and each one gives a different grit and finish. For the initial main polishing you can start with Green and finish with White. If they just need a good hit, go with the White. I started my wheels with the rouges (Green and White) but after taking hours on two of them, I discovered another product. It's called Artesan Metal Polish and it's sold by the POR people. I used that on the remaining two wheels, and although there was a ton of elbow grease expended, I feel that the Artesan did as well as I had done with the rouges. Maybe I'm not that good with the polishing rouges, but I went over the first two wheels with the Artesan, and the difference was, in my eyes, noticeable. I painted my wheels with a gold Rust-Oleum paint because my car is 920 Gold, and I wanted to maintain the "gold" theme. Anyhow, here's a picture of the wheels before and after. There is a small spot in the lower right hand of the right wheel where you can see what 3 minutes of using the Artesan on the untreated wheel compared to the full job on the left. Enrique Scanlon
-
With your being up north, in the snow belt, you'll want to make sure that your floor is nice and dry before you apply any paint. Otherwise, as soon as it gets nice and cold the paint will literally chip right off. I served in the Air Force for 7 years, all at Wurtsmith AFB in Michigan (Lower Peninsula). If you look on the map, find Alpena and go about 60 miles south there's a town called Oscoda. If that doesn't show up, look for Tawas, and go 15 miles north. Anyhow, the reason for telling you this is that one of the things we had to do was keep the Hangar floors painted. In order to do the job right, we had to pressure wash the floor, then we used a concrete etching solution before we applied an Epoxy Floor Paint. But the floor had to be completely bone dry for each step. That took sometimes D A Y S. However, when done right, it lasts for years. Unfortunately to give you specific brands, types, etc, the paint we got just came in with a Milspec number, Stock Number and Color. Even though I was the supply guy, we normally didn't investigate what manufacturer was the one that was currently under contract to provide that paint. Hope this helps you in your search. By the way, you may consider applying sand as a non-slip agent, because the finished paint will be very slippery when wet. If you do that, apply your sand when the paint is still tacky but almost dry, sweep it onto the area you want, THEN apply another coat of paint and let dry. The additional coat of paint is so that the sand won't come off and you will still have the non-slip texture. And it will be a definite NON-SLIP, i.e. you'll get a nice scrape if you slip on it. FWIW
-
They're available as Q-Pads and they're made by Evercoat. I used these to replace the tar pads that came on the car. Several notes: As far as removing the old, if you already have some rust underneath, the old pads will probably just lift off very easily and quickly just using a putty knife. They will probably be old and brittle so just push and lift and they should snap off cleanly. If they are still pliable, that's when I would use the dry ice method. As far as using the heat gun or hair drier, I think you would probably generate more work by allowing them to re-adhere. Remember they are TAR and they will melt and flow and re-stick everywhere. I did the old putty knife method and removed the old ones everywhere, including the hatch area. After removing them, I used the Marine Clean and Metal Ready products before I coated with POR black. After the POR dried, I applied the Q-pads over all of the metal areas leaving no surface exposed, even inside the rear fenders. The final result is that the car is exceptionately quieter. As far as the bubble cell aluminum insulator, I did get some through Beandip, but I admit that I have not used it at all. I was able to pull up the horsehair from my transmission tunnel and just reused that. I also covered the transmission tunnel with POR and the Q-pads for sound insulation and the thermal insulation is by the jutte. FWIW Enrique Scanlon
-
Ditto what 2MZ said. The Heater core doesn't have any electrical connections whatsoever. The only connection that goes to the core, is to the water control valve and that is a mechanical connection via the cable from the heater control panel. The switch on the HCP is either disconnected from the harness that connects it to the blower, OR the ground at the heater blower motor is off, OR the fuse that powers the switch / blower (which is an inline fuse and NOT in the fuse box) is blown. Lastly, if the switch itself is bad, it's really surprising that all 3 speeds would die at once unless it is the ground that died and then it was the ground cable and not the switch. 2¢
-
Bonnie: This is going to be more along the lines of a WAG than a true definitive look here fix. (WAG = Wild A** Guess) When you say that you "pulled out the ignition wiring, and have been starting it that way till I can afford a new ignition", I assume that you mean you disconnected the ignition SWITCH from behind the ignition LOCK. And to start the car you are using a screwdriver to actuate the switch. If that is the case, and you did not disconnect ANY other connectors in the steering column shroud, then as a WAG I would check your Accessory Relay located on the passenger kick panel. However, if you disconnected various connectors leading to the various items that hook up underneath the shroud, then you more than likely did cross connect something that is draining your battery. As to what it could be, yikes! Sorry I can't offer more of a clue. Now if you disconnected the wiring leading to the ignition lock from the connector leading to the switch, and you are basically "hot wiring", then you need to know that those 5 wires aren't just pick the two that start the car. Those other 3 wires control the "accessories", the coil - tach - resistor combination and power to the heater fan. Again on another WAG it is highly possible that if you have an aftermarket radio instead of the stock one, that whoever hooked it up used the A/C power lead coming from the heater fan. That lead gets power directly through the ignition switch. Did you leave your radio on with the volume down and the switch in the accessory position? Sorry couldn't be more specific.
-
You say that all the lights work when the alarm blinks them on when arming or disarming. You might want to check for continuity THROUGH the connection box for the alarm. Depending on whether they spliced into the wiring harness with piggy back connectors or actually stripped and cut in, they may have inadvertently disconnected the switch side of the circuit from the left turn signal. 2¢
-
The turn signals and hazard lights use different flashers, although they use the same filaments in the bulbs. Is the front RH turn signal working? How about the light in the dash? If those are working, have you checked the bulb on the RH rear light, as it may be as simple as a burned out bulb. If on the other hand the complete right hand side turn signal isn't working, neither front, dash or rear, then I would check the turn signal switch. 2¢
-
The "spook" series of spoilers didn't replace the valance, they just bolted onto it. The Motorsports catalog lists these as being for the 70-74 vehicles, but that's due to their being bolted on to the lower front valance and turn signal corners. Since the turn signals moved to the grille area after 74.5 (with the introduction of the "fat" bumpers) the valance area changed. I'm not real familiar with the area down below on your 77, but I can't imagine why it would be so radically different from the early Z's that the spook spoiler wouldn't work. Give them a look, they're items numer 50-1521 and 1522. One has ducts the other does not. Both are fibreglass.
-
Just wanted to have the first post of the year! At least as of Pacific Time U.S.. Happy New Year to all! Enrique Scanlon
-
First off, contact Hagerty Insurance. They'll insure your finished Z for an agreed upon value. You may have to have it appraised, but the cost for insuring my Z for a YEAR at a value of $10k (before I got into it) would have only cost me $112.00 year. I'll bet that that is a heck of a lot less than what you're paying now. Next, on the Z you're working on, reduce the insurance down to storage. You're not driving it, so no need to keep full coverage on it. Storage insurance will work since you're restoring it and it will be a while before you get it back on the road. Those two alone might drop your expenses enough to where you can hang on till spring. As far as selling it just because...well if you must you must, but I think that you just need to trim some expenses and you'll be okay with it. 2¢
-
The "U.S." tail lights for the 240 were Red Turn Signals and Red Brake lights with Clear Reverse. Here's a pic of the back end of my car: http://www.classiczcars.com/photopost/showphoto.php?photo=2597&papass=&sort=1&thecat=500 The "European", or NON-US version, had an amber lens below the brake lights and to the outside of the reverse light. Unfortunately I do not have a picture to show. 2¢
-
This is a picture of my car: http://www.classiczcars.com/photopost/showphoto.php?photo=2599&papass=&sort=1&thecat=500 I believe these are the ones you are referring to. When I set out to purchase these, I tried Courtesy Nissan, Too Intense Restoration, The Datsun Dude, MotorSport and none of them had them in stock, nor were they expecting any. Apparently they'd had them on back-order for a while and had not yet heard. I finally obtained my set through Zedd Findings, Charlie Osborne who in turn got them from Japan through MSA in California. When I contacted him regarding getting replacement lenses (due to a small crack in one, my fault) he told me that the ones I'd received along with a couple other sets were the last ones he was able to get and that they were NLA. Maybe Kats can investigate and let us know if they are or are not available in Japan. 2¢
-
Santa packs his bag with the First Choice Toys and Best Packaged Toys FIRST, then he puts in everything that was deemed "seconds" and fragile stuff. Then when he's delivering he takes out seconds and fragile stuff FIRST, then when he gets to our part of the globe all he has left are FIRST's and BEST's! I missed Vietnam by only a few months, I did register for the draft for it although I was classified 1F if I recall (eligible but waived due to administrative orders [just after the draft for Viet Nam was cancelled]). I did serve in the Air Force some years later for 7 years, so I am still a "vet". Along with you, I salute all those members who served in Vietnam, in whatever capacity. And since you must have been there in some capacity, you deserve a SALUTE as well. Thanks for serving. Enrique Scanlon
-
Mr Camo already answered regarding Armor All, and I won't elucidate more on it. Short succinct reply regarding Armor All: It leaves a greasy oily film that attracts dust while it binds with the plasticizers in the vinyl. Then when it evaporates it takes those plasticizers with it slightly weakening your vinyl, over time it will cause cracking, chalking and leaves the vinyl even MORE susceptible to UV ray damage. I mention the POR product Boss Gloss, and I can't recommend it enough, the only problem with it is that you do NOT want to use it on surfaces which should NOT be slippery. i.e. pedals, steering wheel, etc. 2¢
-
Now you need to take some interior shots and post it in your gallery! In my opinion, $10K here in the U.S. for a pristine, no rust, no restoration nor fixing required 70-72, although on the High end of a #2 car, it would definitely be in the low ball park for a #1 car. Guys remember this, which is cheaper, a $5k vehicle which ends up getting $3k in parts and a couple hundred hours of your time or one that cost $10k and it was "done" the day you got it? (Warning; this is a trick question!) I'll not post the answer as it will depend on what it is you want. Some folks would rather pay now and enjoy immediately, while others would rather do all that work themselves and hence value their "hourly wage" in the negative or zero dollar and see the first car as cheaper. Others have a high value for their free time and therefore would find the second vehicle cheaper. Congratulations! Now DO NOT USE ARMOR ALL on her. DO use a good wax once you are past the new paint job's curing period. DO use a good rubber protectant on all the rubber and weatherstrips. And as sjcurtis mentioned, you can't lock the doors (either one) from the outside without using the key. Welcome to the club! Enjoy the Ride! And most of all remember this: Driving a beautiful Z is like dating a gorgeous TALL woman in a form fitting short dress with high heels. Everyone is going to look at you......deal with it!
-
Hope they help you and others. Enrique
-
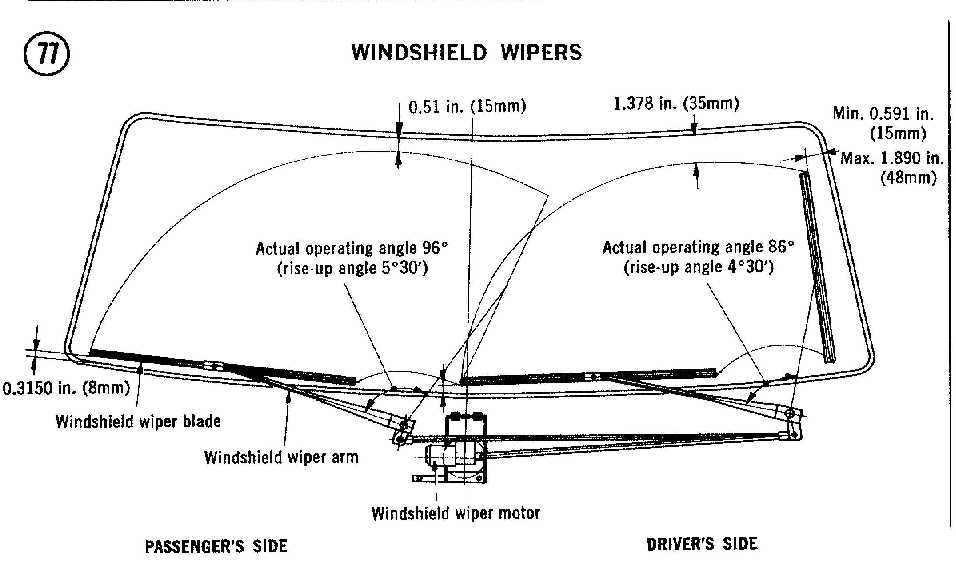
This one has the wiper location for Left Hand drive cars.

-
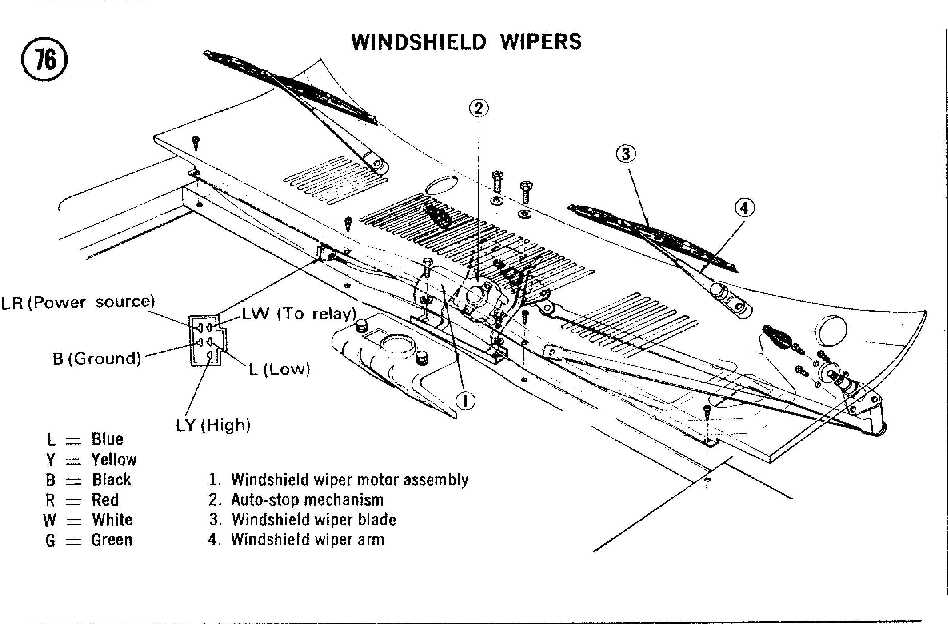
I scanned this in from an old Clymer's manual, the first one with the blue cover. Although it shows the "blow-up" diagram, it doesn't show the parts detailed in my post, but it should help as far as the general assembly and location of the wipers. Hope it helps. Enrique P.S. I had to shrink it and split it into two pictures in order for it to be allowed on the site, if you want a larger image of it, in order to read the numbers / words better, let me know or e-mail me with your address.

-
Extreme possibility that the power wire to the clock could have come in contact with the ameter poles, but as I said, this would have been an extreme possibility. Another possibility is as you mentioned, the voltage regulator. You could get your battery, regulator and alternator checked at a good battery shop and they should be able to help pinpoint the problem. Another good place is M.B. Anderson on 99th Street in Vancouver. Hope this helps. Enrique Scanlon
-
I would check the switch behind the ignition key lock first. Sounds as though it might be failing or it has come loose from the back of the lock. The other items you mention also need to be addressed, but I'm not sure if they would bypass the ignition key circuitry. 2¢
-
Years ago there was a starter interlock solenoid on some cars, not at all sure if the Z would have been equipped with something like that. The solenoid would sometimes have to be overridden and that was what the switch in your picture would be for. Typically it would be connected to the seat belt system, and this is a good possibility for this item, i.e. seat belt use system needs to be disconnected. Just a guess... Enrique
-
Carl, sorry if I made it sound OVERLY complicated as it is NOT. My too anal obsessive overly detailed explanation probably made it seem so, but in fact it's quite straight forward. I'll see if I can find a diagram for the assembly, but I'm sure you'll look at it and say: Geez, he made a huge mountain out of nothing. The main reason I mention the little tiny details is that when this is read by someone in another country who may speak English, but who uses the term Bonnet instead of Hood, or what have you, the overall detail will help identify the item in general and hence convey the idea. This also applies should that person not be fluent in English. Feel free to e-mail me directly with questions and I'll do what I can to get you through it. Enrique Scanlon
-
Simply remove the arm at the motor and turn it 180° and reattach and fasten. If the wiper linkage arms are connected to the motor with the final bar 180° off, the initial movement of the wiper motor (which is the same rotation) wil be transmitted to the wiper shafts in reverse. The connecting arm has a simple extended slot to fit onto the shaft of the motor. The slot is not keyed to only go in one way, it can be mounted 180° off. Believe me, I had this happen to me, although by being completely anal in my assembly inspection and insisting on operating everything before proceeding onto the next step was I able to avoid this pitfall. Otherwise I might have discovered it when my wipers skittered across the cowl and onto the hood! The arm that connects to the motor will first PULL on the link arm, this pull is then converted into rotation by the link behind the shaft holders. When it PULLS it becomes CLOCKWISE rotation of the shaft. If it PUSHES as it will if the arm is mounted 180° off, it will become counter-clockwise rotation. Think of it as having the motor stopped when the wipers are at the end of their travel UP the windshield. If that is the point at which you then START the motor, the first thing it will do is bring the arms back down, before cycling them back up. Now, if you find that you have this problem, you COULD mount your wipers such that the blades stick straight up when parked, but that would look really bad. One other note Carl, when you disassemble the wipers and the motor, no need to disassemble the motor housing etc. If you get ambitious and decide to open the motor up anyhow, be careful of that weird "switch" on the back of the transmission. That is the park location switch, and it allows the motor to operate until it reaches the "park" position. By the way, the transmission is a worm gear to circular gear, so do NOT try to actuate the motor via the shaft, all you'll get is a stripped circular gear. Also, if you open the motor housing to get at the armature, be very VERY careful as it is a bear to put back together again. To check that the motor operates, (which it sounds as it IS working) leave it connected to the wiring harness, but disconnect the arms. If I recall it's a 12mm nut. Actuate your wiper switch on the stalk and observe the motor. The motor is not a speed demon, as long as it turns at both speeds you're ok. If I recall right, it's like 65 RPM at low and 75 or so at High. (someone check the FSM, mine is put away at the moment, THANKS) Next, look at the wiper linkage assembly. This is the culprit of so many slow wipers. Look at the ball linkages and oil those well, then grease them with some white grease. They should turn and swivel around the ball easily. If the felt washers that hold oil / grease there are gone, try to find some, or at least be aware that this is an area that will need maintenance occasionally. Then before you put everything back, carefully remove the round clip at the shaft that holds the shaft through the shaft holder. This can easily be pried up and out of its grove, don't bend it! Then ease it off the shaft, I did it by pushing down on the shaft and letting the shaft holder push it off. You should now be able to remove the shaft from inside the shaft holder. Look inside the shaft holder. You should see that there are two bushings inside of it, with about a 3/8" gap between the upper and lower bushing. Clean these off with a soft wire brush, enough to remove the rust, but not enough to mar or remove material. Also inspect the shaft for any wear. If the shaft is worn badly, you need to find a replacement set of shafts, it's easier to find the whole linkage assy at a boneyard. If the bushings are worn such that they allow the shaft to have play, then I suggest you replace the bushings. You want the shaft to spin freely, but not have any side to side play. If you feel you won't be able to find replacement bushings, then get a new set of linkages. When you're ready to reassemble, make sure that the gap between the bushings gets packed with some white grease. This is the "reservoir" that eventually gets used up, and it's what the rubber boots are supposed to protect. Then put the circle ring back on. Your shaft holders should be able to spin relatively freely around the shaft. If they do, and your arm linkages have easy spin also, you should get the same kind of speed out of your wipers as when the car was new. I find it easier to attach the linkages to the motor outside the car, and then insert the whole thing as a unit. Slide the driver's side of the linkage into the area where it goes and a little beyond, you should now be able to insert the passenger side. Bring everything back to center and place the motor approximately where it goes. Fasten the shaft holders to the cowl undermetal, THEN fasten the motor to the bracket. Connect the wire harness and check the motor rotation NOW. If it's wrong, remove the whole assembly, turn the link to the linkage 180° and reattach. Once you have the wiper shafts operating properly, then turn off the switch, allow the wiper motor to "park", then replace the cowl and wiper arms. Hope this helps, as usual, sorry for the length. Enrique Scanlon P.S. I am a bit anal about how I repair / restore my equipment. I can also type lightning fast, so I tend to make these huge posts. I hope that you guys don't mind the length, if I explain it so that it is simple. My personal peeve in some of the manuals is: Reassembly is the reverse of removal.:stupid: Yes, sometimes it need not be explained, but THIS tip wasn't in any manual I could find.