


EScanlon
-
Posts
5,117 -
Joined
-
Last visited
-
Days Won
2
Content Type
Profiles
Knowledge Base
Zcar Wiki
Forums
Gallery
Events
Downloads
Store
Blogs
Collections
Classifieds
Everything posted by EScanlon
-
KATS! That is EXACTLY what I've been looking for! I was getting ready to "make" my own from two old defog switches. How much do you want for it? Can you ship to the U.S.? I'll pay for the shipping, just do not send it Express delivery. Can you accept either Paypal or would you rather have an International Money order? Thank you! (Deep Bow) Is Thank You in Japanese: Ari gahto (Sorry if I mispelled, or if it is incorrect) Enrique Scanlon
-
A Z by any of it's styles is still a Z! (To paraphrase W. Shakespeare) Whether it's an Automatic, a 2+2, a V-8 Hybrid or even the new 350Z, it's G-R-E-A-T! (Thank You Tony the Tiger) What do YOU want out of it? Are you looking for a rocket racer to scream around the city and shift up and down the gears? Get a Manual. Are you looking for a Ground Airplane that accelerates faster than many other vehicles and is just a plain pleasure to drive? Get an Automatic. Are you looking for a Fast Bullet Train that you, the wife and your two little ones can get into and go for an extremely fun ride? Get a 2+2. The choice between Manual and Auto still applies. Are you looking for a car that will awe many of your friends and give you an exceptionately fine ride, yet not be encumbered with having to find parts for it? Get a 350Z. (and let's not get onto a 350Z bashing / praising thread) Many of us like the "Stock" version without the engine modifications. Some of us like to modify and soup up the engine. It all depends on what YOU want to do with it. In the end, it's ALL good. 2¢
-
Found the information for the place I bought my Halo's at. I've sent him an e-mail to see if he still has the ones for the 240 and I'll post his reply when it arrives. Meanwhile, here's his information: e-Mail: aunomi79@aol.com Business Name: Initial K Auto Concepts, Inc. Attn: AU79 P.O. Box 465 Walnut, CA 91788-0465 U.S.A They cost me $55.00 plus Shipping which was $15.00 for shipping in the Continental U.S.. Hope this helps others. Enrique Scanlon
-
I was getting ready to send you the file with the SCHEMATIC for your year and tranny when I realized that what you wanted was the FUSE box info. Sorry, here goes: There are 4 - 10Amp Fuses and 6 - 20Amp fuses. Their location and value is as follows: (starting at the Top Left, going down and then Top Right down) 1) 20A - Air Conditioning 2) 20A - Wiper 3) 20A - Flasher 4) 10A - Horn 5) 20A - Stop Lamp 6) 10A - Left Headlight 7) 10A - Right Headlight 8) 20A - Parking Lamps 9) 10A - Dome Lamp 10) 20A - Common Don't be misled by the names, some of them are plainly obvious like the headlamp circuits and horn. However, the A/C fuse, if you don't have A/C you might be tempted to leave out, but it also runs the Radio and Antenna. Hope this helps. By the way, if you get a chance to find a Clymer Publications Datsun Service Repair Handbook, I would recommend that one over the Chilton's. Note however, that the one you want is the one with the double black stripe border around a full picture of a red Z at a marina. The Red cover Clymer's also has the same car, but it has the notation "Full Color" and a bold Red cover. That one unfortunately really REALLY got edited. The first one is like a condensed Factory Shop Manual. 2¢
-
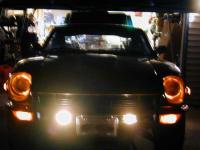
Then you can also go with something that will definitely catch people's eye when they see you coming both at dusk and at night. The picture is of my Halo Headlights that I purchased with H4 45/55 lights. Below you can also spot the fog lamps that are wired through the STOCK wiring. The only thing I've not been able to procure is the original / stock fog lamp switch. 2¢
-
Big Note on changing your lights. Make sure that you either upgrade the wiring or use a relay system if you are going to step up to 90 / 100 watt lights. The original wiring was built for the 40-45 / 50-55w lights. There are H4 lights that are 45/55 and will not tax your wiring, but stepping up the wattage WILL draw more current and if the wiring isn't up to it.......pooof! Meltdown Z! 2¢
-
Tried to send you a PM, but you aren't using that. Then tried to send you an e-mail through the site and that's blocked too. So.... Hazel Dell is just a stone's throw away from me. I might be able to skip away Tue AM 10ish and bring my car out of it's car cover. My email is escanlon@worldaccessnet.com
-
Hey Zwolley, where is Stevenson located? I'm in Vancouver, and beandip is in Beaverton. If time permits and you don't mind the help, I could drive up there and give you a hand with it. Make it a mini Z get-together. Enrique Scanlon
-
It sounds as though you might have burnt out your regulator. That's either mounted on the fender all the way up front by the radiator and below the fuel filter, OR it's an internal one on your alternator. I understand what you mean as far as emergency repairs in order to get you going, but you need to look at the cause of the problem in order to avoid further problems. Trust me on this one, there have been so many posts here and at other websites all complaining about the electrical system on the 240. Many begin with "I blew a fuse the other day...." others begin with "My xxxx stopped working...." or, like yours, "The battery died and I recharged and now......". All I'm trying to say, is that if you know where and what to do to the system, it will work fine. It's when you start doing the "just what it needs to get running again" that many items get bypassed or shorted and MORE problems begin happening. I'm sure others will chime in on this. Take the time one weekend to, if necessary, remove the dash, and check all of the wiring back there against a schematic. You may find that intermittent short and save yourself a bunch of worry. Don't forget the regulator though. 2¢
-
Hoo Boy! Take your pick: Remove the glove compartment box, then insert your hand in and twist it around until you can reach the bolt holding the Y-strap to the dash, unplug the clock and then pull it out. Installation is the reverse of removal. (Don't you hate that line?) OR Remove the Heater Control Panel. In order to do that you may have to remove the center console. Once the center console is out of the way, disconnect the radio face plate from the HCP. Then disconnect the HCP cables from their respective connections on the heater box and vent. Once the HCP is out of the way, reach in and remove the one bolt that holds the Y-Strap holding the radio to the dash. Unplug the clock and remove. IITROR. Now as to which one is the best way? Then again, if your hands are small, and you have relatively nimble fingers and wrist, you might be able to get in there with a 10mm socket on a 1/4" drive ratchet, or a 90° Phillips Ratchet Screwdriver and snake your hand up between the glove compartment box, the radio and the defrost tubes to the back of the clock. Remember, there is only ONE bolt holding that clock to the dash. That bolt goes through the leg of the "Y" bracket that holds the actual clock with two screws, one through each arm of the Y. The connections are polarized, but the connectors are coordinated (i.e. male and female on the clock, and female and male on the harness) If you decide to remove the HCP, you can then also gain access to the Speedo and Tach. Why would you want to access those? So that you can: a) Change the light bulbs to make sure that you have NEW bulbs and not 30 year old ones; Open up the instrument gauges themselves and paint the interior walls of the "cans" with a bright white paint. The paint will make the bulb lighting reflect better throughout the can and you will appreciate the brighter illumination. 2¢
-
The "European" tail lights for the 240 are now a very scarce and pricey item. One of the members here bought one if not THE last set available as NOS, and he paid a bundle for it. Although some people chided him for it, he has them and no more are available. Now maybe we can convince Alan to scour the boneyards in UK, let us know how much to buy and ship the lenses to either individuals or one individual with the will and means to polish, repair, or otherwise make good. That MSA and V/B have them in their catalog is no guarantee that they have them in stock, or have the ability to order them. 2¢
-
At this point you really leave us hurting for information. Once you modify the system from what the wiring schematics show, and what the car came with, we then would need to be there or be psychic before we could be of good help. If on the other hand you would like to return the system to stock, you'd be surprised at how much trouble you could eliminate. But with all the wiring and switching you've added / changed, this might not be what you want to do. Some of the mods you've done can be done with the stock harness and very little alteration of the harness. The electronic distributor, removing the ballast resistor, H4 headlights, Electric fans are all items that have been done and documented sufficiently so that people can assist you in getting it done. It's when someone does something completely "logical" or "obvious" that we must find out what that person was thinking. For example, the fact that your fusible link was failing often are prime indications of a major problem. Replacing the fusible link with a fuse, and no doubt a higher amperage fuse is like putting a rag instead of a gas cap on a gas tank. At that point you are literally driving a Molotov Cocktail waiting for a match. Same thing with the electrical, it blows the fusible link, so you replaced it with a fuse. If they had been of the same amperage, then the fuse would be the one to be blowing continuously now, as the main difference between a fuse and a fusible link is that one is a fast blow and the other is a slow blow. The fusible link "forgives" short duration excesses in current, whereas a fuse will not. I hope you don't feel that I'm putting down what you've done. I'm not, I'm just pointing out that if you hook yours up in a haphazard or non-standard way you really limit the help we can give you on this site. 2¢
-
The ONLY time you should drive your Z on roads that have been treated with SALT, is on it's final drive (rephrase that, TOW) to the crusher. Other than that, think of it as splashing aircraft stripper or lacquer thinner on your private parts! Nuff Said.
-
If you take your clock apart, carefully, you can usually add a very tiny drop of sewing machine oil to the motor (yes there is one in there) and get your clock to work again. I did this, and now have a working clock! (it does lose about 10 minutes a day, but hey, it works!) 2¢
-
Another product with which I've been pleased with: BOSS GLOSS by the POR folks. Note: it does warn that it will leave a SLICK and SLIPPERY surface and should not be used on those surfaces that should NOT be slippery (i.e. foot pedals, tires, steering wheels etc.). However, the finish is as good as or better than my old favorite Clear Guard (no longer available). Additionally Boss Gloss also has a UV protectant in it. It isn't cheap, about $8 for a pint, but it goes a LONG way, and it doesn't need constant reapplication. 2¢
-
Sorry this reply is so late to your post. There are several sources for the 74 Z, but since you refer to it as a Fairlady, then you may have a Japanese model and therefore, right hand drive. Motorsports, Victoria British are but two sources I can think of, but you'd have to contact them to find out if they have RHD carpeting. (The difference will be in the reinforcement for the accelerator pedal and cut-out for the throttle stop). Hope this helps.
-
POR alone will haze or cloud up from UV light. It doesn't hurt it but cosmetically it will look as if you coated it with talcum powder. The Chassis Coat is an excellent product to put on it. You can get it in gloss or satin as well as other colors. The combination between POR and Chassis Coat is excellent in my opinion. Undercoating, on a properly prepared, rust-proofed and painted underside has additional benefits other than "protecting" from road grime. A good coating applied uniformly, on a clean base (i.e. not 6 months after applying the POR mentioned above) will help quiet the under pan from rock, gravel and sand noise. It will also "deaden" any vibrations in the sheet metal. This will actually help reduce noice in the car, just like the tar paper coating on the interior. When I did my car, I POR'ed the interior after having sandblasted the floor pans, then I applied a seam to seam total pan (including tunnel) covering of the OEM style Tar Pads. I put them on from the bottom of the cowl bucket all the way to the tail light openings. (Except for the wheel wells and shock towers) I even put some inside the tool compartments. These pads aren't cheap, and they aren't light, but the difference in the car is nothing short of astounding. The car is QUIET! I'm not talking Acura level quiet (sorry, that's my "luxury" car), but definitely, in my opinion, quieter than my wife's Subaru (although she says it isn't). However, although we might disagree as to the level of noise reduction, we both agree that the reduction in cabin noise is not only drastic it is incredible. The pads are called Q-Pads and they are by EverCoat. I paid about $20 for 6 12"x12" (nominal), and it took about 8 packages to do the complete floor pan, the inside of the doors and inside the rear fenders. Expensive, but the ride is so much nicer. Hope this helps someone. Enrique
-
If you do you'll give yourself tons of grief later. If the back plastic insert, which fits on the horn switch mechanism is cracked, use JB Weld to fill in any gaps. You can also use a couple of those plastic wire ties on the outside of the plastic, but still inside the foam of the pad, to make it tight. Let it sit over night (at least). Then with a Dremel grind / sand smooth and then you can put it on as it is supposed to be. I've personally done this and it does work. Enrique
-
The 73 schematic differs if Automatic or Manual. Could you state which one you have?
-
Hopefully I keep my "arrogance" and condescending attitude in check. I have been accused of that (on another site), so if I come off that way, mostly I'll apologize. (Unless it's something really boneheaded that gets posted.) To remove the latch mechanism DOES involve somewhat of a major disassembly of the door in order to get normal sized American hands and not the smaller Japanese ones that originally worked on it. In brief, you need to: Remove the door panel which includes the arm rest, window crank, and door open handle. Once there, you need to remove the outer chrome trim that has the rubber wipe. Then you will remove the rear window channel sash so that you can then remove the window pane. Once you've done that, you will then remove the window channel. (that's the stainless steel window frame). Take note and care in case the rubber moldings at the front and rear are still glued on. Once you've removed that, you will disassemble the connecting rods for the outside handle, the door lock knob AND the inner fulcrumed lever combination that goes to the inside lock handle. Mind you, others may tell you that you CAN remove the rods from the latch by pulling and / or prying them out of the plastic holders, but remember that those plastic connectors may in fact be 30 years old. Some of them CAN be obtained, but others are very rare and difficult to replace to boot. NOW, you can undo the 3 screws to remove the mechanism. Once you have it out, you could replace the spring, but sincerely, replace the unit. Undoubtedly several pieces have failed, will fail, or are missing. Stuff like the rubber bumper for the lock mechanism when you actuate the key lock or knob. The rubber around the latch, and other rubber bumper pieces that eliminate or reduce the famous metal clunking sounds coming from this piece. For that reason a NEW unit will make your car quieter. Hope this helps, I've personally reworked and quieted my doors and the whole car to where you can actually whisper to your passenger and be heard! Enrique Scanlon
-
Not only the hazzle of doing the work, but a good upholsterer should be able to literally re-create the pattern and styling of the original seat. 2¢
-
First off: If you are NOT familiar with automotive wiring, DO NOT go modifying the circuitry (wires). That 10 gage "wire" from the battery to the starter is in fact a fusible link and not a true "wire". There are various wires that may seem redundant, not needed, superfluous and even stupid in the 240 but you will find that the system can in fact be made to work properly. My car has the original wiring and I've incorporated fog lamps, courtesy lamps, newer h4 halo headlights to mention a few items. I would suggest that you first look at your fuse box. Take it out, clean the contacts for the fuses, replace fuses if they fail a visual and / or a physical continuity check. Don't assume that if they "look" good they are. It is MUCH cheaper to replace all of the fuses than to repair a burnt wiring harness or car. Next, since you've already experienced problems, check your combination switch. Don't just wiggle the thing, check for continuity and if necessary, replace it or repair it. That you have turn signals on one side says the flasher is good, the side they're bad on is probably suffering from a bad contact either in the combo switch, or a short in the wiring. There's tons of information in the archives, just search for wiring or fuse box or any one of half a dozen words and you'll get a ton of information. If you are planning on rewiring the car, go to the boneyard and get a wiring harness from the same year if possible, as there are some changes from year to year. Also, make sure that if you have a manual you get one from a manual car (ditto automatic). Then replace it after labeling each connector on BOTH sides of the connection. If you don't do this, you'll make this into a major PITA job. Feel free to e-mail me or post here as I've done a complete dash rewire as well as getting items to work that others have had problems with. Enrique Scanlon
-
 The color is 920 Gold, aka Mustard, which is the original color for the car. It's been repainted and clear coated by the IPO and it is just slightly darker than what the original color is supposed to be.
 -
 Close up of the back of the Right Hand mirror.
 -
 Inside the Hatch.

