EScanlon
Free Member
-
Joined
-
Last visited
Everything posted by EScanlon
-
Mr Camo already answered regarding Armor All, and I won't elucidate more on it. Short succinct reply regarding Armor All: It leaves a greasy oily film that attracts dust while it binds with the plasticizers in the vinyl. Then when it evaporates it takes those plasticizers with it slightly weakening your vinyl, over time it will cause cracking, chalking and leaves the vinyl even MORE susceptible to UV ray damage. I mention the POR product Boss Gloss, and I can't recommend it enough, the only problem with it is that you do NOT want to use it on surfaces which should NOT be slippery. i.e. pedals, steering wheel, etc. 2¢
-
The following attachment is a test. This test will determine your ability to accomplish goals regardless of the distractions / obstacles placed in your way. Try to find the boat in the picture. Women, for some reason are better than men at this. In fact, most women can find the boat in a matter of seconds. I have been searching for 16 minutes now and thought I was getting close but no such luck. I have dedicated all the time I can to this. Good Luck!

-
Now you need to take some interior shots and post it in your gallery! In my opinion, $10K here in the U.S. for a pristine, no rust, no restoration nor fixing required 70-72, although on the High end of a #2 car, it would definitely be in the low ball park for a #1 car. Guys remember this, which is cheaper, a $5k vehicle which ends up getting $3k in parts and a couple hundred hours of your time or one that cost $10k and it was "done" the day you got it? (Warning; this is a trick question!) I'll not post the answer as it will depend on what it is you want. Some folks would rather pay now and enjoy immediately, while others would rather do all that work themselves and hence value their "hourly wage" in the negative or zero dollar and see the first car as cheaper. Others have a high value for their free time and therefore would find the second vehicle cheaper. Congratulations! Now DO NOT USE ARMOR ALL on her. DO use a good wax once you are past the new paint job's curing period. DO use a good rubber protectant on all the rubber and weatherstrips. And as sjcurtis mentioned, you can't lock the doors (either one) from the outside without using the key. Welcome to the club! Enjoy the Ride! And most of all remember this: Driving a beautiful Z is like dating a gorgeous TALL woman in a form fitting short dress with high heels. Everyone is going to look at you......deal with it!
-
Hope they help you and others. Enrique
-
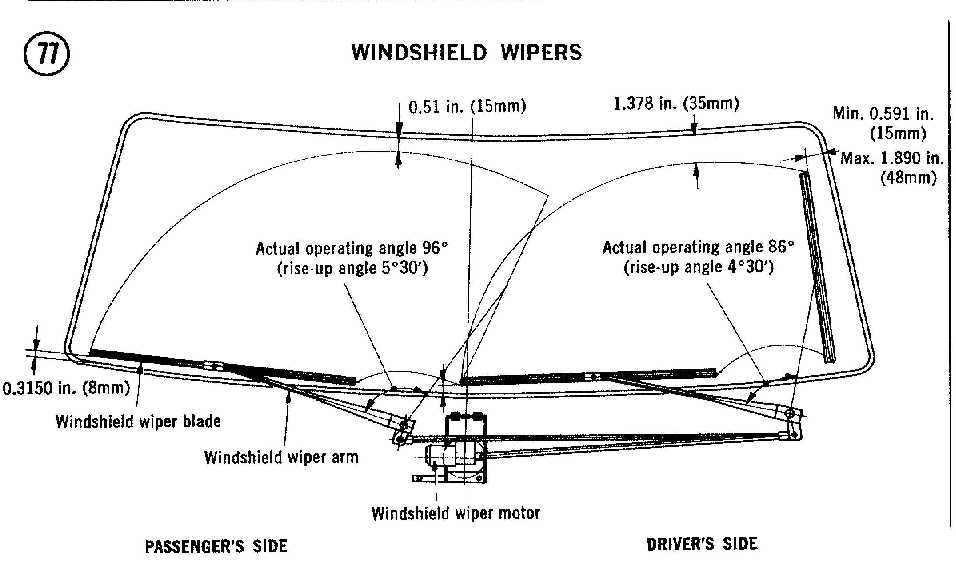
This one has the wiper location for Left Hand drive cars.

-
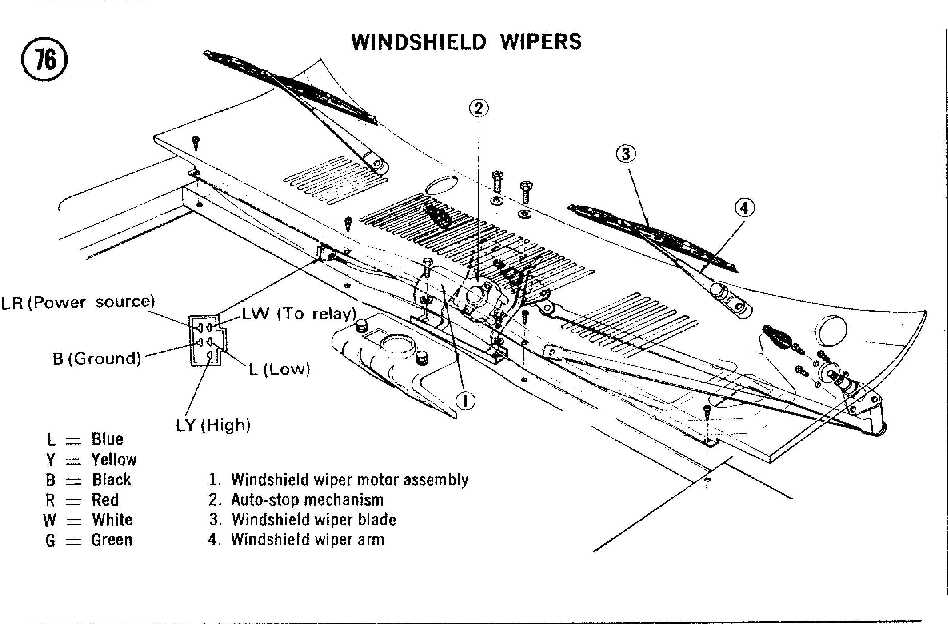
I scanned this in from an old Clymer's manual, the first one with the blue cover. Although it shows the "blow-up" diagram, it doesn't show the parts detailed in my post, but it should help as far as the general assembly and location of the wipers. Hope it helps. Enrique P.S. I had to shrink it and split it into two pictures in order for it to be allowed on the site, if you want a larger image of it, in order to read the numbers / words better, let me know or e-mail me with your address.

-
Extreme possibility that the power wire to the clock could have come in contact with the ameter poles, but as I said, this would have been an extreme possibility. Another possibility is as you mentioned, the voltage regulator. You could get your battery, regulator and alternator checked at a good battery shop and they should be able to help pinpoint the problem. Another good place is M.B. Anderson on 99th Street in Vancouver. Hope this helps. Enrique Scanlon
-
I would check the switch behind the ignition key lock first. Sounds as though it might be failing or it has come loose from the back of the lock. The other items you mention also need to be addressed, but I'm not sure if they would bypass the ignition key circuitry. 2¢
-
Years ago there was a starter interlock solenoid on some cars, not at all sure if the Z would have been equipped with something like that. The solenoid would sometimes have to be overridden and that was what the switch in your picture would be for. Typically it would be connected to the seat belt system, and this is a good possibility for this item, i.e. seat belt use system needs to be disconnected. Just a guess... Enrique
-
Carl, sorry if I made it sound OVERLY complicated as it is NOT. My too anal obsessive overly detailed explanation probably made it seem so, but in fact it's quite straight forward. I'll see if I can find a diagram for the assembly, but I'm sure you'll look at it and say: Geez, he made a huge mountain out of nothing. The main reason I mention the little tiny details is that when this is read by someone in another country who may speak English, but who uses the term Bonnet instead of Hood, or what have you, the overall detail will help identify the item in general and hence convey the idea. This also applies should that person not be fluent in English. Feel free to e-mail me directly with questions and I'll do what I can to get you through it. Enrique Scanlon
-
Simply remove the arm at the motor and turn it 180° and reattach and fasten. If the wiper linkage arms are connected to the motor with the final bar 180° off, the initial movement of the wiper motor (which is the same rotation) wil be transmitted to the wiper shafts in reverse. The connecting arm has a simple extended slot to fit onto the shaft of the motor. The slot is not keyed to only go in one way, it can be mounted 180° off. Believe me, I had this happen to me, although by being completely anal in my assembly inspection and insisting on operating everything before proceeding onto the next step was I able to avoid this pitfall. Otherwise I might have discovered it when my wipers skittered across the cowl and onto the hood! The arm that connects to the motor will first PULL on the link arm, this pull is then converted into rotation by the link behind the shaft holders. When it PULLS it becomes CLOCKWISE rotation of the shaft. If it PUSHES as it will if the arm is mounted 180° off, it will become counter-clockwise rotation. Think of it as having the motor stopped when the wipers are at the end of their travel UP the windshield. If that is the point at which you then START the motor, the first thing it will do is bring the arms back down, before cycling them back up. Now, if you find that you have this problem, you COULD mount your wipers such that the blades stick straight up when parked, but that would look really bad. One other note Carl, when you disassemble the wipers and the motor, no need to disassemble the motor housing etc. If you get ambitious and decide to open the motor up anyhow, be careful of that weird "switch" on the back of the transmission. That is the park location switch, and it allows the motor to operate until it reaches the "park" position. By the way, the transmission is a worm gear to circular gear, so do NOT try to actuate the motor via the shaft, all you'll get is a stripped circular gear. Also, if you open the motor housing to get at the armature, be very VERY careful as it is a bear to put back together again. To check that the motor operates, (which it sounds as it IS working) leave it connected to the wiring harness, but disconnect the arms. If I recall it's a 12mm nut. Actuate your wiper switch on the stalk and observe the motor. The motor is not a speed demon, as long as it turns at both speeds you're ok. If I recall right, it's like 65 RPM at low and 75 or so at High. (someone check the FSM, mine is put away at the moment, THANKS) Next, look at the wiper linkage assembly. This is the culprit of so many slow wipers. Look at the ball linkages and oil those well, then grease them with some white grease. They should turn and swivel around the ball easily. If the felt washers that hold oil / grease there are gone, try to find some, or at least be aware that this is an area that will need maintenance occasionally. Then before you put everything back, carefully remove the round clip at the shaft that holds the shaft through the shaft holder. This can easily be pried up and out of its grove, don't bend it! Then ease it off the shaft, I did it by pushing down on the shaft and letting the shaft holder push it off. You should now be able to remove the shaft from inside the shaft holder. Look inside the shaft holder. You should see that there are two bushings inside of it, with about a 3/8" gap between the upper and lower bushing. Clean these off with a soft wire brush, enough to remove the rust, but not enough to mar or remove material. Also inspect the shaft for any wear. If the shaft is worn badly, you need to find a replacement set of shafts, it's easier to find the whole linkage assy at a boneyard. If the bushings are worn such that they allow the shaft to have play, then I suggest you replace the bushings. You want the shaft to spin freely, but not have any side to side play. If you feel you won't be able to find replacement bushings, then get a new set of linkages. When you're ready to reassemble, make sure that the gap between the bushings gets packed with some white grease. This is the "reservoir" that eventually gets used up, and it's what the rubber boots are supposed to protect. Then put the circle ring back on. Your shaft holders should be able to spin relatively freely around the shaft. If they do, and your arm linkages have easy spin also, you should get the same kind of speed out of your wipers as when the car was new. I find it easier to attach the linkages to the motor outside the car, and then insert the whole thing as a unit. Slide the driver's side of the linkage into the area where it goes and a little beyond, you should now be able to insert the passenger side. Bring everything back to center and place the motor approximately where it goes. Fasten the shaft holders to the cowl undermetal, THEN fasten the motor to the bracket. Connect the wire harness and check the motor rotation NOW. If it's wrong, remove the whole assembly, turn the link to the linkage 180° and reattach. Once you have the wiper shafts operating properly, then turn off the switch, allow the wiper motor to "park", then replace the cowl and wiper arms. Hope this helps, as usual, sorry for the length. Enrique Scanlon P.S. I am a bit anal about how I repair / restore my equipment. I can also type lightning fast, so I tend to make these huge posts. I hope that you guys don't mind the length, if I explain it so that it is simple. My personal peeve in some of the manuals is: Reassembly is the reverse of removal.:stupid: Yes, sometimes it need not be explained, but THIS tip wasn't in any manual I could find.
-
I agree with 2MZ's. Motor heard running...electrical check ok. Wipers can be moved manually with the motor turned off...link to motor gone. Remove the arms, then the cowl, then check the nut and the arm that holds everything to the motor. Like 2MZ said, you're probably just missing that connection. To correct it you may have to remove the motor and the arms from the bay to make it easier. With that being the case, take the time to disassemble the wiper arm bushing holders (that's the thing that bolts to the car and the wiper mechanism rod goes through), check for play, regrease them then reassemble them. I've heard of people using spark plug wiper boots in an emergency, instead of the wiper boots. Grease all of the linkages for the wipers before you return the assembly to the car. Take a minute to ensure that you clean out any leaves / debris that may be in the cowl bucket area. Replace cowl but note the following WARNING!! BEFORE YOU REPLACE THE WIPER ARMS!!! Connect the motor to the harness, then get inside and turn the key in the ignition lock to "run", i.e. that position that it falls back to after the starter has started the engine. Let the wiper motor cycle back to "park" Then before you go mounting wipers, turn ON the wipers and observe the shafts as you turn on and turn off the motor a couple times. Ensure that when the wiper motor STARTS it turns the shafts CLOCKWISE from the STOPPED and INITIAL position. If it is going COUNTER-CLOCKWISE you will scrape your cowl and hood with the wiper arms. If the arms are going clockwise, turn off the wiper motor AT THE SWITCH, let the park function operate, then mount your wiper arms at the lowest position on the windshield, such that they are barely touching the windshield gasket rubber. 2¢
-
I hear you on getting rid of the parts car...My problem is that I can only park 4 cars in the driveway, in front of the 2 car garage that's jammed packed with tools and other crap, and with my Z, the 68 Roadster and the parts car, I would have to bump my wife's Subaru out onto the street where my Acura currently resides. I'm working on the garage, but it's been easier said than done.
-
So you are looking for an OLD USED VIRGIN! Sounds like an oxymoron to me.......j/k
-
Ok, let's see.... 1-1/2 car garage.... Xterra- out in the rain, it's supposedly a "Sports" Utility Vehicle so the rain will do it good. 260 - get a racing car trailer, put it in there. You don't want the local tree apes in the neighborhood messing around in or around it. You can tow the trailer behind the Xterra. 66 Mustang- it's getting restored, no problem for now. When it gets back......sell it. They're cute, but it's no Z and besides you can always find another one, heck they're still making the darn thing. New Mustang - It's under warranty and should be no problem out in the rain. If it isn't then you can sue Ford and get a new one. 71 240 - Needed to fill the space in the garage, as well as ensure that it stays in good condition. The other half of the garage ----- the Motorcycle!! I think that about covers it.
-
Why not sell whatever SHE'S driving. If she wants a new Mustang let her be the one to sacrifice...... Remember, SAVE THE Z!! Collect one of each model!!!! or better yet let ME collect them all.. 2¢
-
2¢ Have the undercarriage checked out by a body shop (since you don't have prior welding experience), and have them give you an estimate on repairing those rust holes. While you're at it have them check the outside to ensure that you're not looking at something more major than just surface rust. Whether or not it disuades you from continuing with the project will be up to you, i.e. how much money to work with it. Rust can be a killer, I've seen vehicles with otherwise good running gear (engine, tranny, rear end) with bodies that simply do not have what it takes to be considered for restoration. (i.e. it would be easier to replace the body, or transplant the running gear into a good body with bad gear) If you address the rust early enough it can be managed, if you wait, it might kill the car out from your engine overhaul etc. Just my 2¢
-
Mike: One of the biggest considerations in painting a car in pieces or as a unit will be the type of paint you paint with. Metallic paints are notorious for having a different "look" when painted separately and then assembled. Same with Pearls and other paints with additives in the paint. Generally, you would do the interior and underside of the pieces (doors, fenders, hatch and jambs) first, then have the whole unit at least put together, although not bolted, and then paint the exterior as one unit. Then again, it's also up to the painter and the booth he has to work with. 2¢
-
Since the car hasn't run in a while, you might check the Vacuum Advance plate inside the distributor. These are notorious for drying out, cracking and dropping the ball bearings inside the dizzy. The end result is that the dizzy won't stay on time. When you adjust it you might be adjusting with the vacuum plate off center, then when the vacuum does kick in it moves it out etc etc. This plate sits below the point table in the dizzy. My car had a backfiring problem, when I took it in to the mechanic to be tuned up, he pointed this part as being the culprit. 2¢
-
I bought mine at the Paint Store. Now granted, this one has both Automotive and House paint as well as all the different types of body working materials you want. I would check for a automotive paint supply house, ask them if they have products by Evercoat. (They also produce Plastic Body Filler (aka Bondo except BONDO is a trademark name). Then ask specifically for the Q-Pads and describe them as tar paper pads. As far as being the "original" stuff, well, it's as close as I could find. Granted Datsun used a single sheet / cutout for each of the floor pans and hatch area, and you'll have to piece it together, but I'm happy with it. I also applied it OVER the POR so I won't be making the same mistake that Datsun did by applying it over plain galvanized metal. I don't recall who or where I got the information about Dynamat having some fiber inside. Like I said, I've not used their product and therefore can't really comment on it. I went mainly for ease of purchasing it, and price. 2¢
-
Q-Pads are manufactured by Fibre Glass Evercoat Company, or simply Evercoat. They are simply Tar with a thin film on the outside and adhesive on the back. You peel off the protective plastic film to expose the adhesive and adhere it to wherever you are mounting it to. They cut quite readily with a utility knife although I found it easier to use a rotary blade cutter. (Available at fabric shops and EXTREMELY sharp!) If shaping or moulding is required a simple hair drier or heat gun works very well. Additionally heating them causes the adhesive to adhere more firmly. I've heard that Dynomat has an additional layer of fibre within it, but have not seen the actual product. 2¢
-
Got a reply from the guy that sold them to me. Hope this helps!
-
Sorry Mudge, the VIN breakdown for the 240's gives only very basic information as to model, engine, left or right hand drive etc. Color codes are not part of it. About the only "option" code that would be on the VIN is whether it was an Automatic or not. And even then I'm not sure how accurate that was as mine is an automatic and the VIN on my car doesn't have it listed. 2¢
-
I've not used this, and I have heard GREAT things about it. However, one of the things I've heard about it is it's cost. A package of Q-Pads with 6 12"x12" squares is about $20.00 U.S. at my local Paint Store. A quick check of Eastwood says Quiet Pads 12"x12" box of 5 = $19.99 US. Granted they also sell it in two other variations, Original and Hood Liner. For my purposes it was cheaper to go with the Q-Pads. 2¢
-
I think this question really needs to be broken down a bit more before a generalized answer can be given. The Jute padding in use underneath the transmission vinyl is used PRIMARILY for Heat Insulation, although it also serves as a sound attenuator. The Tar Paper on the floor pan is PRIMARILY a Sound Attenuator although it does give a bit of thermal insulation. In the case of the Jute Padding, it is putting a multi layer air and material substance to block the heat and sound. The "dead" air spaces cause the thermal energy to lose energy as it passes from level to level. The sound is mitigated the same way. The Tar Paper on the other hand, is reducing the harmonic vibration of the metal by adding a viscous layer to the metal. This in essence is simply like putting a damper on a vibrating piece of metal, it quiets it by reducing the vibrations that metal can do. Just like a speaker cone, put your finger on a speaker as it plays and see if the sound doesn't diminish. The thermal insulation it offers is simply due to the increased thickness and the difference in the thermal properties of the materials (steel vs tar). Now, to answer your question, and you'll see why I had to explain the "obvious". I just did this, this past summer. I removed the complete interior and sandblasted the metal. I followed that with the proper metal cleaning and preparation for a total POR paint job all over the floor pan. From the Cowl Bucket to the Tail Lights. I used POR for rust proofing and as a MOISTURE BARRIER to prevent further rusting. I then followed this up with Q-Pads. Again from the front to the back, as well as inside the doors and fenders, even inside the tool boxes. Yes, they are a bit on the heavy side, but I wanted QUIET and not LIGHT WEIGHT. This gave me SOUND INSULATION. I saved and reused my original jute padding for the transmission tunnel, but I had investigated a couple options. First off, you can still get jute. The problem comes in in trying to cut it to shape. Next option is an item that is called Reconstituted Foam Rubber. This is basically pieces of Sponge Rubber that have been glued together to form a sheet. Most commonly seen as under carpet padding. This is more resilient than the single sheet of new foam as it won't tear as easy. Another option is to use the item mentioned by St. Stephen, or another one that uses "bubble" wrap instead of fiber. Both of these will provide THERMAL insulation primarily, the sound attenuation, although there, will be less than that offered by the Q-Pads. My carpetting already had some thick padding sewn into it, and I also added the car mats. So I have about an 1-1/2" of carpetting on the main floor pan and about 3/4" everywhere else. The Transmission tunnel has both the Q-Pad AND the original Jute and the vinyl. The rear wheel wells have just the vinyl. The reason for just the vinyl there is that the metal is double thickness and very little heat / sound is transmitted through there. If you ride in my car today, you would be surprised at how QUIET it is. Granted, I still have to get the rear end and the tranny overhauled, but that's next on the list. For What It's Worth, hope it helps someone. Enrique Scanlon