EScanlon
-
Posts
5,117 -
Joined
-
Last visited
-
Days Won
2
Content Type
Profiles
Knowledge Base
Zcar Wiki
Forums
Gallery
Events
Downloads
Store
Blogs
Collections
Classifieds
Everything posted by EScanlon
-
You don't list the year of your car, and if it's one of the earlier ones it didn't get that weatherstrip piece or medal ridge. If memory serves it was on the 73's and later. FWIW E
-
Yes we do. Start here: http://www.classiczcars.com/forums/dto_clubs.php?do=services Be sure to Register your club: http://www.classiczcars.com/forums/dto_clubs.php?do=reg and Mike will get you set up. The site runs on contributions, so while we take care of the bulk of the work, please feel free to chip in to offset the utilities. E
-
Jim: The green and black ARE for the fuel pump fuse connection in that picture. What I was referencing in the picture is that in the background of that picture you see another connector, which is pictured in the second picture. THAT connector is the one that finishes the circuit for the Fog Lamps. All that is needed there is a switch to jumper those two wires the Red and the Green/White. If you could have had the Fog Lamps mounted at the Dealer (Back in the day), they would have mounted the fog lamps on the bumper and inside the console you'd have had a switch connected to that connector. The Fog Lamps are powered off the Parking Light Circuit and are only on when the quarter lamps are on. At the front of the car, you may want to use individual relays or just one to receive the power from the harness' wiring rather than power the fog lamps directly. You'll have to run a power source, but this way if you have any doubts/concerns as to your wiring harness, you'll be safe. FWIW E PS: The Red wire that is part of the connector is the direct connection to the Fog Lamps up front. The Black wire up front connects directly to the ground screw up front.
-
If you're referring to the open coil resistance at the exit to the fan housing, that's the voltage restrictor for the different fan speeds. They're typically riveted to the fan housing. I don't know of a way to replace/repair that. You could probably find another blower unit to cannibalize. Sorry, HTH E
-
I thought the only option given was when they called you to go pick up your car at the dealer, and you drove there eager to pick up the vehicle you'd been on a waiting list for that had finally arrived and you were then given the option of: --- Take it or leave it, the next guy on the list is waiting. --- Highlight between the dashes to see the answer. E
-
Ask Alan (HS30-H) or Kats. E
-
Congratulations. Is this the same vehicle that is still with all it's original un-replaced parts or is it the one that you had repainted 20+ years ago and later restored by Pierre Z? Did Pierre check with you on each and every part he replaced? When you FIRST bought your car a small detail like the weather strip might have escaped your use and enjoyment. Additionally when you repainted the car, the Arizona heat may have required replacement by then, or when Pierre did it. Some years ago you said: http://www.classiczcars.com/forums/newreply.php?do=postreply&t=42260 with regards to the finish on the inspection lid fasteners, which leads one to believe that other details might have escaped your notice.This is obviously of utmost importance to you, so in order to keep the peace, have it your way, your car as you remember it, or as you had it restored, had the one piece tubular weatherstrip put on the outside seal of the hatch. That may be how the car originally left the factory, and later they went to the two part style. But then why did they come out with the non-tubular weatherstrip, and for what purpose? Why would Nissan add the extra cost of maintaining two different part numbers when previously ONE served the purpose? Why would they RETURN to the one part later? In either case, this is the type of discussion that leaves a bad taste for everyone. You may indeed have noted that weatherstrip back then but not other details. That you still recall that specific of a detail 40+ years later, while needing clarification on other items, well you'll understand why I don't stand in awe. I've known people to specificaly remember something, only to later have proof of it otherwise. Again, congratulations on being an original owner, and having had your car restored by Pierre-Z. I trust it looks great. E
-
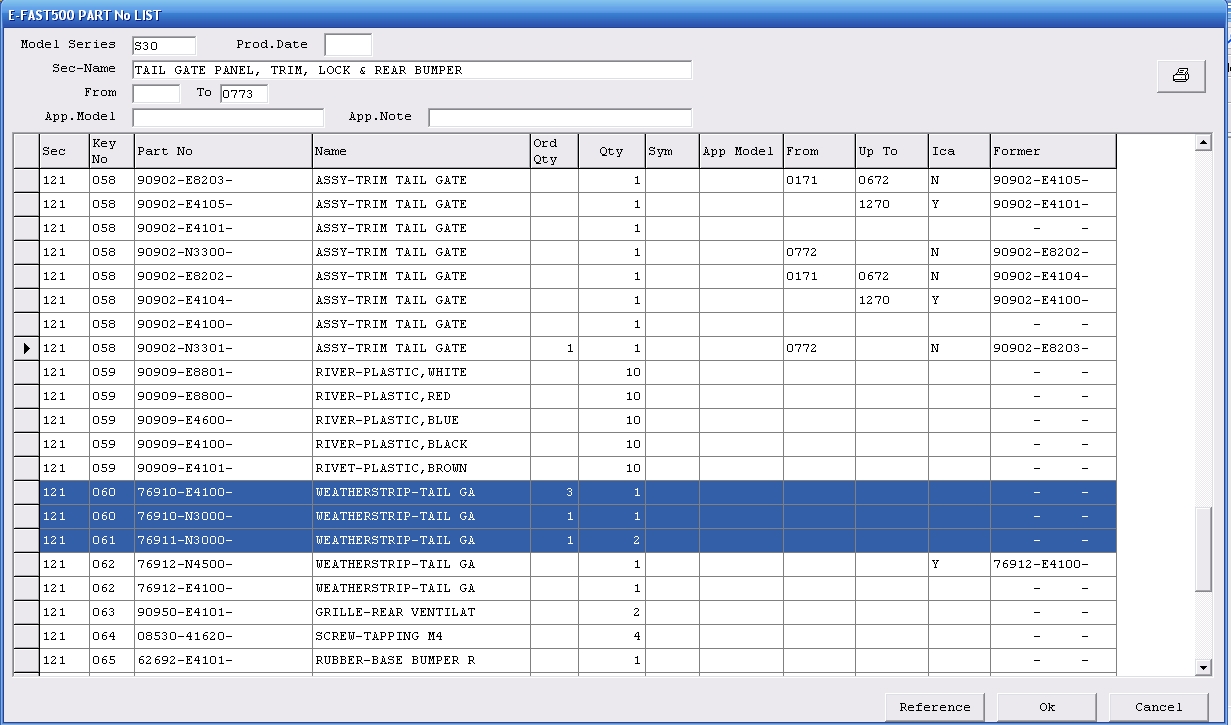
Your reasoning is valid. The differences in the part number suffixes support what you are saying, and it does stand to reason that the single item 60-1 would be a single piece and that 60-2 and 61-1 as a set comprise the alternative to 60-1. But the available documentation doesn't disprove or prove either one of our points. It also doesn't specify that the one piece preceeded and was superseded by the 3 piece. The -01/02 sequences are also used for variations on pieces that had options. There they used the Applied Date and the Former columns to identify replaced or superseded items. The dash item numbers denote other part numbers in use concurrently or superseded/changed items. (Note: Those dash numbers disappear in the latest E-Fast system.) The dash item numbers many times did indicate replacement part numbers but not always, that's where the ICA (interchangeability) code came into play. The ICA coding is what was mainly used to identify parts that could be substituted/replaced for other parts, as well as denoting which parts could be fabricated from other parts with the part number relationship shown in the Former column.The ICA coding also shows that there were some distinctive changes that precluded the part being able to interchange from prior to later. This type of coding dates as far back as the Sport / Fairlady Roadster (SP-311) Parts Catalog, with the Fab From being a later addition. Look at part number 58 in the same slide to verify. There you can see the color option at work. Part 58 is the hatch finisher, which would have had the interior vent grilles for an early vehicle and not have them for a later vehicle. Additionally it could not be fabricated readily for a later vehicle from the earlier version due to the vents and the embossing. Using other color items like the seats, slide 122-1 item 1-01 through 1-15, you can readily see the superseded part numbers (in the Former column) as well as the Up To Applied date on several. Additionally, the cases where the ICA is filled in with a Y in the N column indicates that the part IS interchangeable. Interestingly this is not the case for the hatch weatherstrip pieces. The Hatch weatherstrip pieces would have had an ICA code showing that the top piece in the set of three could have been made from the single piece that went all the way around, as well as showing that these parts were interchangeable as a set. But there you would be correct saying that I'm reading too much into this. Look at these screen shots of my EFAST CD system which is the electronic version of the microfiche and is what the parts counter guys at Nissan use to reference parts currently. There you'll see that the Hatch Weatherstrip still does not show any Up To or Former data, additionally there is no ICA coding. As I've said, you may be completely right, but this might also be a part that was done both ways and no specific documentation was made to any of the parts databases that Nissan kept. The cars I've seen (both at a bone yard and in people's garages) have had it done both ways. One mechanic I talked to (who has been in the business for 30+ years working exclusively on Datsun/Nissan products) stated that he recalled the earlier vehicles being 3 pieces and were later swapped to 1 piece due to the fume problem. His original parts catalog concurs with the CD and the E-Fast, that's the one he maintained and his Dad maintained before him before he took over the shop. So, let's agree to disagree. E
-
I couldn't find them, so I went with the next best thing I could find. I went to the local hobby store and found some stainless screws and a die to get as close to the original thread pitch and size as I could. I don't recall exactly right off the top of my head, but I think I went with standard as opposed to metric, 4-40 1" long is what I recall. FWIW E
-
Darrel is correct, the further away from the compressor you put the separator the better it will perform. The only other way that I know to keep the condensation down is to keep the compressor pump and tank as cool as possible so the air doesn't get super heated and then it's hard for the separator to work properly. The separator works by suddenly increasing the volume in the air line, while it maintains the pressure constant. The formula P=VT is the accepted thermodymanic method for determining it's pressure to volume / temperature ratio. With that formula you can see how the temperature drops directly related to the increase in volume. Do it at a temperature close to the dew point and the humidity falls out of "solution" (the air). Do it at too high a temperature and the drop in temperature isn't enough to allow the dew point to be reached. That and empty your main tank often on humid days. E
-
Dan, I'm not reading more into it than what is printed. While the suffix on the part numbers does seem logical, it's interesting that the CD doesn't concur with your recollection, nor does Wick Humble's book which has also been cited as an authoritative reference. The CD does mention a 1 and 2 item index suffix so it may be as you remember, however, the CD does NOT have any Applied Date limitations on either of the parts. It does however, mention quantity two for the side pieces. This seems to be one of those items that the available documentation contradicts what people remember after 40+ years. E
-

Ultimate Headlight upgrade: DOT Legal LED Headlamps!
EScanlon replied to Ben's Z's topic in Electrical
Adding to what Arne writes, there are numerous times when you can tell a vehicle has had the headlamps replaced... and the replacement lamps require a different alignment. New tires, new shocks, front end work, rear-end work, a large extra weight in the car all of these can change the alignment profile. The argument of "They were aligned before..." is at best moronic, and at worst criminal. Why? For exactly the same reasons people purport to needing a headlamp change. If your current, meaning original, OEM or dealer-installed lamps aren't putting the light where YOU need it, then first things first, CHECK THE ALIGNMENT!! It may be that the car's suspension has settled over time, and the rear of the car sits lower than it used to... translate that to mean that the lamps will be shining further down the road and more into the eyes of the opposing direction drivers. The opposite would be the case if the front end was now sitting lower, worn shocks, alignment out of whack, etc and all it takes is a few degrees and now you're searching for man-hole covers directly in front of the car. Couple either of these with poor seat back alignment, and your eyes can't see where the light is actually shining. The "I'm so cool" posture of reclining the seat back until the rear ledge stops you means you can't see in front of the car properly. (Granted, I'm exagerating.) But the point is simple, try a simple alignment first. It only takes one or two TURNS of the alignment screws on each headlamp to effect FEET worth of adjustment at the point of focus. Throw in that many "restored" cars haven't taken that into consideration and when replacing the lamps adjusted the adjustment screws to that area that shows the least amount of corrosion... while ignoring the fact that they removed the screws (all four) and stuck them in a bag, so there is a slim if any possibility that they're going back into the correct adjuster. It happens, and if you don't adjust the headlamps after you've re-assembled the car and set it up for every day use, there's a good chance your headlamps won't be shining where you think they are. I researched having my headlamps aligned on both the Roadster and the Z when I refreshed them. I found that very few mechanic shops even knew HOW to do it, or offered it as a service. Now this may be specific to Vancouver, WA (I didn't check all of Portland, Oregon) but my results led me to believe that this is something that is largely ignored. Don't think so? Next time you find yourself in front of a raised Pick-Up truck, with monster tires and suspension jacking it up so that it's bumper is about eye level with your Z, see if you can discern where his lights are shining. I find I use the "Night" feature on my Z's mirror all the time and sadly the Roadster doesn't have one, which is when I'm grateful the plastic window has darkened over time and "mitigates" the mis-aligned super beams. Lastly, when you've checked all that and everything is to spec and you still don't have enough light, that's when you should look into upgrading the lamps themselves. Do the basics, check the wiring, check the grounds, make sure there's adequate voltage supply and then get the bulbs you need for a wattage that is appropriate. A 100W may sound great, but it's illegal for use on the road/highway per the DOT of the states that I know of, and I'll wager that it's illegal in most states (with a possible few exceptions). I'll also further bet that if you replace them with new bulbs of the same or slightly higher rating (while still keeping within legal limits) you'll find that they're bright enough.... once they're aligned properly. FWIW my 2¢ E -
Ultimate Headlight upgrade: DOT Legal LED Headlamps!
EScanlon replied to Ben's Z's topic in Electrical
I agree with Arne. A military vehicle's beam pattern would be either extremely tight and defined or very wide and dispersed. Either one could be problematic on a vehicle that isn't worried about being spotted from the air or the side or needing to see every bush and obstacle on the side of the road. There was a reason that war time vehicles get their lenses masked and painted so that only a small tight beam can be seen. Aside from that, I can't help but feel that many of these deficiencies in headlamps may be solved by a proper electrical supply and a good alignment. The relays help the supply voltage, but if they're mis-algned, then you're either searching for squirrels /chipmunks or worse yet blinding other drivers. FWIW E -
Interesting bit of research. I used the Club's CD: The Microfiche (Section 121-5, H6) shows items # 60 & 61 (76910-E4100 & 76910-N3000 for 60 and 76911-N3000 for 61) with no revisions nor Use Up To dates given. That covers Z's up to July 73. It shows two part numbers and a discernible break in the outer seal. Then in Section 143-4, G14 it shows the 76910-N3000 and 76911-N3000 for items 68 and 69. That covers up to the Aug 74 2 seater. Again, same discernible break and two part numbers. Once you get to Sept 74 to July 76, in Section 143A-3 H2 do you find that there is an option for items 51, 52 and 53. Item 51 is shown as what appears to be one piece that includes both sides while there is also a reference to 52 and 53 as side pieces. The earlier drawings had a discernible "break" between the sides and top. As I read it, it wasn't until the 260's came out that they went to a single piece, but I may be reading too far into it. And additionally, the references to the "side" part numbers leads one to believe that they are different than the top piece. But.... Wick Humble's book shows ONE piece for the "Outer" seal (No part number is given) on page 223 item 60 and bills the schematic as "Up to July 73". Yet on page 167, his description of the Hatch Weatherstrip reads: "Weatherstrip-- Zs have a three-piece weatherstrip on the hatch jamb. The tubular segment goes across the top run. ... Continue down one side similarly with the plain strip and repeat..." (emphasis mine). So you decide. It wouldn't be incorrect to say that it depends on who believes what. Humble's editing of available information (he only included the one set of drawings) contradicts what he writes. FWIW E
-
If, unlike Nissan, you first apply some rust-protecting paint, then NO, you shouldn't have any problem. I qualify that shouldn't because rust protecting paint is only as good as the rust preventing process you did before paint. Too many people clean off the paint, tar, primer etc, shoot it with Rust-O-Leum and call it permanently rust-proofed. While that's a good basic protection, it's not the forever type of protection (by the way, there is no PERMANENT rust-proofing). There are various products out there, Zero Rust, Rust Mort, Rust Bullet, POR, to name but a few. Some depend heavily on preparation some depend on multiple coatings, some depend on top-coats, but ALL of them are at best temporary. The trick is to find and use the one with the LONGEST service life. Which one will usually depend on money and your willingness to do more than a simple vacuum and paint. But, if you apply a good rust-protectant, after a good rust-preventative process and you take care not to encapsulate water / moisture between the covering and the floor, you should be good for years. FWIW E
-
As has been mentioned, it's for hanging the shoulder belt. There should be a "D" looking loop on the adjusting part that takes up the slack of belt (once adjusted) and that's what slips into the clip. FWIW E
-
Jim the pieces you originally received are correct for an OEM replacement set. That IS the profile of the side pieces, yes, without the bulb. Many have opted to do as you have and replaced the side pieces with one continuous piece of weatherstripping of the center and upper section variety. It does seal better and does keep the moisture out of the hatch, however, it will drive those who abhor any modifications to the original design kind of batty... be prepared to be shunned over it. E
-
Does anyone know how to jump out the ignition switch on a 1974 260z
EScanlon replied to zdude1967's topic in Electrical
Yes, get the electrical diagram for your car and follow the wiring connections per the diagram. A step by step procedure on how to "jump out the ignition switch" is a subject a little too close to "how to hot-wire the car". As such, it's not a subject to be posting on and therefore closes this thread. There is also plenty of information available with a simple search. FWIW E -
Actually, as I look at it better today, it might be that you have a steering wheel adapter that MAY be useable with your newer/different steering wheel. If you look at the flange hub, there are 5 bolt holes which are possibly in line with the bolt holes on the steering wheel you're looking at / have. Since the main problem in changing steering wheels from the OEM to an aftermarket brand is the Adapter, you might be able to avoid that problem by using what you have. Also, sometimes you can use the old steering wheel bolted to the adpater and while pulling hard on the steering wheel have someone rap briskly on the steering column with a mallet or other non-marring hammer to remove the wheel. You do NOT want to deform the end of the steering column. Also don't forget to do it with a nut on the end of it as mentioned above, otherwise you'll literally "eat" the steering wheel. FWIW E
-
Boy, I hope that is NOT weld bead.... It seems like it could be the marks from a type of lock washer where the outside is smooth, but the inside edge (ID) is starred and "sawlike". Don't know the specific name for it, but it's a common type of lock washer used with steering wheels. Anyhow, if it IS what I presume, then you only need to use a standard pulller to pull on the large diameter flange while pushing on the steering column shaft. E
-
There is/was a kit available that had two extra rectangular pieces to fit under the seat between the front and rear seat mounts. I have that set and all those pieces are are rectangular pieces of carpet. They do "add" to the interior in making it a bit quieter. As to where they came from, alas, I can't help you. I bought my set used from someone on e-bay who had bought the cut pile set and did not like it (it wasn't the OEM style) and he decided to swap the set just a few months after buying it. My gain for his losss. FWIW E
-
Paint shop spoiling chances at bring car to ZCon 2011
EScanlon replied to bpilati's topic in Body & Paint
Bryan, sorry, you CHOOSE to sit at the bottom. Why do I say that? Because you're not offering the kind of incentive they need to do the job. What kind of incentive? Simple, MONEY. Go back to the shop, ask them for your bill and then mention that it has taken far too long and that you will be pulling your car and going elsewhere since this is obviously beyond their skill/ability level or that they're obviously too busy to effect the work needed. If they are or look relieved... you've done the right thing, get it out of "jail" now. If, on the other hand, they offer objections and claim that "blah-blah-blah", then ask them for a FIRM date based on a FIRM dollar amount. Then mention that any "slips" past that date will be subject to deductions from the amount they quote. And establish that amount up front and do visit them often. Then it's up to you to either accept their bid/date or not. But, and no offense meant, I'll bet that you've NOT been dilligently stopping by every week or so to check on your car. If you had, you would have bugged them enough to know that you were serious and wanted it done now. If you have visited however, then I wouldn't hesitate in pulling the car, they obviously aren't going to finish it any time soon. It's become a car they refer to when others bring in business as "We're currently "restoring"....." with the intentions of showing how "good" they are. 2¢ E -
I agree, that's the closest to "rust-free" I've seen in a long time. E
-
The rollers ARE sided, and though it's angled slightly upwards at the front, the axis of the roller is generally horizontal... i.e. perpendicular to the window pane's vertical movement. Additionally the clip will not let you mount it any other way, but unfortunately you CAN mount them on the wrong door (i.e. right side on left door, vice versa). E
-
You should also note that there are two notches on each door. If you get a second roller it can be installed in the rearmost notch, "stock" is in the front notch. E