EScanlon
Free Member
-
Joined
-
Last visited
Everything posted by EScanlon
-
His floorpans are the best, and although I haven't bought them myself, (no need), I've heard from dozens of folks who say the same. I was able to get my Chrome Headlight Covers from him when no one else was able to get them Regarding replacing the frame rails, don't go cutting metal out just because you may have heard there could be trouble there. First check them out, if you HAVE problems then address them, but if you're going to begin replacing metal just because it might have or might get rust, then just buy a new car. Many times there are repairs that can be made without having to replace all the metal. If your friend is knowledgeable have him look at it. All it might need is a reinforcement gusset that he can fabricate in his shop. 2¢
-
The ONLY difference you might note is that the 72 ~might~ have a small indent in the upper portion of the tank closest to the filler neck on the rear corner. This was the indent to accomodate the rear bumper shock absorber which began in either late 72 or early 73. 2¢
-
Since you've already replaced your OEM radio with a newer unit, it should have the automatic lead to power a fully automatic antenna. (Note: it's the radio that tells the antenna to go up or down) This is typically a separate blue wire lead from the rest of the wiring harness. (i.e. you'll have the two power wires and the speaker wire pairs all somewhat bundled or in the same connector, but the antenna lead will come out of the radio case by itself.) Personally, rather than trying to get an expensive OEM style or replacement antenna, I would go find a good aftermarket antenna, probably a fully automatic one, that closely resembles the original antenna. You'll probably spend a lot less, even if you were to buy the "top of the line", since an "expensive" aftermarket antenna here in the U.S. will be about $100, whereas the OEM antenna which I did buy (I'm using the original radio) cost me closer to $140. The original antenna used two wires with the chassis ground to either go up or down, MANUALLY via the switch above or to the side of the tuning knob. If you plan on using the original wiring to power the antenna keep this in mind as the newer antennas use two wires and it is the SWITCH that inverts the polarity of the current to actuate the motor in one direction or the other. Since you've already replaced the radio, it's not that much more work to run a pair of wires to the back of the car to power a newer style antenna which does NOT use chassis ground as one of it's "wires". Although you can use the original wiring, but you'll have to splice it into the harness behind the connector. Anyhow, hope this helps.
-
I hope this doesn't come off as too arrogant, but this is one of the BASIC things you MUST do with your Z. Remove the fuses, don't just visually check them, using some steel wool or a fiber glass contact cleaner clean the contacts. If possible replace the fuses or at least do a complete continuity check AND a physical integrity check i.e. twist the ends and make sure they don't fall off. This is the source of so many problems on the Z that it isn't funny. Dim Headlights, instrument lights not working, erratic performance, etc etc. Good Luck. By the way Brian, I'm only a few days away from having the Z back on the road.
-
Wick's book references it but no pictures or drawings given. The wiring schematic I have in several guises and that's how I was able to determine which wires both in front and inside the car to use to wire my fog lamps. Yes, I am using the original wiring, and I've put my fog lamp switch where the two switch parking light switch goes in the console. I'll be posting pictures soon. So far, I've gotten pictures of what the Parking Light Switch on the console should look like, but no one, as yet has had a picture or description of the Fog Lamp Switch. I'm still hoping. Your point on Charlie is very good, he just may have one. I'll also check out the website you posted. Thanks! Enrique Scanlon
-
That forward console cover is considered 72 and later here in the U.S., although some late 71's had the panel. The console that accepts this forward piece has the ash-tray located in the receiving cup for the choke / throttle assy in the early 71 and prior. The late 71's and forward did not have the hand throttle cable, and the choke cable was different. Again, this is for U.S. models, other countries probably differed from what I'm stating here. Thanks for the input. This is the best part of having people from all over the world. We've had input from the U.K., Australia, and the U.S.. What about some of our European Continent or Latin American members? Anyone from the Far East? Thanks guys!
-
You can get a pretty comprehensive kit from Sears that has both Metric and Standard socket sets in 1/4, 3/8 and 1/2 inch sizes. Both shallow and deep all in 6 point. About $120.00 Screwdrivers: Again Sears has a good set with most of the sizes in both Phillips and Straight. About $30.00 A good set of pliers; needlenose, regular, pipe (I maybe have the wrong name here). Wire cutters and Dykes. Vise Grips, 9" and 6" both in standard version and needlenose in the 6". Clamps, I like the various sizes of the QuickGrip line. Get at least 2 each of the smaller two sizes. Small Mag-Lite flashlight; a head light will also work. Safety glasses! or at least a Face Shield. Dust Masks! A 3.5 ton jack is sufficient. You can get a high reach or fast lift or heavier base, but there is a small compact unit at Sears with a case for about $80.00 TWO sets of Jack Stands. Trust me you'll find more times you want to lift all four corners of the car than you think. You can get the spendy ones at Sears or go to Harbor Freight Tools and pick up a pair for about $15.00 A good set of Metric Tap and Dies. Again, Sears has a spendy one, and yes they are the better harder sharper steel, but the cost is VERY high, usually starting at $90.00 for a basic set. Harbor Freight has a good 40 piece Metric set for about $25.00 It has almost all the sizes you need and the right pitches. Remember it's not only the size, it's also the pitch of the thread. A Dremel 395 Pro set. Just about any one of the packaged sets they offer. About $60.00 to $95.00 I prefer the 395 because it's variable speed up to 30k rpm, the digital one is nice, but the speeds are fixed and for the extra money they want.....I don't think it's worth it, about $120.00 Get the one with the most bits and pieces you can get. While you're at it, get several of the wire brushes, not only the cup, but also the wheel and the tip. A creeper, you'll be spending plenty of time under the car. You can get a real basic one from about $15.00 (on sale) to a real fancy one (about $150.00) with extra low pan, large wheels and an adjustable headrest. You decide. A Magnetic pick up tool. A three prong finger pick up tool. (the one you press, it expands three "fingers" they go around the item, then you release and it grips it.) Two or three different inspection mirrors, in different sizes. A set of padded knee pads. A gallon of Orange GoJo. A bundle or two of shop rags. A greasy rag can, so you can dump your dirty ones into and reduce the chance of fire. If you are careful you can usually wash your rags with lots of detergent, bleach and degreaser and they'll come out clean, although maybe stained. There, I've given you what I consider to be the basics. Granted I don't get into the grease mechanics, I'm an old body man, so check what the guys who get into engine work as well. Good Luck.
-
First off, loose your ballast resistor. Join the wires going to it. All that does is allow the engine to have 12v all the time instead of just when starting. That may do it. If you had already done that, then check to make sure that the black white wires going to the coil (which feed the dizzy) are NOT reversed. If they are, the dizzy won't work although the car will start and run. 2¢
-
I have the microfiche from here and it's a copy of the actual micrifiche. I also have a true blue microfiche. Neither one shows the items. Thanks though.
-
You can get new ones from Andy Russell (The Datsun Dude). E-Mail is z@datsundude.com Phone is 480-343-2962 Used ones are available, but usually for the time and effort you expend in cleaning them up and refurbishing them, it's sometimes cheaper to get a new one.
-
I went to an old harness I have in the garage. Sorry it took me so long to post back. Ok, the white / red wire has another wire connected to it about 9" up from the fuse box. This wire rounds out the connection to the ammeter and ignition. I guess, technically, it's superfluous but in my opinion you should restore it as well. The wire that connects to it connects to the other half of the wiring harness that connects to the fuse box. Let me explain, as that may seem muddled. The back of the dash actually has 2 complete wiring harnesses that connect everything together. They interconnect at several places, most notably the ignition switch and the fuse box area. The white / red wire connects to the engine harness at two points via each of the two harnesses. One with a stand alone single wire connection and another on the other harness as part of a 6 wire connector. The T connection at the fuse box area connects the two harnesses together. Hope this explains it.
-
Do you have the item number? Maybe I can download and blow up the picture to see if it shows the switch. Thanks
-
Ok, someone shoot Z Kid for everyone else that shuddered at the thought of parting out that car for the damage it shows. Yes, it's nasty, but it doesn't look as though you should junk her for it. The front fender can be obtained from a donor car, the rear fender can be either straightened out or again grafted from a donor. What condition are the rocker panels and rails? That's more of an indicator. Hope you fix her.
-
While locating the pictures of the two styles of tail lights, I came accross this other picture of another style of tail.

-
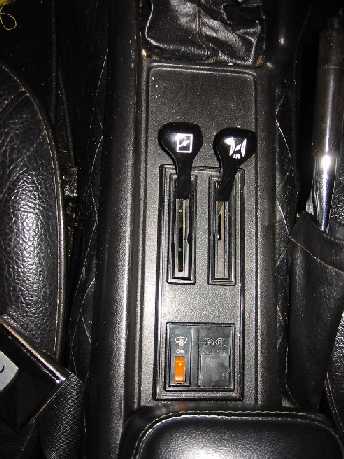
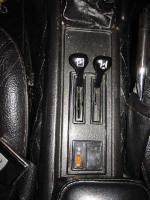
Ok, now you guys know the light I'm talking about. It took me some time, but I finally had someone respond and tell me that these are lights that get turned on when you park your car on the street, i.e. curbside. And that you must illuminate the side of the car which is on the street side versus the side walk side. I'm not sure about the reasoning for this, but that's the story I was given. So, that means a double switch. The location of that switch is on the console. At least on the EARLY 240 consoles. Here's a picture of the panel on the console I am referring to. You will note that this car has the Choke, the HAND THROTTLE, (which is a SELDOM seen item in the U.S., although not non-existent), the second generation Rear Window Defog switch, (because it's the illuminated variety, the first generation had a non-illuminated switch), and lastly, the space for this parking light switch I'm referring to. Note that the hole has been filled in with this 1" x 1" black plastic plug. This is the same plug that I've seen on dozens of 240's. What I'm hoping to get out of this post, is that someone will be able to post either a picture of the ACTUAL switch, so that I can try to find a similar, OR that someone will admit to having a spare or knowing where to get one and willing to help me obtain this. Thanks in advance.
-
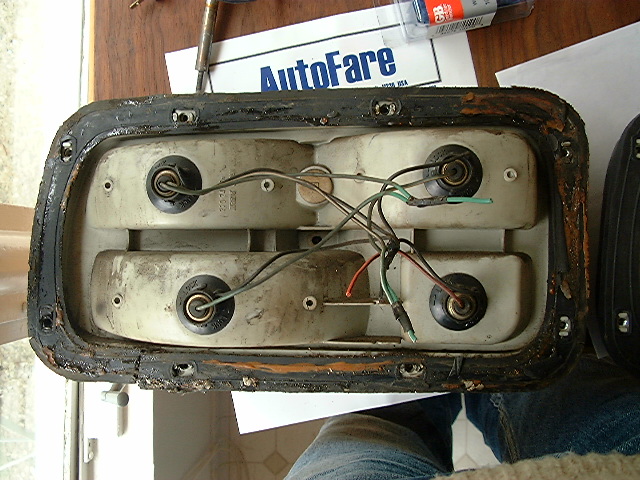
Now take a look at this light, which the original owner referred to as a Japanese Tail light. Please note the ADDITIONAL bulb wiring in the top center.

-
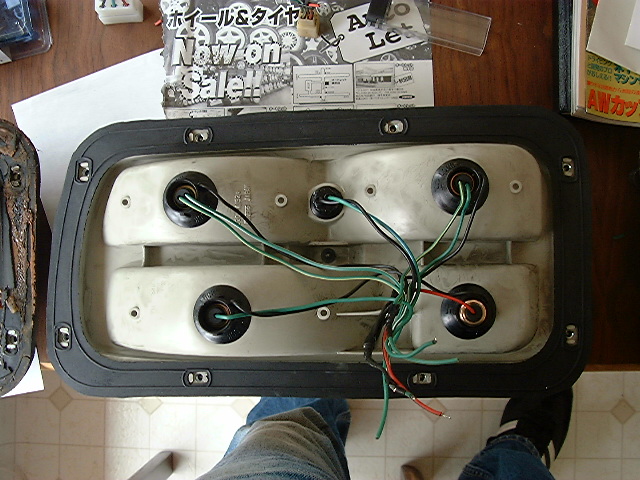
This is going to be a couple posts long in order to post pictures and explanations. If you look at the rear tail lights on the 240, you will note that there are actually 5 bulb openings, not just the 4 everyone is aware of. This is even more evident in the two pictures I'm posting. The first picture is the back of a set of tail lights from a U.S. car. Please note that the wiring is for 4 bulbs, but that there is a gray colored plug in the middle top, between the two bulbs.

-
The one that mounts on the throttle / choke panel on the center console to the right of the Rear Window Defog switch on the early 240's.
-
The one that mounts on the dash above the Hazard Light Switch. Thanks in advance.
-
Another of those never seen in the U.S. items. The parking light switch that mounts on the early 240 console (70 to 71) which operates the separate right and left parking lights (actually that extra bulb in the tail light, and I presume also on the front light), is an enigma to me. I've heard what it does, but I've not located a picture or anyone that can describe it. If any of you Aussies or U.K. folk have a picture, or better yet a working spare that you would sell, let me know, I'll pay the shipping. Thanks in advance.
-
This is addressed to our members who don't reside in the U.S. as I've not met nor heard from anyone in the U.S. who has seen one. In fact probably Alan in the U.K. will know. Thanks in advance. The Fog Lamp Switch, the one that is supposed to mount above the cigar lighter on 70 through 72 240 Z's, does anyone have a picture of what it looks like? Better yet, anyone have a spare one they're willing to sell? I'll pay the shipping! Any information would be appreciated.
-
With the latch cable broken, unless you can get underneath the car, reach up and around the engine / transmission and then stick your finger or screwdriver into the latch mechanism to actuate it, you'll have to do what zedrally mentioned. At the front, behind the grille remove the four bolts holding the hood / bonnet to the hinges. Once you've done that, get a piece of wood to push up on the hood as far as you can raise it without damaging the paint on the hood or the cowl. Then, from either side, with a 10mm wrench (not a socket, not enough room) remove the mechanism from the hood. Notice I said to remove the latch from the hood / bonnet and not remove the latch from the body. The reason for that is that the safety catch will still prevent you from opening the hood. By removing the two bolts holding the latch to the hood, you'll have freed the hood completely and can now either lift it off the car OR re-attach the hinges. If you're working by yourself, it's tricky and wieldy but you can remove the hood by yourself. If you don't have a lot of forearm strength though, I wouldn't recommend it. Once you've opened the hood / bonnet you can repair / replace the cable. Check the cable to determine what actually happened. Did the little lead ball finally fall off, or did the cable break? If the lead came off, you can adapt a bicycle cable stop (collar & screw) for brakes to do the job. If the cable broke, now it gets more difficult as the mechanism for the handle holds the other end. It's easiest to find a replacement cable. Hope this helps.
-
Although it may seem ludicrous to repair the lighter assy, it is in fact easy. The lighter assembly is comprised of 3 parts. The Holder has two parts, the inner sleeve, which surrounds the lighter itself when it's inserted; and the outer sleeve which clamps the inner sleeve to the dash or bracket. The outer sleeve is attached to the inner sleeve either by a nut at the back which screws onto the inner sleeve, or by the outer sleeve having threads. The outer sleeve exists in two variations, one has a light bulb holder that attaches to it, and the other does not. Typically, the sleeve with the light bulb is used on the dash, and the one without is used in the console next to the fuse box on early Z's. Both of these have a wire soldered or riveted to the side to provide ground. Although it may be grounded by contact with the metal hardware that holds it to the dash or bracket, it is a very good idea to provide a direct ground for it, due to the high resistance / current the lighter draws. There's a reason why it has it's own fuse. The inner sleeve is the one that holds the lighter both before, during and after heating. (I know kind of obvious) The inner sleeve has a U shaped clip at the bottom which grips the resistance coil housing on the lighter and keeps it held until the coil heats up and causes the U shaped clip to expand and release the lighter. There are also 2 to 3 pressure tabs that grip the lighter along it's sleeve. The U clip is the positive electrical connection for the lighter. The body of the inner sleeve, via contact with the outer sleeve provides the ground. The lighter itself, although addressed as a single part, is actually two, the knob and the lighter heating element and sleeve. To repair the lighter itself you simply buy a new heating element or knob. The sleeve is part of the heating element. The sleeve has a spring which allows the resistance coil to extend outwards to contact the U clip on the inner sleeve. Additionally the sleeve also has a groove along it's circumference for the pressure tabs on the inner sleeve to grip. Over time, the typical failure of these lighters is either the heating coil burns out or the inner sleeve's U clip or pressure tabs loose their spring and no longer hold the lighter. To repair the heating coil you buy a new element. To repair the U clip, as long as it's not broken, you bend the wings on the clip in so that they will grip the heating coil. Just be careful of this as it is possible to bend them in too tightly, which will result in the lighter NOT popping out. The last one, the pressure tabs are the ones that grip the lighter sleeve so that the lighter doesn't fly out of the holder. To repair these, again you re-bend them in so that they grip the sleeve more firmly. Although it is difficult to over bend these, it will make it harder to remove the lighter if you over bend. The repair you need to make is to tweak those pressure tabs into the center of the inner sleeve so that they grip the lighter more firmly than they currently are doing. You can do this with the lighter in position as long as you make sure NOT to touch the U clip at the bottom. If you do, you will definitely short out the lighter with all the ensuing problems of an electrical short circuit. Sorry for the length of this, especially for so simple an item as a cigar lighter, but hope this helps you guys. Enrique
-
This is a perfect example of why you need / want to get the Parts Microfiche that is for sale here. By looking up the individual models you can readily compare the part number. If they're the same, then bingo, they'll work. The first part of the part number is the same, what seems to change is the suffix, which is the color code. You may find that as Daniel pointed out that some of the other parts also have to be changed to accomodate the different year panel. If you're changing the panel due to availability, be aware that you CAN get the correct ones for the early years. Hope this helps, but do yourself a favor, get the CD from Mike here, it's definitely worth it. 2¢
-
Tracing down the reason a wire shorted out can be a real spaghetti pull festival. The White / Red wire you mention is the main feed for the fuse box as well as the Ameter in the dash. These are critical as they run the rest of the options attached to the car. While you may still be able to run the car, (the ignition circuit has it's own separate feed from the White /Red coming from the battery) you are in definite need of repairing this. First of all, determine if the cigar lighter wire was the one to short. To determine this, look at the condition of the wire itself. If it is just melted, as you describe the W/R; as opposed to Fried i.e. crispy burnt; then it may have just overheated due to proximity to a wire that overheated. A crispy burnt wire is a prime indication of a short. Since this was to the cigar lighter, it isn't inconceivable that either a piece of metal or something fell into contact with the inside of the holder. This would definitely cause what you've mentioned. By the way, although the end of the cigar lighter has a screw for it's connection, that is not the mounting screw. The cigar lighter typically is held onto the bracket (if by the fuse box) or to the dash (if above the hazard switch) by the two parts of the barrel. There is an outer barrel, with ridges, typically the yellow zinc plated color, that slides over the inner silver holder. The silver holder will usually have a chromed or polished outer rim. The outer barrel holds onto the inner via either a nut at it's back end or by screwing onto the inner. The ground for the assembly is usually soldered / riveted onto the side of the outer barrel. The electrical connection at the center of the inner barrel is for the hot wire, or positive. Sometimes, there will be a small housing on the outside of the outer barrel to hold a light bulb. This bulb is to illuminate the holder when the lighter is out of the housing and the lights are on. To short out a lighter all you have to do is drop something that will make contact between the clip at the bottom which grabs the head of the lighter itself, and the outer wall. This can also happen if someone forces the lighter in and bends the tabs on the clip until they contact the outer wall. To repair what you've already encountered, I would replace the melted and fried wires as far back as they are damaged. Make sure you use wiring of the same type and gauge. Don't substitute solid strand for stranded,don't step down from 16 to 18. The opposite of these aren't as bad, as a general rule, you can sub stranded for solid and go from 18 to 16 gage but you need to be aware that you CAN change the dynamics of the system. The ~IDEAL~ solution is to find a complete wiring harness from a donor car, as this way you can correct many problems. Just be aware that there ARE subtle differences between the years as well as automatic and standard harnesses. Hope this helps, feel free to ask further questions. Enrique