EScanlon
-
Posts
5,117 -
Joined
-
Last visited
-
Days Won
2
Content Type
Profiles
Knowledge Base
Zcar Wiki
Forums
Gallery
Events
Downloads
Store
Blogs
Collections
Classifieds
Everything posted by EScanlon
-
You're most welcome. E
-
Use the dry ice technique on the tar mat. It works QUICKLY and it removes the majority with a simple rubber mallet strike. Get the dry ice from an ice cream shop. Baskin & Robbins is usually a good place to find it. Put it in a rag or heavy plastic bag and lay it on the tar-mat that you want to remove. Wait a couple of minutes (it doesn't take long) and then give the metal a quick rap with a rubber mallet, ideally from the other side than the tar mat, but even on or near will usually do. The tar-mat will usually shatter like glass (it has hardened because of the cold). Move on to the next area. Then you can scrape off the little pieces that may have survived this process and then clean up the rest with Mineral Spirits. FWIW E
-
As mentioned, pictures will go a long way towards giving you a good guesstimate. How big a patch (and a floor pan replacement IS a patch, just a bigger one) will depend on just how much has rusted beyond repair. Surface rust can be cleaned up, but pitted rust is an indication of a bigger patch needed. Pitted rust next to a rust-through hole is just more metal that should be cut away. If you still have the tar-mat on the floor pan, you may want to remove it and get a good look at what the metal is ACTUALLY like. I've seen floor pans with the tar mat that looked good until you removed the tar mat, then serious cancer. By the way, a small patch fashioned by a competent welder is an easy fix. Replacing a whole floor pan is more involved and expensive, but the end result is you don't have to worry about the integrity of any repairs. FWIW E
-
takes about 20 tries until it car starts...but rough idle
EScanlon replied to raltz's topic in Help Me !!
Yes, this forum is on. However, what isn't is your description which is what Bruce was asking about. Cranking but not turning over... kind of like standing while sitting down, it just doesn't "compute". If it cranks, the starter is engaging and the engine is turning over. Trying to trouble shoot the starter is to take a step backwards. That's why your post is confusing, how can it be cranking but NOT turn over? From this post and the others, you're busy attacking it from several different fronts, probably compounding the problem from any one of them. You need to be a bit more systematic and dedicated on ONE front, before going on to the next. If you mess with the electrical, then switch to the fuel, then to the starter, then back to the ... you'll never get anything aligned properly and you'll frustrate yourself, as your last post shows. I'm not the one to answer your questions as I'm not a mechanic. You may want to take a minute and describe fully each step and not use terms that mean something else trying to simplify your description. If you can hear the starter motor running, say that, not that the car cranks, because cranking means something else as explained above. FWIW E -
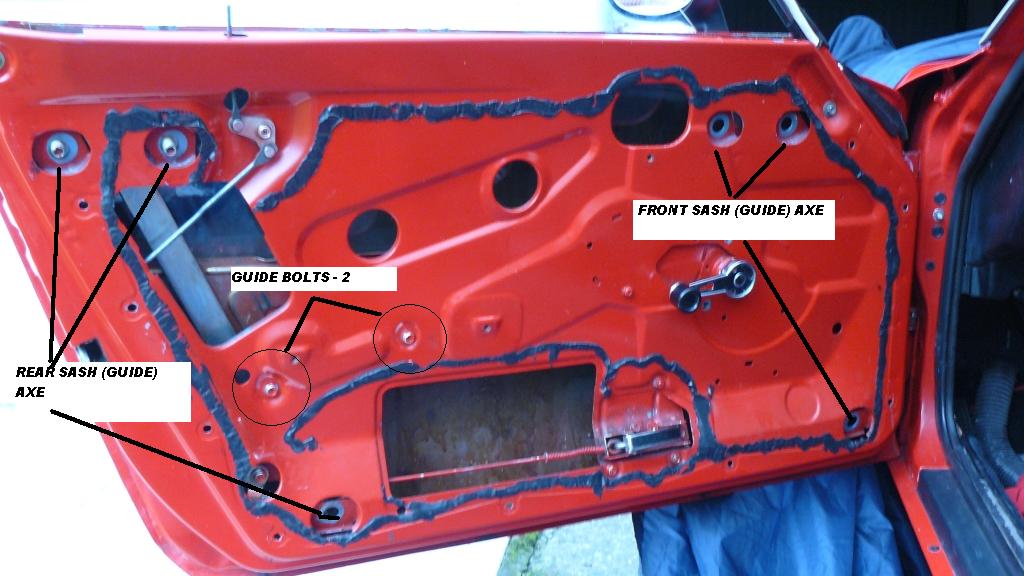
The two bolts circled hold the GUIDE CHANNEL to the door frame. Removing those will allow you to remove the glass from the door and then have access to the mirror bolt. Here's a link to the Factory Service Manual for a 74 260 (the only year the US had the 260), but it should help you find Nissan's instructions on removing the door glass. (The link will download a file.) http://www.xenons30.com/files/FSM/1974%20260z%20FSM.zip However, the diagrams for the door are the same as for the 240 (Section BF). This link will download the 1979 280ZX Factory Service Manual, and Section BF page BF-11 shows a door panel more like yours. This one may prove to be a better help to you: http://www.xenons130.com/files/1979%20280zx%20FSM.zip Hope this helps; A bientôt Enrique

-
Before you start disassembling relays, or other items: Look at the BACK of the Steering Wheel Hub, the side closest to the dash and opposite the horn "cap". There is a brass arm that rubs against the contact plate on the back of the steering wheel hub. When you replaced the Steering Column Shroud/Clamshell you might have inadvertently bent that little arm AWAY from the steering wheel, if so, there is no way that the horn switch is getting power and therefore no horn. If that doesn't do it, check for the Green/Black wire that connects to the Steering Wheel Hub. You might also check the fuse. Yes, there is a fuse for the Horn and the horn only. It might have blown if you replaced the horn button and it sparked. FWIW E
-
Also be patient. Between noon and 2 pm Pacific is when most of the residents here are either off working or taking their mid-afternoon siesta. E
-
Bon Soir Hendrik. Je parle français un peut, mais pas bien pour me fair compris. It is not necessary to disassemble the door completely. You can either a) remove the glass or roll the glass all the way up and then carefully put your hand on the nut to remove it. The last two pictures you listed P1000683 AND 684 show the front and rear part of the door but not the center part of the door. From those pictures I can see that you have part of the window crank mechanism removed (there are two screws missing from around the crank handle) which is NOT necessary, and will cause problems with removing the glass. To remove the glass, there is a SLIDE (similar to what you refer to as an axe, but called a Guide Channel) in the CENTER part of the door for one of the LEGS of the SCISSOR LIFT mechanism. Remove that slide from the door, which will allow you to tilt the glass and then slide it out of the door. You may also want to remove the FRONT "Axe" (Sash) to release the nylon guide at the front of the window glass. My Haynes book describes the procedure in section 12.11, page 201. I do not know if the version you are using is in French and therefore on a different page number. Alternatively, you can raise the window all the way to the top, AFTER replacing all the screws you've removed so far. Then carefully work your way in there to remove the mirror. If it's the standard mirror bolt it's probably a 10mm wrench/ socket you will need. Hopefully, this makes sense and it helps you. Enrique
-
Sorry Dennis, but I think you missed the key word. Annoy is to disturb or to irritate. Disturb is the second descriptor under the definition of molest in the dictionary I used. As such, DISTURB is more the key word in this use as a vehicle can't be said to be irritated. Disturb has several indexed definitions, but in brief: to interfere with; to alter the position of; to break up or damage; to destroy the tranquility or composure or; and lastly to throw into disorder. With those definitions added to the mix, I would agree with your basic definition: But I would mention that those using this term in regards to cars in general would be hoping that you would infer that there have been NO Repairs or Replacement effected at all other than standard maintenance items (oil, tires, etc.). 2¢ E
-
Ahh... you're an enlightened scientist... that is, if it doesn't match your idea of what it's supposed to mean then it's inconsequential. That is, ignore the facts if it contradicts your hypothesis. 1) Different diameter exhaust tubing is used to allow for less back pressure. Less back pressure means that the exhaust isn't being pushed out with as much force towards the air turbulence behind the car. 2) My theory as you put it, is that your translation is off ... which it is. YOUR theory is that the length of the pipe in your non-stock diameter exhaust pipe in a STOCK location has no effect and therefore that's why you don't smell fumes. But your theory is based on your ignoring the effect of the spoiler, which by your admission creates more negative pressure behind the car. More negative pressure and less exhaust pressure and you have the reason you're NOT smelling fumes. They're being blown away by the shear forces behind the car. 3) Yes, you're right... by disrupting the air flow over the car. 4) Not if you are capable of logical thought. 5) I'll agree with you there. That is the main reason that so many people do have a problem with this. But, the extended pipe still proves to alleviate the problem for many. The design of the car is such that there is a vortex of turbulence behind the car. That turbulence traps the exhaust behind the car so that at certain speeds the vortex actually engulfs the rear section of the car. Any opening into the cabin (which is at a lower air pressure than the vortex) is literally sucking that exhaust rich air into the car. The extended and downward pipe puts the exhaust on the lower and outer portion of the vortex, allowing it to dissipate more than if it's positioned near the middle of the vortex. Congratulations on being a long time Z owner. Have you been Arizona the whole time? Maybe the reason you've not noticed the fumes is that you're mostly running with the A/C on, and the windows closed. Which would explain why you only notice the fumes when the car has a leaky cabin. If the cause could be effectively pinpointed and the solution(s) documented then maybe this wouldn't be such a divisive subject. As it is, it's mostly conjecture based on individual, non-reproducible results. I've never smelt the fumes in my Z, with a straight stock length tailpipe, without a spoiler, air dam or skirts, window(s) open but with both hatch and side window louvers... could they be the proper fix? You can choose to argue it, but the theory is far from being properly phrased, let alone solved. I will agree that properly sealing the cabin is of the utmost importance, and probably the single most important preventative measure to avoiding the fume problem. But some supposedly still encounter problems, so go figure. Let's not get this thread closed. We can agree to disagree, but insults or expletives are not required. E
-
I suppose if you choose to ignore the effect of that ice scraper you're using for a spoiler AND the increased diameter of your tailpipe in your hypothesis regarding length of tailpipe NOT having an effect on fumes in the cabin then the theory might be .... naah... the translation is off. That spoiler changes the air flow behind the car considerably. I believe that that is the PRIMARY reason for putting them on, to change the air flow. I'll bet that the spoiler is more likely the reason you're not getting fumes than the length of your tail-pipe. The discussions regarding exhaust fumes in the cabin, the causes and solutions have been going on for years. Spoilers AND / OR length of tail-pipe have been tried all with moderate success. So have louvers, both side and rear window, as well as front/rear/side skirts, all to some measure of success... or at least that's what's been reported. Of all the ones that have been written about, and you can do a search here, the downward pointing tail-pipe that's been extended just a couple of inches (just to knee scraping protrusion) is the one that's (purportedly) worked for more people. 2¢ E
-
And to those who used and due to circumstances STOPPED using armor all for a short period of time.... cracks galore. Ruined one dash of mine and also others that I know of. This discussion has been argued before sometimes to vitriolic content. Those who use it religiously AND don't miss any applications (hence the addicted to heroin similé) report that "everything's fine" and that they have no problems. I'm willing to bet that their dashes are NOT regularly exposed to the sun's UV rays, and that they shudder at the thought of missing a "fix", for fear of the dash cracking, but.... you can see where my thoughts lie. I personally like the new 302 Protectant being sold. Although it's a relatively new product, friends who have hot-tubs outdoors and have been using it for years report that it has worked well for them for YEARS. To me that's a good endorsement. Then again, I use a dash cover other than at shows, simply to ensure that my dash lasts as long as possible. But, the thought that it IS 40 year old plastic technology is a very sobering one. Find the best product you can afford and use it regularly. A note regarding the silicone oil technology. I've read that the original formulation for Armor All and other silicone oil based protectants used a variation of the silicone oil that would bond to the plasticizers in the plastic, and that when the silicone oil would leach out / evaporate / gas out, it would further extract those plasticizers it had bonded to. This was the biggest reason that at one company I worked for, that sold PVC Strip Curtains that we would specifically discourage the use of Armor All on the clear PVC. The biggest reason was that it left the PVC cloudy and could cause a traffic hazard, but also because it aged the PVC faster and warranty issues came into play. My 2¢ E
-
Post your car info, it helps to pinpoint problems. E
-
emphasis mineNo, and don't put words in my mouth. Misrepresentation puts a different spin on things. That's what false advertising is all about. If the item was intentionally (tricky to prove by the way) misrepresented, then it's fraud ... period. Not much more can be said. If it is unintentional, then a simple offer to refund would suffice. Or in the case of a business, a price reduction to what the item's actual selling price would be. (Interesting to note that when someone gets the better part of a deal, they're NOT going to come back and allow the seller to charge more.) However an individual who is not in the business of selling parts or wouldn't necessarily know the selling price of the lesser item shouldn't be forced to accept the price reduction tendered by the buyer. The buyer is not going to offer an equitable price. It would be up to the seller to decide what would be correct. If the buyer doesn't like it,, then get a refund. But, and this an important but, if the original advertisement or offer for sale SPECIFICALLY expressed that there is/was some uncertainty as to the item's actual or supposed characteristics, then it's up to the buyer to ascertain whether it meets his purpose and/or whether it is or isn't what the item is purported to be. And at that point, if the item proved to NOT be what the buyer thought it would be... then YES, tough luck. However, let me turn it around on you and see if it isn't an unfair question both ways. Are you saying that if the item is misrepresented / mis-identified and instead of being a lesser item (as apparently an R-160 vs an R-180) instead it is a highly desireable item such as a Racing LSD, would you go back and offer to pay the seller MORE money for it? I'll bet you don't even let them know. A FAIR transaction is fair, regardless of which side of the transaction you are on. If it favors one side over the other, then it's obviously NOT fair. In this specific example, only the seller is explaining his side. The buyer could just as easily be lying as to the identification of the differential. So, have the guy return it, and get his money back. Wonder if he would accept that? That would be the true measure of his dissatisfaction. E
-
Nor a rebate if they found it cheaper elsewhere or have a bad case of buyer's remorse. I believe they call that CAVEAT EMPTOR! If he b!tches, have him read the fine print on his receipt.... which I'll bet you did not give him, and he also failed to provide a purchase order, in which case simple contract law applies: Offer, Consideration, Acceptance. That he used a proxy to take delivery of the item does not void that. You offered it for sale, he gave you money for it (consideration), then he took delivery (acceptance). Contract/transaction finished. Unless you modified that with a written receipt detailing your return policy or price guarantee, and/or he provided a purchase order that specified the condition, price, warranty he expected you to fulfill; THEN he has a case. If not... as my sister says: "Tough Beans!" In my opinion, if you are looking to "save face" with this individual... for whatever reason, THEN pacify him. If you are NOT looking to save face, tell him to take a long walk off a short pier. If he tries to slander you, remind him that THAT may be actionable in court (that's where you check with a lawyer and take his pants away.) JMO E
-
When the POR is just about set (they refer to it as finger drag sticky) you can give it a shot of paint that will adhere firmly to the POR. Alternatively, wait till it sets then use one of their primers. Tie-Coat allows build-up and sanding, Self-Etching doesn't build but does etch into the POR. Both will etch into cured POR so having to scuff/sand the POR isn't necessary. Depending on what you want as your final surface finish to be, you have options. FWIW E
-
And you may also want to extend that drain hose OUT from the car. Look in my gallery. E
-
But USE A RESPIRATOR with POR. E
-
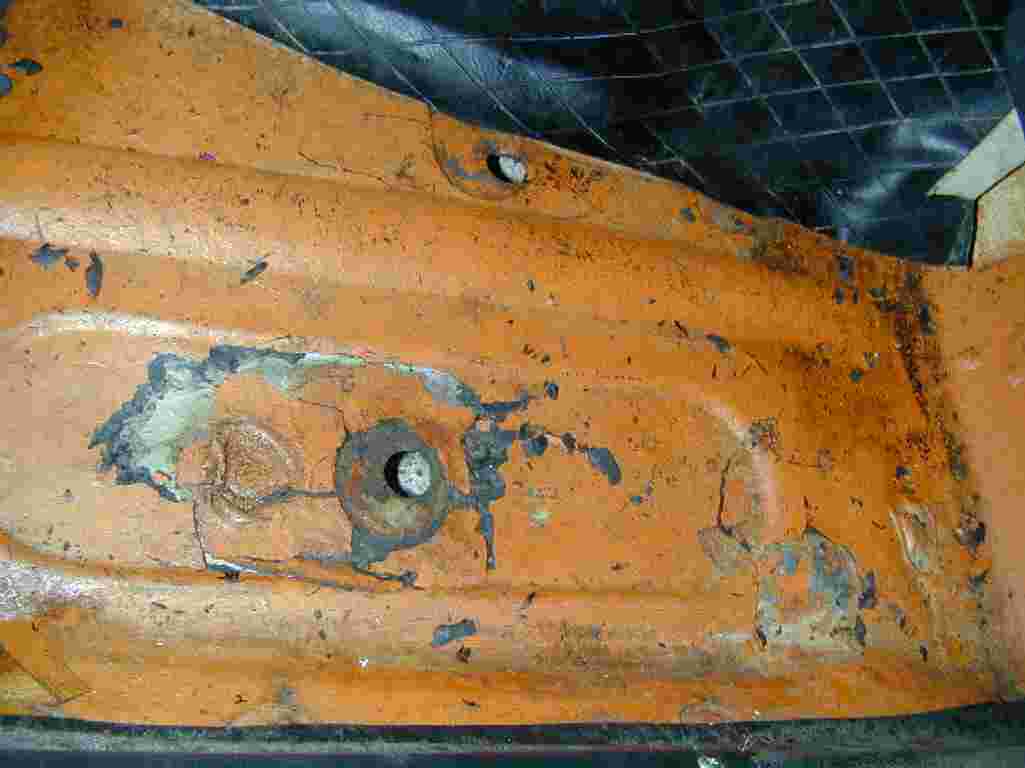
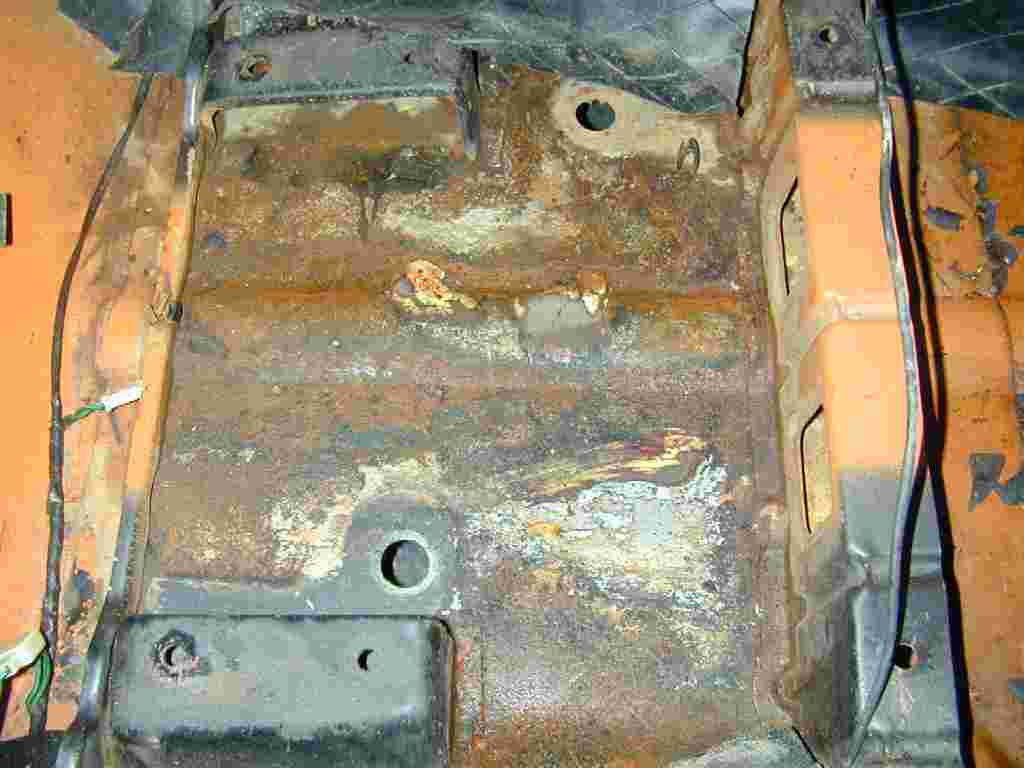
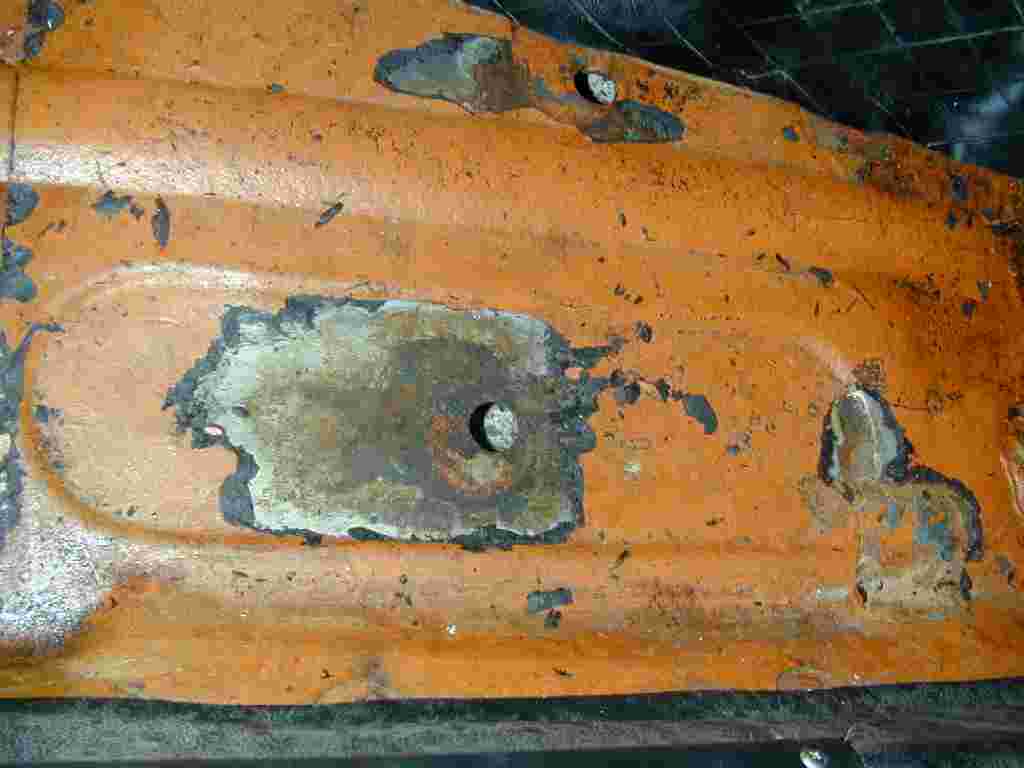
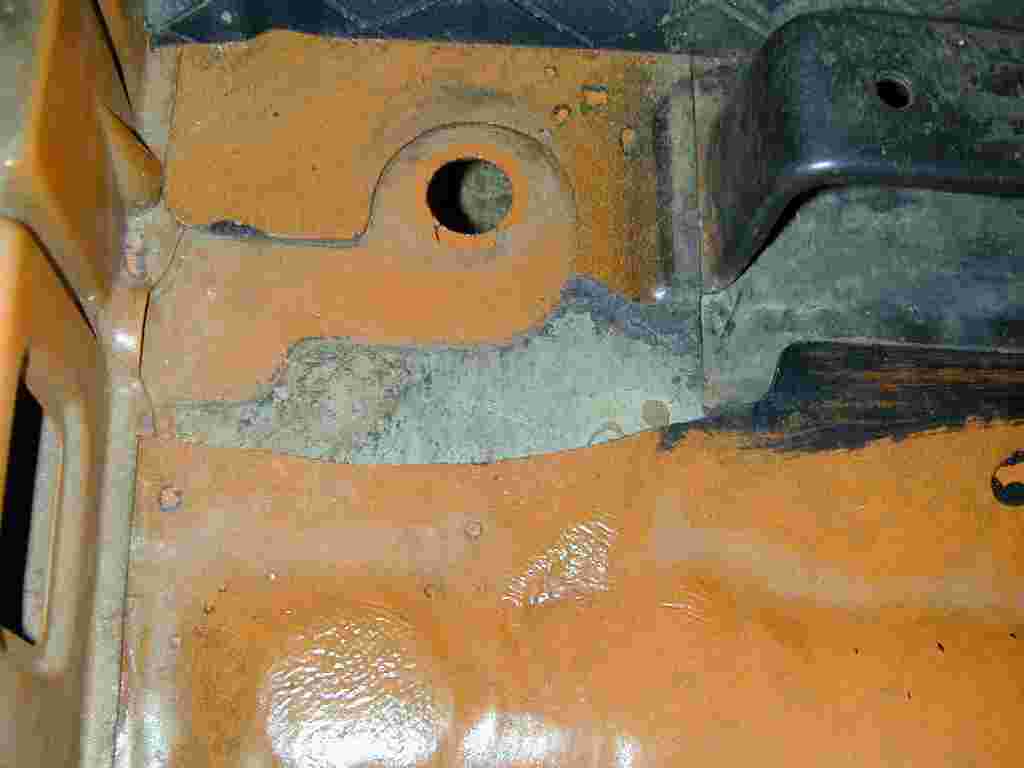
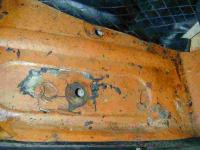
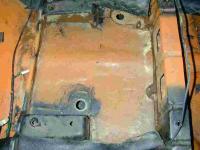
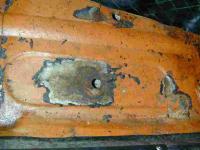
You definitely want to look under the tar-mat on the floor. NOT doing so could be a MAJOR mistake. Don't forget that the tarmat on the floor pan was applied before the car got painted. This as NOT a good procedure as 40 years later proves. As a result what appears to be relatively rust-free is NOT. I've attached some pictures showing what I mean. As you look at them remember that the car seemed to be relatively rust free, and chipping away at some of the tar-mat revealed clean rust free metal in more than one area. Then further inspection revealed.... Lastly, after painting with POR, you may choose to re-apply the tar-mat or another sound-deadener (they're all pretty much the same). As such, you may choose to forego painting and save a couple of bucks. FWIW E


-
But I don't think your rust is isolated to just that rear section. I'd pull the seat, and then the tar-mat to see what's underneat the tar. I'm guessing that the rust you're showing is from STANDING water, which means it WICKED under the tar further forward. Meaning that it was water/humidity that stayed in contact with the metal for a LONG period of time. Not trying to burst your bubble, just being factual. E
-
Mark (260zinsd): no need to quote the complete post when replying. It IS helpful at times, but when the discussion is pretty linear (i.e. question, answer, question, answer) and you're not getting 23 responses for each question, the extra text from the quote can prove annoying and wastes both server and page space. When you ARE getting 23 responses, then just copy the salient points, or as I did, address it to the individual. Mike (mikes z car): Don't know what kind of 240 you were driving with a trouble light that would pulse as you mentioned, unless you mean the one in the engine bay and you were driving without a hood. To my knowledge, none of the 240's had an alternator light, they all had an Ammeter. But, your explanation does have a certain air to it.... What's the expression, if you can't dazzle with brilliance.... Sorry, couldn't resist, no offense intended. E
-
Starter fluid in the air intake, if it starts and runs even for a few seconds, then you know you're not getting fuel to the engine. E
-
You've got an electrical short. E
-
Please help fuel guage not showing proper fuel levels
EScanlon replied to raltz's topic in Help Me !!
Raltz, the reason for my questioning your first post's validity is that many of the references you were making to wiring, parts etc. were similar to those that have been used by other prank posters to incite arguments and make members mad or angry. Even spammers try to sound "on topic" while just looking to spam. Trying to help either one of those is a waste of time. To help you: 1) the Fuel Float Sensor doesn't have any wires coming out of it. It has a pair of "T" style connections that a locking spade connector connects to. One is the large size, the other is the smaller size. The two wires that connect to it are a Yellow and a Black. The Black is a ground connection. 2) the Fuel Pump receives it's power via a Green wire, and it's other wire goes to ground. 3) Have no idea what/where the Blue wire you have goes to. A WAG would be that it's the lead from the fuel pump that then gets the Green wire connected to it. Get the wiring schematic for your year car and much of this will be much easier to trace and fix. FWIW E -
Actually, it depends on whether you're trying to restore OR refresh/rebuild the car. The difference is that in Restoring, you HAVE to find the original OEM / OEM style hoses, or as close as possible. The further you are from the original style will cost you points (AFAIK) at a concours meet. If on the other hand all you are looking for is proper functionality, then just use the appropriate fuel rated hose for anything that comes into contact with gasoline or fumes and heater hose for those which come into contact with the coolant. FWIW E