EScanlon
Free Member
-
Joined
-
Last visited
Everything posted by EScanlon
-
Or use a pair of vice-grips, one on each hose. Problem is that many of these hoses are ancient and the vice grips may crack what you have. Like Walter says, drain it first. Even then you'll have some spillage onto the floor, so keep some rags handy. E
-
You do NOT want to do much stretching. If you do, you run a good chance of the vinyl not laying down properly and in time may come unglued and then "snap" back to it's original dimension. You want to pull it taut and that will require pulling, the problem comes in when you use a heat source as that will allow the material to stretch. 2¢ E
-
Wouldn't the eroded vanes result in an engine OVER-heating and not UNDER heating which is what his original (now resolved) complaint was? 2¢ E
-
My first thought was that your thermostat was stuck open, or not installed. The Fan's clutch was mentioned, which if the thermostat was functioning properly wouldn't have that much effect. Are you sure all six cylinders are firing? You may be "running" but you may not have all six working. It's a WAG, but.... The last suggestion I have is similar, have you had the carbs balanced properly? Just another WAG. E
-
When I was replacing one years ago, I found that Allen Hex Head screws were readily available. Granted you lose the ease of using a straight edge screwdriver, but you gain the ease of finding a source. Don't recall the size or thread pitch, but I used a tap from my tap/die set to determine which one. FWIW E
-
Of the people that have done the 73 HCP change over, AFAIK all have done it to gain the illumination on the HCP's face. Connecting the extra bulbs shouldn't be a problem as there are a couple of extra connections back there on the dash harness that you can either use as is, or connect two or more leads to. (AT gear selector bulb for one) Unfortunately you had a hard time of it by piecing the "kit" one item at a time. Best advice for others is to obtain the 73 HCP COMPLETE, and include the bellows you refer to. The complete assy. should include the cabling, the light shrouds, the bulb holders and wiring as well as the knobs on the levers and rotary switch. FWIW E
-
Randy; Check with the Paintless Dent Removal guy before you remove the headliner. He may not need you to remove it. Removing the Headliner is a major PITA, especially with the early style you have (perforated and textured). The method involves literally scraping it off the roof metal AFTER prying out the edges from underneath the roof and windshield supports. FWIW E
-
How about a simple car wash? Or if the car isn't driving yet, a hose and a bucket of suds. You don't need to get all fancy and such. The ants don't cruise the neighborhood and pick where they nest, it was the queen ant that landed on your car and found enough detritus to make a nest in and a few days later... voila! Ant Nest! Wash the car, use the high pressure setting on your sprayer, shoot into the crevices, the cowl, the underside etc. and that should hopefully get them or the bulk of the nest. If this is something that worries you about doing.... then you may have bigger problems than an ant nest. 2¢ E
-
Or it may be that the knob that rotates the contact on the rheostat has broken off the plate and that is why he only has the dim setting. If the Rheostat had burned out, or the wipe contact had bent out of shape and no longer contacts the spiral wound wire he wouldn't have any dash lamps at all. The pictures that Terrapin Z provided show the rheostat well. Those two phillips screws and the knob on the underside need to be removed before you can push the rheostat UP into the backside of the dash to remove it. Part of the problem in pushing it UP into the backside, is that the Tach itself, and the Hazard Switch wiring can get in the way. Mike is correct in that you can simply connect the two wires going to the rheostat to get an idea of what the brightest setting would be. Removing the drivers seat isn't a must, but it certainly does help not having to contort yourself between the seat, the steering wheel and the foot pedals in order to lay down on the floor to be able to get your hand up and behind the dash to get the little bugger out. The reason for mentioning the 90° screwdriver is that even a short 1.5" stubby will be difficult if not impossible to fit in there. I used a 90° and was able to do the job... some years back which is when I wrote the post. One of those small handles that hold a P2 Screwdriver bit would also work and you can get a set of those at Harbor Freight for a buck or two. When you look at Terrapin's photos, the one on the right shows you the backing plate for the Hazard Switch and Cigar Lighter which should allow you to "see" what you're working on. HTH E
-
You might also check with other insurance companies.
-
Why not check what DOES exist before you re-invent the wheel? McMaster-Carr, Graingers, are but two re-sellers of extruded products. You may even find the exact profile or so close to exact that it's function is identical. FWIW E
-
How long since you made it a DD? If you only just got it working, it might need a shot of Seafoam run through it, an oil change, the gas-tank drained and cleaned, fuel filter changed and then a full tank run through it before you declare it as a gas-hog. Other than that, as far as suggestions go: Take your foot off the brake when driving down the road. Don't sit in your driveway revving the engine for hours on end. Take the Parking Brake off when you drive. Get rid of the extra weight in the car that you don't need to haul around everywhere. J/K on the second half, but serious on the first. E
-
If you have AAA you can ask for a flat bed... generally the safest bet on ANY classic vehicle. Alternatively, if the tow driver is knowledgeable, the Tow Dolly set up if used properly should cause no problems. You may want to have him lift the rear end and lock the steering wheel, although some outfits have the caster wheel set up for the wheels that stay on the ground and use a double bar lift to lift the TIRES and not the bumper. Then it doesn't matter which wheels are lifted. But if the car is still running, aside from the discharge noted on the ammeter, drive it home and park it. Then take the alternator to a shop and have it tested. FWIW E
-
Lee: Those rubber pads on the gas tank are just attached with a type of rubber cement adhesive. If you are planning on using POR on the exterior, you might as well remove them to get it on all surfaces and truly encapsulate the metal. You might also check that all the vent tubes are solid and not wiggling at all, if they are, now is the time to resolder them in place. Use a Heat Gun and not an open flame. Also try to minimize the amount of POR you put into the Sender O-Ring Groove... VET On the Heater box, just immediately before applying POR on the side doors and other hinged items that you cannot remove from the box, apply a gnat's drop of oil to the hinge pin itself. Work it in and make sure you don't have it anywhere else. The oil will prevent the POR from cementing your doors open or shut... VET (Voice of Experience). FWIW E
-
The key word "straightened" means they may have eased some of the "V" in the bumper thereby widening the mounting bolt locations. 2¢ E
-
With your question re-phrased our tone will change remarkedly, as you can see. In descending order by my opinion: As Unkle mentions, a good pager alarm can provide notificaiton of someone messing with your car. If it's properly connected and hidden it will probably be the best for the casual thief, and to a certain extent even from for the professional with a tow truck. Except that you're S.O.O.L. if you don't respond immediately. "The Club" will also provide a measure of security making it harder for the thief to straighten out your front wheels, but it's irrelevant if they use a tow dolly or truck and can jack up the front end. A cut off switch, either fuel and battery, as long as well hidden (and discussing WHERE you should hide it is the part of security that should NOT be mentioned publicly) will help you feel better but again... not from the professional with a truck or tow dolly. Myself, I would opt for the same style of alarm as James Bond's Lotus in the film "For Your Eyes Only". That way if the thief trips it... the car blows up and takes him with it, except that it's messy and it takes a ton of buffing hide the damage.... FWIW E
-
Get a product called Household Goop. Insert a piece of paper or vinyl into the tear to prevent the Goop from gluing the seat vinyl to the foam and put some of the Goop into the tear and on top of the inserted scrap vinyl. Carefully align the edges of the tear and press down on the inserted Goop and paper or vinyl insert. If any Goop squeezes through the tear, either remove it or using a bit of spit on your finger smooth it down. Goop is essentially silicone on steroids. It is strong enough to repair convertible roof vinyl and supple enough to remain flexible. It can be worked just like silicone. 2¢ E
-
It isn't a matter of growing a pair of "noids", unless you're referring to "hemorhoids"... It's a simple lesson you get taught in the military... the first step to maintaining security is YOU DON'T TALK ABOUT IT! You don't mention what it DOES, nor what it DOES NOT. You don't talk about what you would like it to do, nor what you wish it would NOT. It's simple really, this site is a well known resource for information on the Z's, let's not devolve into being morons who also let people know how to steal them as well nor how to defeat any security measures we may have taken. I concur with Stephen, this is a very suspicious first post. Nuff said; E
-
Unbalanced carburators. E
-
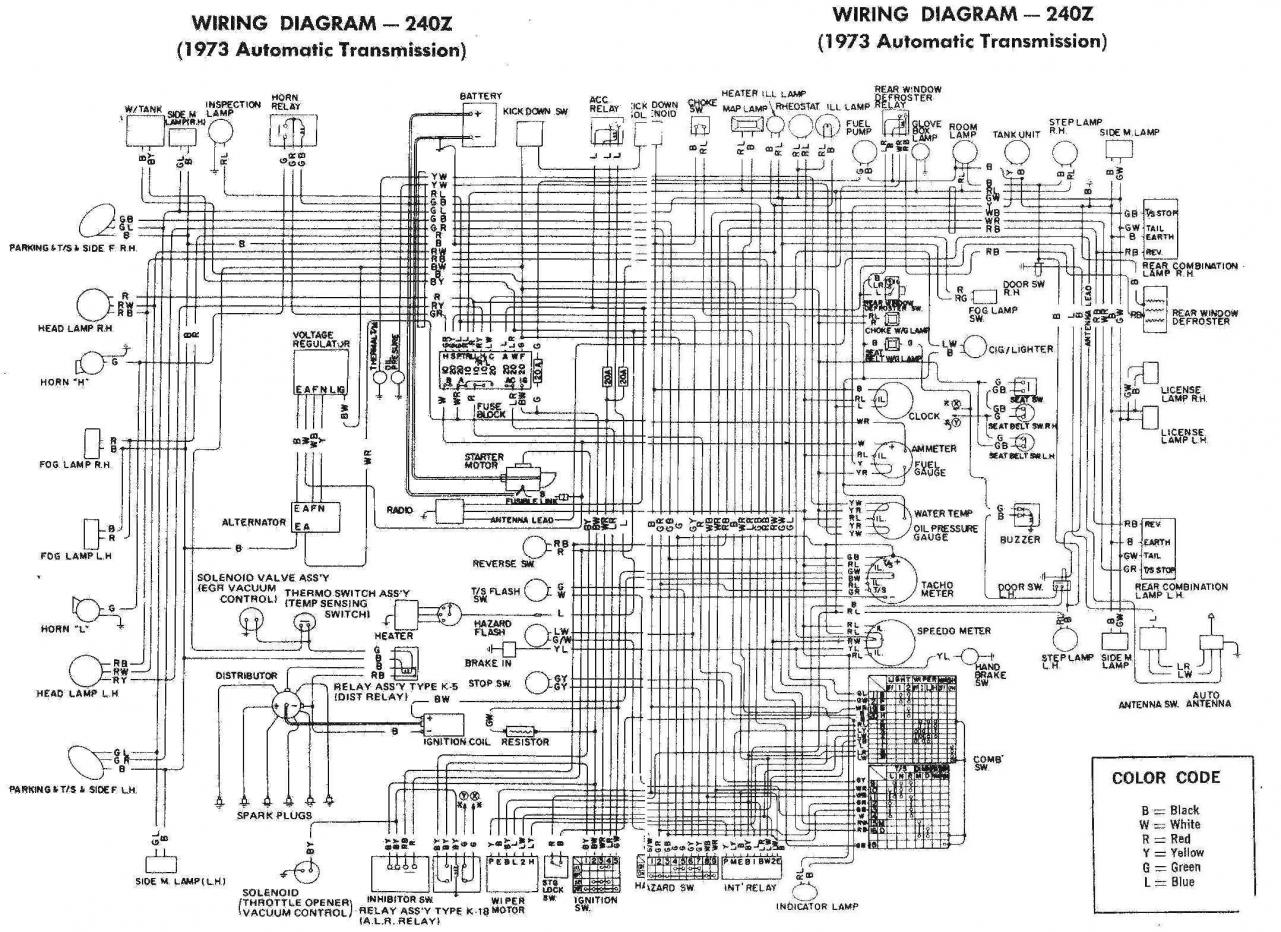
For those that take note of these little nits, the diagram I posted has the infamous "3-wire" Accessory Relay... which some have theorized is grounded via it's case. Although it seems logical, the problem is that I've yet to see or find a 3 wire Accessory Relay on one of the cars that matches the schematic wiring. Additionally, look further to the right of the schematic and you'll see the Rear Window Defrost Relay... it's a 4 wire. I doubt that they had two different styles of relays in the same model circuit doing the exact same function. I.e.: unlike the Horn Relay which is a true 3 wire relay. As you use the diagram, be careful of vague "connections" that aren't, and also those that in fact ARE connections. That's the main problem with this diagram, the scan rate is so low that it introduces pixellation around the lines and intersections that can cause you to "see" or not "see" a connection. If someone has the original diagram from a 73 FSM, a scan of the AT and also the MT diagrams would be beneficial to all. (Note, the MT also has the 3 wire relay error.) FWIW E
-
This is the one you want. E
-
You're using the wiring diagram for a 71-72 AT, you need the one for the 73 AT. That one will show you the Green wires and their relationship to the Seat Belt Interlock portion of the switch. The one you're looking at does not, that's why you're having the difficulty in tracing the circuit. The 73 AT diagram shows the Type K-18 Inhibitor Switch which ties in the Seat Belt interlock circuit. The Manual transmission uses a different type Inhibitor Switch (K-24 IIRC). The important point being that it MUST show the seat belt and seat sensors. Other than that, your notes seem to be on target. FWIW E
-
The holes were there long before the bumper shocks were put into the car. My 71 has the holes I'm referring to. E
-
Caps, they cover the access hole for the Bumper Shocks, if they're the ones I think you are referring to. E
-
Looks to be the Starter Interlock Inhibitor Switch. E