EScanlon
Free Member
-
Joined
-
Last visited
Everything posted by EScanlon
-
Then the socket option is also not going to work for you. The replacement key would, but that's going to take a bit. Since you're not trying to save the locknuts, why not take your small grinder (4") and grind two flat spots on either side of the top of the acorn and use the vise grips? The heat from grinding will loosen them up some, and grinding flat spots will give you something to grip. Just be sure to have the vise grips "bite" hard. Arne's suggestion of welding a bolt head, as long as you're careful of the wheel would also work. It CAN be done. E
-
Vise-Grip? Or is that too obvious? E
-
Moving the door further back (towards the rear) will not alleviate the problem you're showing. Part of what is causing the problem is that the distance from the hinge exacerbates the tiny amount of alignment you need to make. The adjustment out at the front need only be a small amount to provide for a larger correction at the rear. At the front of the door, you can either add a shim behind each of the hinge mounts at the pillar, or adjust the door outward just a tiny bit, If the door's alignment in the opening front and rear is good, and only the protrusion at the back of the door is at issue, then adjust the hinge bolts on the door and push the forward edge out just a tad. If however, the compression at the front of the weatherstrip is still excessive, you need a shim at the pillar side of the hinge. FWIW E
-
I'll offer the "nutshell" explanation I was given, not to start a war, but to offer a point of view by someone who did a lot of research on it: Newer cars have a catalytic converter in the exhaust system which can get plugged up with the casual blow-by combustion of older oils, which contain Zinc. Older engines, due to the nature of their design, benefit from the added Zinc in the oil on those polished surfaces that are in constant rub/wear with other metal pieces (cam, crank, valve lifters, etc.). Newer engines have newer bearings, surface treatments and linkages in these areas that reduce the requirement for Zinc, and as such do not need Zinc in the oil. Oil manufacturers were pressured to remove the zinc from their motor oils. Now, our cars without a catalytic converter and an older engine can use the Zinc in the oil. From what I've been told, the oils to use (and this is not an all-inclusive list): 1) Valvoline Racing 10-30 in the Grey bottle 2) Shell Rotella Non-Emissions 3) Standard Dello Non-Emissions All of these are a bit pricier than the standard convenience store quart, but they're "worth it". I won't quibble the details, if your mileage on this issue differs, enjoy. FWIW E
-
More than likely an old fuse, and /or the "spark" of connecting your phone charger. E
-
Rotate the Latch/Lobe cam with the door open, you should be able to get the complete 2 clicks. Make sure the outside key-lock is in the "neutral", i.e. center/ straight up/down position. Try pushing the Lock Knob down. If it still will NOT go down, you need to remove the door panel to get access to the lock mechanism. With a flashlight shining into the door, and specifically where the Lock Rod connects to the latch mechanism, press down on the rod and observe what it does / does not do. Possible problem: The outside door handle has an adjustable length rod. If that rod is extended past a given point, it will actually BLOCK the locking mechanism from actuating. Post what you find/adjust. E
-
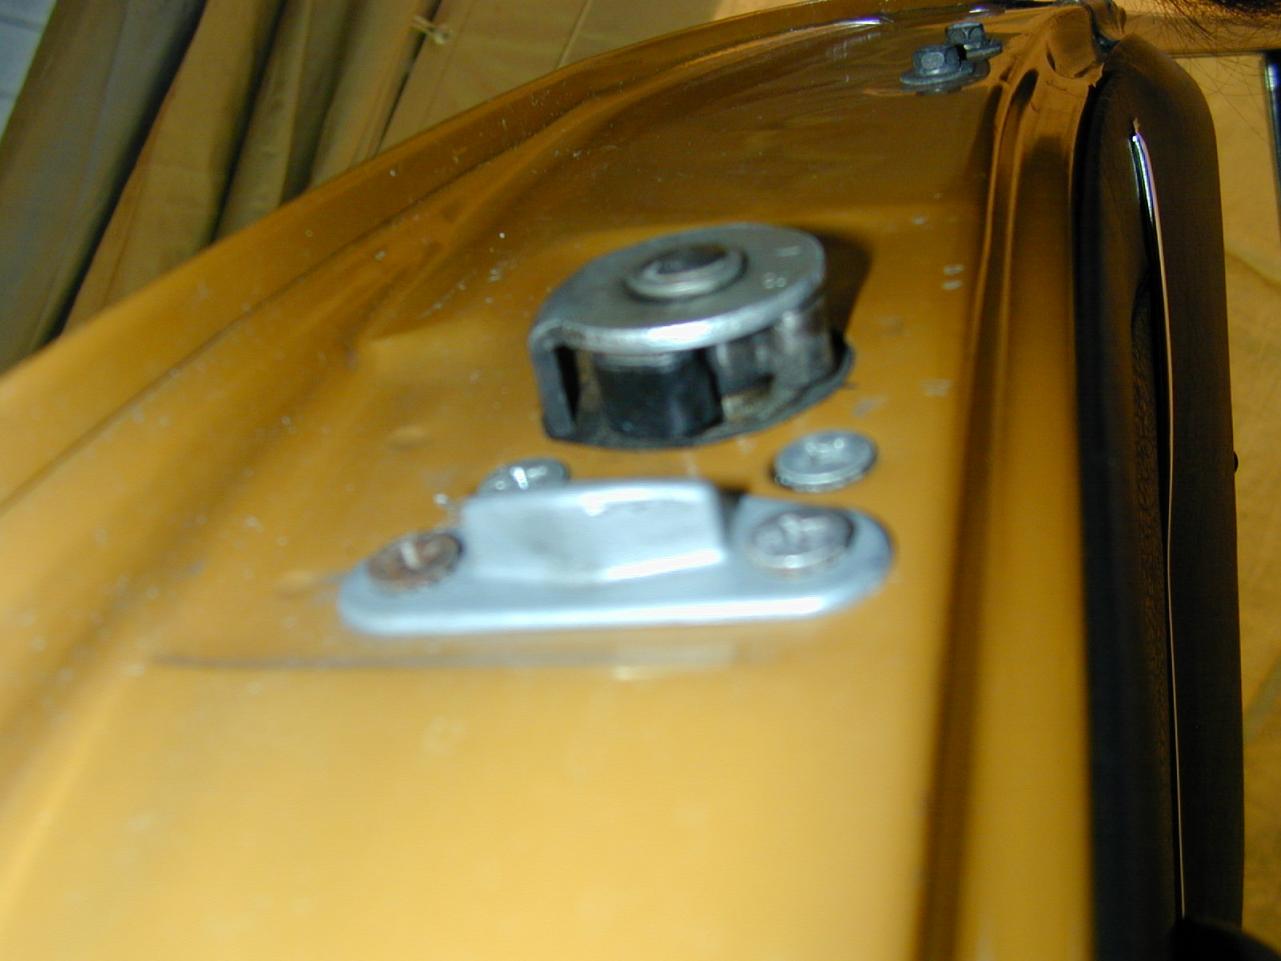
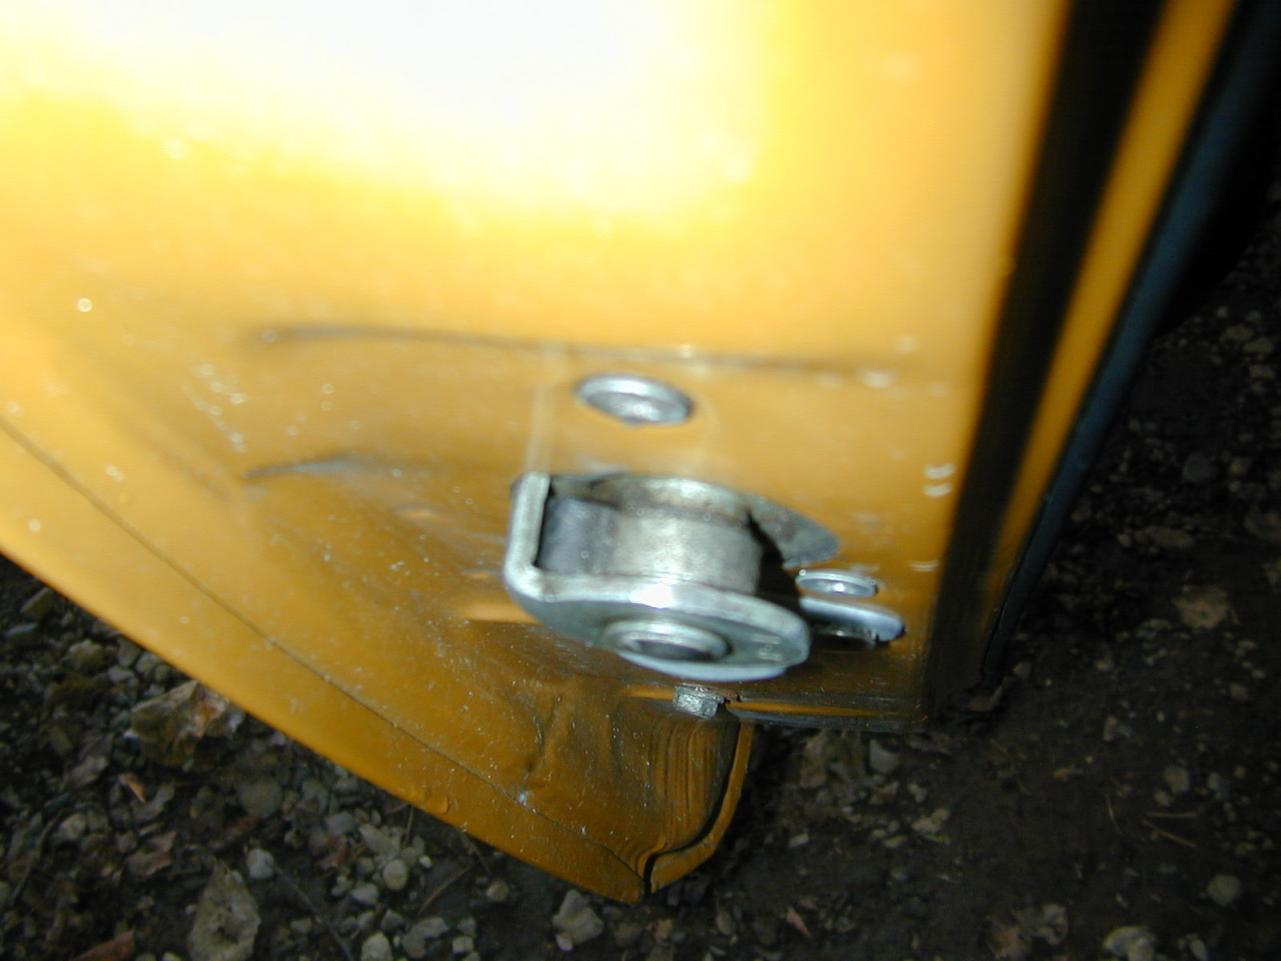
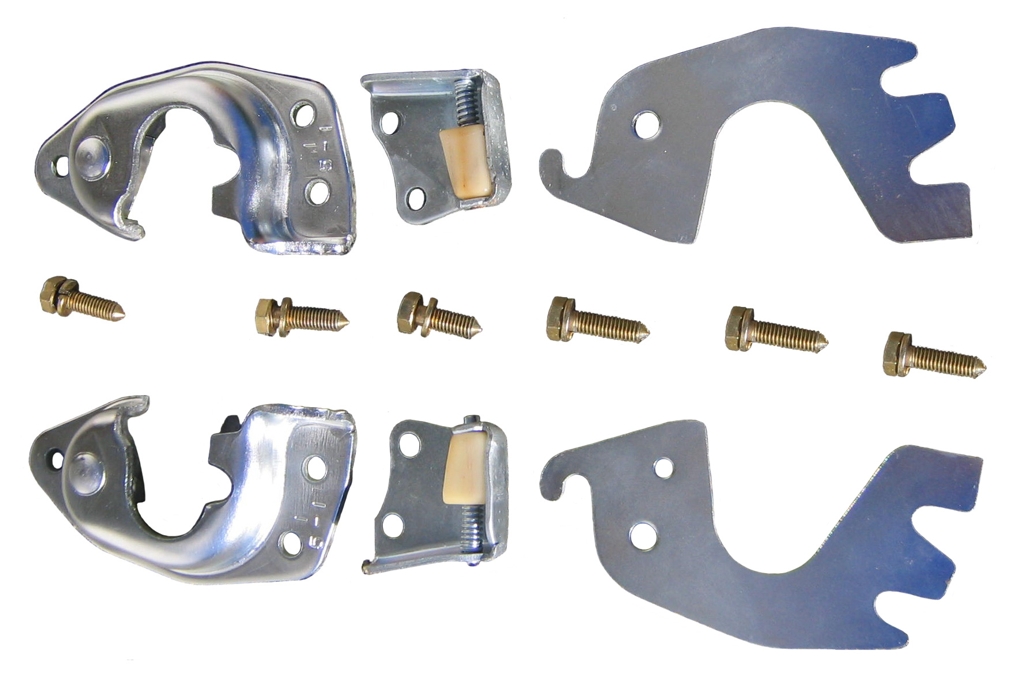
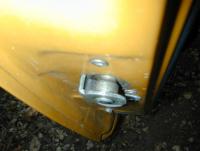
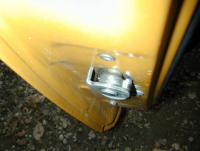
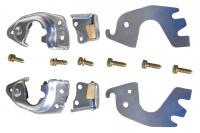
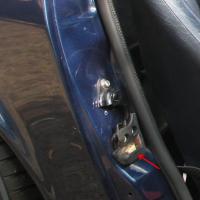
Here are a couple of pictures that hopefully will explain things. Also, here's a quick explanation of "terms", for lack of better nomenclature. Latch = what you can see in these pictures, the rotating part of the lock that is attached to the door. Catch = the stamped metal piece, AKA "striker". Seen in the door striker set pic. Lobe = the finger/arm that engages the catch. dovetail = the piece seen below the latch. #31 shows the rubber surrounding the lobe/arm of the latch that is the first one to contact the catch on the door jamb. They're viewed from below. This is the rubber that commonly gets lost. #32 shows the latch once it has "clicked" twice, i.e. fully closed. #33 shows the latch completely open. The distance between the two "notches" on the catch (the one on the door jamb) co-incide with the rotating distance of the two finger lobes on the latch. When you close the door, the rubber coated latch strikes first initiating the rotation of the latch and allowing the second lobe to process into the second notch on the catch. If the rubber coating is gone from the first lobe, the distance between the lobes is now lengthened, which causes the second lobe to impact deeper into the catch than designed and as a result, will not rotate far enough to allow the latch to reach the second "click" or fully latched position. I erred in saying that the rubber surround on the first lobe prevents rattling, but it is important to have it as it is critical to the mechanism. Gouging out the second notch on the catch on the side closest to the passenger cabin is the "repair" that's been suggested as a fix. The dovetail that was mentioned as missing, inserts into the spring/lever visible in the picture of the blue car. It's function is to push on the door UP and OUT as well as dampen the door "slam". Hope this makes sense. E

-
Have you searched through the older posts? This has been covered numerous times.
-
I don't think so. But it's easier to describe than to get a shot of it. If you're familiar with the felt hammers in use in a piano, think of the felt wrapping. That's what it is, except it's made out of rubber. Simply get a section of 1/4" ID tubing or thereabouts (I used a piece of scrap I had in the garage to fix a friends), and cut it's length to match the width of the latch part. Coat the rubber and latch part with a good contact cement and attach. The thickness is roughly the same. I'll see if I can get a picture later (I just realized we actually have sun today). E
-
As Arne points out, the distribution of inbound Z's from the port of arrival to their final destination would have been tremendously overworked if there had been specific destinations for specific vehicles. Rick points out the limited distribution of 2 vehicles per distributor (which, from other discussions was sparse and spread-out), and the likelyhood that you would be offered; take it or leave it; or get back in line. I recall a similar situation with the 25th Anniversary edition of the Corvette, the one with the special graphics etc. In both those situations, some Dealers/distributors would up the price as much as it would bear. The up-pricing may not be as well known now as it was then, but it has been brought up in discussion before. Some of those who were "out-bid" were (are) adamant that this was unfair. What would they have felt if they were told that the vehicle they were "forced" to accept, had an option that they did not wish to pay for? But one item that has continuously not been addressed is the problem that the steel import tariff laws, in place at that time in the US, may have played on the quality/thickness of the steel on the car (the cars weight was what was used to determine said tariff) AND the availability of options. More options means variable weight which means raising the average weight of the vehicle.... higher tariffs. Don't forget that Customs spots checks the vehicles at the port of entry. Variations in the weights of the vehicles would have meant a closer scrutiny and therefore slower off-loading. E P.S.: You only have to worry about the police when you know you're doing something wrong.
-
Too many times to count, the problem is NOT that the catch on the door jamb is at fault, but rather that the LATCH on the door has lost a piece. It's often missing, so much so that some people believe it doesn't exist... but it IS supposed to be there. That's the rubber "wrap" around the tab extending from the rotating center portion. If you look closely, you'll see that it IS a rubber sleeve if you will, if you can't find it... it's more than likely missing. That piece of rubber acts not only to quiet the door and keep it from rattling once closed, but it also "thickens" the arm tab so that it will rotate the cam far enough to get to the second latching point. There is a "non-fsm" method to repair this, but that may be controversial. This method of grinding material off the catch is probably even more non-fsm AND dangerous, surprisingly it's not being berated. Post what you find. E
-
There are repair methods that have worked on those pieces. I've also effected those repairs for folks. E
-
The problem with the form lies in that it allows a single column to be sorted without linking the adjacent columns. It may "mirror" Excel, but Excel keeps the complete record row together when sorting by a single column. E
-
I hope you got your deposit back.... even that may have been too much for this car. $500.... for parts.... to sell on the East coast. Both sugar scoops show cracks, both rockers show damage, complete rear end is one big bondo swab, interior is ... garbage. Cleanest part seemed to be the engine bay, and that has overspray. In a nutshell, this is someone's high school auto shop class project.... and he got a C-. E
-
Insert the leading edge in first, all the way to the front, allowing the window channel to help hold it down, then proceed to insert the rest. E
-
But it's OK when YOU do so? ========== The FSM's explanation of the process is quite simply: "8. Install the windshield moulding." Your added explanation, while it IS helpful, is not part of the FSM. You should note that your post implies that it is. A less experienced person may not have the same level of success you have had with your method. Additionally, while you've described your homemade tool, you've not given measurements nor a complete enough description so that someone can accurately replicate it. Do post some pictures, some measurements and the method of manufacture, or offer to sell one, but descriptions alone aren't a substitute. In 1987 I contacted a glass installer to replace a windshield on a Z I was working on. That glass installer, who both showed and explained the reason for instaling the trim before mounting, was also on contract by the Nissan dealership in East Tawas Michigan and other Nissan dealerships in the area to replace glass in their bodyshops. His reasoning is/was simple, it's one less - tricky- step to do, and since you are pulling on the rope from the inside, does not change the characteristic of the gasket. I have used his method several times since then all with success, and so have others to whom I've described it to. The gasket edge that holds the trim in place is very fragile and prone to tearing. Even Wick Humble in his book advises to be extremely careful with that edge. So, while you have had success, others may not be as successful. So, while you may disagree with "my" method, there have been several people, myself included, who have had success with it. Before you present your method as "the only correct way to do this", you just might want to find out if others haven't found it to be more difficult or problematic than it need be. That's one of the many reasons for this site, to find workarounds, short-cuts and alternative methods to obscure instructions in the FSM. Otherwise we could save a lot of bandwidth by just posting.... "See the FSM". My 2¢ E
-
The trim molding gets put on the rubber BEFORE the windshield/rubber gets installed on the car. It may seem counter-intuitive, but you'll literally shred the rubber trying to put the metal pieces in AFTER you've installed it. There are several threads with just that problem looking for a remedy... there isn't, you install the trim onto the rubber BEFORE you install the windshield. The tool mentioned works... for the rubber or plastic insert commonly used on the EXPANSION style glass weatherstrip. That insert is used to push out the sides of the rubber AND lock in the glass. The metal trim on the Z, while it does have a small amount of "lock" to it, is mostly for a) looks and to push the outermost edge to seat on the body. Referencing the tool again, it works by pushing the rubber out and away from the channel that the trim fits into and expects the trim to have a certain amount of "bend" to it. The Z's trim does NOT have any bend to it. You will leave small gouges and dents all the way around if you are not very VERY careful and very experienced. Part of the "rope trick" is that as you install the windshield, your buddy on the outside should be pressing on the windshield both INTO the vehicle AND towards the edge of the windshield (upper or lower) that is opposite your starting point for the rope. That is, as you begin pulling on the rope from the lower portion of the windshield gasket, your buddy will be pushing from the top edge DOWN towards the lower edge, to keep the already inserted edge located firmly within the gasket's channel. As you progress to the sides and round the corner(s), you will feel a gentle seating effect, keep working towards the last edge, when you round the last two corners, you will literaly feel the windshield drop into poistion. Finish the last of the edge and go around and with a teflon knife lift and smooth any imperfections in the gasket. The bunching up of the gasket you are mentioning, causes me to wonder if you are pulling on the rope at 90° or less to the edge you are seating. More than 90° (i.e. essentially making the rope have a U bend) will cause the gasket to stretch as it seats and will leave you with excess material. Another item, are you trying to do this with the dash IN or OUT of the car? With the dash in, you'll have a harder time pulling the rope out from the gasket's lip. However, the suggestion to pay a pro to install it for you may be the easiest way to go. FWIW E
-
Subtle difference between the right and left door switches. The LEFT side (or actually the DRIVER'S side since it also appears on RHD vehicles) has 2 connections in the 240 (at least the 71, and 72, not sure later or earlier). That's why you the key in buzzer works ONLY when the driver's door is open and not when the passenger's door or the Dome light is on. There is a small separation washer on the switch plunger itself. 2¢ E PS: Look at the Black Dragon catalog page: http://www.blackdragonauto.com/icatalog/z/full.aspx?Page=114 The earlier version (240) LH switch (Driver's side) is NLA, which is why you use a later version. If memory serves the later version had THREE connections (one is a starter interlock/seat belt?).
-
Possible lack of proper contact at the body of the switch on the door pillar; remove the switch and using a small wire brush, clean out the contact area for the switch. It might be just part of the hole that needs cleaning up, or it might be that you need to make sure the body of the switch actually contacts the sides of the hole. It could also be that the wires slipped off the back of the switch. FWIW E
-
When I painted my instrument "cans", I used a BRUSH and some very thick paint. That way I did not have to mask the green bulb filter. The paint I used is normally used to paint the insides of R/C plastic bodies. It is a very BRIGHT white (Polar White if I recall the name) and it is sold by Pactra under their Racing Finish line of paints. I used that paint both because of the intensity of the white, the flexibility of the paint once dried and it's ability to cover in one coat. This line of paint gets used as the final coat for the bottom of the clear plastic bodies and it is what gives the fluorescent colors their bright intensive look. (Remember, those bodies get painted from the underside... i.e. first coat IS the color or accents, then the base, and finally the bright or dark coat, depending on what type of finish you're going for.) The mask itself, use a nice flat black since it will be "under glass". FWIW E
-
Check this link: http://www.datsunroadster.com/SUB_SECTION_DIRECTORIES/accessories.htm That's Rallye Enterprises, he has some knobs that are for the Roadster, but they do have the emblem you're looking for. E
-
The "mask" which is what you are actually referring to, was attached by melting the plastic locating pins that both secure and locate the mask. The "mask" is what limits your view of the two instruments (the Tach, Speedo and Clock, do NOT have them). So it's only on the Fuel, Oil, Amp, Temp paired gauges. If the black on the mask has chipped, gotten dirty or .... then the only way to remove the mask from the bezel is to chip off those melted nubs of plastic. To re-assemble, you can either use some Hot Glue or a small dab of some hard set glue (i.e. that has some consistency to it, that is, not like model glue or the like). I have used a small dab of hot glue in the past and as long as you don't use a lot, you should be ok. I've also dabbed a bit of melted plastic (from a model's leftover pieces) with a soldering iron. Hope this helps E
-
U gets glued to the frame, "bottom" edge to the 1/4 window frame; longer "leg" towards the exterior of the car (i.e. shorter "leg" towards the interior side of the window). E
-
It's interesting that your HC appears to only have 3 cables and not 4. I'm wondering if that is because of the AC and the Fresh Air Vent being rendered inoperative. AFAIK, that "hard wire" IS the thermocouple for the AC, i.e. it detects that the AC has reached the "temp" that you've selected. As far as the sealing foam between the triple horn bellows and the body of the heater, any thin foam tape will do as long as it's compressible and about 1/2" wide. The real bear to replicate is the other end of the connecting bellows from the triple horn to the center fresh air vent. That one needs to seal the complete back of the vent to the bellows AND also the rotating vent itself. The inside of that connection behind the vent is all covered with foam. I used a 1/2" thick material to reproduce it. I think I have a very fragile original foam seal still on a vent to photograph and I'll do that in the next few days. E
-
You ARE aware that this is posted in the FUNNYBONE section? E