EScanlon
Free Member
-
Joined
-
Last visited
Everything posted by EScanlon
-
Whoa! Did this thing take on a life of it's own or what? My point regarding changing from points to electronic wasn't to imply that one or the other was bad. Each has their valid characteristics and each has their vulnerabilities. Can points leave you stranded suddenly? Yes, it happened to me in a 70 Chevy Nova. One of the point halves decided to fall off and the other half sparked against the other holder bad enough that it wore a hole in it. I had the fun of having it fuse itself together and then the car wouldn't run. A friend of mine helped me discover the cause. Electronic modules can also leave you stranded. That's also happened to me, although not in a Z. It has happened to a friend of mine in his Z. My point in recommending them is that there is little to no adjustment to be made to the electronic dizzy -- other than setting the timing -- for the average Z driver. Now, before you guys pull out your slide rules, calculators etc. I'm referring to the basic adjustment. I'm sure some engineer someplace calculated the duration of the spark, some other one calculated when during the rotation of the rotor to release the spark etc, etc, etc. Those of you who disassemble engine's after a single day's run, or routinely swap transmissions between different cars just to check if one has less slop than the other are obviously NOT the regular run of the mill driver. You have skills and experience that many of us simply do not. To you adjusting a set of points is so stupidly simple that it totally befuddles you when someone mentions not wanting to do it. Some of us can read a wiring diagram and know what and why things are acting the way they are. I know friends who immediately toss in the towel over the simplest of bulb changes. Some of us paint cars and think nothing of worrying about a dry-line, or how much to thin primer or how much peroxide to use in bondo and laugh at those that shudder at the thought of using the same. To each of those "specialties" or fields of expertise if you will, there will undoubtedly be items that are ... to them ... considered so simple as to seem to be unexplainable...."What do you mean: 'How do you breathe?'" Yet, to those of the other fields, there are valid questions and valid reasons for the things you do ... "'Expand your chest to bring in air, then compress it to force it out! Don't do that underwater!" I'm not trying to use individual items for each of the "fields" because...I'm not an expert in all of the Z's different items. I, like many of you, repeat what I've learned, here and other places, after having seeing it discussed and even argued by others more in the know. There are items I posted, that may have been construed improperly. In refering to the tires, I was going by the data in the owner's manual I have. It references X style tire rotation (left rear to right front, etc.). Since I've only ever had Radial tires on my cars, and they always made it a point to tell me to NOT cross-rotate them, I made the inference to the steel belted or bias ply tires. Batteries, yes their basic construction is as Carl mentioned. But when was the last time you checked the electrolyte? Or added distilled water to them? Bet you'd void a warranty if you did. Sealed beam headlights are yet available, but many of us have switched to H4 lamps. Some have even made the effort to go with projector style units. The old 1157 and 1156 bulbs are still readily available yet folks are experimenting with LED replacement bulbs and LED boards. Newer cars routinely have an inverted function side marker / turn signal function, and Arne/Dave have recently produced one....not without some caution involved (grounding issues) but an "improvement" over the OEM/Stock configuration. That that improvement/change can be reversed, is desireable, yet to some of us it doesn't matter because we won't reverse it. Richard's upgrade to a fan motor....that's a no brainer, he's in Las Vegas. I would do it as well. The basis for my mentioning the electronic ignition in a thread about points, is that new users...who routinely ignore the search function...might benefit from having that alternative posted. That it ended up being a debate over new and improved, versus old and superseded was not my intent. Should we give up on old technology? Should we totally embrace the new? All valid questions, and both have their advantages and disadvantages. Me? I'll give up my Z when I can get one of those Luke Skywalker zippy little jobbers in the original movie. Till then, I'll add those improvements that I feel will "improve" my Z to MY satisfaction and ignore those that I don't think will benefit .... ME. 2¢ E
-
While it may be a bit early to "cash" in on the earlier wheels, that price is by no means surprising. Early Roadster steering wheels, routinely fetch over $100 in "restoreable" condition. In Mint? Last 7 out of 10 wheel I saw went for over $250 dollars. Heck the horn buttons for the same steering wheel with the "D" in the center are going for over $200 dollars. FWIW E
-
The discussion about the unacceptable comments is spot on. However, IMO, the biggest obstacle to this web-site/forum/club having a larger female membership is that we tend to be "Guys amongst Guys" more often than we want to admit. We have a Boobs and Camel-Toe threads. Personally, I find nothing wrong with them, and am not advocating that they be removed or do anything other than let them continue as is. By the title of the thread alone you are forewarned that it may be something that is not suitable for work, or may be something that is objectionable to some. I'm sure that the ladies rarely check those threads, and if they do, they don't mention it. But it has to grate on them. If the ladies decided to put up a "TIGHT BUNS" thread or a "Codpiece or not?" would we be as tolerant? Next, the obsequious answers and flagrant attempts at "endearment". Let's face it, if you were to be at another site receiving of some of these replies/come-ons, from women that you did not want to encourage...for whatever reason...you'd exit and not return soon...if at all. But that's been the nature of male/female exchange for eons. IS there a way of making this site more gender-neutral and more enticing to females? I don't know. I don't know that we would want that anymore than we want a site that makes women feel unwelcome. My 2¢ E P.S.: Dade, for those of us who remember the 70's and 80's inuendos regarding "eating" a woman, it WAS a direct sexual inuendo. While you may have hoped to obfuscate it by referring to your stomach, that doesn't whitewash it enough to make it lilly white. (And absolutely no offense meant by that comment. Sometimes there are NO hidden agendas or messages.) Full House's comment WAS offensive due to the openly direct and potentially insulting comment of being fat. While Santa may not object to being called fat, just about everyone else...including men, do object.
-
To all you New Year's Day Babies....who would have thought that ALL of you would end up being Z lovers! E
-
When mounted on the hatch, does that rearmost edge butt up to the rear downward edge of the hatch? If so, you might be able to mount it with double stick tape, the automotive type. See my edit of your picture. Don't know what to tell you about the extension of the piece past the sides of the hatch. Was this piece produced for the Z or was it bought thinking it could be adapted? FWIW E

-
Carl, thanks for the correction. I truly did not know if it was America or Association and your correction helps to underline one of my points. Just WHAT is this ZCCA? Your post helps clarify it's INTENT or GOAL as originally conceived, but it's apparent that it's conceptual idea evolved into something that needs clarification AND definition. But the biggest point is that if it is supposed to be as you stated: This implies that it's intended reach is WORLDWIDE and not just the US/Canada. Ron, I don't know why I blanked on Kingston Ontario. If you look at the list Art mentioned (again, the only one provided), the predominant focus of the ZCCA is the EASTERN and SOUTHERN USA. While there have been excursions out west (Colorado, Vegas, LA, ABQ) and even North (NH and Kingston Ontario), the whole Northern and Western section of the continent has been ignored. Vancouver BC hosts one heck of a show, from what I've heard, unfortunately funds have been tight so I've not been able to attend. Same with the Meeting of the MindZ in Washington State. Many groups are trying to get the Canby and the Blue Lake show in Oregon noticed, but of the ones I've attended....not even a peep out or about the ZCCA. Maybe the ZCCA needs to go back to having the meetings/convention held in a different locale each year...regardless of the perceived attendance. But focus on getting and RETAINING membership clubs and even individual members. Tomo, in order to get a radio station to want to do a "live" show, someone needs to pay for it. Why not get the NISSAN dealers in the area, the Classic Car Dealers in the area to all chip in together and then approach a radio station to act as both Music and Emcee's for the event. The Nissan dealers could have several of their models scattered about the show with salespeople to answer questions. Ideally a new model would be unveiled, but highlighting a current "hot" one works as well. The Classic Car Dealers could also bring in other vehicles of the same era / vintage as the Z for "comparison" and sales. Having an Opel GT, an MG, a Mercury Capri, a Porsche 944 or 924 all tie in to the history of the Z. If they went so far as to participate in the Track Day....WOW! Even if the live show is only for one afternoon or morning, the participation would benefit. Undesireable elements, that's part of the game in an open venue. Try to restrict it too much and you end up with a closed door function. Have club volunteers scattered over the area to observe and communicate problems. Having other affiliated clubs would only benefit the event. The 510 clubs, the Roadster clubs, there are even 1200, 620, and 210 owners out there that would enjoy being part of a big production such as this. Hopefully this seed of input germinates into a full fledged idea that induces many of us to get involved. Unfortunately if we're constantly reminded that changes can only come FROM the ZCCA, and it's apparent that the ZCCA is not concerned with what the "rabble" thinks.....meaning the average Z owner.....then it will eventually fade away. FWIW E
-
1) Consider some "northern tier" locations. From the list mentioned by Art, the ONLY northern location was New Hampshire. Colorado may get snow, but it's not the PacNW so our Canadian friends can attend (Vancouver, BC), nor is it Detroit or Minneapolis or Chicago so the other parts of Canada can attend there. The ZCCA name IS Z Car Club of AMERICA and they're part of North America. Mexico didn't see the Z as part of Datsun's offerings there (economy), and the only other market for the Z in the Americas was Canada. 2) Have classes and prizes for "Daily Drivers" and "Modifieds", not just the Concourse / Garage Queen museum pieces. Sure the Concourse will likely be the only ones eligible for the 300 point Gold award, but there are a lot of well maintained cars that get driven, not just trailered. As far as the modifieds, sometime down the road it will be far easier to modify and customize a Z than attempt to restore it to "bone stock". ZRush's Red car is a beautiful example of a well executed mod, there are many others out there. They don't usually bother attending these shows because of the "stigma" of not being "stock". Additionally, I know of cars that have some major body work in their future simply to correct items that were done either by the dealer or by an aftermarket supplier sponsored BY the dealer (in this case sunroofs) in order to make them more desireable/ sellable. To me the car as it is, is more of a true classic than one that has had major bodywork to return it to it's "original" state. 3) Highlight Original Owner Cars and Lowest/Highest Mileage and VIN vehicles. Granted, some of this will be difficult to ascertain accurately, but with careful cooperation amongst participants and other dealerships (Gets Nissan dealers involved) it shouldn't be impossible. Mercedes has an emblem plaque they used to award after so many hundred thousand kilometers, and subsequent numbers. Granted with the mileage being so easy to fudge this might be impossible, but with careful documentation.... 4) Encourage other market vehicles to join in and be highlighted. Not many people will have the $ and time to ship a car from Australia, Japan or the U.K. to San Francisco or Savannah or Chicago; but if one should arrive then laud it as it should be, and not just lump it in with the American market cars. A true ZG was not offered in the US or Canada, if one shows up it DESERVES special recognition. An early Fairlady Z with a 2000 cc engine from Japan, RHD with accesories and items NOT available in the US/Canada would, to the uneducated, appear to be a bastardized Z....when they're not. Don't exclude these vehicles, highlight them. 5) Have local clubs sponsor their individual "best" car. Then either trailer, or drive it to the convention where it will compete against other club entries. Let the individual clubs decide how they're going to pick their candidate; it may be as simple as who is willing to go to the convention, or their own show winner. Get the individual clubs involved. This would be separate from # 2 above. Then, IMO, the ZCCA convention may take on a more desireable "I want to go...even if just to see!" rather than the, "Why go, it's the same people winning all the time, and they're picked by their buddies." I've not been to a convention yet, but I HAVE been reading many of the comments given out freely both by those "in" the crowd, and those "out" of the crowd. That is how the majority of Z drivers make their opinion, which to emphasize my point, is why comments such as Art's and John's and Carl's are so poignant to the rest of us who would like to attend. Comments such as those exchanged between John and Art can be misunderstood....both well (just joking!) or badly (I'm still pissed!). Holding off on giving out the awards and judging sheets smells of croniism and collusion like 5 day old fish. Not explaining deductions and giving deducts for items that shouldn't have mattered again...stinks. Taking months to tally/announce/mail out results...Are these due to keeping things too close to the vest and refusing to let others make decisions...they call that micro-managing, and smells a lot like fudging to adjust for the "real" winners. I'm probably well off base here. I know there is a LOT of work to put these conventions on. It isn't easy to try to get that many people together in one area, heck you couldn't get that many to sing Yankee Doodle together and make it sound ok. I'm not trying to insult, antagonize nor offend anyone, but sometimes it seems as though the convention is about keeping the "elite" Z owners up on their pedestal, and those from the "other side of the tracks" out. But keeping it all down to one or two or just a few people who, seemingly, refuse to consider other opinions other than their own.... that's not a club, that's a private golf course. 2¢ E
-
Richard: We discussed the Points/Electronic situation and if you either are, or have access to, a capable mechanic to whom that type of adjustment is a piece of cake, then the simplicity of the system cannot be argued. To many it's a "no-brainer", to others it's a "hair puller". Granted, as you mentioned, as points become more elusive in the in-stock availability at your local parts store, you'll need to keep some in stock yourself to continue using them. Sounds like you're already headed there. Small question to the side though, if your car is "bone stock" down to the hubcaps, are you forgetting the Honda Fan Motor that was giving you grief earlier? And what about the Blade Fuses you had recommended to you? My point in bringing that up, isn't to "call you out" but rather to underline that to some car enthusiasts the newer items are more than just "succumbing to the inevitable" but rather that much of the newer technology has replaced old technology because it IS better. You upgraded the fan motor for the additional push of air that you wanted that the original motor could not provide. There ARE situations where change is forced upon you....Leaded Gas anyone? But while points may in fact be original, OEM, and "stock", so are Bias-Ply tires, DOT3 brake fluid, Lead/Acid celled batteries and non-synthetic engine oil, just to name a few items. But aside from Concourse cars, and Garage Queens, most drivers have made the "sacrifice" to some form of newer technology. Your car has A/C...some would argue whether it's OEM or not, and now it has a Honda motor. I'll wager that even some Garage Queens have newer Radial tires. Possibly not at the Concourse level, but is it "original" factory air in the tire? (Just kidding... ) We are all faced with accepting some modifications to our cars. Some because technology no longer supports the original configuration, and some because it is perceived as better. 2¢ E
-
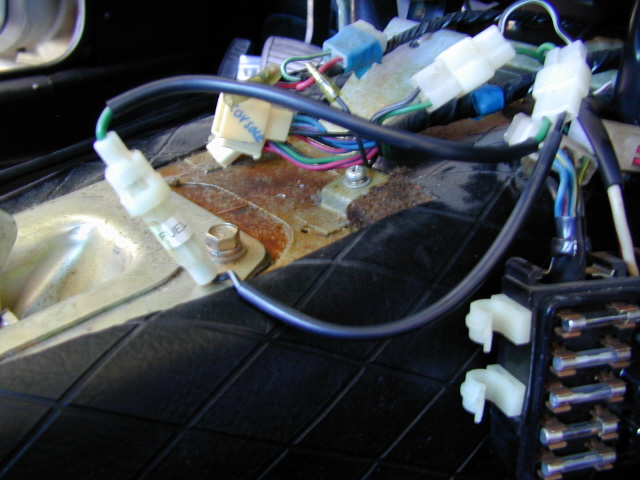
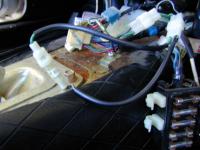
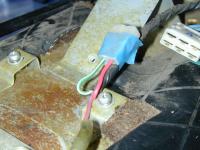
Not sure what the connector you have connects to or for. In your photo, you can see the Fuel Pump Fuse connector just upwire from the one you are holding. The Fuel Pump Fuse basically bridges the two wires coming to it. See the attached photo. Not sure what the "other" half of the connector connects or connects to. There are several circuits in the harness that in vehicles produced during model transitions that did or did not have full functionality. The Fuel Pump circuit is present from the late Series I through ... But if you'll note, the fuse holder just connects the Black/White to the Green wire with an in line Fuse. It would be easy to say that the other connector is for the Fog Lamps, but that has a different wire color combination. (Green/White and Red, see second picture) FWIW E
-
Walter: What about the Points Condensor....that can't be too EMP resistant. Then again, as you pointed out....where would you be driving to? E
-
Well for those that enjoy working on their engine on a routine basis...then have at it. Not everyone relishes going out and disassembling their engine for s.... and grins, some of us just like to drive the car. I had my car tuned with the electronic dizzy going on 6 years ago...and it still starts and runs well, without a weekly tweak of the points, dwell etc. I have a ZX dizzy and haven't had problems. Richard mentioned having problems with getting a good set of points, he finally found some and your suggestion of a different item number will help him in the future. In the "real world" points ARE getting harder and harder to find, and then you may be forced to accept the Taiwanese cheapies or go electronic. E
-
WAG: Vibration Dampner for a Sway Bar? E
-
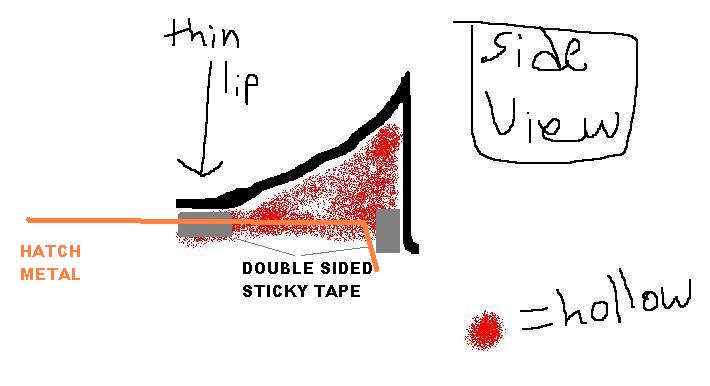
The Hybrid Z idea is sound, but going to the trouble of laying a 1/2" of fiberglass in order to drill and then Heli-Coil it is over-thought. Why not just epoxy a bolt to the back of the dam and then bolt your reinforcing bar to the back of it? As far as where to mount it to, I presume that the original poster at Hybrid had an idea in mind as to where he was going to post it. Rather than re-invent his idea, why not ask him? Not trying to brush you off, but he'd be someone who has done it. At a WAG, you could mount it to the bottom of the radiator support. When you say your spoiler is hollow, do you mean that it DOES have a "floor" to it, and that the INTERIOR of it is hollow (that is, it's a triangle) , OR do you mean that it only has the outer two surfaces (and therefore two EDGES that touch the car) and nothing in between them? If the first, cheapest answer I can think of is to get some 3M Double stick tape. Applied properly and allowed to bond and it will hold well to your hatch. Don't extend it past the hatch or you won't be able to open it (). Double Stick Tape would also work on the second ONLY if there is enough of an edge to adhere to, otherwise you're looking at a spoiler that was due to be fiberglassed, or epoxied in place. There are other methods, but this is a quick reply. Fifty Cans of El-Cheapo paint ain't gonna be cheap!!! If you're planning on repainting the whole car, why not save some $ and have it done at MAACO or Earl Scheib? But for just the spoiler / air dam, you could probably get a couple of cans of paint that has been matched to your car from your local auto paint supplier. But if you have access to a spray gun, you could get a quart of mixed paint, the reducer and stuff for much cheaper than 50 cans of spray cans....even the el-cheapo brand. FWIW E
-
I understand the allure of a "bone stock" engine, but why not look into the ZX dizzy or even a Pertronix? You get rid of the vaguaries of points (dwell, etc.) and you get the same even spark throughout the range. While the ZX wouldn't look stock, the Pertronix could be hidden such that only removing the distributor cap or a very careful close inspection would you be able to tell. Then again, if nothing but bone stock will do....what was the date stamp on the points you installed? J/K E
-
No Tach? Since it's a 73, more than likely there is no Ignition connection to the Coil. Without that all you'll do is wear down the battery. Look for the 4 wire Tach connector with a Green/White and a Black/White pair of wires and connect those two to bridge the connection and send power to the coil. (The Tach Connector will also have a Green and a Black wire as part of those 4 wires.) 2¢ E
-
Darbji: Certain elements of trim are commonly applied with double sided sticky tape. Door Edge Protectors, the much hated Fender Guard Edge Strips (the long aluminum channel as well as the flexible molded kind), some OEM's even mount emblems with that stuff. But it isn't your regular tape. The difference between sticky tapes is in the quality and hence the $ you spend for it. Some manufacturers of aftermarket parts include the white double sided sticky tape, which is ok for some uses, but which I would NOT recommend for use on a car. (I have a rear window louver which uses that style to mount the attachment hardware...it doesn't.) I've also noted the headlight cover attachment tabs using the white. IMO it isn't strong enough, water-proof enough, heat or temperature-proof enough for automotive use, especially on exterior pieces. If you're attaching a small piece of velcro along with other pieces to hold a carpet dash cover...fine. If you're mounting a long strip of velcro for a litter bag...ok there. But any kind of tension, pulling / pushing on that tape and it will let go. Then there is the higher $ style, which is the one used by OEM's to attach rocker panel trim, emblems, and other permanently attached items without drilling holes for attachment hardware. The one I'm familiar with, and have used successfully is 3M Automotive Acrylic Plus Attachment Tape, Part # 051131-06384. It may be available in other colors as the package specifies it as Black, but I've never seen or used it in any other color. Expect to pay about $10-12 for 5 yards of the 1/2" wide. It's also availalbe in 5/8" and 3/4" AFAIK, but don't know the prices. The key to attaching ANY one of the tapes is surface preparation. Both surfaces MUST be grease-free, oil-free, dust-free and wax-free. Then you must take care in applying the tape to ensure that you don't contaminate the sticky surface. 3M recommends the use of a special cleaner and adhesion promoter to ensure a good tight bond. While this is a "permanent" attachment, it can be removed without damage to the paint. 3M even sells a special tool to remove the old tape. Here's a link to their products (note US products): http://solutions.3m.com/wps/portal/3M/en_US/3MAutomotive/Aftermarket/Products/Product-Catalog/?nid=GSLH9CJP5Qge Hope this helps. E
-
Broken Counter Spring? Try pulling up on the glass as you try to crank it up. If that works, then you may have a broken spring, or a dislodged one. If it doesn't help at all, you may have a stripped or partially stripped crank spline. FWIW E
-
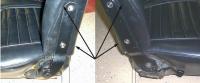
From the same picture that Carl posted, look at the position of the mechanisms as mounted on the SEAT BOTTOM in relation to each other. One seems further back than the other. It may be that you need to swap out seat backs WITH mechanism onto the other bottoms. But from what Carl's picture shows it may be that your mechanisms alone may be what needs to be swapped out and not the cushions. Swapping out ONLY the seat backs without changing the mechanisms assumes that you have the mechanisms on the proper seat bottom. That was why I explained the location of the adjustment lever, so you could ascertain if you had the proper mechanism on the proper seat cushion. 2¢ E
-
When you swapped them around, did you swap JUST the seat backs or seat backs WITH mechanisms? Since you have another seat with the "same situation" it might be as simple as swapping out JUST the backs or the mechanisms. When I say the mechanisms, I mean swapping out the seat backs onto the other mechanisms, then swapping out them as a unit. It might be that the right back is on the right seat, but the mechanisms are on the wrong pair. FWIW E
-
Some more identifying criteria: The reclining seat back mechanism in your pictures is for a Right Hand Side seat. (Since you have a LHD car, that's the passenger side.) The Reclining Adjustment Lever goes on the "outside" side of the seat, which in this case is the Right side of the seat bottom. Your Seat Adjustment Lever for the RH seat should be on the LEFT FRONT side of the lower cushion. (It's attached to the slider bracket, but removing the slider from the seat cushion frame is usually NOT done as it is difficult and usually unnecessary.) For the Left Hand seat, everything inverts. Reclining lever is on the Left, Adjustment lever is on the Right Front. Dogma is correct in the change in seat bottom support springs, but without further research I couldn't tell you what month/year they switched. HTH E
-
Have you assembled both seats? I vaguely recall a similar problem when I was re-assembling mine years ago. Unfortunately, I don't remember if I had put the Passenger seat bottom on the Driver's back or vice versa. That's why I'm asking that. Your pictures do show that one is definitely further forward than the other. Might there have been a different set of holes further back in the seat bottom frame? Just thinking out loud. E
-
Radio Shack. From cheap to expensive, depends on what you are looking for and the quality of the radio you hook up to it. For the original radio I used a plain 5-1/4" Round, about 20-30 watts (lowest I could find). Cost about $20 for the pair. You could step up to a coaxial, or even a tri-axial, again in various watt brackets, but if you're using the OEM radio, don't waste your money. Don't forget the OEM is MONO and you'll have to connect the two speakers to the same pair of wires. On a higher end radio it makes a difference if in Series or Parallel, but the OEM is very plain and low powered. As such, since it's power output is so low (3.5 watts), and it expects a 4Ω speaker, connect the two you buy in parallel. This will reduce the resistance and allow for a bit more sound out of the pair. Brackets are simple, if you have a Left speaker (standard with a radio) then the Right speaker bracket is simply the mirror image. You can however, manufacture your own and as long as you're not rubbing the vent hoses or the back of the plastic surround, you should be fine. FWIW E
-
OEM style has the Polished Stainless Trim. I'm not aware of any other covers that have a polished metal trim at all. E
-
G.I. Joe? or Barbie? Sorry, the hint escapes me at this moment. Hope it's taken in good fun. E
-
Are the skirts going to be permanently mounted? That is, you will be using some form of adhesive or welding or ...? If so, then definitely mount and then have the car painted. Be sure to tell your painter that you shot some rattle-can paint over the primer (don't forget to scuff or sand the primer so the paint will stick), and most importantly the BRAND and TYPE. Certain paints will react with others and you'll marr your final paint. However, if the skirts can be mounted such that you can remove them, then do your modifications, adjustments and get them fitted properly THEN tell the painter so he can remove them, if he so chooses to do so. In my experience, if you are shooting a metallic paint, then you would want them shot in the same general alignment as they will be on the car and not separated. However, with the difficulty in shooting down low on the rocker panel...the car would have to be up on jack-stands. That's not so unusual, and it may be what the painter would be doing anyhow. (That's my technique.) FWIW E