EScanlon
-
Posts
5,117 -
Joined
-
Last visited
-
Days Won
2
Content Type
Profiles
Knowledge Base
Zcar Wiki
Forums
Gallery
Events
Downloads
Store
Blogs
Collections
Classifieds
Everything posted by EScanlon
-
For that amount of rust, Renu may be overkill. However, the process does claim to fully coat inside and out and to restore otherwise shot tanks. It is a franchise service, so dealer performance may vary. You may want to check into shipping a fuel tank across state borders, that may be the biggest obstacle. FWIW E
-
Carl: You're right. It is a glue on seal on the inner weatherstrip. Don't know why I remembered it as being held in place with welting. (Maybe it was due to the incorrect seal that had been used on my 67-SPL311?) E
-
The hatch has two sets of weatherstripping. One goes around the inner opening itself, and it's held on by pinch welding molded into the seal. The second is the item you're referring to as coming in 3 pieces. While the 3 piece item (the two sides are of the same style) is technically correct, some people have expressed that they like using the center item piece (with the bulb attached) in a longer length all the way around the top 3 sides more than the 3 separate pieces because it seals the rain out better. FWIW E
-
One HUGE word of caution, the screen on the intake tube INSIDE the tank will NOT fare well if the POR hardens on it. In fact, there is no way to reach in and replace it if it should get clogged. If you do DO the POR Tank method, make sure you periodically (as in every few minutes) blast air through the intake tube to keep the in-tank filter clean to ensure that you don't ruin your tank. There have been a couple of posts regarding this same tank filter. FWIW E
-
Hey Ron, that's interesting about MS 10-30. I'll have to point it out to Beandip as he's the one that informed me as to the 20wt info. As far as how much, I've also been told that the excess will just flow into the airstream and be burned off in the engine. At least as I've been told. E
-
Weasel: After you clarify which type of carb you have (Flat Tops are just that FLAT on top and the edge is definitely noticeable, while the Round tops have a domed top and a soft transition to the sides of the carb.) then you can take advantage of this site and really get all sorts of info. As far as what type and how much oil to use, get 20 weight Motorcycle Fork damper fluid. Gary M. (Beandip) found it at a motorcycle shop and it has worked great for both of us. Some people will claim ATF or some other weight oil, but 20 wt is what the FSM calls for. As far as how much, just enough to cover the top of the plunger that screws into the top of the carb. By the way Beandip is the one that has (patiently)fexplained all this to me so if you have a bunch of questions ask him. E
-
No, you mounted the arm that connects to the motor 180° off. Several articles have been written on this. E
-
Matt: When I lived in Iowa, Minneapolis was a short "road-trip". Heck, we'd go up there just to be able to ski! So, Minneapolis to NW Indiana? Heck, that's just a couple more hours and in a Z??? And if you get a huge savings on stuff??? And you have to question WHY??? (Then again, she might just be funning you and you'd drive all the way and still pay retail...."Who, HIM??? Never saw him before!!!") On the bra thing.... If your front end is indeed looking ratty and in need of "camouflage", then by all means go for it. It will hide damage and divert the eye from the surrounding areas. However, do take note that you will have to pay extra attention to that area if the bra isn't attached and fitted properly. It will rub and chafe the paint. FWIW E
-
I'm going strictly off memory here, but IIRC the only thing in the "rear" track is a felt guide that wraps around the glass. The glass is held back in the track by the front nylon guide. The felt goes in the Stainless Trim inside the door just below the gasket that seals the window when it's fully closed. Hope this helps E
-
You might want to check with some of the guys that have done engine transplants what kind of reinforcements to the body were required. But it would be a kick in the a$$....literally!!! E
-
The plastic clip is attached. That is, you unclip and swing it out of the way, then pull on the angled rod out of the handle and you can then remove the handle. The clip is to keep the rod IN the handle's hole. FWIW E
-
Matt: You're not ruined, you're on the right path!!! I'm willing to bet that KTM has a SERIOUS amount of time invested in his engine bay, you're still in the process of getting and installing, reviewing and discarding and ..... on and on. What you've done is excellent! Keep up the good work and soon enough you'll be posting a pic and saying "OK KTM Match THIS!!!!" (But no fair if you get Darbji's help in procuring parts!! ) E
-
Ok, this is where it can get lengthy, so I'll just chip in fast excerpts. Wash and dry the hubcaps with a STRONG solution of soap/water. This removes as much of the brake dust and other contaminants present. Wipe Wax and Grease remover on and off with a clean rag for each step. That is TWO rags, one with W&G on it, one that's clean to remove it. You can reuse the removal rag as the application rag on the next step, but don't try to reuse a removal rag as a removal rag because it defeats the purpose. Using a strong tape, tape off any area that will NOT be painted. Putting two layers or more at this point will pay off well. The double layer is to protect the masked areas from the next step. Now you should only have the areas to be painted exposed. Using a Maroon scotch-brite pad, scuff up the old paint. You're not looking to remove the paint, just scuff up the surface and remove the gloss. This is to give the new paint "teeth" to bite into and stay on the old paint. If you've already removed all the old paint, then you want to be sure to use a paint that WILL accept bare metal as it's base or you will need to spray primer first. This is critical if you expect the paint to last. At this point you should have the exposed old paint areas de-glossed. Remove the tape masking and apply/remove Wax and Grease remover again. This eliminates the possibility that you shredded the edge of the prior tape that would allow bleed-through paint on the edges. The tape was necessary to protect the shiny exposed metal. Using fresh masking tape, re-mask the hubcap. You don't need to double tape like before. I like to use a 1/4" masking tape to follow all the contours and curves, that I then overlay with 3/4" but only just enough to continue the mask. The 1/4" tape should be exposed enough that it will be the primary edge mask, while still being accessible for removal independently of the balance of the masking. This will make sense at a later step. There are two styles of tape out there, one is a plastic style and the other is a paper type. The plastic type isn't as forgiving in tight curves without stretching a lot and that can cause problems in sticking. The paper type can be stretched around curves somewhat easier but you have to be careful not to tear it's edges nor stretch it to where it becomes porous. Try to make the edge of your tape that actually stops the paint, to be ONE continuous edge. That is, if you have to splice an edge do not just overlay the next piece of tape, use a razor blade and carefully mate the edges of the tape. Overlaid tape has a tendency to have little creep holes at the overlay point. Once you've re-taped the whole hubcap again, and go ahead and "skirt" the hubcap so as not to get paint on the backside, then use Wax and Grease remover again. This is to cleanse the cap of your finger oils. Now you're ready to paint. Set up your hubcap such that you can walk around it while facing it all 360°. Then using very short side to side strokes, spray paint from the edge to the center, then shift to the side, and now from the center to the edge, shift to the side and back to the center. Walk your way completely around the cap. This will give you your first coat. Your second coat is the same as your first, except now you will be painting on the OPPOSITE side of the cap. This is critical if you have embossing or edges that won't have received spray directly (i.e. just deflected spray) on your first coat. Subsequent coats are up to you should there be any areas that look as if they need it. Remember, don't spray a THICK coat, spray a UNIFORM coat. Your FINAL coat is one to achieve gloss (if your paint is a gloss type), or sheen if your paint is a satin. (I don't recommend Flat for hubcaps .... it's impossible to keep clean.) You can wait till the next day to begin removing the tape from the painted edge, but that will leave you with a ridge at the edge of the paint. If you wait and allow the paint to harden too long though, you may find that you have to use a razor blade to cut the edge in order to get a crisp edge. The next step is why you left the 1/4" masking tape on the edge accessible. That will allow you to remove just the 1/4" while not fiddling with the balance of the mask which just protected unpainted areas and can be removed later without affecting the painted area. If you think you can handle the hubcap with the paint still somewhat soft, then do the following: Allow to set for at least an hour or so, then before the paint has fully hardened but after it has definitely skinned and even started to harden (like a very stiff taffy), begin removing the tape at a steep angle to the paint edge. This method allows the tape to pull away and "tear" off the edge of the paint. The paint should be sufficiently hard to allow the tear, but still barely soft enough to "heal" the edge. Do this carefully and you will have a smooth paint edge that won't catch on things. Dang, it's still long...... Hope it helps though. Enrique
-
The key phrase "It runs up through the gears a little low on power, but still runs" is perplexing. When you say a little "low" on power, are you saying that if you push the accelerator down to the floor it will die or bogs completely down to where it stumbles? If so, and this is a long shot but it DOES happen, check the vacuum advance mechanism INSIDE the distributor. Simply disconnect the vacuum hose from the carbs, and with the dizzy cap off, suck the air out of the vacuum advance and then let it loose. The lower plate of the dizzy should rotate AND return easily. If it stumbles, or does not move at all, or return, you may have a problem with the advance plate. That's a little plastic piece with ball bearings in it that allows the vacuum advance to rotate. Over time and age they crumble and fall apart leaving you with a stuck or malfunctioning vac adv mech. You need to replace it, but they're available from the dealers. Other than that, I haven't got any thing else to offer. E
-
Shipping options/companies from USA to Australia?
EScanlon replied to toecutter's topic in Open Discussions
Sulio: Since you mention it's a "one-of" shipment, and it is some carbs, I presume you're only referring to ONE PAIR of carbs. If that's the case, then UPS, DHL, or FED-EX are going to be your best and in the long run, cheapest bets. Yes, they'll be a bit spendy pound for pound compared to a Sea Freight company, but you will not be dealing with having the carbs crated, then consolidated into a container by a freight consolidator for shipment on the next full container they may fill, then to deal with their choice of importer and customs broker and .....weeks later (sometimes even a month or two) you'll finally get your carbs only to discover that there was a problem someplace along the line and they refuse your claim. Now this is a WORST case scenario but not necessarily an unusual situation. While you may pay $100 or a bit more for any one of the 3 carriers listed above, they'll deliver promptly and with guarantees. You could also ship via Postal Service with Registered Parcel Post with Insurance and that has some assurances, but not as much as the big three. But that's just my opinion. Enrique -
In your case, no discussion is EVER complete. You'll change your opinion half-way through to "fully discuss" all the possible points that you can possibly hallucinate and not make sense at the beginning, middle or end of the "discussion". You've stated it before, all you wish to do is argue the point. E
-
Let's see Tommy, the SUBJECT of your thread is "Source for HEADLIGHT RETAINING RING" (emphasis mine). You were given two links to check. The name for the part at site number one, that is Z Specialties: "Headlight Ring, 70-78 240Z-260Z-280Z" At site number two, that is MSA the name is: "Headlight Retaining Ring '70-78" Seems to me that Austen did a fine job of finding you two links and quickly too. He deserves the Boy Scout award for having done a good deed. You on the other hand, don't even bother to go and check them out. Instead you question the use of a "specialty" shop, when that's just the shop' name. Then you question why MSA is involved and decide to give them a bad plug too. The price at BOTH of those links is under $20 as you stated your shop guy mentioned. Was it because it wasn't at a "common place" that you decided to ... once again ... poo-pooh all the help you've received? If you can get up off your lazy behind and find them cheaper....then say and DO so. If on the other hand you expect others to find them for you, then don't belittle them when they DO help you. Otherwise, expect responses such as this. Raise both arms, cross them over your head, grab your ears and pull up hard, maybe then you'll pull your head out of your ....... Make sure the edges of your AFDB are smoothed out though. E
-
So Tommy, did you even BOTHER to check the "specialty" shops you derided? One sells them for $17.92 ea. and the other for $19.95 ea.. He's right, but only if you check the links you're given. Can I take you up on that offer? Heck, you don't even need to send me a card at all or ever, just pay me the $100 and I'll send you a pair for your car PDQ. Sheeesh, we know you like to argue on and on over asking for and receiving advice, and then belittling those that help you, but even for you this is a new low in idiocy. Got your AFDB on? (Aluminum Foil Deflector Beanie) E
-
1) $500 for a motor-home car transport bar???? That sales guy's got another think coming if he thinks I'm shelling out that kind of money.... 2) Bill and Ferris figured that if they drove their Z on the school bus while facing backwards they'd quickly shave off all the extra miles they'd put on. 3) Will figured out that they wouldn't charge extra toll if the car's axles weren't on the ground!! 4) Ok honey, let's try it again, but this time let out the clutch R-E-E-A-A-A-L slow and whatever you do don't tromp down on the accelerator. E
-
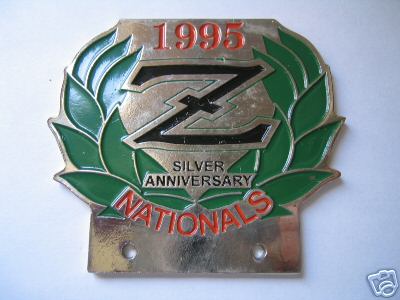
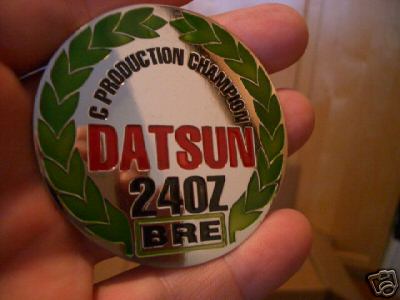
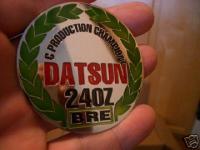
I too, thought it was pricey. More than likely an attempt to make money from the "Z" folks, than a real piece (there were 10 available when I posted). But, having researched it, I know that it takes a bunch of $ to make the first few (due to mold costs etc.). I posted it more for the discussion of than the veracity of the item. Then again, whether it's an obscure and heretofore unknown relic or a newly designed piece, it is from their uniqueness and appeal factor that pieces become desireable. AAA used to give away metal emblems to new members to mount on their cars, now those emblems command a pretty penny. Same with auto club , car marque, and even sports car association emblems. Personally, I would like to see a Z emblem that we can all use. Whether it's one of the ones available on e-bay (which I have but I'm not real thrilled with it), or we can come up with our own. I've mentioned that we can all chip in and make a CZC emblem for the grille, but I've yet to hear any support. So, FWIW, here's a couple of pictures to give a visual idea. E
-
There ARE wheels that are "sided", that is, RIGHT and LEFT side wheels. The visual effect is what was being achieved and in some cases a minimal performance effect. If the Turbo wheels were to be sided, the driver's side wheels would have the smaller bars clockwise from the large bar to simulate the "blur" in a photo or stuttered image when drawn. The only performance effect that I'm aware of, is that in some wheels the wheel supports / "spokes" would have the edges shaped like the vane of a turbine, such that when rotating they would draw air out from underneath the car (just like a fan blade). This enhances the vacuum generated beneath the car by the front spoiler and side skirts. However, to my knowledge, none of the wheels in use on the Z in any of it's OEM styles were sided. Someone else may have better information than that and if so I hope they clarify it. FWIW E
-
For those who might be interested: http://cgi.ebay.com/ws/eBayISAPI.dll?ViewItem&ih=011&sspagename=STRK%3AMEWA%3AIT&viewitem=&item=320149960705&rd=1 E
-
FWIW: Louvers really REALLY help keep the car cool, as in temperature. They also do a fantastic job of preventing the rear carpet from fading in the sunshine. Granted they are can be a major PITA to remove to clean the rear window. The same goes for the rear quarter window louvers. I've got both, and they also DO provide tons of privacy, i.e. to keep your lawn chairs or cooler back there without prying eyes seeing it readily. As far as thinking of mods, updates, fixes, etc. for your new ride, may I suggest something? ENJOY THE RIDE FIRST!!! There will be plenty of time later to disassemble and add/remove/change items. Drive it for a few weeks / months to get used to the car as is. Then do changes. If the car is as advertised, you shouldn't need to repair it upon receiving it. Another suggestion is to check the archives here. There's tons of information on the cars, and even with your car being a 77 280, there is still a LOT of information that applies. Check into a subscription to Nissan Sport magazine. Many of the vendors advertise there and there is also a lot of good information being compiled there for you. Check out a local Z club. Get to know the people who you'll be cruising with to the shows, cruises, etc.. Hope this helps. Enrique
-
Sublime, don't take this wrong, but the seller may have noted your age when you called and been reluctant to sell or have it "checked out" by a younger person. Hope everything checks out good when you do get the car. E
-
I researched a bit for this oxidation problem, and couldn't find any references resulting in corrosion due to the braze itself. The only references to corrosion occuring in a brazing process refer to improper cleaning or release of the flux used in brazing but not to the brass or bronze used in brazing. Which concurs with the times I've found it, when there was poor prep work or poor clean up afterwards. Those times, it wasn't oxidation of the brass, but rather oxidation due to the flux not being cleaned off, or the metal having been oxidized by the heat of the flame used, or the metal being brazed not being cleaned up prior to brazing. I'm wondering if your "expert" was giving you grief over what you did because you didn't consult with him first, as opposed to doing it with someone else's help who may have experience. His scare tactic may be due to his inhaling lead fumes from using lead on the Willy's body panels....otherwise it's NOT what was done at the factory. The flux used for lead can ALSO have the same problems with corrosion. Brazing is such a common technique for bonding dissimilar metals and light welding (think of brazing as "hot glue" for metals), that if in fact it were to corrode as readily as your "expert" makes it sound, then it would be common knowledge. Not only that, it IS an accepted production process for several large companies. If it really oxidized that quickly would it be the process they'd choose? Make sure you clean off the brazed area properly after you finish brazing, even to the extent of grinding the brass surface to smooth it off (probably the best way of removing the flux) and level the surface again. The area you worked on is notorious for rust anyhow so it could rust even if you take all precautions anyhow. If you heated it properly such that the brass FLOWED and actually clung to the metal instead of balling up and rolling off, then you more than likely did burn off the flux. Look for tell tale scorch marks as well as black carbon deposits...those have to go. Another method would be to use the POR 15 Marine Clean, and Metal Prep process to degrease and etch the metal, and then follow up with the POR, making sure you get it well into all the cavities, nooks and crannies of that panel. But always do some grinding first. Are there any guarantees? Yes, if you do nothing, it will DEFINITELY continue rusting. Was there a better way of eliminating rust in this part of the car? Yes, but it would have involved cutting out and re-welding a new part in....and even that wouldn't necessarily guarantee that it wouldn't rust again in the next 6 months. Then again, you could disassemble the car, send it off for dip-stripping and see how much metal you get back and how much work you end up doing. FWIW E